淘宝入手一个 Type-C 切换器,牌子是淇睿通。拿到收之后,实验了2台显示器(一个HDMI,一个 TypeC),3根Type-C 线(1根是同事正在用的),2台都无法正常点亮。
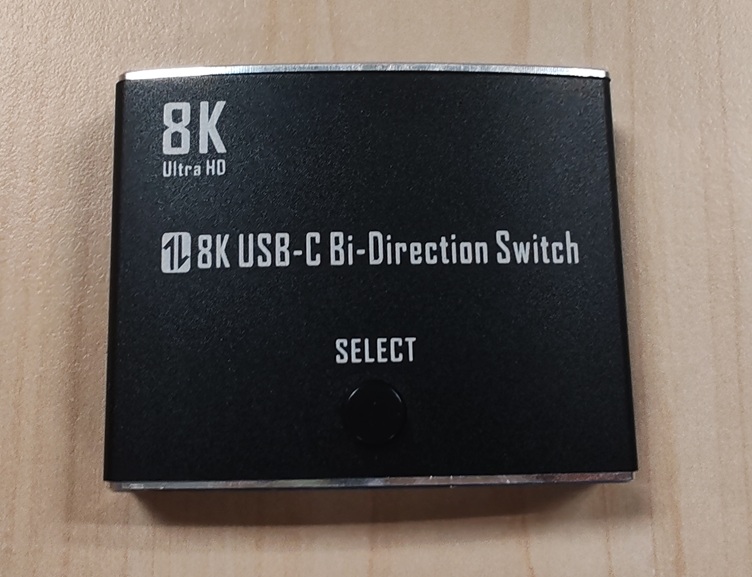


咨询了客服,经过一番折腾,还是没有点亮只好退货了。
使用 Type-C 显示器的时候,显示器上的摄像头是OK 的, 估计 USB 部分通的,但是 DP 部分信号出问题了。感觉这种东西应该还是有点技术含量的。
淘宝入手一个 Type-C 切换器,牌子是淇睿通。拿到收之后,实验了2台显示器(一个HDMI,一个 TypeC),3根Type-C 线(1根是同事正在用的),2台都无法正常点亮。
咨询了客服,经过一番折腾,还是没有点亮只好退货了。
使用 Type-C 显示器的时候,显示器上的摄像头是OK 的, 估计 USB 部分通的,但是 DP 部分信号出问题了。感觉这种东西应该还是有点技术含量的。
最近在研究JPEG格式的编码(Encode)问题,偶然发现了一个好用的开源解码库(Decode)。项目地址:
https://github.com/brackeen/ok-file-formats
看起来比较简单,于是进行一些研究。
首先编写一个 console 读取指定jpeg 的尺寸:
#include <stdio.h>
#include <stdlib.h>
#include "ok_jpg.h"

#pragma warning(disable:4996)

int main() {
    FILE* file = fopen("my_image.jpg", "rb");
    ok_jpg image = ok_jpg_read(file, OK_JPG_COLOR_FORMAT_RGBA);
    fclose(file);
    if (image.data) {
        printf("Got image! Size: %li x %li\n", (long)image.width, (long)image.height);
        free(image.data);
    }
    return 0;
}
可以正常读取。
接下来试验一下复杂的,将结果显示在窗口中:
#include <windows.h>
#include <iostream>
#include <cstdint>
#include <memory>

#include <stdio.h>
#include <stdlib.h>
#include "ok_jpg.h"

#pragma warning(disable:4996)

// 添加这行来链接必要的库
#pragma comment(lib, "msimg32.lib")

// 全局变量
HWND g_hWnd = NULL;
const wchar_t* CLASS_NAME = L"RGBAImageWindow";

// 图像数据结构
struct ImageData {
    uint8_t* data;
    int width;
    int height;
    int channels; // 4 for RGBA
};

ImageData g_imageData = { nullptr, 0, 0, 4 };

// 创建测试用的 RGBA 图像数据
void CreateTestRGBAImage() {

    FILE* file = fopen("./my_image.jpg", "rb");
    ok_jpg image = ok_jpg_read(file, OK_JPG_COLOR_FORMAT_RGBA);
    fclose(file);

    g_imageData.width = image.width;
    g_imageData.height = image.height;
    g_imageData.channels = 4;

    g_imageData.data = image.data;

}

// 将 RGBA 数据转换为 Windows 位图并绘制
void DrawRGBAImage(HDC hdc, const ImageData& imageData, int destX, int destY, int destWidth, int destHeight) {
    if (!imageData.data || imageData.width <= 0 || imageData.height <= 0) {
        return;
    }

    // 创建 DIB (Device Independent Bitmap) 信息
    BITMAPINFO bmi = {};
    bmi.bmiHeader.biSize = sizeof(BITMAPINFOHEADER);
    bmi.bmiHeader.biWidth = imageData.width;
    bmi.bmiHeader.biHeight = -imageData.height; // 负值表示从上到下
    bmi.bmiHeader.biPlanes = 1;
    bmi.bmiHeader.biBitCount = 32; // RGBA = 32 bits
    bmi.bmiHeader.biCompression = BI_RGB;

    // 创建兼容的内存 DC
    HDC memDC = CreateCompatibleDC(hdc);
    void* pBits = nullptr;
    HBITMAP hBitmap = CreateDIBSection(hdc, &bmi, DIB_RGB_COLORS, &pBits, NULL, 0);

    if (hBitmap && pBits) {
        // 将 RGBA 数据复制到位图 (注意:Windows 使用 BGRA 格式)
        uint8_t* destData = static_cast<uint8_t*>(pBits);
        for (int i = 0; i < imageData.width * imageData.height; i++) {
            int srcIndex = i * 4;
            int destIndex = i * 4;

            destData[destIndex + 0] = imageData.data[srcIndex + 2]; // B
            destData[destIndex + 1] = imageData.data[srcIndex + 1]; // G
            destData[destIndex + 2] = imageData.data[srcIndex + 0]; // R
            destData[destIndex + 3] = imageData.data[srcIndex + 3]; // A
        }

        // 选择位图到内存 DC
        HBITMAP hOldBitmap = static_cast<HBITMAP>(SelectObject(memDC, hBitmap));

        // 使用 AlphaBlend 支持透明度
        BLENDFUNCTION blendFunc = {};
        blendFunc.BlendOp = AC_SRC_OVER;
        blendFunc.BlendFlags = 0;
        blendFunc.SourceConstantAlpha = 255;
        blendFunc.AlphaFormat = AC_SRC_ALPHA;

        // 绘制到目标 DC,支持缩放
        AlphaBlend(hdc, destX, destY, destWidth, destHeight,
            memDC, 0, 0, imageData.width, imageData.height, blendFunc);

        // 清理资源
        SelectObject(memDC, hOldBitmap);
        DeleteObject(hBitmap);
    }

    DeleteDC(memDC);
}

// 窗口过程函数
LRESULT CALLBACK WindowProc(HWND hwnd, UINT uMsg, WPARAM wParam, LPARAM lParam)
{
    switch (uMsg)
    {
    case WM_PAINT:
    {
        PAINTSTRUCT ps;
        HDC hdc = BeginPaint(hwnd, &ps);

        // 获取窗口客户区大小
        RECT rect;
        GetClientRect(hwnd, &rect);

        // 设置背景为黑色
        FillRect(hdc, &rect, static_cast<HBRUSH>(GetStockObject(BLACK_BRUSH)));

        // 绘制 RGBA 图像,居中显示
        if (g_imageData.data) {
            int windowWidth = rect.right - rect.left;
            int windowHeight = rect.bottom - rect.top;

            // 计算缩放比例以适应窗口
            float scaleX = static_cast<float>(windowWidth) / g_imageData.width;
            float scaleY = static_cast<float>(windowHeight) / g_imageData.height;
            float scale = min(scaleX, scaleY) * 0.8f; // 留一些边距

            int scaledWidth = static_cast<int>(g_imageData.width * scale);
            int scaledHeight = static_cast<int>(g_imageData.height * scale);

            int x = (windowWidth - scaledWidth) / 2;
            int y = (windowHeight - scaledHeight) / 2;

            DrawRGBAImage(hdc, g_imageData, x, y, scaledWidth, scaledHeight);
        }

        // 绘制信息文本
        SetBkMode(hdc, TRANSPARENT);
        SetTextColor(hdc, RGB(255, 255, 255));

        wchar_t info[256];
        swprintf_s(info, L"RGBA Image: %dx%d pixels", g_imageData.width, g_imageData.height);

        RECT textRect = rect;
        textRect.top = rect.bottom - 30;
        DrawText(hdc, info, -1, &textRect, DT_CENTER | DT_VCENTER | DT_SINGLELINE);

        EndPaint(hwnd, &ps);
        return 0;
    }

    case WM_KEYDOWN:
        switch (wParam) {
        case VK_ESCAPE:
            PostMessage(hwnd, WM_CLOSE, 0, 0);
            break;
        case VK_SPACE:
            // 空格键重新生成图像
            if (g_imageData.data) {
                delete[] g_imageData.data;
            }
            CreateTestRGBAImage();
            InvalidateRect(hwnd, NULL, TRUE);
            break;
        }
        return 0;

    case WM_SIZE:
        // 窗口大小改变时重绘
        InvalidateRect(hwnd, NULL, TRUE);
        return 0;

    case WM_CLOSE:
        DestroyWindow(hwnd);
        return 0;

    case WM_DESTROY:
        // 清理图像数据
        if (g_imageData.data) {
            delete[] g_imageData.data;
            g_imageData.data = nullptr;
        }
        PostQuitMessage(0);
        return 0;

    default:
        return DefWindowProc(hwnd, uMsg, wParam, lParam);
    }
}

// 注册窗口类
bool RegisterWindowClass()
{
    WNDCLASS wc = {};
    wc.lpfnWndProc = WindowProc;
    wc.hInstance = GetModuleHandle(NULL);
    wc.lpszClassName = CLASS_NAME;
    wc.hbrBackground = static_cast<HBRUSH>(GetStockObject(BLACK_BRUSH));
    wc.hCursor = LoadCursor(NULL, IDC_ARROW);
    wc.hIcon = LoadIcon(NULL, IDI_APPLICATION);

    return RegisterClass(&wc) != 0;
}

// 创建窗口
HWND CreateAppWindow()
{
    return CreateWindowEx(
        0,
        CLASS_NAME,
        L"RGBA 图像显示窗口",
        WS_OVERLAPPEDWINDOW,
        100, 100,
        800, 600,
        NULL, NULL,
        GetModuleHandle(NULL),
        NULL
    );
}

// 消息循环
void MessageLoop()
{
    MSG msg = {};
    while (GetMessage(&msg, NULL, 0, 0))
    {
        TranslateMessage(&msg);
        DispatchMessage(&msg);
    }
}

// 从外部数据加载 RGBA 图像的函数
void LoadRGBAImage(uint8_t* data, int width, int height) {
    // 清理旧数据
    if (g_imageData.data) {
        delete[] g_imageData.data;
    }

    g_imageData.width = width;
    g_imageData.height = height;
    g_imageData.channels = 4;

    // 复制数据
    size_t dataSize = width * height * 4;
    g_imageData.data = new uint8_t[dataSize];
    memcpy(g_imageData.data, data, dataSize);

    // 刷新窗口
    if (g_hWnd) {
        InvalidateRect(g_hWnd, NULL, TRUE);
    }
}

int main()
{
    SetConsoleOutputCP(CP_UTF8);

    std::wcout << L"=== RGBA 图像显示程序 ===" << std::endl;
    std::wcout << L"正在创建窗口..." << std::endl;

    if (!RegisterWindowClass())
    {
        std::wcout << L"❌ 注册窗口类失败!" << std::endl;
        system("pause");
        return -1;
    }

    g_hWnd = CreateAppWindow();
    if (g_hWnd == NULL)
    {
        std::wcout << L"❌ 创建窗口失败!" << std::endl;
        system("pause");
        return -1;
    }

    // 创建测试图像数据
    CreateTestRGBAImage();

    ShowWindow(g_hWnd, SW_SHOW);
    UpdateWindow(g_hWnd);

    std::wcout << L"✅ 窗口创建成功!" << std::endl;
    std::wcout << L"💡 提示:" << std::endl;
    std::wcout << L"   - ESC 键退出程序" << std::endl;
    std::wcout << L"   - 空格键重新生成图像" << std::endl;
    std::wcout << L"   - 关闭窗口退出程序" << std::endl;

    MessageLoop();

    std::wcout << L"程序已退出。" << std::endl;
    return 0;
}
运行结果:

这个库不单单提供JPEG解码功能,完整的列表如下:
| Library | Description |
|---|---|
| ok_png | Reads PNG files. Supports Apple’s proprietary CgBI chunk. Tested against the PngSuite. |
| ok_jpg | Reads JPEG files. Baseline and progressive formats. Interprets EXIF orientation tags. No CMYK support. |
| ok_wav | Reads WAV and CAF files. PCM, u-law, a-law, and ADPCM formats. |
| ok_fnt | Reads AngelCode BMFont files. Binary format from AngelCode Bitmap Font Generator v1.10 or newer. |
| ok_csv | Reads Comma-Separated Values files. |
| ok_mo | Reads gettext MO files. |
完整的库下载:
有需要的朋友可以试试。
最近在调试一个程序,在设置了 Multi-threaded (/MT) 之后,编译时出现下午的错误
Error LNK2001 unresolved external symbol guard_check_icall$fo$
根据搜索结果,这个可能和 SDK 有关系,于是下载最新的 26100 的 SDK(26100.8038.260310-1641.ge_release_svc_im_WindowsSDK)安装后问题就解决了。
在物联网获得数据的过程中,HTTP 和 HTTPS 还是有蛮大区别的。
curl -X POST https://httpbin.org/post -H "Content-Type: application/json" -d '{"name": "test", "value": "123"}'
返回值
{
  "args": {},
  "data": "{name: test, value: 123}",
  "files": {},
  "form": {},
  "headers": {
    "Accept": "*/*",
    "Content-Length": "24",
    "Content-Type": "application/json",
    "Host": "httpbin.org",
    "User-Agent": "curl/8.7.0",
    "X-Amzn-Trace-Id": "Root=1-69ddf67f-75016f90629ad2556d1387f1"
  },
  "json": null,
  "origin": "117.143.53.223",
  "url": "https://httpbin.org/post"
}
2.编写 ESP32 Arduino 代码
#include <WiFi.h>
#include <WiFiClientSecure.h>

// 设置 Wi-Fi 凭据,
const char* ssid = "你的 WIFI 名称";
const char* password = "对应的密码";

// 目标服务器信息
const char* server = "httpbin.org"; // 域名
const int port = 443; // HTTPS 默认端口
const char* path = "/post"; // 请求路径

// 创建安全客户端对象
WiFiClientSecure client;

void setup() {
  Serial.begin(115200);
  delay(1000);

  // 连接 Wi-Fi
  Serial.println("正在连接 Wi-Fi...");
  WiFi.begin(ssid, password);
  while (WiFi.status() != WL_CONNECTED) {
    delay(500);
    Serial.print(".");
  }
  Serial.println("\nWi-Fi 连接成功!");
  Serial.print("IP 地址: ");
  Serial.println(WiFi.localIP());

  // 设置 HTTPS 客户端(跳过证书验证,仅用于测试)
  client.setInsecure(); // 注意:生产环境中应使用证书验证

  // 发送 POST 请求
  sendPostRequest();
}

void loop() {
  // 主循环为空,仅执行一次请求
}

void sendPostRequest() {
  Serial.println("正在连接服务器...");
  if (!client.connect(server, port)) {
    Serial.println("连接服务器失败!");
    return;
  }
  Serial.println("服务器连接成功!");

  // 构建 POST 请求数据(JSON 格式)
  String postData = "{\"name\":\"test\",\"value\":\"123\"}";

  // 构建 HTTP 请求头
  String request = "POST " + String(path) + " HTTP/1.1\r\n";
  request += "Host: " + String(server) + "\r\n";
  request += "Content-Type: application/json\r\n";
  request += "Content-Length: " + String(postData.length()) + "\r\n";
  request += "Connection: close\r\n\r\n"; // 关闭连接
  request += postData;

  // 发送请求
  Serial.println("发送 POST 请求...");
  client.print(request);
  Serial.println("请求已发送!");

  // 等待并读取响应
  Serial.println("服务器响应:");
  unsigned long timeout = millis();
  while (client.connected() || client.available()) {
    if (client.available()) {
      String line = client.readStringUntil('\n');
      Serial.println(line);
    }
    // 超时处理
    if (millis() - timeout > 5000) {
      Serial.println("响应超时!");
      break;
    }
  }

  // 断开连接
  client.stop();
  Serial.println("连接已关闭。");
}
运行结果串口输出如下:
请求已发送!
服务器响应:
HTTP/1.1 200 OK

Date: Tue, 14 Apr 2026 08:21:05 GMT

Content-Type: application/json

Content-Length: 412

Connection: close

Server: gunicorn/19.9.0

Access-Control-Allow-Origin: *

Access-Control-Allow-Credentials: true


{
  "args": {},
  "data": "{\"name\":\"test\",\"value\":\"123\"}",
  "files": {},
  "form": {},
  "headers": {
    "Content-Length": "29",
    "Content-Type": "application/json",
    "Host": "httpbin.org",
    "X-Amzn-Trace-Id": "Root=1-69ddf8f1-007fb8cc07ce50765cddb2f1"
  },
  "json": {
    "name": "test",
    "value": "123"
  },
  "origin": "117.143.53.223",
  "url": "https://httpbin.org/post"
}
[  7009][E][ssl_client.cp
另外一个例子,看起来更容易理解一些:
#include <WiFi.h>
#include <HTTPClient.h>
#include <WiFiClientSecure.h>
#include <ArduinoJson.h>

// WiFi凭据
const char* ssid = "your_wifi_ssid";
const char* password = "your_wifi_password";

void setup() {
  Serial.begin(115200);

  // 连接WiFi
  WiFi.begin(ssid, password);
  Serial.print("连接WiFi");

  while (WiFi.status() != WL_CONNECTED) {
    delay(500);
    Serial.print(".");
  }

  Serial.println();
  Serial.println("WiFi连接成功!");
  Serial.print("IP地址: ");
  Serial.println(WiFi.localIP());

  // 发送HTTPS POST请求
  sendHttpsPostRequest();
}

void loop() {
  // 空循环
}

void sendHttpsPostRequest() {
  // 创建WiFiClientSecure对象用于HTTPS
  WiFiClientSecure *client = new WiFiClientSecure;

  if(client) {
    // 设置为不验证SSL证书(用于测试,生产环境建议验证证书)
    client->setInsecure();

    // 或者如果你想验证证书,可以设置根CA证书
    // client->setCACert(rootCACertificate);

    HTTPClient https;

    Serial.println("[HTTPS] 开始连接...");

    if (https.begin(*client, "https://httpbin.org/post")) {
      Serial.println("[HTTPS] 连接成功");

      // 设置HTTP头
      https.addHeader("Content-Type", "application/json");
      https.addHeader("Token", "abc");

      // 准备JSON数据
      String jsonPayload = "{\"cityCode\":\"310100\",\"isGetStopArrive\":\"1\",\"lon\":\"121.3747863\",\"lat\":\"31.11027359\",\"limit\":20,\"offset\":0,\"coordinateType\":1}";

      Serial.println("发送HTTPS POST请求到: https://httpbin.org/post");
      Serial.println("请求头: Token=abc");
      Serial.println("请求体: " + jsonPayload);

      // 发送POST请求
      int httpResponseCode = https.POST(jsonPayload);

      if (httpResponseCode > 0) {
        String response = https.getString();
        Serial.println("HTTPS响应代码: " + String(httpResponseCode));
        Serial.println("响应内容:");
        Serial.println(response);
      } else {
        Serial.println("HTTPS请求失败");
        Serial.println("错误代码: " + String(httpResponseCode));
        Serial.println("错误信息: " + https.errorToString(httpResponseCode));
      }

      // 关闭连接
      https.end();
    } else {
      Serial.println("[HTTPS] 无法连接");
    }

    // 删除客户端对象
    delete client;
  } else {
    Serial.println("无法创建WiFiClientSecure客户端");
  }
}
之前提到过,UEFI 上没有 E820 ,而是通过gBS->GetMemoryMap() 来获得当前内存分配情况,这里给出了一个驱动代码,可以在UEFI Shell 下加载,他会替换之前的GetMemoryMap() 函数,基于之前的返回值增加一个条目:0xFED00000-0xFED1FFFF ,报告为 available 。
HookMemoryMapDxe.c
/** @file
  Memory Map Hook DXE Driver
  Hooks GetMemoryMap to add a fake memory region
**/

#include <Uefi.h>
#include <Library/UefiDriverEntryPoint.h>
#include <Library/UefiBootServicesTableLib.h>
#include <Library/MemoryAllocationLib.h>
#include <Library/BaseMemoryLib.h>
#include <Library/DebugLib.h>

// Hook Protocol GUID
#define MEMORY_MAP_HOOK_PROTOCOL_GUID \
  { 0x87654321, 0x4321, 0x8765, { 0xab, 0xcd, 0xef, 0x12, 0x34, 0x56, 0x78, 0x90 } }

EFI_GUID gMemoryMapHookProtocolGuid = MEMORY_MAP_HOOK_PROTOCOL_GUID;

// Hook数据结构
typedef struct {
  UINT32                Signature;
  EFI_GET_MEMORY_MAP    OriginalGetMemoryMap;
  EFI_PHYSICAL_ADDRESS  FakeMemoryStart;
  UINT64                FakeMemoryPages;
  BOOLEAN               HookEnabled;
} MEMORY_MAP_HOOK_DATA;

#define HOOK_SIGNATURE  SIGNATURE_32('H','M','A','P')

// 全局变量
STATIC MEMORY_MAP_HOOK_DATA *gHookData = NULL;
STATIC EFI_HANDLE gProtocolHandle = NULL;
STATIC EFI_EVENT gExitBootServicesEvent = NULL;

/**
  Hooked GetMemoryMap function
**/
EFI_STATUS
EFIAPI
HookedGetMemoryMap (
  IN OUT UINTN                  *MemoryMapSize,
  IN OUT EFI_MEMORY_DESCRIPTOR  *MemoryMap,
  OUT UINTN                     *MapKey,
  OUT UINTN                     *DescriptorSize,
  OUT UINT32                    *DescriptorVersion
  )
{
  EFI_STATUS                Status;
  UINTN                     OriginalMapSize;
  EFI_MEMORY_DESCRIPTOR     *OriginalMap;
  UINTN                     NewMapSize;
  UINTN                     EntryCount;
  UINTN                     Index;
  BOOLEAN                   NeedToAddEntry = TRUE;

  // 检查Hook是否启用
  if (gHookData == NULL || !gHookData->HookEnabled || gHookData->OriginalGetMemoryMap == NULL) {
    return EFI_UNSUPPORTED;
  }

  // 如果MemoryMap为NULL,只是查询大小
  if (MemoryMap == NULL) {
    Status = gHookData->OriginalGetMemoryMap(MemoryMapSize, MemoryMap, MapKey, DescriptorSize, DescriptorVersion);
    if (Status == EFI_BUFFER_TOO_SMALL) {
      // 为新增的条目预留空间
      *MemoryMapSize += *DescriptorSize;
    }
    return Status;
  }

  // 分配临时缓冲区
  OriginalMapSize = *MemoryMapSize + *DescriptorSize;
  OriginalMap = AllocatePool(OriginalMapSize);
  if (OriginalMap == NULL) {
    return EFI_OUT_OF_RESOURCES;
  }

  // 调用原始的GetMemoryMap
  Status = gHookData->OriginalGetMemoryMap(&OriginalMapSize, OriginalMap, MapKey, DescriptorSize, DescriptorVersion);
  if (EFI_ERROR(Status)) {
    FreePool(OriginalMap);
    return Status;
  }

  EntryCount = OriginalMapSize / *DescriptorSize;

  // 检查是否已经存在重叠的内存区域
  for (Index = 0; Index < EntryCount; Index++) {
    EFI_MEMORY_DESCRIPTOR *Entry = (EFI_MEMORY_DESCRIPTOR *)((UINT8 *)OriginalMap + Index * (*DescriptorSize));
    EFI_PHYSICAL_ADDRESS EntryStart = Entry->PhysicalStart;
    EFI_PHYSICAL_ADDRESS EntryEnd = EntryStart + (Entry->NumberOfPages * EFI_PAGE_SIZE) - 1;

    // 检查是否与新条目重叠
    if ((gHookData->FakeMemoryStart >= EntryStart && gHookData->FakeMemoryStart <= EntryEnd) ||
        (gHookData->FakeMemoryStart + (gHookData->FakeMemoryPages * EFI_PAGE_SIZE) - 1 >= EntryStart &&
         gHookData->FakeMemoryStart + (gHookData->FakeMemoryPages * EFI_PAGE_SIZE) - 1 <= EntryEnd)) {
      NeedToAddEntry = FALSE;
      break;
    }
  }

  // 计算新的内存映射大小
  if (NeedToAddEntry) {
    NewMapSize = OriginalMapSize + *DescriptorSize;
  } else {
    NewMapSize = OriginalMapSize;
  }

  // 检查提供的缓冲区是否足够大
  if (*MemoryMapSize < NewMapSize) {
    *MemoryMapSize = NewMapSize;
    FreePool(OriginalMap);
    return EFI_BUFFER_TOO_SMALL;
  }

  // 复制原始内存映射
  CopyMem(MemoryMap, OriginalMap, OriginalMapSize);

  // 如果需要,添加新的内存条目
  if (NeedToAddEntry) {
    EFI_MEMORY_DESCRIPTOR *NewEntry = (EFI_MEMORY_DESCRIPTOR *)((UINT8 *)MemoryMap + OriginalMapSize);

    NewEntry->Type = EfiConventionalMemory;  // Available memory
    NewEntry->PhysicalStart = gHookData->FakeMemoryStart;
    NewEntry->VirtualStart = 0;
    NewEntry->NumberOfPages = gHookData->FakeMemoryPages;
    NewEntry->Attribute = EFI_MEMORY_WB;  // Write-back cacheable
  }

  *MemoryMapSize = NewMapSize;
  FreePool(OriginalMap);

  return EFI_SUCCESS;
}

/**
  ExitBootServices event handler
**/
VOID
EFIAPI
ExitBootServicesNotify (
  IN EFI_EVENT  Event,
  IN VOID       *Context
  )
{
  // 在ExitBootServices之前恢复原始函数指针
  if (gHookData != NULL && gHookData->HookEnabled && gHookData->OriginalGetMemoryMap != NULL) {
    gBS->GetMemoryMap = gHookData->OriginalGetMemoryMap;

    // 更新CRC32
    gBS->Hdr.CRC32 = 0;
    gBS->CalculateCrc32((UINT8 *)gBS, gBS->Hdr.HeaderSize, &gBS->Hdr.CRC32);

    gHookData->HookEnabled = FALSE;
  }
}

/**
  Driver entry point

  @param ImageHandle     The image handle
  @param SystemTable     The system table

  @retval EFI_SUCCESS    Driver loaded successfully
**/
EFI_STATUS
EFIAPI
HookMemoryMapDxeEntry (
  IN EFI_HANDLE        ImageHandle,
  IN EFI_SYSTEM_TABLE  *SystemTable
  )
{
  EFI_STATUS Status;

  DEBUG((DEBUG_INFO, "HookMemoryMapDxe: Driver starting...\n"));

  // 分配Hook数据结构
  gHookData = AllocateRuntimeZeroPool(sizeof(MEMORY_MAP_HOOK_DATA));
  if (gHookData == NULL) {
    DEBUG((DEBUG_ERROR, "HookMemoryMapDxe: Failed to allocate hook data\n"));
    return EFI_OUT_OF_RESOURCES;
  }

  // 初始化Hook数据
  gHookData->Signature = HOOK_SIGNATURE;
  gHookData->OriginalGetMemoryMap = gBS->GetMemoryMap;
  gHookData->FakeMemoryStart = 0xFED00000;  // 0xFED00000-0xFED1FFFF
  gHookData->FakeMemoryPages = 0x20000 / EFI_PAGE_SIZE; // 128KB = 32 pages
  gHookData->HookEnabled = FALSE;

  // 安装Protocol (用于标识和查找)
  Status = gBS->InstallProtocolInterface(
    &gProtocolHandle,
    &gMemoryMapHookProtocolGuid,
    EFI_NATIVE_INTERFACE,
    gHookData
  );

  if (EFI_ERROR(Status)) {
    DEBUG((DEBUG_ERROR, "HookMemoryMapDxe: Failed to install protocol: %r\n", Status));
    FreePool(gHookData);
    gHookData = NULL;
    return Status;
  }

  // 创建ExitBootServices事件
  Status = gBS->CreateEvent(
    EVT_SIGNAL_EXIT_BOOT_SERVICES,
    TPL_NOTIFY,
    ExitBootServicesNotify,
    NULL,
    &gExitBootServicesEvent
  );

  if (EFI_ERROR(Status)) {
    DEBUG((DEBUG_WARN, "HookMemoryMapDxe: Failed to create ExitBootServices event: %r\n", Status));
    // 不是致命错误,继续执行
  }

  // 安装Hook
  gBS->GetMemoryMap = HookedGetMemoryMap;

  // 更新CRC32
  gBS->Hdr.CRC32 = 0;
  gBS->CalculateCrc32((UINT8 *)gBS, gBS->Hdr.HeaderSize, &gBS->Hdr.CRC32);

  // 启用Hook
  gHookData->HookEnabled = TRUE;

  DEBUG((DEBUG_INFO, "HookMemoryMapDxe: Driver loaded successfully\n"));
  DEBUG((DEBUG_INFO, "HookMemoryMapDxe: Hook installed and enabled\n"));
  DEBUG((DEBUG_INFO, "HookMemoryMapDxe: Fake memory region: 0x%lx-0x%lx\n",
        gHookData->FakeMemoryStart,
        gHookData->FakeMemoryStart + (gHookData->FakeMemoryPages * EFI_PAGE_SIZE) - 1));

  return EFI_SUCCESS;
}
HookMemoryMapDxe.inf
这个代码需要放置在MdeModulePkg下面,然后在MdeModulePkg.dsc添加:
[PcdsDynamicExDefault]
  gEfiMdeModulePkgTokenSpaceGuid.PcdRecoveryFileName|L"FVMAIN.FV"

[Components]
  MdeModulePkg/HookMemoryMapDxe/HookMemoryMapDxe.inf
  MdeModulePkg/Application/HelloWorld/HelloWorld.inf
  MdeModulePkg/Application/DumpDynPcd/DumpDynPcd.inf
  MdeModulePkg/Application/MemoryProfileInfo/MemoryProfileInfo.inf
之后,使用下面的命令进行编译即可:
build -a X64 -p MdeModulePkg/MdeModulePkg.dsc -t VS2019
完整的代码下载:
使用时,只需要在 UEFI Shell 下 load HookMemoryMapDxe.efi 即可,之后可以使用 memmap 命令看到改动结果。
特别注意:这里只是一个Demo ,实际使用时需要根据你的需求进行修改。
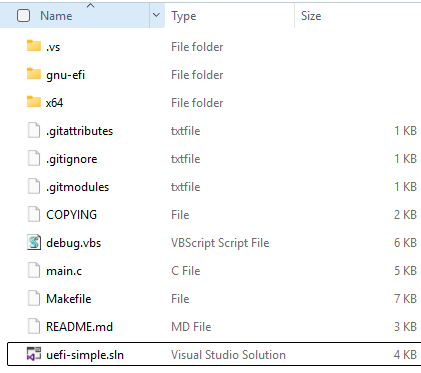
pbatard 在GitHub 上提供了一个轻量级UEFI 编译环境(https://github.com/pbatard/uefi-simple),用户可以直接在 Visual Studio 中直接创建项目,然后使用 GNU-EFI 来进行编译。
下载之后可以看到项目提供了一个 VC 的工程文件作为例子,可以使用 VS2019 直接打开。
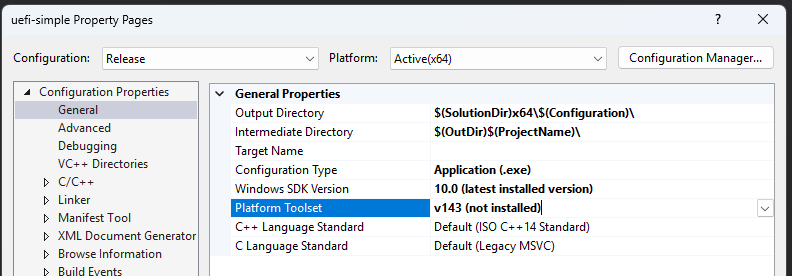
打开之后编译会发生错误,因为这个项目是 VS2022 的。修改的方法是在项目中搜索所有的 V143 字样,修改为 V142
比如,uefi-simple.vs\msvc\uefi-simple.vcxproj 中的下面<PlatformToolset> 中给出的
  <PropertyGroup Condition="'$(Configuration)|$(Platform)'=='Debug|x64'" Label="Configuration">
    <ConfigurationType>Application</ConfigurationType>
    <UseDebugLibraries>true</UseDebugLibraries>
    <PlatformToolset>v143</PlatformToolset>
    <CharacterSet>Unicode</CharacterSet>
  </PropertyGroup>
另外还要修改项目的属性中, Platform Toolset 为 v142
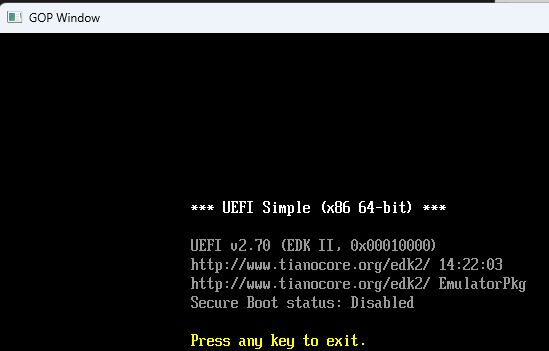
修改之后就可以直接 Build 出来需要的 EFI 文件了(main.c)

在模拟器中运行结果如下:
修改后的,能直接在 VS2019 下编译的可以在这里下载
仍然使用之前提到的模块 https://www.lab-z.com/ds3231165/ 。这个模块已经有内部上拉了,因此中断 Pin 无需再额外上拉。
这次遇到的问题是中断经常触发,打开Alarm1 后就立即触发。经过研究发现这是因为没有清除A1F 导致的,之前触发过Alarm1 中断后这个Flag 就会一直处于 1(触发状态)。当再次Enable Alarm1 后,就会继续拉低 Interrupt
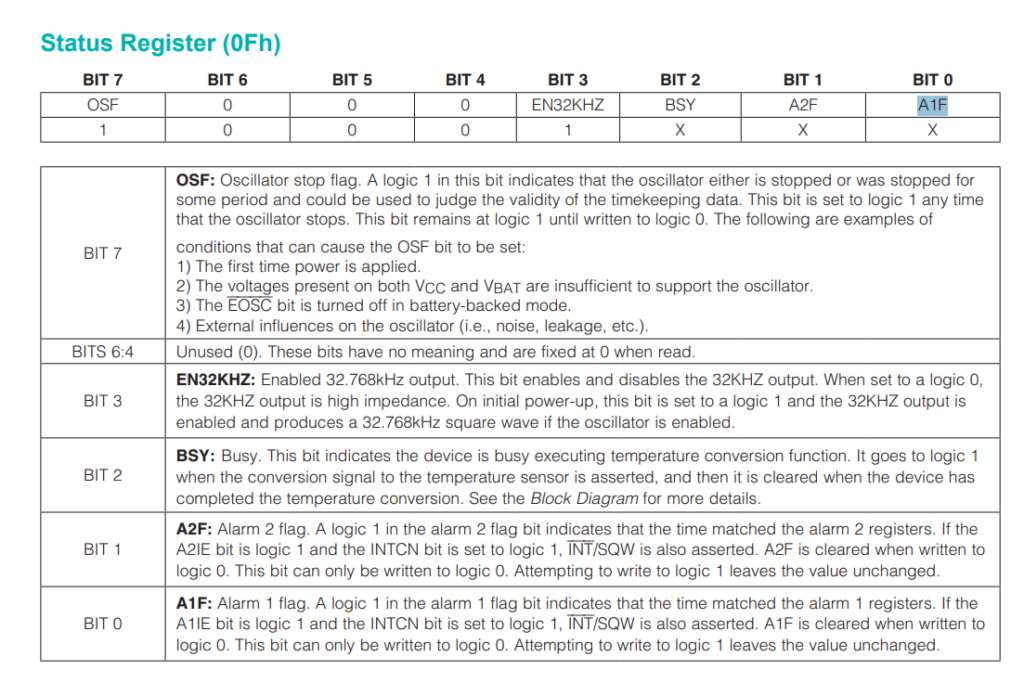
解决方法是在关闭 Alarm 1的时候多做一个动作:
  // 特别注意必须用下面函数清除 Interrupt Flag 否则只要 Enable Alarm 就会触发
      myRTC.checkIfAlarm(1);
  // 关闭 Alarm1
      myRTC.turnOffAlarm(1);
完整的测试代码如下:
#include <Wire.h>
#include <Arduino.h>

#include <WiFi.h>
#include <WiFiMulti.h>

#include <HTTPClient.h>
#include <ArduinoJson.h>

#include <DS3231.h>

DS3231 myRTC;
RTClib CurrentTime;

WiFiMulti wifiMulti;
JsonDocument doc;

const char* ssid = "CMCC-TSR6739";
const char* password = "!!1783az";

void showdate() {
  bool century;
  bool h12Flag;
  bool pmFlag;
  Serial.print(myRTC.getYear(), DEC);
  Serial.print("-");
  Serial.print(myRTC.getMonth(century), DEC);
  Serial.print("-");
  Serial.print(myRTC.getDate(), DEC);
  Serial.print(" ");
  Serial.print(myRTC.getDoW(), DEC);
  Serial.print(" ");
  Serial.print(myRTC.getHour(h12Flag, pmFlag), DEC); //24-hr
  Serial.print(":");
  Serial.print(myRTC.getMinute(), DEC);
  Serial.print(":");
  Serial.println(myRTC.getSecond(), DEC);
}

void setup() {
  wifiMulti.addAP(ssid, password);

  Serial.begin(115200);
  Serial.println("Start");
  Wire.begin();
  delay(100);

  myRTC.setClockMode(false);  // set to 24h

  pinMode(14, INPUT_PULLUP);
}

// 设置 seconds 秒后的闹钟
void SetAlart(uint32_t seconds) {
  DateTime Current = CurrentTime.now();

  printf("%d\n", Current.unixtime());
  printf("%d %d %d %d %d %d \n",
         Current.year(), Current.month(), Current.day(),
         Current.hour(), Current.minute(), Current.second());

  Current = DateTime(Current.unixtime() + seconds);
  printf("%d\n", Current.unixtime());

  printf("%d %d %d %d %d %d \n",
         Current.year(), Current.month(), Current.day(),
         Current.hour(), Current.minute(), Current.second());

  // 1分钟后触发
  myRTC.setA1Time(Current.day(), Current.hour(), Current.minute(), Current.second(), 0, false, false, false);
  // myRTC.setA1Time(Current.day(), Current.hour(), Current.minute(), Current.second()+20, 0, false, false, false);
  // 打开闹钟
  myRTC.turnOnAlarm(1);

}

uint8_t geti2c(uint8_t reg) {
  Wire.beginTransmission(0x68);
  Wire.write(reg);
  Wire.endTransmission();

  Wire.requestFrom(0x68, 1);
  return Wire.read();
}


unsigned long char_to_uint32(const char* t) {
  unsigned long result = 0;
  for (int i = 0; i < 14; i++) {
    if (t[i] >= '0' && t[i] <= '9') {
      result = result * 10 + (t[i] - '0');
    }
  }
  result = result + 8 * 3600;
  return result;
}

void loop() {


  while (Serial.available()) {
    char c = Serial.read();
    if (c == '1') {
      // 从互联网取得当前时间
      Serial.print("测试:从互联网获得当前时间, 并且设置给 RTC:");
      // 从互联网取得时间
      if ((wifiMulti.run() == WL_CONNECTED)) {
        HTTPClient http;
        //http.begin("http://quan.suning.com/getSysTime.do"); //HTTP
        http.begin("http://api.k780.com/?app=life.time&appkey=10003&sign=b59bc3ef6191eb9f747dd4e83c99f2a4&format=json");
        int httpCode = http.GET();

        // httpCode will be negative on error
        if (httpCode > 0) {
          String payload = http.getString();
          // 解析JSON数据
          DeserializationError error = deserializeJson(doc, payload);

          Serial.println(doc["result"]["timestamp"].as<const char*>());
          myRTC.adjust(char_to_uint32(doc["result"]["timestamp"].as<const char*>()));

        } else {
          Serial.println("Http 访问出错");
        }
        http.end();
      } else {
        Serial.println("WIFI 未连接");
      }
      Serial.print("测试结束");
    }

    if (c == '2') {
      // 显示当前时间
      showdate();
    }
    if (c == '3') {
      // 设置 20秒后触发中断,对应引脚会变低
      SetAlart(20);
    }
    if (c == '4') {
      // 关闭闹钟
      Serial.println("TurnOff Alarm");
      // 特别注意必须用下面函数清除 Interrupt Flag 否则只要 Enable Alarm 就会触发
      myRTC.checkIfAlarm(1);
      // 关闭 Alarm1
      myRTC.turnOffAlarm(1);
    }

    if (c == '5') {
      // 检查闹钟状态
      if (myRTC.checkAlarmEnabled(1)) {
        Serial.println("闹钟 Enabled");
        if (myRTC.checkIfAlarm(1, false)) {
          Serial.println("闹钟已触发");
        } else {
          Serial.println("闹钟未触发");
        }
      } else {
        Serial.println("闹钟 Disabled");
      }
    }

    if (c == '6') {
      // 输出当前闹钟设定的时间
      byte alarmDay, alarmHour, alarmMinute, alarmSecond, alarmBits;
      bool alarmDy, alarmH12Flag, alarmPmFlag;
      // Display Alarm 1 information
      myRTC.getA1Time(alarmDay, alarmHour, alarmMinute, alarmSecond, alarmBits, alarmDy, alarmH12Flag, alarmPmFlag);
      Serial.print(alarmDay, DEC);
      if (alarmDy) {
        Serial.print(" DoW");
      } else {
        Serial.print(" Date");
      }
      Serial.print(' ');
      Serial.print(alarmHour, DEC);
      Serial.print(' ');
      Serial.print(alarmMinute, DEC);
      Serial.print(' ');
      Serial.print(alarmSecond, DEC);
      Serial.print(' ');
      if (alarmH12Flag) {
        if (alarmPmFlag) {
          Serial.print("pm ");
        } else {
          Serial.print("am ");
        }
      }
      Serial.printf("alarmBits:%x %x \n", alarmBits, alarmDy);
      Serial.println(' ');
    }

    if (c == '7') {
      // 寄存器检测
      printf("0x07: %d\n", geti2c(0x07));
      printf("0x08: %d\n", geti2c(0x08));
      printf("0x09: %d\n", geti2c(0x09));
      printf("0x0A: %d\n", geti2c(0x0A));
      printf("0x0E: %d\n", geti2c(0x0E));
      printf("0x0F: %d\n", geti2c(0x0F));
    }

  }

}