最近在编写一个需要随机生成数值的代码,使用之前的 rand 函数【参考1】发现每次生成的随机数是相同的,忽然意识到这是因为代码里面的随机种子是固定值导致的,如果使用当前时间作为随机种子那么每次生成的数值将会是不同的。
可以使用 Runtime Service 中的 GetTime 来取得时间作为种子,返回的时间格式如下:
//
// EFI Time Abstraction:
//  Year:       2000 - 20XX
//  Month:      1 - 12
//  Day:        1 - 31
//  Hour:       0 - 23
//  Minute:     0 - 59
//  Second:     0 - 59
//  Nanosecond: 0 - 999,999,999
//  TimeZone:   -1440 to 1440 or 2047
//
typedef struct {
  UINT16  Year;
  UINT8   Month;
  UINT8   Day;
  UINT8   Hour;
  UINT8   Minute;
  UINT8   Second;
  UINT8   Pad1;
  UINT32  Nanosecond;
  INT16   TimeZone;
  UINT8   Daylight;
  UINT8   Pad2;
} EFI_TIME;
根据上面的结构编写测试代码如下:
/** @file
    A simple, basic, EDK II native, "hello" application to verify that
    we can build applications without LibC.

    Copyright (c) 2010 - 2011, Intel Corporation. All rights reserved.<BR>
    This program and the accompanying materials
    are licensed and made available under the terms and conditions of the BSD License
    which accompanies this distribution. The full text of the license may be found at
    http://opensource.org/licenses/bsd-license.

    THE PROGRAM IS DISTRIBUTED UNDER THE BSD LICENSE ON AN "AS IS" BASIS,
    WITHOUT WARRANTIES OR REPRESENTATIONS OF ANY KIND, EITHER EXPRESS OR IMPLIED.
**/
#include  <Uefi.h>
#include  <Library/UefiLib.h>
#include  <Library/ShellCEntryLib.h>
#include  <Library/UefiBootServicesTableLib.h> //global gST gBS gImageHandle
#include  <Library/ShellLib.h>

extern EFI_RUNTIME_SERVICES      *gRT;

EFI_TIME        ET;

/***
  Print a welcoming message.

  Establishes the main structure of the application.

  @retval  0         The application exited normally.
  @retval  Other     An error occurred.
***/
INTN
EFIAPI
ShellAppMain (
  IN UINTN Argc,
  IN CHAR16 **Argv
  )
{
        gRT->GetTime(&ET,NULL);

        Print(L"Hour  [%d]\n",ET.Hour);
        Print(L"Minute[%d]\n",ET.Minute);
        Print(L"Second[%d]\n",ET.Second);
        Print(L"Nano  [%d]\n",ET.Nanosecond);

        return(0);
}
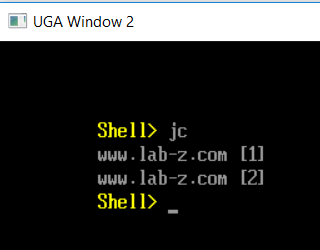
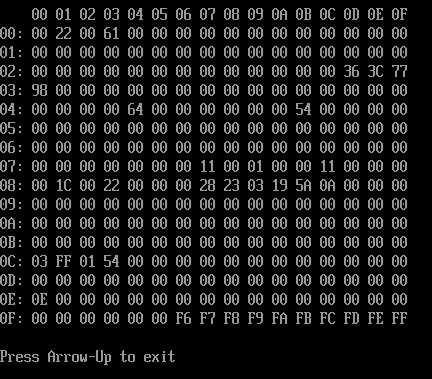
在NT32 虚拟机中运行结果如下:
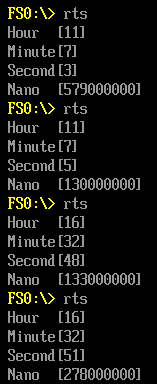
但是实体机上(KBL-R)跑出来的结果显示 Nanosecond 始终为 0。于是开始研究这个代码。
首先,在 NT32 环境下,GetTime 函数具体实现在 \Nt32Pkg\RealTimeClockRuntimeDxe\RealTimeClock.c 中。
EFI_STATUS
EFIAPI
InitializeRealTimeClock (
  IN EFI_HANDLE                            ImageHandle,
  IN EFI_SYSTEM_TABLE                      *SystemTable
  )
  SystemTable->RuntimeServices->GetTime       = WinNtGetTime;
  SystemTable->RuntimeServices->SetTime       = WinNtSetTime;
具体实现
EFI_STATUS
EFIAPI
WinNtGetTime (
  OUT EFI_TIME                                 *Time,
  OUT EFI_TIME_CAPABILITIES                    *Capabilities OPTIONAL
  )
/*++

Routine Description:
  Service routine for RealTimeClockInstance->GetTime

Arguments:

  Time          - A pointer to storage that will receive a snapshot of the current time.

  Capabilities  - A pointer to storage that will receive the capabilities of the real time clock
                  in the platform. This includes the real time clock's resolution and accuracy.
                  All reported device capabilities are rounded up.  This is an OPTIONAL argument.

Returns:

  EFI_SUCEESS   - The underlying GetSystemTime call occurred and returned
                  Note that in the NT32 emulation, the GetSystemTime call has no return value
                  thus you will always receive a EFI_SUCCESS on this.

--*/
// TODO:    EFI_INVALID_PARAMETER - add return value to function comment
{
  SYSTEMTIME            SystemTime;
  TIME_ZONE_INFORMATION TimeZone;

  //
  // Check parameter for null pointer
  //
  if (Time == NULL) {
    return EFI_INVALID_PARAMETER;

  }

  gWinNt->GetLocalTime (&SystemTime);
  gWinNt->GetTimeZoneInformation (&TimeZone);

  Time->Year        = (UINT16) SystemTime.wYear;
  Time->Month       = (UINT8) SystemTime.wMonth;
  Time->Day         = (UINT8) SystemTime.wDay;
  Time->Hour        = (UINT8) SystemTime.wHour;
  Time->Minute      = (UINT8) SystemTime.wMinute;
  Time->Second      = (UINT8) SystemTime.wSecond;
  Time->Nanosecond  = (UINT32) (SystemTime.wMilliseconds * 1000000);
  Time->TimeZone    = (INT16) TimeZone.Bias;

  if (Capabilities != NULL) {
    Capabilities->Resolution  = 1;
    Capabilities->Accuracy    = 50000000;
    Capabilities->SetsToZero  = FALSE;
  }

  Time->Daylight = 0;
  if (TimeZone.StandardDate.wMonth) {
    Time->Daylight = (UINT8) TimeZone.StandardDate.wMonth;
  }

  return EFI_SUCCESS;
}
从上面可以看到 Time->Nanosecond 来自 (SystemTime.wMilliseconds * 1000000)。
接下来,在实体机BIOS代码中检查,发现赋值函数在 \PcAtChipsetPkg\PcatRealTimeClockRuntimeDxe\PcRtc.c 文件中:
/**
  Converts time read from RTC to EFI_TIME format defined by UEFI spec.

  This function converts raw time data read from RTC to the EFI_TIME format
  defined by UEFI spec.
  If data mode of RTC is BCD, then converts it to decimal,
  If RTC is in 12-hour format, then converts it to 24-hour format.

  @param   Time       On input, the time data read from RTC to convert
                      On output, the time converted to UEFI format
  @param   RegisterB  Value of Register B of RTC, indicating data mode
                      and hour format.

  @retval  EFI_INVALID_PARAMETER  Parameters passed in are invalid.
  @retval  EFI_SUCCESS            Convert RTC time to EFI time successfully.

**/
EFI_STATUS
ConvertRtcTimeToEfiTime (
  IN OUT EFI_TIME        *Time,
  IN     RTC_REGISTER_B  RegisterB
  )
{
  BOOLEAN IsPM;
  UINT8   Century;

  if ((Time->Hour & 0x80) != 0) {
    IsPM = TRUE;
  } else {
    IsPM = FALSE;
  }

  Time->Hour = (UINT8) (Time->Hour & 0x7f);

  if (RegisterB.Bits.Dm == 0) {
    Time->Year    = CheckAndConvertBcd8ToDecimal8 ((UINT8) Time->Year);
    Time->Month   = CheckAndConvertBcd8ToDecimal8 (Time->Month);
    Time->Day     = CheckAndConvertBcd8ToDecimal8 (Time->Day);
    Time->Hour    = CheckAndConvertBcd8ToDecimal8 (Time->Hour);
    Time->Minute  = CheckAndConvertBcd8ToDecimal8 (Time->Minute);
    Time->Second  = CheckAndConvertBcd8ToDecimal8 (Time->Second);
  }

  if (Time->Year == 0xff || Time->Month == 0xff || Time->Day == 0xff ||
      Time->Hour == 0xff || Time->Minute == 0xff || Time->Second == 0xff) {
    return EFI_INVALID_PARAMETER;
  }

  //
  // For minimal/maximum year range [1970, 2069],
  //   Century is 19 if RTC year >= 70,
  //   Century is 20 otherwise.
  //
  Century = (UINT8) (PcdGet16 (PcdMinimalValidYear) / 100);
  if (Time->Year < PcdGet16 (PcdMinimalValidYear) % 100) {
    Century++;
  }
  Time->Year = (UINT16) (Century * 100 + Time->Year);

  //
  // If time is in 12 hour format, convert it to 24 hour format
  //
  if (RegisterB.Bits.Mil == 0) {
    if (IsPM && Time->Hour < 12) {
      Time->Hour = (UINT8) (Time->Hour + 12);
    }

    if (!IsPM && Time->Hour == 12) {
      Time->Hour = 0;
    }
  }

  Time->Nanosecond  = 0;

  return EFI_SUCCESS;
}
其中给定的Time->Nanosecond 始终为 0. 这就是为什么我们在实体机看到0的原因。
完整的代码如下:
最终,我使用 (ET.Hour* ET.Minute* ET.Second) 作为种子。当调用间隔时间足够长(至少大于1秒),这种方式能够正常工作并且足够简单。如果你对安全性有特别要求,建议使用 RDRand 来取得随机数。
参考:
1. http://www.lab-z.com/clibrand/ CLIB:RAND 随机数生成