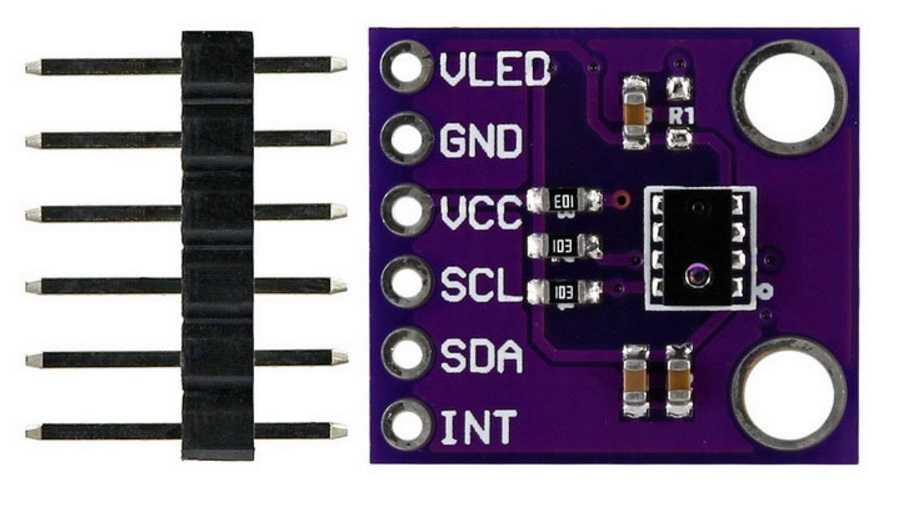
AP3216C 模块的核心就是这个芯片本身。这颗芯片集成了光强传感器(ALS:Ambient Light Sensor),接近传感器(PS: Proximity Sensor),还有一个红外LED(IR LED)。这个芯片设计的用途是给手机之类的使用,比如:返回当前环境光强以便调整屏幕亮度;用户接听电话时,将手机放置在耳边后,自动关闭屏幕避免用户误触碰。
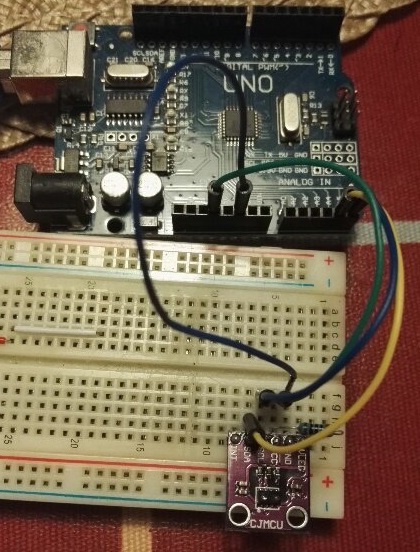
可能是因为模块接线非常简单,我在网上找不到模块的电路图,只能用芯片的DataSheet对照进行查看。
从上到下分别是 :
VLED IR LED的供电,IR LED 电流最高为 20ma。使用 3.3v给模块和IR LED 同时供电时,在IR LED 上串联了一个200欧姆的电阻,这样保证电流不会超过20ma。
GND 地
VCC 模块供电,特别注意:最高 3.6V,对于 Arduino 来说,只能选择 3.3V供电输出
SCL I2C 的 CLOCK,对应 A5
SDA I2C 的 DATA,对应 A4
INT 中断输出,可以通知 Arduino有数据。对于轮询,无需使用。
参考【参考1】, 可以使用的代码如下:
// Interfacing the AP3216 light / proximity sensor with Arduino UNO
// By RoboRemo
// www.roboremo.com
// Big thanks to ICStation for providing the AP3216 sensor
// http://www.icstation.com/ap3216-ambient-light-sensorals-proximity-sensorps-p-7958.html
// Command examples:
// "write 0x00 0x01\n" - will write value 0x01 to the register 0x00
// "read 0x0C\n" - will read the value from register 0x0C
// "als start\n" - will start streaming the value from the ALS (ambient light sensor)
// "ps start\n" - will start streaming the value from the PS (proximity sensor)
// "stop\n" - will stop streaming the ALS / PS data.
// Commands can be sent using Serial Monitor / Terminal,
// Or using the RoboRemo app from Google Play.
// RoboRemo app can also display a nice plot of the ALS / PS data,
// and also log to a file on the sdcard of the phone.
// Hardware wiring:
// Arduino AP3216
// VLED --,
// GND ------- GND |R| 240 Ohm
// 3.3V ------ VCC ---'
// A5 -------- SCL
// A4 -------- SDA
long baud = 115200;
#include <Wire.h>
char cmd[100];
int cmdIndex;
bool als_on = false;
bool ps_on = false;
boolean cmdStartsWith(const char *st) { // checks if cmd starts with st
for(int i=0; ; i++) {
if(st[i]==0) return true;
if(cmd[i]==0) return false;
if(cmd[i]!=st[i]) return false;;
}
return false;
}
int hexCharToInt(char c) {
if(c>='a') return (c-'a')+10;
if(c>='A') return (c-'A')+10;
return c-'0';
}
String hexByteToString(int val) {
char digits[] = {'0', '1', '2', '3', '4', '5', '6', '7', '8','9', 'A', 'B', 'C', 'D', 'E', 'F'};
char a = digits[(val/16) %16];
char b = digits[val%16];
return (String) "" + a + b;
}
void alsStart() {
AP3216_write(0x00, 0x01);
als_on = true;
}
void alsPsStop() {
als_on = false;
ps_on = false;
AP3216_write(0x00, 0x00);
}
void psStart() {
AP3216_write(0x00, 0x02);
ps_on = true;
}
void AP3216_write(int regAddress, int value) {
Wire.beginTransmission(0x1E); // I2C Address of AP3216 sensor is 0x1E
Wire.write(regAddress);
Wire.write(value);
Wire.endTransmission();
}
int AP3216_read(int regAddress) {
Wire.beginTransmission(0x1E); // I2C Address of AP3216 sensor is 0x1E
Wire.write(regAddress);
Wire.endTransmission();
Wire.requestFrom(0x1E, 1, true);
return Wire.read() & 0xFF;
}
void exeCmd() {
if( cmdStartsWith("read 0x") ) { // example: read 0x1A
int a = hexCharToInt(cmd[7]); // '1' -> 1
int b = hexCharToInt(cmd[8]); // 'A' -> 10
int regAddress = (a*16)+b; // 0x1A = 26
int regValue = AP3216_read(regAddress);
Serial.print( (String)"reg_0x");
Serial.print( hexByteToString(regAddress) );
Serial.print(" = ");
Serial.print( hexByteToString(regValue) );
Serial.print("\n");
}
if( cmdStartsWith("write 0x") ) { // example: write 0x1A 0x55
int a = hexCharToInt(cmd[8]); // '1' -> 1
int b = hexCharToInt(cmd[9]); // 'A' -> 10
int regAddress = (a*16)+b; // 0x1A = 26
a = hexCharToInt(cmd[13]);
b = hexCharToInt(cmd[14]);
int regValue = (a*16)+b;
AP3216_write(regAddress, regValue);
Serial.print( (String)"reg_0x");
Serial.print( hexByteToString(regAddress) );
Serial.print(" <- ");
Serial.print( hexByteToString(regValue) );
Serial.print("\n");
}
if( cmdStartsWith("als start") ) {
alsStart();
}
if( cmdStartsWith("stop") ) {
alsPsStop();
}
if( cmdStartsWith("ps start") ) {
psStart();
}
}
void setup() {
Wire.begin();
Serial.begin(baud);
cmdIndex = 0;
}
void loop() {
while( Serial.available() ) {
char c = Serial.read();
if(c=='\n' || c=='\r') {
cmd[cmdIndex] = 0; // end cmd string with 0
exeCmd(); // execute the command
cmdIndex = 0; // reset the cmdIndex
} else {
cmd[cmdIndex] = c; // append c to the cmd string
if(cmdIndex<99) cmdIndex++;
}
}
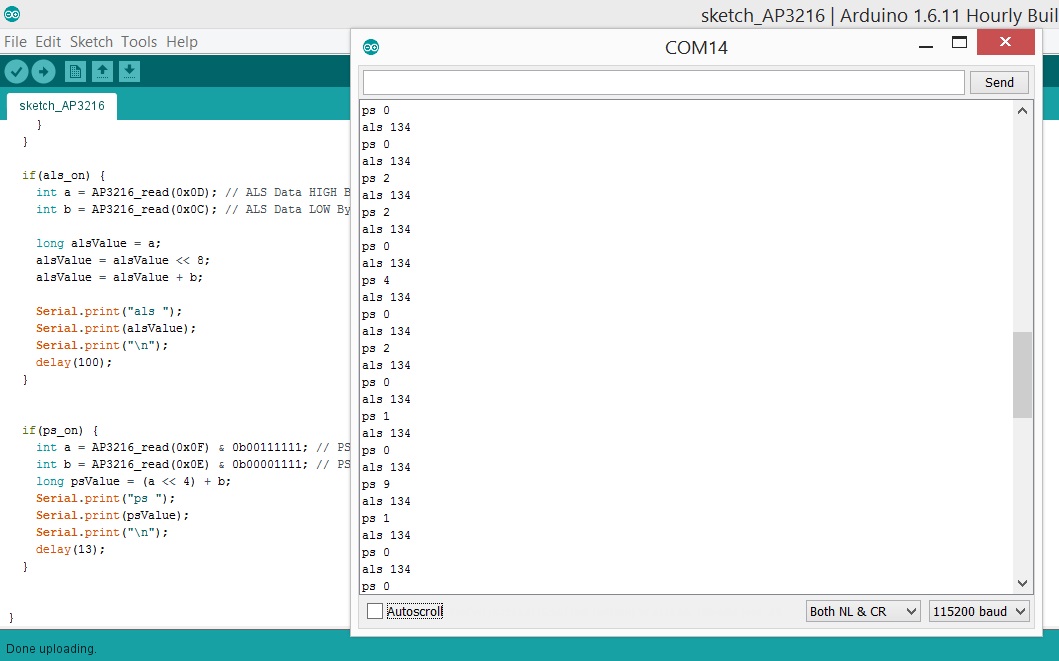
if(als_on) {
int a = AP3216_read(0x0D); // ALS Data HIGH Byte
int b = AP3216_read(0x0C); // ALS Data LOW Byte
long alsValue = a;
alsValue = alsValue << 8;
alsValue = alsValue + b;
Serial.print("als ");
Serial.print(alsValue);
Serial.print("\n");
delay(100);
}
if(ps_on) {
int a = AP3216_read(0x0F) & 0b00111111; // PS Data HIGH 6 bits
int b = AP3216_read(0x0E) & 0b00001111; // PS Data LOW 4 bits
long psValue = (a << 4) + b;
Serial.print("ps ");
Serial.print(psValue);
Serial.print("\n");
delay(13);
}
}
使用方法:
串口输入 als start 获取当前的光强
串口输入 ps start获得当前接近传感器的数值
串口输入 stop 停止输出
目前这个模块没有成熟的库供使用,上述代码只是实现一个大概的功能,如果应用在产品上,还需要根据需求对照DataSheet进行详细的调试。
参考:
1. http://www.roboremo.com/reading-ap3216-with-arduino.html