单纯的函数调用从动作上来说,Call 指令可以看作保存寄存器压栈外加 JMP 的过程(复杂的说调用 Call 会有有实模式,保护模式, Near/Far,gated等等差别,在 IA32 手册上描述足有8页之多)。因此,可以使用压栈保存寄存器外加一个跳转来实现。在 UEFI 中可以通过SetJump() 和 LongJump()函数组合来实现。
在 \MdePkg\Include\Library\BaseLib.h 可以看到下面的定义。
/**
  Saves the current CPU context that can be restored with a call to LongJump()
  and returns 0.

  Saves the current CPU context in the buffer specified by JumpBuffer and
  returns 0. The initial call to SetJump() must always return 0. Subsequent
  calls to LongJump() cause a non-zero value to be returned by SetJump().

  If JumpBuffer is NULL, then ASSERT().
  For Itanium processors, if JumpBuffer is not aligned on a 16-byte boundary, then ASSERT().

  NOTE: The structure BASE_LIBRARY_JUMP_BUFFER is CPU architecture specific.
  The same structure must never be used for more than one CPU architecture context.
  For example, a BASE_LIBRARY_JUMP_BUFFER allocated by an IA-32 module must never be used from an x64 module.
  SetJump()/LongJump() is not currently supported for the EBC processor type.

  @param  JumpBuffer  A pointer to CPU context buffer.

  @retval 0 Indicates a return from SetJump().

**/
RETURNS_TWICE
UINTN
EFIAPI
SetJump (
  OUT     BASE_LIBRARY_JUMP_BUFFER  *JumpBuffer
  );
从介绍上来看,SetJump能保存调用处的全部寄存器,然后返回到调用的位置。
/**
  Restores the CPU context that was saved with SetJump().

  Restores the CPU context from the buffer specified by JumpBuffer. This
  function never returns to the caller. Instead is resumes execution based on
  the state of JumpBuffer.

  If JumpBuffer is NULL, then ASSERT().
  For Itanium processors, if JumpBuffer is not aligned on a 16-byte boundary, then ASSERT().
  If Value is 0, then ASSERT().

  @param  JumpBuffer  A pointer to CPU context buffer.
  @param  Value       The value to return when the SetJump() context is
                      restored and must be non-zero.

**/
VOID
EFIAPI
LongJump (
  IN      BASE_LIBRARY_JUMP_BUFFER  *JumpBuffer,
  IN      UINTN                     Value
  );
从介绍上来看,LongJump恢复SetJump函数能保存调用处的全部寄存器,然后返回到调用SetJump函数的下一条指令的位置。
为了验证上面的说法,编写一个Application。主要代码如下:
UINTN RunMark   =       0;

void
ShowString()
{
        Print(L"www.lab-z.com [%d]\n",RunMark);
}

/***
  Print a welcoming message.

  Establishes the main structure of the application.

  @retval  0         The application exited normally.
  @retval  Other     An error occurred.
***/
INTN
EFIAPI
ShellAppMain (
  IN UINTN Argc,
  IN CHAR16 **Argv
  )
{
        BASE_LIBRARY_JUMP_BUFFER  JumpBuffer;

        SetJump(&JumpBuffer);
        RunMark++;
        ShowString();
        if (RunMark==1) {
                LongJump (&JumpBuffer, (UINTN)-1);
        }

        return(0);
}
运行结果如下:
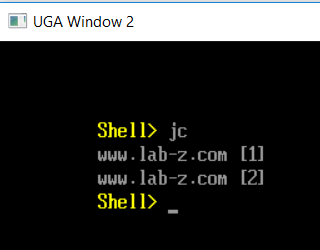
第一次运行 SetJump() 会将当前寄存器存放在 JumpBuffer 中。然后 RunMark 加一,从0变成1.接着,判断这个值等于1,再执行 LongJump,执行的结果会回到 SetJump(); 的下一条指令,也就是 RunMark++。这样,RunMark 变成了2,不会运行 LongJump() 接下来顺利退出了。
最后一个问题,SetJump 和 LongJump的具体实现在哪里?我这边通过 Build 目录里面 MakeFile 内容来确认。
1.找到Application 的 MakeFile 在 \AppPkg\DEBUG_VS2015x86\X64\AppPkg\Applications\JumpCall\JumpCall\Makefile 其中有如下代码
#
# Build Macro
#
STATIC_LIBRARY_FILES =  \
    $(BIN_DIR)\MdePkg\Library\BaseDebugPrintErrorLevelLib\BaseDebugPrintErrorLevelLib\OUTPUT\BaseDebugPrintErrorLevelLib.lib \
    $(BIN_DIR)\MdePkg\Library\BasePrintLib\BasePrintLib\OUTPUT\BasePrintLib.lib \
    $(BIN_DIR)\MdePkg\Library\BasePcdLibNull\BasePcdLibNull\OUTPUT\BasePcdLibNull.lib \
$(BIN_DIR)\MdePkg\Library\BaseLib\BaseLib\OUTPUT\BaseLib.lib \
2.确定 BaseLib.Lib 的生成方式,在C:\BuildBs\201903\Build\AppPkg\DEBUG_VS2015x86\X64\MdePkg\Library\BaseLib\BaseLib\Makefile 可以看到
$(OUTPUT_DIR)\X64\SetJump.obj : $(MAKE_FILE)
$(OUTPUT_DIR)\X64\SetJump.obj : $(WORKSPACE)\MdePkg\Include\Base.h
$(OUTPUT_DIR)\X64\SetJump.obj : $(WORKSPACE)\MdePkg\Include\X64\Nasm.inc
$(OUTPUT_DIR)\X64\SetJump.obj : $(WORKSPACE)\MdePkg\Include\X64\ProcessorBind.h
$(OUTPUT_DIR)\X64\SetJump.obj : $(WORKSPACE)\MdePkg\Include\Library\PcdLib.h
$(OUTPUT_DIR)\X64\SetJump.obj : $(DEBUG_DIR)\AutoGen.h
$(OUTPUT_DIR)\X64\SetJump.obj : $(WORKSPACE)\MdePkg\Library\BaseLib\X64\SetJump.nasm
	"$(PP)" $(PP_FLAGS) $(INC) c:\buildbs\201903\MdePkg\Library\BaseLib\X64\SetJump.nasm > c:\buildbs\201903\Build\AppPkg\DEBUG_VS2015x86\X64\MdePkg\Library\BaseLib\BaseLib\OUTPUT\X64\SetJump.i
	Trim --trim-long --source-code -o c:\buildbs\201903\Build\AppPkg\DEBUG_VS2015x86\X64\MdePkg\Library\BaseLib\BaseLib\OUTPUT\X64\SetJump.iii c:\buildbs\201903\Build\AppPkg\DEBUG_VS2015x86\X64\MdePkg\Library\BaseLib\BaseLib\OUTPUT\X64\SetJump.i
	"$(NASM)" -Ic:\buildbs\201903\MdePkg\Library\BaseLib\X64\ $(NASM_INC) $(NASM_FLAGS) -o c:\buildbs\201903\Build\AppPkg\DEBUG_VS2015x86\X64\MdePkg\Library\BaseLib\BaseLib\OUTPUT\X64\SetJump.obj c:\buildbs\201903\Build\AppPkg\DEBUG_VS2015x86\X64\MdePkg\Library\BaseLib\BaseLib\OUTPUT\X64\SetJump.iii
就是说使用了c:\buildbs\201903\MdePkg\Library\BaseLib\X64\SetJump.nasm 进行编译。
3.具体代码在C:\BuildBs\201903\MdePkg\Library\BaseLib\X64\SetJump.nasm
;------------------------------------------------------------------------------
; UINTN
; EFIAPI
; SetJump (
;   OUT     BASE_LIBRARY_JUMP_BUFFER  *JumpBuffer
;   );
;------------------------------------------------------------------------------
global ASM_PFX(SetJump)
ASM_PFX(SetJump):
    push    rcx
    add     rsp, -0x20
    call    ASM_PFX(InternalAssertJumpBuffer)
完整的例子代码在这里下载
这个和 Lisp 里面的 call/cc 差不多,感觉能用在 coroutine 的实现上。
setjmp 和 longjmp 在 C 标准库里面有:
https://en.cppreference.com/w/c/program/setjmp
https://en.cppreference.com/w/c/program/longjmp