研究一下:UEFI APP 在编译的时候会加入什么头。
使用上一次的示例程序 ClrTest。稍微修改一下,去掉清屏的调用以便我们能看清结果:
#include <Uefi.h>
#include <Library/UefiLib.h>
#include <Library/ShellLib.h>
#include <Library/UefiApplicationEntryPoint.h>

extern EFI_BOOT_SERVICES             	 *gBS;
extern EFI_SYSTEM_TABLE			 *gST;
extern EFI_RUNTIME_SERVICES 		 *gRT;

//
// Entry point function
//
EFI_STATUS
UefiMain (
  IN EFI_HANDLE        ImageHandle,
  IN EFI_SYSTEM_TABLE  *SystemTable
  )
{
   Print(L"www.lab-z.com\n");
   return EFI_SUCCESS;
}
编译命令是 build -p AppPkg\AppPkg.dsc
首先查看生成的 Makefile
在 \Build\AppPkg\DEBUG_VS2008\IA32\AppPkg\Applications\ClsTest\ClsTest\Makefile
下面的语句指定了入口函数
DLINK_FLAGS = /NOLOGO /NODEFAULTLIB /IGNORE:4001 /OPT:REF /OPT:ICF=10 /MAP
/ALIGN:32 /SECTION:.xdata,D /SECTION:.pdata,D /MACHINE:X86 /LTCG /DLL
/ENTRY:$(IMAGE_ENTRY_POINT) /SUBSYSTEM:EFI_BOOT_SERVICE_DRIVER /SAFESEH:NO
/BASE:0 /DRIVER /DEBUG
同样的 Makefile中,给出入口函数
IMAGE_ENTRY_POINT = _ModuleEntryPoint
顺便看一眼 \Build\AppPkg\DEBUG_VS2008\IA32\AppPkg\Applications\ClsTest\ClsTest\OUTPUT\ClsTest.map
__ModuleEntryPoint 00000260 f UefiApplicationEntryPoint:ApplicationEntryPoint.obj
就是说 ModuleEntryPoint 是从 ApplicationEntryPoint.obj 中链接进来的
这个函数的头文件在 \MdePkg\Include\Library\UefiApplicationEntryPoint.h
再进一步查找 \MdePkg\Library\UefiApplicationEntryPoint\UefiApplicationEntryPoint.inf 其中给出了对应的函数体的位置
[Sources]
ApplicationEntryPoint.c
打开看看 \MdePkg\Library\UefiApplicationEntryPoint\ApplicationEntryPoint.c
EFI_STATUS
EFIAPI
_ModuleEntryPoint (
IN EFI_HANDLE ImageHandle,
IN EFI_SYSTEM_TABLE *SystemTable
)
...............
//
// Call constructor for all libraries.
//
ProcessLibraryConstructorList (ImageHandle, SystemTable);
//
// Call the module's entry point
//
Status = ProcessModuleEntryPointList (ImageHandle, SystemTable);
//
// Process destructor for all libraries.
//
ProcessLibraryDestructorList (ImageHandle, SystemTable);
其中调用了4个函数,下面分别按图索骥
- ProcessLibraryConstructorList 函数,他在
\Build\AppPkg\DEBUG_VS2008\IA32\AppPkg\Applications\ClsTest\ClsTest\DEBUG\AutoGen.c
追进去,看一下
VOID
EFIAPI
ProcessLibraryConstructorList (
IN EFI_HANDLE ImageHandle,
IN EFI_SYSTEM_TABLE *SystemTable
)
{
EFI_STATUS Status;
Status = UefiBootServicesTableLibConstructor (ImageHandle, SystemTable);
ASSERT_EFI_ERROR (Status);
Status = UefiRuntimeServicesTableLibConstructor (ImageHandle,SystemTable);
ASSERT_EFI_ERROR (Status);
Status = UefiLibConstructor (ImageHandle, SystemTable);
ASSERT_EFI_ERROR (Status);
}
1.1 追一下UefiBootServicesTableLibConstructor 发现它在\MdePkg\Library\UefiBootServicesTableLib\UefiBootServicesTableLib.c
EFI_STATUS
EFIAPI
UefiBootServicesTableLibConstructor (
IN EFI_HANDLE ImageHandle,
IN EFI_SYSTEM_TABLE *SystemTable
)
{
//
// Cache the Image Handle
//
gImageHandle = ImageHandle;  //看到这里也能明白之前文章中Extern 的gImageHandle哪里来了
ASSERT (gImageHandle != NULL);
//
// Cache pointer to the EFI System Table
//
gST = SystemTable;
ASSERT (gST != NULL);

//
// Cache pointer to the EFI Boot Services Table
//
gBS = SystemTable->BootServices;
ASSERT (gBS != NULL);

return EFI_SUCCESS;
}
1.2 再看看UefiRuntimeServicesTableLibConstructor 在 \MdePkg\Library\UefiRuntimeServicesTableLib\UefiRuntimeServicesTableLib.c
EFI_STATUS
EFIAPI
UefiRuntimeServicesTableLibConstructor (
  IN EFI_HANDLE        ImageHandle,
  IN EFI_SYSTEM_TABLE  *SystemTable
  )
{
  //
  // Cache pointer to the EFI Runtime Services Table
  //
  gRT = SystemTable->RuntimeServices;
  ASSERT (gRT != NULL);
  return EFI_SUCCESS;
}
1.3 UefiLibConstructor 在\MdePkg\Library\UefiLib\UefiLib.c
EFI_STATUS
EFIAPI
UefiLibConstructor (
  IN EFI_HANDLE        ImageHandle,
  IN EFI_SYSTEM_TABLE  *SystemTable
  )
{
  return EFI_SUCCESS;
}
2. ProcessModuleEntryPointList在
\Build\AppPkg\DEBUG_VS2008\IA32\AppPkg\Applications\ClsTest\ClsTest\DEBUG\AutoGen.c
EFI_STATUS
EFIAPI
ProcessModuleEntryPointList (
IN EFI_HANDLE ImageHandle,
IN EFI_SYSTEM_TABLE *SystemTable
)
{
return UefiMain (ImageHandle, SystemTable); //至此,马上进入到了我们写的函数中
}
3.继续追ProcessLibraryDestructorList 这里应该是收尾的一些工作了
\Build\AppPkg\DEBUG_VS2008\IA32\AppPkg\Applications\ClsTest\ClsTest\DEBUG\AutoGen.c
VOID
EFIAPI
ProcessLibraryDestructorList (
  IN EFI_HANDLE        ImageHandle,
  IN EFI_SYSTEM_TABLE  *SystemTable
  )
{

}
上面很罗嗦的说了很多,总结一下可以用下面的图表示调用过程
当然,说了很多如果没有实验不能保证正确性
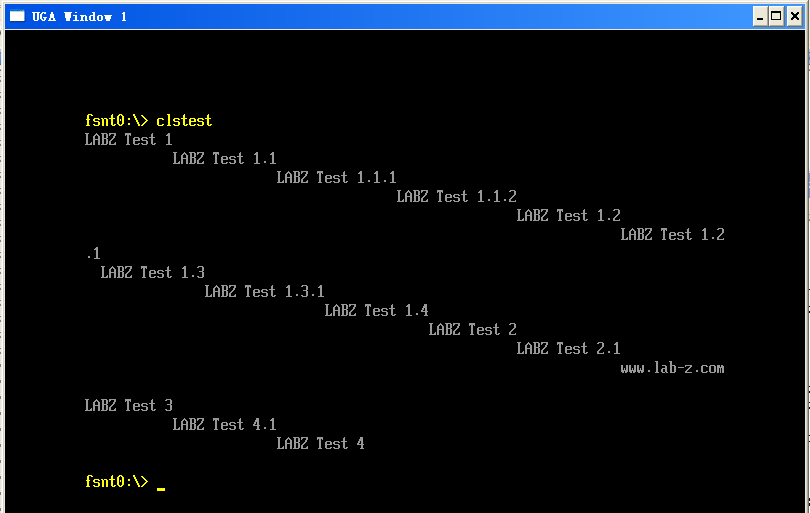
验证的办法是在上述提到的过程里面插入下面的语句
SystemTable->ConOut->OutputString(SystemTable->ConOut,L"LABZ Test X.X\n");
如果输出结果能够正常输出全部插入的,那么表示找到的点是正确的。
结果
============================================================
2024年10月9日
还可以在 UefiApplicationEntryPoint.inf文件中加入如下编译指令:
[BuildOptions]
  MSFT:*_*_X64_CC_FLAGS  = /FAsc /Od
之后,可以在对应的 Application 的 Build 目录下看到生成的 .COD 文件中出现的代码。

