Windows 下Victor86B 的数据读取

Victor 86B 是一款带有 USB接口的数字万用表,就是说用户可以从USB口来获取当前的万用表测量结果。经过实验以及结合说明书,数字部分表示如下:

比如,“1” 可以通过 Bit0/2 置1来进行表示, 因此 “1”对应 0x05 (0000 0101B)。类似的,每个数字表示如下:

            0           7D

            1           05

            2           5B 

            3           1F

            4           27

            5           3E

            6           7E  

            7           15

            8           7F

            9           3F

有了这个表格,再配合说明编写一个 C# 的Windows Console程序:

using System;
using System.Collections.Generic;
using System.ComponentModel;
using System.Data;
using System.Drawing;
using System.Linq;
using System.Text;
using System.Threading.Tasks;
using System.Windows.Forms;
using System.Management;
using System.Diagnostics;

using System.Runtime.InteropServices;

// 程序中提到的接收 (read)和发送(write)都是以电脑端为主机的
namespace serialtest
{
    public partial class Form1 : Form
    {
        public const int COM_BAUDRATE = 2400; //当前波特率
        public Form1()
        {
            InitializeComponent();
        }

        byte[] readBuffer = new byte[1024]; //接收Buffer
        private void Form1_Load(object sender, EventArgs e)
        {
            //设置可以选择的串口号
            comboBox1.Items.AddRange(System.IO.Ports.SerialPort.GetPortNames());
            comboBox1.SelectedIndex = 0;

            //输出当前的串口设备名称
            ManagementObjectSearcher searcher = new ManagementObjectSearcher("root\\CIMV2", "SELECT * FROM Win32_PnPEntity");
            foreach (ManagementObject queryObj in searcher.Get())
            {
                if (queryObj["Caption"] != null)
                    if (queryObj["Caption"].ToString().Contains("(COM"))
                    {
                        textBox1.AppendText(queryObj["Caption"].ToString() + Environment.NewLine);
                    }
            }
            searcher.Dispose();

        }

        private void button1_Click(object sender, EventArgs e)
        {
            
            if (button1.Text == "PC Receive Stop")
            {
                // 开始接收 86B 发送过来的数据
                serialPort1.BaudRate = COM_BAUDRATE;
                serialPort1.PortName = comboBox1.SelectedItem.ToString();
                // 为了接收> 127 的 ASCII 必须有下面这一句
                serialPort1.Encoding = System.Text.Encoding.GetEncoding(28591);

                // 设置收到 MAX_N 字节后触发
                serialPort1.ReceivedBytesThreshold = 28;
                serialPort1.Open();
                button1.Text = "PC Receive Start";
            }
            else {
                // 停止接收
                button1.Text = "PC Receive Start";
                serialPort1.Close();
            }
        }

        private string ByteToString(byte b1,byte b2, Boolean first) {
            byte tmp = (byte)(((byte)(b1 << 4)) + ((byte)(b2 & 0xF))&0x7F);
            //                                   0     1     2     3     4     5     6     7     8     9   L   
            byte[] HexToValue =  new byte[] { 0x7D, 0x05, 0x5B, 0x1F, 0x27, 0x3E, 0x7E, 0x15, 0x7F, 0x3F ,0x68};
            String Result = "";
            if (first) {
                if ((b1 & 0x8) != 0) {
                    Result = Result + '-';
                }
            } else {
                if ((b1 & 0x8) != 0)
                {
                    Result = Result + '.';
                }
            }
            for (int i = 0; i < 11; i++) {
                if (tmp == HexToValue[i]) {
                    if (i == 10)
                    { Result = Result + "L"; }
                    else { Result = Result + i.ToString(); }
                        break;
                }
            }
            return Result;
        }
        private void serialPort1_DataReceived(object sender, System.IO.Ports.SerialDataReceivedEventArgs e)
        {
            // 当前处于接收模式
            serialPort1.Read(readBuffer, 0, 28);
            int start;
            for (start = 0; start < 28; start++)
            {
                if ((byte)(readBuffer[start] & 0xF0) == 0x10) {
                    break;    
                }
            }
                
                // 收到的数据
                textBox2.AppendText(">>>>>>>>>>>>>>>>\r\n");
                for (int i = 0; i < 14; i++)
                {
                     textBox2.AppendText(readBuffer[i+start].ToString("X2")+ "  ");
                }
                textBox2.AppendText("\r\n");
                
                if ((readBuffer[start] & 8) != 0) {
                    textBox2.AppendText("AC");
                }
                if ((readBuffer[start] & 4) != 0)
                {
                    textBox2.AppendText("DC");
                }
                if ((readBuffer[start] & 2) != 0)
                {
                    textBox2.AppendText("AUTO");
                }
                if ((readBuffer[start] & 1) != 0)
                {
                    textBox2.AppendText("RS232\r\n");
                }

                textBox2.AppendText(
                    ByteToString(readBuffer[1+ start], readBuffer[2 + start],true)+
                    ByteToString(readBuffer[3 + start], readBuffer[4 + start],false)+
                    ByteToString(readBuffer[5 + start], readBuffer[6 + start], false) +
                    ByteToString(readBuffer[7 + start], readBuffer[8 + start], false)
                    );
                //textBox2.AppendText("\r\n");

            if ((readBuffer[9 + start] & 8) != 0) {
                textBox2.AppendText("u");
            }
            if ((readBuffer[9 + start] & 4) != 0)
            {
                textBox2.AppendText("n");
            }
            if ((readBuffer[9 + start] & 2) != 0)
            {
                textBox2.AppendText("K");
            }
            if ((readBuffer[9 + start] & 1) != 0)
            {
                textBox2.AppendText("--->|---");
            }

            if ((readBuffer[10 + start] & 8) != 0)
            {
                textBox2.AppendText("m");
            }
            if ((readBuffer[10 + start] & 4) != 0)
            {
                textBox2.AppendText("% Duty");
            }
            if ((readBuffer[10 + start] & 2) != 0)
            {
                textBox2.AppendText("M");
            }
            if ((readBuffer[10 + start] & 1) != 0)
            {
                textBox2.AppendText("BEEP");
            }

            if ((readBuffer[11 + start] & 8) != 0)
            {
                textBox2.AppendText("F");
            }
            if ((readBuffer[11 + start] & 4) != 0)
            {
                textBox2.AppendText("Ω");
            }
            if ((readBuffer[11 + start] & 2) != 0)
            {
                textBox2.AppendText("REF");
            }
            if ((readBuffer[11 + start] & 1) != 0)
            {
                textBox2.AppendText("HOLD");
            }

            if ((readBuffer[12 + start] & 8) != 0)
            {
                textBox2.AppendText("A");
            }
            if ((readBuffer[12 + start] & 4) != 0)
            {
                textBox2.AppendText("V");
            }
            if ((readBuffer[12 + start] & 2) != 0)
            {
                textBox2.AppendText("Hz");
            }
            if ((readBuffer[12 + start] & 1) != 0)
            {
                textBox2.AppendText("BAT");
            }

            if ((readBuffer[13 + start] & 4) != 0)
            {
                textBox2.AppendText("mV");
            }
            if ((readBuffer[13 + start] & 2) != 0)
            {
                textBox2.AppendText("℃");
            }
            textBox2.AppendText("\r\n");
        }

        private void Form1_FormClosed(object sender, FormClosedEventArgs e)
        {
            serialPort1.Close();
        }


    }
}

运行结果:

Step to UEFI (258)DxeIpl

 前文提到了在 PEI 阶段的末尾,通过下面的代码调用 DxeIpl 进入 DXE 中。

  //
  // Enter DxeIpl to load Dxe core.
  //
  DEBUG ((EFI_D_INFO, "DXE IPL Entry\n"));
  Status = TempPtr.DxeIpl->Entry (
                             TempPtr.DxeIpl,
                             &PrivateData.Ps,
                             PrivateData.HobList
                             );

定义在  PeiMain.c 中

PEI_CORE_TEMP_POINTERS      TempPtr;

PEI_CORE_TEMP_POINTERS 定义如下:

///
/// Union of temporarily used function pointers (to save stack space)
///
typedef union {
  PEICORE_FUNCTION_POINTER     PeiCore;
  EFI_PEIM_ENTRY_POINT2        PeimEntry;
  EFI_PEIM_NOTIFY_ENTRY_POINT  PeimNotifyEntry;
  EFI_DXE_IPL_PPI              *DxeIpl;
  EFI_PEI_PPI_DESCRIPTOR       *PpiDescriptor;
  EFI_PEI_NOTIFY_DESCRIPTOR    *NotifyDescriptor;
  VOID                         *Raw;
} PEI_CORE_TEMP_POINTERS;

EFI_DXE_IPL_PPI 定义如下:

///
/// Final service to be invoked by the PEI Foundation.
/// The DXE IPL PPI is responsible for locating and loading the DXE Foundation.
/// The DXE IPL PPI may use PEI services to locate and load the DXE Foundation.
///
struct _EFI_DXE_IPL_PPI {
  EFI_DXE_IPL_ENTRY Entry;
};

/**
  The architectural PPI that the PEI Foundation invokes when
  there are no additional PEIMs to invoke.

  This function is invoked by the PEI Foundation.
  The PEI Foundation will invoke this service when there are
  no additional PEIMs to invoke in the system.
  If this PPI does not exist, it is an error condition and
  an ill-formed firmware set. The DXE IPL PPI should never
  return after having been invoked by the PEI Foundation.
  The DXE IPL PPI can do many things internally, including the following:
    - Invoke the DXE entry point from a firmware volume
    - Invoke the recovery processing modules
    - Invoke the S3 resume modules

  @param  This           Pointer to the DXE IPL PPI instance
  @param  PeiServices    Pointer to the PEI Services Table.
  @param  HobList        Pointer to the list of Hand-Off Block (HOB) entries.

  @retval EFI_SUCCESS    Upon this return code, the PEI Foundation should enter
                         some exception handling.Under normal circumstances,
                         the DXE IPL PPI should not return.

**/
typedef
EFI_STATUS
(EFIAPI *EFI_DXE_IPL_ENTRY)(
  IN CONST EFI_DXE_IPL_PPI        *This,
  IN EFI_PEI_SERVICES             **PeiServices,
  IN EFI_PEI_HOB_POINTERS         HobList
  );

对着应\MdeModulePkg\Core\DxeIplPeim\DxeLoad.c

//
// Module Globals used in the DXE to PEI hand off
// These must be module globals, so the stack can be switched
//
CONST EFI_DXE_IPL_PPI mDxeIplPpi = {
  DxeLoadCore
};

可以用加 DEBUG Message 的方法确定,前面的TempPtr.DxeIpl->Entry() 调用,执行的是\mdemodulepkg\core\dxeiplpeim\DxeLoad.c中的

/**
   Main entry point to last PEIM.

   This function finds DXE Core in the firmware volume and transfer the control to
   DXE core.

   @param This          Entry point for DXE IPL PPI.
   @param PeiServices   General purpose services available to every PEIM.
   @param HobList       Address to the Pei HOB list.

   @return EFI_SUCCESS              DXE core was successfully loaded.
   @return EFI_OUT_OF_RESOURCES     There are not enough resources to load DXE core.

**/
EFI_STATUS
EFIAPI
DxeLoadCore (
  IN CONST EFI_DXE_IPL_PPI *This,
  IN EFI_PEI_SERVICES      **PeiServices,
  IN EFI_PEI_HOB_POINTERS  HobList
  )

其中通过 gEfiPeiLoadFilePpiGuid 加载 DXE Core

Loading PEIM D6A2CB7F-6A18-4E2F-B43B-9920A733700A
Loading PEIM at 0x00007EA3000 EntryPoint=0x00007EA3D78 DxeCore.efi
  DEBUG ((DEBUG_INFO | DEBUG_LOAD, "Loading DXE CORE at 0x%11p EntryPoint=0x%11p\n", (VOID *)(UINTN)DxeCoreAddress, FUNCTION_ENTRY_POINT (DxeCoreEntryPoint)));

Loading DXE CORE at 0x00007EA3000 EntryPoint=0x00007EA3D78

最后,使用下面的代码跳入 DxeCore:

  //
  // Transfer control to the DXE Core
  // The hand off state is simply a pointer to the HOB list
  //
  HandOffToDxeCore (DxeCoreEntryPoint, HobList);

跳转之后首先进入一个DxeCoreEntryPoint  模块,代码在 \MdePkg\Library\DxeCoreEntryPoint

/**
  The entry point of PE/COFF Image for the DXE Core.

  This function is the entry point for the DXE Core. This function is required to call
  ProcessModuleEntryPointList() and ProcessModuleEntryPointList() is never expected to return.
  The DXE Core is responsible for calling ProcessLibraryConstructorList() as soon as the EFI
  System Table and the image handle for the DXE Core itself have been established.
  If ProcessModuleEntryPointList() returns, then ASSERT() and halt the system.

  @param  HobStart  The pointer to the beginning of the HOB List passed in from the PEI Phase.

**/
VOID
EFIAPI
_ModuleEntryPoint (
  IN VOID  *HobStart
  )

在这个函数中通过下面的函数转入 DXE Core:

  //
  // Call the DXE Core entry point
  //
  ProcessModuleEntryPointList (HobStart);

特别之处在于对应的ProcessModuleEntryPointList 位于\Build\OvmfX64\DEBUG_VS2015x86\X64\MdeModulePkg\Core\Dxe\DxeMain\DEBUG\AutoGen.c

VOID
EFIAPI
ProcessModuleEntryPointList (
  IN VOID  *HobStart
  )
{
  DxeMain (HobStart);
}

这个文件是编译期自动生成的,无法直接插入 DEBUG 来输出(编译时会被覆盖)。起初我以为是BIOS代码指定了上述的内容,但是在代码中无法搜索到类似的字样,后来经过研究这是 Basetools 里面代码生成的。在\BaseTools\Source\Python\AutoGen\GenC.py有如下定义:

gDxeCoreEntryPointString = TemplateString("""
${BEGIN}
VOID
EFIAPI
ProcessModuleEntryPointList (
  IN VOID  *HobStart
  )

{
  ${Function} (HobStart);
}
${END}
""")

如果我们在  ${Function} (HobStart); 前面加入一行注释,那么对应的Auto Gen.c 会变成如下:

EFIAPI
ProcessModuleEntryPointList (
  IN VOID  *HobStart
  )

{
  // www.lab-z.com
  DxeMain (HobStart);
}

调用的代码在 \mdemodulepkg\core\dxe\dxemain\DxeMain.c

// Main entry point to the DXE Core
//

/**
  Main entry point to DXE Core.

  @param  HobStart               Pointer to the beginning of the HOB List from PEI.

  @return This function should never return.

**/
VOID
EFIAPI
DxeMain (
  IN  VOID *HobStart
  )

从这里也可以看出:EDK2 编译过程中有BaseTools中的工具参与了编译过程,如果你在纯代码部分无法找到对应的内容,不妨考虑一下编译工具中。

最后,讲个好玩的事情:

肯·汤普森还有一个备受争议的行为,就是在UNIX里留后门。是的,这哥们竟然在代码里下毒。

最开始的时候,UNIX系统在贝尔实验室是供大家免费使用的。有人发现,肯·汤普森总能进入每个人的账户,于是一位同事就分析UNIX代码,重新编译了系统。

令人意想不到的是,肯·汤普森还是能进入他们的账户,贝尔实验室的科学家们却对此束手无策。

直到1983年,肯·汤普森在他的图灵奖获奖感言里揭示了这一秘密,原来,让他轻松“侵入”各位同事账户的秘诀不在UNIX代码,而在编译UNIX代码的C编译器里,而肯·汤普森正是编译器的开发者。

https://www.sohu.com/a/469445120_121124377

CH343 ESP32 串口模块

本文首发 https://mc.dfrobot.com.cn/thread-312276-1-1.html

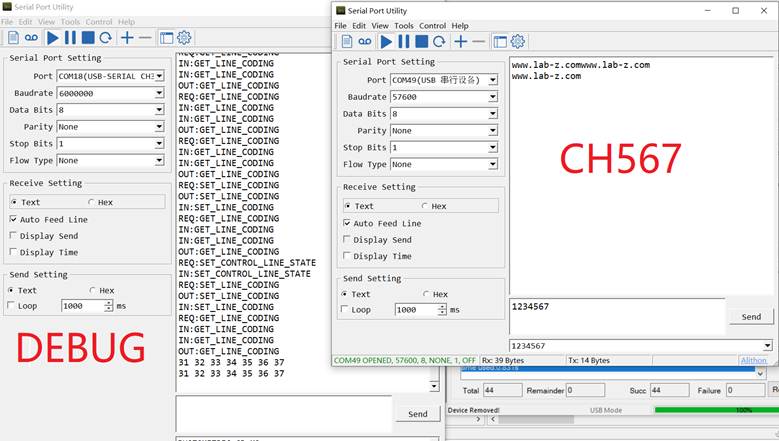
前面介绍了ESP32 S2 的半针测试板,这里介绍一下配合这个半针测试板的烧写板。

这个烧写板有如下特点:

1.ESP32 自动下载无需按键;

2.板子上提供了下载按钮;

3.串口最高支持 6M 波特率;

设计电路图如下:

电路图

选择SOP16封装的 CH343,这样焊接非常简单。此外,上面中间的电路用于实现自动下载功能,会拉ESP32的EN_AUTO和IO0 Pin。右侧从上到下分别是:数据接口,供电接口和5V 转3.3V电路。

PCB

设计上预留了2个跳线,下图红框位置。短接的时候 Power Pin(桔色框)中会有对应的电压。这样的设计是因为 ESP32 使用 3.3V,但是如果需要支持 USB ,那么还需要5V电源。

渲染图

有了这样的卡,在你的ESP32 S2 设计上只要预留上图中右上方的引脚即可(特别注意TX RX 需要交叉)。

完整的工程下载:

ESP32 S3 实现蓝牙键盘功能

之前使用 ESP32 S2 实现过蓝牙键盘的功能,使用的是 https://github.com/T-vK/ESP32-BLE-Keyboard 提供的 ESP32 BLE Keyboard库。前几天在 Arduino 中实验针对 S3 的编译,这个库能够通过编译,但是运行之后会有不断重启的问题。经过搜索在 https://github.com/T-vK/ESP32-BLE-Keyboard/issues/152 找到了解决方法;

BLESecurity* pSecurity = new BLESecurity();
pSecurity->setAuthenticationMode(ESP_LE_AUTH_REQ_SC_MITM_BOND);
 
to
 
BLESecurity *pSecurity = new BLESecurity();
pSecurity->setAuthenticationMode(ESP_LE_AUTH_BOND);

修改之后确实能够解决问题。估计一段时间之后这个修改会 Check in 到代码中吧。

ESP32-BLE-Keyboard

Step to UEFI (257)DxeIpl S3Resume2Pei PEI 的终结

Loading PEIM 86D70125-BAA3-4296-A62F-602BEBBB9081
Loading PEIM at 0x00007ECF000 EntryPoint=0x00007ECF5A8 DxeIpl.efi
Install PPI: 1A36E4E7-FAB6-476A-8E75-695A0576FDD7
Install PPI: 0AE8CE5D-E448-4437-A8D7-EBF5F194F731

代码在\MdeModulePkg\Core\DxeIplPeim 中,模块入口是如下函数:

/**
  Entry point of DXE IPL PEIM.

  This function installs DXE IPL PPI.  It also reloads
  itself to memory on non-S3 resume boot path.

  @param  FileHandle  Handle of the file being invoked.
  @param  PeiServices Describes the list of possible PEI Services.

  @retval EFI_SUCESS  The entry point of DXE IPL PEIM executes successfully.
  @retval Others      Some error occurs during the execution of this function.

**/
EFI_STATUS
EFIAPI
PeimInitializeDxeIpl (
  IN       EFI_PEI_FILE_HANDLE  FileHandle,
  IN CONST EFI_PEI_SERVICES     **PeiServices
  )

1A36E4E7-FAB6-476A-8E75-695A0576FDD7 是 EFI_PEI_DECOMPRESS_PPI_GUID

0AE8CE5D-E448-4437-A8D7-EBF5F194F731 是EFI_DXE_IPL_PPI_GUID

Loading PEIM 89E549B0-7CFE-449D-9BA3-10D8B2312D71
Loading PEIM at 0x00007ECA000 EntryPoint=0x00007ECA5C8 S3Resume2Pei.efi
Install PPI: 6D582DBC-DB85-4514-8FCC-5ADF6227B147

代码在 \ueficpupkg\universal\acpi\s3resume2pei\中

/**
  Main entry for S3 Resume PEIM.

  This routine is to install EFI_PEI_S3_RESUME2_PPI.

  @param  FileHandle              Handle of the file being invoked.
  @param  PeiServices             Pointer to PEI Services table.

  @retval EFI_SUCCESS S3Resume Ppi is installed successfully.

**/
EFI_STATUS
EFIAPI
PeimS3ResumeEntryPoint (
  IN EFI_PEI_FILE_HANDLE       FileHandle,
  IN CONST EFI_PEI_SERVICES    **PeiServices
  )

动作是安装 EFI_PEI_S3_RESUME2_PPI_GUID  6D582DBC-DB85-4514-8FCC-5ADF6227B147 这个 PPI

当全部的 PEIM 都加载之后, \mdemodulepkg\core\pei\dispatcher\Dispatcher.c 会执行下面的代码,在第二个FV 中扫描查找 PEIM:

      if (Private->CurrentPeimCount == 0) {
        //
        // When going through each FV, at first, search Apriori file to
        // reorder all PEIMs to ensure the PEIMs in Apriori file to get
        // dispatch at first.
        //
        DiscoverPeimsAndOrderWithApriori (Private, CoreFvHandle);
      }

查找没有找到,输入如下:

DiscoverPeimsAndOrderWithApriori(): Found 0x0 PEI FFS files in the 1th FV

\mdemodulepkg\core\pei\peimain\PeiMain.c 中如下代码执行完毕,至此PEI 阶段就结束了。

  //
  // Call PEIM dispatcher
  //
  PeiDispatcher (SecCoreData, &amp;PrivateData);

接下来查找 IPL PPI

  //
  // Lookup DXE IPL PPI
  //
  Status = PeiServicesLocatePpi (
             &gEfiDxeIplPpiGuid,
             0,
             NULL,
             (VOID **)&TempPtr.DxeIpl
             );
  ASSERT_EFI_ERROR (Status);

通过这个 PPI 进入 DXE 阶段:

  //
  // Enter DxeIpl to load Dxe core.
  //
  DEBUG ((EFI_D_INFO, "DXE IPL Entry\n"));
  Status = TempPtr.DxeIpl->Entry (
                             TempPtr.DxeIpl,
                             &amp;PrivateData.Ps,
                             PrivateData.HobList
                             );

至此开始了新的阶段。

做一个 ESP32 S2 模块测试板子

本文首发在 DFRobot 论坛:https://mc.dfrobot.com.cn/thread-312276-1-1.html

在这个世界上有很多潜规则,比如:一般情况下焊接后的芯片是不给退换的,这样就出现了下面这种无解的循环:

值得庆幸的是:ESP32 通常以模组形式出货,模组是带有邮票孔的。这样我们可以设计一个测试板。就是说能够在焊接之前,荣国这个测试板上验证你手上的 ESP32 S2 能否正常工作。

设计的关键在于使用了“邮票孔测试针半孔烧录探针C款”,在淘宝【参考1】这个店铺:

卖家直接提供了这款测试针的立创EDA库文件,有兴趣的朋友可以直接搜索 BKZ-C035-LABZ, 这是我从卖家库上修改得到的:

库下载:

使用这个元件,给 ESP32-S2设计了一个库,可以在立创EDA中搜索“ESP32-S2-WROVER-半针测试”得到:

使用上面的库设计完整的测试板:

左侧是ESP32-S2 接口,右侧上方是一个 USB母头用于测试 ESP32-S2的USB功能,然后右侧中间是5V 转 3.3V 的电路。使用时,可以从USB母头或者Power 接口输入5V 电压。

接下来是2个接口,一个用于通讯,另外一个用于供电。上面的 H1 是通讯接口,其中有串口还有用于自动让ESP32 进入 BootLoader Mode的IO0和EN_AUTO 引脚。供电接口POWER可以提供5V或者3.3V(建议两者不要同时出现)。

下图就是拿到手后焊接结果,只焊接了必要的电容和电阻,使用外部供电3.3V.

半针测试针,在阳光下看起来挺漂亮

安装ESP32-S2 模组,这样的测试针让拆装都很方便。

在 Arduino 下测试可以正常烧写代码:

本文提到的完整的项目下载

参考:

1. https://item.taobao.com/item.htm?spm=a1z09.2.0.0.c3df2e8dNDygE7&id=652903337616&_u=pkf8s9a3d3

Step to UEFI (256)运行两次的 PEIM

在查看 Log 的时候,发现一个有趣的地方:

DiscoverPeimsAndOrderWithApriori(): Found 0x7 PEI FFS files in the 0th FV
Loading PEIM 9B3ADA4F-AE56-4C24-8DEA-F03B7558AE50
Loading PEIM at 0x0000083A7A0 EntryPoint=0x0000083AC68 PcdPeim.efi
Install PPI: 06E81C58-4AD7-44BC-8390-F10265F72480
Install PPI: 01F34D25-4DE2-23AD-3FF3-36353FF323F1
Install PPI: 4D8B155B-C059-4C8F-8926-06FD4331DB8A
………………….
Notify: PPI Guid: EE16160A-E8BE-47A6-820A-C6900DB0250A, Peim notify entry point: 847814
PlatformPei: ClearCacheOnMpServicesAvailable
Loading PEIM 9B3ADA4F-AE56-4C24-8DEA-F03B7558AE50
Loading PEIM at 0x00007ED8000 EntryPoint=0x00007ED84C8 PcdPeim.efi
Reinstall PPI: 06E81C58-4AD7-44BC-8390-F10265F72480
Reinstall PPI: 4D8B155B-C059-4C8F-8926-06FD4331DB8A
Reinstall PPI: 01F34D25-4DE2-23AD-3FF3-36353FF323F1
Reinstall PPI: A60C6B59-E459-425D-9C69-0BCC9CB27D81

就是说在 PEI 阶段,PcdPeim.efi 运行了两次。本着探究的精神着手研究原因。

首先研究了一下 PeiCore 的部分,唯一可以确定的是:第二次运行是在内存Ready 后的PeiDispatcher() 函数中:

         if (Status == EFI_SUCCESS) {
            //
            // PEIM_STATE_REGISTER_FOR_SHADOW move to PEIM_STATE_DONE
            //
            Private->Fv[Index1].PeimState[Index2]++;
            //
            // Call the PEIM entry point
            //
            PeimEntryPoint = (EFI_PEIM_ENTRY_POINT2)(UINTN)EntryPoint;
			
            PERF_START_IMAGE_BEGIN (PeimFileHandle);
            PeimEntryPoint(PeimFileHandle, (const EFI_PEI_SERVICES **) &amp;Private->Ps);
            PERF_START_IMAGE_END (PeimFileHandle);
          }

于是目光转到 PcdPei 本身,在\MdeModulePkg\Universal\PCD\Pei\Pcd.c 文件中PcdPeimInit() 函数里面可以看到,运行之后调用了 PeiServicesRegisterForShadow() 函数:

EFI_STATUS
EFIAPI
PcdPeimInit (
  IN       EFI_PEI_FILE_HANDLE  FileHandle,
  IN CONST EFI_PEI_SERVICES     **PeiServices
  )
{
  EFI_STATUS Status;
  Status = PeiServicesRegisterForShadow (FileHandle);
  if (Status == EFI_ALREADY_STARTED) {
    //
    // This is now starting in memory, the second time starting.
    //
    EFI_PEI_PPI_DESCRIPTOR *OldPpiList;
    EFI_PEI_PPI_DESCRIPTOR *OldPpiList2;
    VOID *Ppi;
    VOID *Ppi2;

猜测第二次运行就是因为这个函数的缘故,修改之前的TestPei 加入PeiServicesRegisterForShadow() 函数:

EFI_STATUS
EFIAPI
InitializeTestPei (
  IN       EFI_PEI_FILE_HANDLE  FileHandle,
  IN CONST EFI_PEI_SERVICES     **PeiServices
  )
{
  EFI_STATUS Status;
  
  DEBUG ((DEBUG_INFO, "LABZ Test PEIM\n"));

  Status = PeiServicesRegisterForShadow (FileHandle);
  if (Status == EFI_ALREADY_STARTED) {
          DEBUG ((DEBUG_INFO, "LABZ Test RUN AGAIN\n"));
  }
  return EFI_SUCCESS;
}

运行之后查看 Log:

iscoverPeimsAndOrderWithApriori(): Found 0x8 PEI FFS files in the 0th FV
Loading PEIM 122C386D-5ABC-4FB4-B124-FBB82488ACF4
Loading PEIM at 0x0000085A920 EntryPoint=0x0000085ADA8 TestPei.efi
LABZ Test PEIM
Loading PEIM 9B3ADA4F-AE56-4C24-8DEA-F03B7558AE50
Loading PEIM at 0x0000083A8A0 EntryPoint=0x0000083AD68 PcdPeim.efi
Install PPI: 06E81C58-4AD7-44BC-8390-F10265F72480
Install PPI: 01F34D25-4DE2-23AD-3FF3-36353FF323F1
……………………
Notify: PPI Guid: EE16160A-E8BE-47A6-820A-C6900DB0250A, Peim notify entry point: 847914
PlatformPei: ClearCacheOnMpServicesAvailable
Loading PEIM 122C386D-5ABC-4FB4-B124-FBB82488ACF4
Loading PEIM at 0x00007EDB000 EntryPoint=0x00007EDB488 TestPei.efi
LABZ Test PEIM
LABZ Test RUN AGAIN
Loading PEIM 9B3ADA4F-AE56-4C24-8DEA-F03B7558AE50
Loading PEIM at 0x00007ED5000 EntryPoint=0x00007ED54C8 PcdPeim.efi
Reinstall PPI: 06E81C58-4AD7-44BC-8390-F10265F72480
Reinstall PPI: 4D8B155B-C059-4C8F-8926-06FD4331DB8A
Reinstall PPI: 01F34D25-4DE2-23AD-3FF3-36353FF323F1

可以看到 TestPei 运行了2次。

在\mdepkg\library\peiserviceslib\PeiServicesLib.c可以看到 PeiServicesRegisterForShadow() 函数定义:

/**
  This service is a wrapper for the PEI Service RegisterForShadow(), except the
  pointer to the PEI Services Table has been removed.  See the Platform
  Initialization Pre-EFI Initialization Core Interface Specification for details.

  @param FileHandle             PEIM's file handle. Must be the currently
                                executing PEIM.

  @retval EFI_SUCCESS           The PEIM was successfully registered for
                                shadowing.

  @retval EFI_ALREADY_STARTED   The PEIM was previously
                                registered for shadowing.

  @retval EFI_NOT_FOUND         The FileHandle does not refer to a
                                valid file handle.
**/
EFI_STATUS
EFIAPI
PeiServicesRegisterForShadow (
  IN  EFI_PEI_FILE_HANDLE FileHandle
  )
{
  return (*GetPeiServicesTablePointer())->RegisterForShadow (FileHandle);
}

本质上是使用 EFI_PEI_SERVICE 中的RegisterForShadow来实现的,这个函数的作用是注册一个 PEIM, 当内存 Ready时会再次执行。

【参考1】

参考:

1. https://uefi.org/sites/default/files/resources/PI_Spec_1_7_A_final_May1.pdf Platform Initialization Specification, Vol. 1

Windows 11 无网络安装方法

Windows 11 的一些版本默认安装时需要联网登录微软账户,但是大多数测试机不会直接接入互联网,要求联网的要求对于我们的测试造成了极大的不便。这里介绍一下跳过要求联网的方法,有需要的朋友可以尝试本文方法。

1.安装到要求联网的位置,此时会提示当前没有网络

2.使用 shift+F10打开CMD窗口,输入 OOBE\BYPASSNRO, 输入之后会自动重启

3.再次进入之前要求联网的界面会出现 “I don’t have internet”选项,选中这个选项之后就可以继续安装了

4.最后安装成功的界面

Windows 11 内部版本号 25131.1000

Windows 11 22H2下无法运行 RW的解决方法

感谢Tim网友在评论中指出解决 RW_Everyhing 在 Windows 11 22H2 无法运行的方法,正好最近有空于是在虚拟机上研究了一下(顺便说一下,Windows 11 最低系统要求是 4G RAM, 64GB 硬盘, 2 Core CPU,只有按照上述设置才能在虚拟机中跑起来)。

首先安装 22H2 (25131)的 Windows 11,然后确定能够看到现象:

RW_Everything 错误提示
RW_Everything 错误提示

接下来关闭 Core Isolation (直接在搜索中输入 “Core” 字样就会自动跳出来)中的 Microsoft Vulnerable Driver Blocklist:

Core Isolation -> Microsoft Vulnerable Driver Blocklist

然后需要重启一次,就能够启动 Rw_Everything了。

22H2 RW_Everything 工作正常

一些特殊情况无法进行上述的设置还可以更换另外一款类似软件: HE (Hardware Read&Write作者Faintsnow,下载网站 http://hwrwdrv.phpnet.us/?i=1)

=========================================================

2022年7月28日

针对这个问题我咨询了一下我的朋友天杀,他丢给我一个微软的链接:

https://docs.microsoft.com/en-us/windows/security/threat-protection/windows-defender-application-control/microsoft-recommended-driver-block-rules

简单的说,在新版的 Windows 中,微软添加了一个“黑名单”,进入这个名单的 Driver 都会被阻止。这也是为什么很多人发现:之前用的好好的版本忽然之间 RW 无法打开,这是因为 Windows 推送了这个更新,更新之后“黑名单”生效所以之前可以但是现在不行了。

    <FileAttrib ID=”ID_FILEATTRIB_RTKIOW10X64_DRIVER” FriendlyName=”” FileName=”rtkiow10x64.sys” MinimumFileVersion=”65535.65535.65535.65535″ />

    <FileAttrib ID=”ID_FILEATTRIB_RWDRV_DRIVER” FriendlyName=”” FileName=”RwDrv.sys” MinimumFileVersion=”65535.65535.65535.65535″ />

      <FileAttrib ID=”ID_FILEATTRIB_SANDBOX_1″ FriendlyName=”Agnitum sandbox FileAttribute” FileName=”sandbox.sys” MinimumFileVersion=”0.0.0.0″ MaximumFileVersion=”65535.65535.65535.65535″ />

理论上只要对 RW_Everything 的驱动重新签名即可,但是这个意味着如果有一天微软再将新驱动封杀很可能也会影响你的签名本身(用这个签名签发的所有驱动都无法运行)。

目前解决方法:

1.下载这个去除签名版本的 rw 驱动;

RwDrv下载

2.将上述文件放到 windows\system32\driver 目录下

3.管理员权限运行 cmd, 打开 bcdedit /set testsigning on (进入 TestSigning Mode 之后屏幕右下角会有显示)

4.重启之后即可启动 RW_Everyting

5.只要不 disable TestSigning Mode,就可以一直使用 RW_Everything

6.关闭 TestSigning 的方法是: bcdedit /set testsigning off

========================================================

2022年8月10日 更新

一位匿名网友的建议可以通过修改注册表达到让 RW 工作的目标:

Windows Registry Editor Version 5.00

[HKEY_LOCAL_MACHINE\SYSTEM\CurrentControlSet\Control\CI\Config]
“VulnerableDriverBlocklistEnable”=dword:00000000

经过测试这个方法可行,这里表示感谢!

Step to UEFI (255)PlatformPei之后

当BIOS执行完 PlatformPei.efi 之后,不会和其他PeiM 一样继续执行而是要进行一些特别的处理。

在\MdeModulePkg\Core\Pei\Dispatcher\Dispatcher.c 文件 PeiDispatcher函数中会 invoke 每一个PEIM。

/**
  Conduct PEIM dispatch.

  @param SecCoreData     Points to a data structure containing information about the PEI core's operating
                         environment, such as the size and location of temporary RAM, the stack location and
                         the BFV location.
  @param Private         Pointer to the private data passed in from caller

**/
VOID
PeiDispatcher (
  IN CONST EFI_SEC_PEI_HAND_OFF  *SecCoreData,
  IN PEI_CORE_INSTANCE           *Private
  )

这里会调用每个 PEIM 的 EntryPoint, 有兴趣的朋友可以在此加入 Debug Message.

                  //
                  // Call the PEIM entry point for PEIM driver
                  //
                  PeimEntryPoint = (EFI_PEIM_ENTRY_POINT2)(UINTN)EntryPoint;
                  PeimEntryPoint (PeimFileHandle, (const EFI_PEI_SERVICES **) PeiServices);
                  Private->PeimDispatchOnThisPass = TRUE;

特别提一句,在\mdemodulepkg\core\pei\dispatcher\Dispatcher.c这个文件中,大多数 DEBUG message是通过下面的方式输出的:

DEBUG ((DEBUG_DISPATCH, "Evaluate PEI DEPEX for FFS(Unknown)\n"));

但是如果你也用这种方式,会发现无法在Log 文件中看到消息的。这是因为在\OvmfPkg\OvmfPkgX64.dsc 中定义如下:

  # DEBUG_INIT      0x00000001  // Initialization
  # DEBUG_WARN      0x00000002  // Warnings
  # DEBUG_LOAD      0x00000004  // Load events
  # DEBUG_FS        0x00000008  // EFI File system
  # DEBUG_POOL      0x00000010  // Alloc &amp; Free (pool)
  # DEBUG_PAGE      0x00000020  // Alloc &amp; Free (page)
  # DEBUG_INFO      0x00000040  // Informational debug messages
  # DEBUG_DISPATCH  0x00000080  // PEI/DXE/SMM Dispatchers
  # DEBUG_VARIABLE  0x00000100  // Variable
  # DEBUG_BM        0x00000400  // Boot Manager
  # DEBUG_BLKIO     0x00001000  // BlkIo Driver
  # DEBUG_NET       0x00004000  // SNP Driver
  # DEBUG_UNDI      0x00010000  // UNDI Driver
  # DEBUG_LOADFILE  0x00020000  // LoadFile
  # DEBUG_EVENT     0x00080000  // Event messages
  # DEBUG_GCD       0x00100000  // Global Coherency Database changes
  # DEBUG_CACHE     0x00200000  // Memory range cachability changes
  # DEBUG_VERBOSE   0x00400000  // Detailed debug messages that may
  #                             // significantly impact boot performance
  # DEBUG_ERROR     0x80000000  // Error
gEfiMdePkgTokenSpaceGuid.PcdDebugPrintErrorLevel|0x8000004F

默认是没有DEBUG_DISPATCH  的,所以要么将 PcdDebugPrintErrorLevel 设置为0x800000CF,要么在 DEBUG 宏中使用DEBUG_INFO参数。

从PlatformPei.efi出来之后,因为内存初始化已完成,进入下面的函数之后 PeiCheckAndSwitchStack (SecCoreData, Private);会检查

Private->SwitchStackSignal是否已经Enable。 具体的是在\mdemodulepkg\core\pei\memory\MemoryServices.c 代码中设置起来的。

/**

  This function registers the found memory configuration with the PEI Foundation.

  The usage model is that the PEIM that discovers the permanent memory shall invoke this service.
  This routine will hold discoveried memory information into PeiCore's private data,
  and set SwitchStackSignal flag. After PEIM who discovery memory is dispatched,
  PeiDispatcher will migrate temporary memory to permanent memory.

  @param PeiServices        An indirect pointer to the EFI_PEI_SERVICES table published by the PEI Foundation.
  @param MemoryBegin        Start of memory address.
  @param MemoryLength       Length of memory.

  @return EFI_SUCCESS Always success.

**/
EFI_STATUS
EFIAPI
PeiInstallPeiMemory (
  IN CONST EFI_PEI_SERVICES  **PeiServices,
  IN EFI_PHYSICAL_ADDRESS    MemoryBegin,
  IN UINT64                  MemoryLength
  )

一句话:当BIOS执行完 PlatformPei.efi 之后内存可用。

Temp Stack : BaseAddress=0x818000 Length=0x8000
Temp Heap  : BaseAddress=0x810000 Length=0x8000
Total temporary memory:    65536 bytes.
  temporary memory stack ever used:       29192 bytes.
  temporary memory heap used for HobList: 6608 bytes.
  temporary memory heap occupied by memory pages: 0 bytes.
Memory Allocation 0x0000000A 0x7F78000 - 0x7FFFFFF
Memory Allocation 0x0000000A 0x810000 - 0x81FFFF
Memory Allocation 0x0000000A 0x807000 - 0x807FFF
Memory Allocation 0x0000000A 0x800000 - 0x805FFF
Memory Allocation 0x0000000A 0x806000 - 0x806FFF
Memory Allocation 0x00000006 0x7EF4000 - 0x7F77FFF
Memory Allocation 0x0000000A 0x820000 - 0x8FFFFF
Memory Allocation 0x00000004 0x900000 - 0x14FFFFF
Old Stack size 32768, New stack size 131072
Stack Hob: BaseAddress=0x3F36000 Length=0x20000
Heap Offset = 0x3746000 Stack Offset = 0x3736000
TemporaryRamMigration(0x810000, 0x3F4E000, 0x10000)

在运行PeiCheckAndSwitchStack() 函数的过程中输出上述Log。之后,再次跳入 PeiCore 进行执行,此时内存已经 Ready。

      //
      // Entry PEI Phase 2
      //
      PeiCore (SecCoreData, NULL, Private);

我们能够看到的Log 如下:

Loading PEIM 52C05B14-0B98-496C-BC3B-04B50211D680
Loading PEIM at 0x00007EE7000 EntryPoint=0x00007EE7538 PeiCore.efi
Reinstall PPI: 8C8CE578-8A3D-4F1C-9935-896185C32DD3
Reinstall PPI: 5473C07A-3DCB-4DCA-BD6F-1E9689E7349A
Reinstall PPI: B9E0ABFE-5979-4914-977F-6DEE78C278A6
Install PPI: F894643D-C449-42D1-8EA8-85BDD8C65BDE
Loading PEIM 9B3ADA4F-AE56-4C24-8DEA-F03B7558AE50
Loading PEIM at 0x00007EE1000 EntryPoint=0x00007EE14C8 PcdPeim.efi
Reinstall PPI: 06E81C58-4AD7-44BC-8390-F10265F72480
Reinstall PPI: 4D8B155B-C059-4C8F-8926-06FD4331DB8A
Reinstall PPI: 01F34D25-4DE2-23AD-3FF3-36353FF323F1
Reinstall PPI: A60C6B59-E459-425D-9C69-0BCC9CB27D81

就是说再次进入 Peicore 之后重新执行了 PcdPeim.efi。