自由自在的在空中飞翔一直是人类梦想和追求的目标。在飞机发明之前,人类能够通过热气球氢气球的方式实现滞空飞行,1903年12月17日莱特兄弟实验成功的“飞行者一号”是完全受控、依靠自身动力、机身比空气重、持续滞空不落地的飞行器。因此,莱特兄弟也是世界公认的飞机发明者。他们能够成功的一个重要原因是他们实验的方法和之前的先驱相比,更加安全和高效。莱特兄弟于1900年建造了一个风洞,截面40.6厘米×40.6厘米,长1.8米,气流速度40~56.3千米/小时。1901年莱特兄弟又建造了风速12米/秒的风洞,为他们的飞机进行有关的实验测试。【来自百度百科】
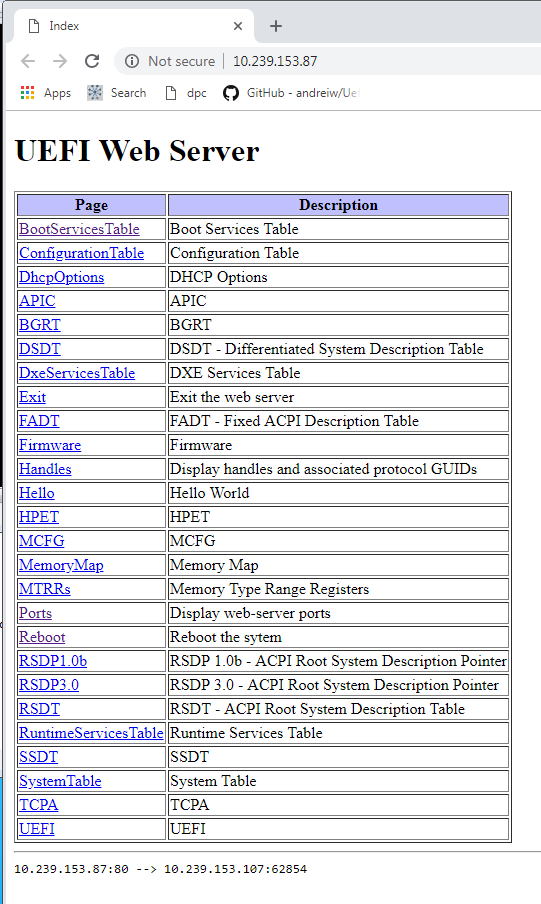
对于我们来说,EDK2 自带的 NT32 模拟环境也是一个便于实验的风洞。在没有实体机的情况下,它提供更加简单便捷的测试方法。
前面提到了可以通过在 Application 中直接 Include 另外一个 EFI Application ,然后通过 StartImage 执行之。剩下的问题就是为什么当我们使用UnloadImage 的时候会出现 Error。
首先,要找到出现这个错误的位置。根据我们之前的经验,在\MdeModulePkg\Core\Dxe\DxeMain\DxeMain.c 有定义LoadImage StartImage 和 UnloadImage
//
// DXE Core Module Variables
//
EFI_BOOT_SERVICES mBootServices = {
  {
    EFI_BOOT_SERVICES_SIGNATURE,                                                          // Signature
    EFI_BOOT_SERVICES_REVISION,                                                           // Revision
    sizeof (EFI_BOOT_SERVICES),                                                           // HeaderSize
    0,                                                                                    // CRC32
    0                                                                                     // Reserved
  },
……………………
  (EFI_IMAGE_LOAD)      CoreLoadImage,                            // LoadImage
  (EFI_IMAGE_START)     CoreStartImage,                           // StartImage
  (EFI_IMAGE_UNLOAD)    CoreUnloadImage,                          // UnloadImage
……………………
当我们调用 gBS->UnloadImage 的时候,实际上是由CoreUnloadImage来完成的。对应的代码在\MdeModulePkg\Core\Dxe\Image\Image.c 中。
/**
  Unloads an image.

  @param  ImageHandle             Handle that identifies the image to be
                                  unloaded.

  @retval EFI_SUCCESS             The image has been unloaded.
  @retval EFI_UNSUPPORTED         The image has been started, and does not support
                                  unload.
  @retval EFI_INVALID_PARAMPETER  ImageHandle is not a valid image handle.

**/
EFI_STATUS
EFIAPI
CoreUnloadImage (
  IN EFI_HANDLE  ImageHandle
  )
{
  EFI_STATUS                 Status;
  LOADED_IMAGE_PRIVATE_DATA  *Image;

  Image = CoreLoadedImageInfo (ImageHandle);
  if (Image == NULL ) {
    //
    // The image handle is not valid
    //
    Status = EFI_INVALID_PARAMETER;
    goto Done;
  }
通过前面介绍的插入 DEBUG 输出 Message 的方法,可以看到最终的错误是CoreLoadedImageInfo (ImageHandle); 调用返回的错误找到的,在同样的文件中还可以找到CoreLoadedImageInfo 的定义:
/**
  Get the image's private data from its handle.

  @param  ImageHandle             The image handle

  @return Return the image private data associated with ImageHandle.

**/
LOADED_IMAGE_PRIVATE_DATA *
CoreLoadedImageInfo (
  IN EFI_HANDLE  ImageHandle
  )
{
  EFI_STATUS                 Status;
  EFI_LOADED_IMAGE_PROTOCOL  *LoadedImage;
  LOADED_IMAGE_PRIVATE_DATA  *Image;

  Status = CoreHandleProtocol (
             ImageHandle,
             &gEfiLoadedImageProtocolGuid,
             (VOID **)&LoadedImage
             );
  if (!EFI_ERROR (Status)) {
    Image = LOADED_IMAGE_PRIVATE_DATA_FROM_THIS (LoadedImage);
  } else {
    DEBUG ((DEBUG_LOAD, "CoreLoadedImageInfo: Not an ImageHandle %p\n", ImageHandle));
    Image = NULL;
  }

  return Image;
}
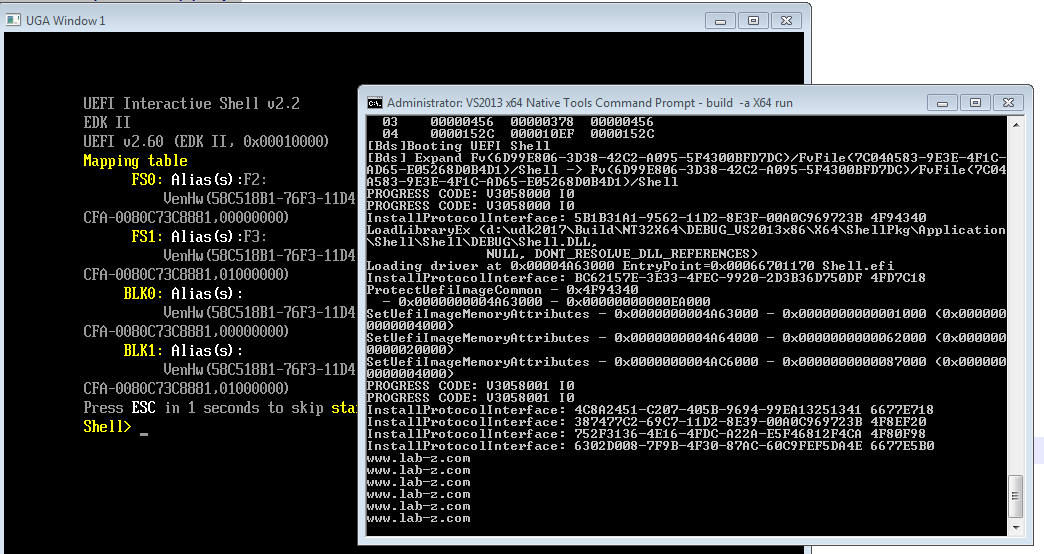
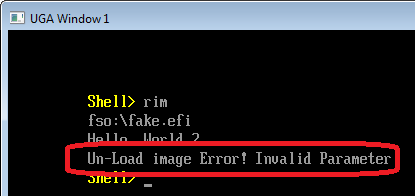
下面的错误是NT32 模拟环境输出的 Debug 信息,Hello2.efi 的 Handle 是 4BFE318:

从上面的信息可以确定错误发生在 CoreHandleProtocol 函数的调用过程中。此时正在尝试在给定的Handle 上查找gEfiLoadedImageProtocolGuid Protocol( gEfiLoadedImageProtocolGuid = { 0x5B1B31A1, 0x9562, 0x11D2, { 0x8E, 0x3F, 0x00, 0xA0, 0xC9, 0x69, 0x72, 0x3B }})。
继续查找这个 Protocol 的来源,是在 CoreLoadImageCommon 函数中安装的:
  //
  // Install the protocol interfaces for this image
  // don't fire notifications yet
  //
  Status = CoreInstallProtocolInterfaceNotify (
             &Image->Handle,
             &gEfiLoadedImageProtocolGuid,
             EFI_NATIVE_INTERFACE,
             &Image->Info,
             FALSE
             );
  if (EFI_ERROR (Status)) {
    goto Done;
  }
经过试验,运行 RIM.EFI 后会多次调用CoreLoadedImageInfo 函数,但是奇怪的是前面几次不会有问题,最后一次UnloadImage 的时候才会出现错误。因此,这意味着有人在整个过程中卸载了这个 Protocol。接下来尝试在 Application 中去掉了 StartImage 函数,惊奇的发现问题会消失。接下来就研究StartImage对应的CoreStartImage 函数,在 \MdeModulePkg\Core\Dxe\Image\Image.c
/**
  Transfer control to a loaded image's entry point.

  @param  ImageHandle             Handle of image to be started.
  @param  ExitDataSize            Pointer of the size to ExitData
  @param  ExitData                Pointer to a pointer to a data buffer that
                                  includes a Null-terminated string,
                                  optionally followed by additional binary data.
                                  The string is a description that the caller may
                                  use to further indicate the reason for the
                                  image's exit.

  @retval EFI_INVALID_PARAMETER   Invalid parameter
  @retval EFI_OUT_OF_RESOURCES    No enough buffer to allocate
  @retval EFI_SECURITY_VIOLATION  The current platform policy specifies that the image should not be started.
  @retval EFI_SUCCESS             Successfully transfer control to the image's
                                  entry point.

**/
EFI_STATUS
EFIAPI
CoreStartImage (
  IN EFI_HANDLE  ImageHandle,
  OUT UINTN      *ExitDataSize,
  OUT CHAR16     **ExitData  OPTIONAL
  )
看到了其中有如下操作:
  //
  // If the image returned an error, or if the image is an application
  // unload it
  //
  if (EFI_ERROR (Image->Status) || Image->Type == EFI_IMAGE_SUBSYSTEM_EFI_APPLICATION) {
    CoreUnloadAndCloseImage (Image, TRUE);
    //
    // ImageHandle may be invalid after the image is unloaded, so use NULL handle to record perf log.
    //
    Handle = NULL;
  }
这段代码的意思是:如果加载的代码运行有问题或者Image->Type 是EFI_IMAGE_SUBSYSTEM_EFI_APPLICATION 就直接在 StartImage 中释放掉 Image了。而我们调用的 Hello2.efi 类型是EFI_IMAGE_SUBSYSTEM_EFI_APPLICATION ,因此这里释放掉了Handle 上面的 Protocol,当我们调用的时候确实也无法找到。
结论:我们碰到的错误是因为RIM 这个 Application中多此一举的添加了UnLoadImage的操作,去掉这个动作就正常了。