这两个例子分别是 USB1 和 USB2 接口做 USB CDC Device,Windows 10 及其以上无需额外安装驱动。来自CH32V20xEVT 文中,可以独立编译。
MemTest86 Free 最新版
最近在测试 Memory 的时候偶然发现老版本的 MemTest86 在运行时会发生死机,新版本可以正常使用。于是,动手制作了一个精简版:
解压之后得到 MemTest2023.IMG 文件,可以直接放在Ventoy 制作出来的启动盘上,开机启动之后从菜单选择这个文件即可进入 Memtest86。
参考:
1.https://www.memtest86.com/ 官方网站
C# 读取物理硬盘的例子
本质上和VC 写的没有区别,都是使用 CreateFile 打开 PhysicalDrive 然后进行操作。
using System;
using System.Collections.Generic;
using System.Linq;
using System.Text;
using System.Threading.Tasks;
using System.IO;
using System.Runtime.InteropServices;

namespace RW_PyhsicalDisk
{
    class Program
    {
        [DllImport("kernel32", SetLastError = true)]
        static extern IntPtr CreateFile(
        string FileName,
        uint DesiredAccess,
        uint ShareMode,
        IntPtr SecurityAttributes,
        uint CreationDisposition,
        int FlagsAndAttributes,
        IntPtr hTemplate
        );

        static class DESIREDACCESS
        {
            public const uint GENERIC_READ = 0x80000000;
            public const uint GENERIC_WRITE = 0x40000000;
            public const uint GENERIC_EXECUTE = 0x20000000;
            public const uint GENERIC_ALL = 0x10000000;
        }
        /// <summary>
        /// Sharing mode of the file or object
        ///</summary>
        static class SHAREMODE
        {
            public const uint FILE_SHARE_READ = 0x00000001;
            public const uint FILE_SHARE_WRITE = 0x00000002;
            public const uint FILE_SHARE_DELETE = 0x00000004;
        }
        /// <summary>
        /// Action to take on files that exist, and which action to take when files do not exist.
        /// </summary>
        static class CREATIONDISPOSITION
        {
            public const uint CREATE_NEW = 1;
            public const uint CREATE_ALWAYS = 2;
            public const uint OPEN_EXISTING = 3;
            public const uint OPEN_ALWAYS = 4;
            public const uint TRUNCATE_EXISTING = 5;
        }
        /// <summary>
        /// File attributes and flags for the file.
        /// </summary>
        static class FLAGSANDATTRIBUTES
        {
            public const uint FILE_FLAG_WRITE_THROUGH = 0x80000000;
            public const uint FILE_FLAG_OVERLAPPED = 0x40000000;
            public const uint FILE_FLAG_NO_BUFFERING = 0x20000000;
            public const uint FILE_FLAG_RANDOM_ACCESS = 0x10000000;
            public const uint FILE_FLAG_SEQUENTIAL_SCAN = 0x08000000;
            public const uint FILE_FLAG_DELETE_ON_CLOSE = 0x04000000;
            public const uint FILE_FLAG_BACKUP_SEMANTICS = 0x02000000;
            public const uint FILE_FLAG_POSIX_SEMANTICS = 0x01000000;
            public const uint FILE_FLAG_OPEN_REPARSE_POINT = 0x00200000;
            public const uint FILE_FLAG_OPEN_NO_RECALL = 0x00100000;
            public const uint FILE_FLAG_FIRST_PIPE_INSTANCE = 0x00080000;
        }

        static void Main(string[] args)
        {
            IntPtr handle = CreateFile(@"\\.\PHYSICALDRIVE1",
                            DESIREDACCESS.GENERIC_READ | DESIREDACCESS.GENERIC_WRITE,
                            SHAREMODE.FILE_SHARE_READ | SHAREMODE.FILE_SHARE_WRITE,
                            IntPtr.Zero,
                            CREATIONDISPOSITION.OPEN_EXISTING,
                           0,
                IntPtr.Zero);
            FileStream disk = new FileStream(handle, FileAccess.ReadWrite);
            byte[] bt = new byte[512];
            disk.Seek(0, SeekOrigin.Begin);
            disk.Read(bt, 0, 512);
            for (int i = 0; i < bt.Length; i++)
            {
                Console.Write(bt[i].ToString("x2") + " ");
            }

            Console.ReadLine();
        }
    }
}
运行结果:
EDK2 202302 来了
今年的3月3日,edk2-stable202302 版本正式发布,需要的朋友可以在下面的链接下载到
https://github.com/tianocore/edk2/releases/tag/edk2-stable202302
新增了如下功能:
- Add support for RISC-V qemu virt machine
- Add RPMB related commands and DCB definition for NVMe
- SecurityBoot – remove self-signed PK requirement in SetupMode
- SecurityBoot – support Authenticated SetVariable with ContentInfo
- TDVF Optimization – Enable Separate-Fv in OvmfPkg/IntelTdx
- TDVF Optimization – Pre-alloc shared memory for TDVF DMA
- TDVF Optimization – Enable Multi-core based lazy-accept
- TDVF – Fix Instruction Pointer Incrementation by TD #VE MMIO Handler
- TDVF – Incorrect implementation in the TDX RTMR implementation
- TDVF – Incorrect protocol and structure version in the TDX CC measurement
- TDVF – TdTcg2Dxe lives in the Ovmfpkg instead of the SecurityPkg
- TDVF – need measurement VMM input ACPI table before register
- TDVF – need integrate feature in config-B to config-A
看起来和我们 X86 UEFI 开发者关系不大。
前面介绍过下载之后手工补充编译一些第三方依赖库的方法,此外,可以使用下面的方法直接下载完整的代码:
git clone -b edk2-stable202302 https://github.com/tianocore/edk2.git --recursive
这里放置一个下载好的完整代码还包括了AppPkg,第一次运行时最好先使用下面的命令重新编译Build代码所需工具:
edksetup.bat ForceRebuild
我测试了如下几个 Package 都可以正常编译通过:
build -a X64 -t VS2019 -p AppPkg\AppPkg.dsc
build -a X64 -t VS2019 -p OvmfPkg\OvmfPkgX64.dsc
build -a X64 -t VS2019 -p EmulatorPkg\EmulatorPkg.dsc
这里放一个完整版本,有需要的朋友可以取用。
链接: https://pan.baidu.com/s/1vm1SDSe7PB_MtntsZIZyiQ?pwd=LABZ 提取码: LABZ
CH32V208 USB上手指南
本文介绍 CH32V208 评估板、开发板如何进行 USB 方面的测试。CH32V208 支持2个USB 接口,可以独立工作,其中一个可以作为Host和Device(USB2),另外一个只能作为Device 使用(USB1)。
一.硬件接口介绍。板子上的 USB 接口分布如下:
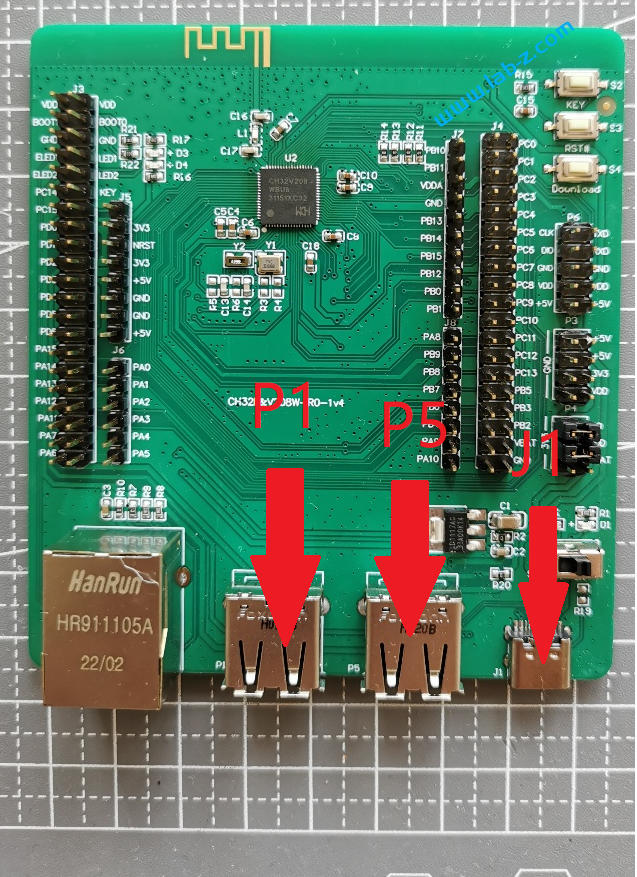
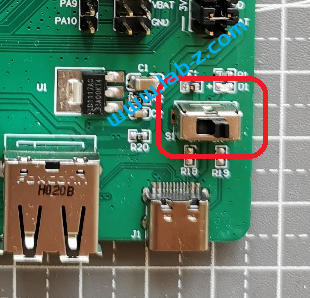
需要注意的是如下几点:
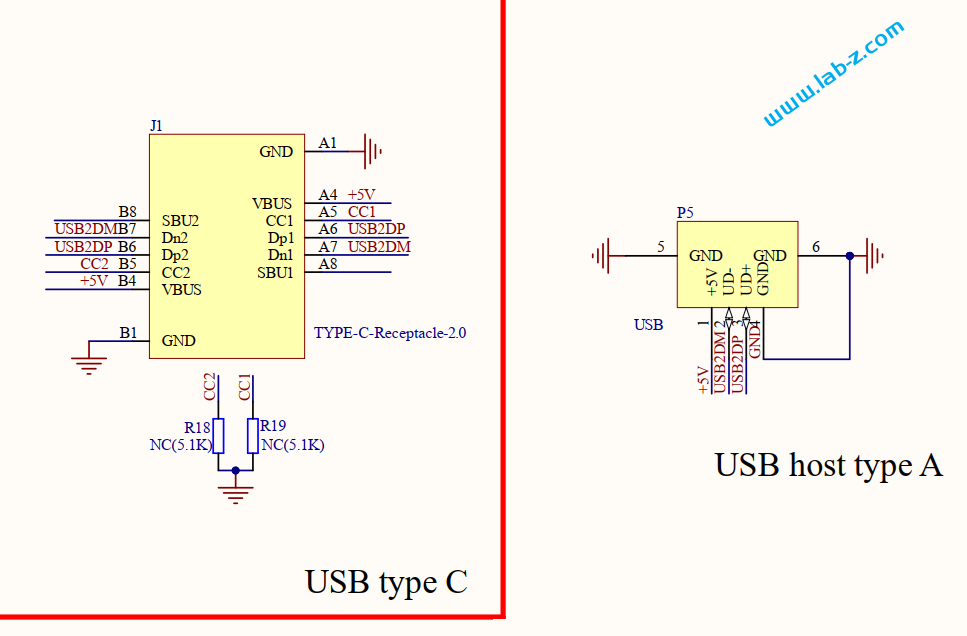
- P5和J1 是连通的(USB2),换句话它两个实际上是同一个。虽然 P5 是USB 母头,但是可以通过转接为公头作为设备使用:
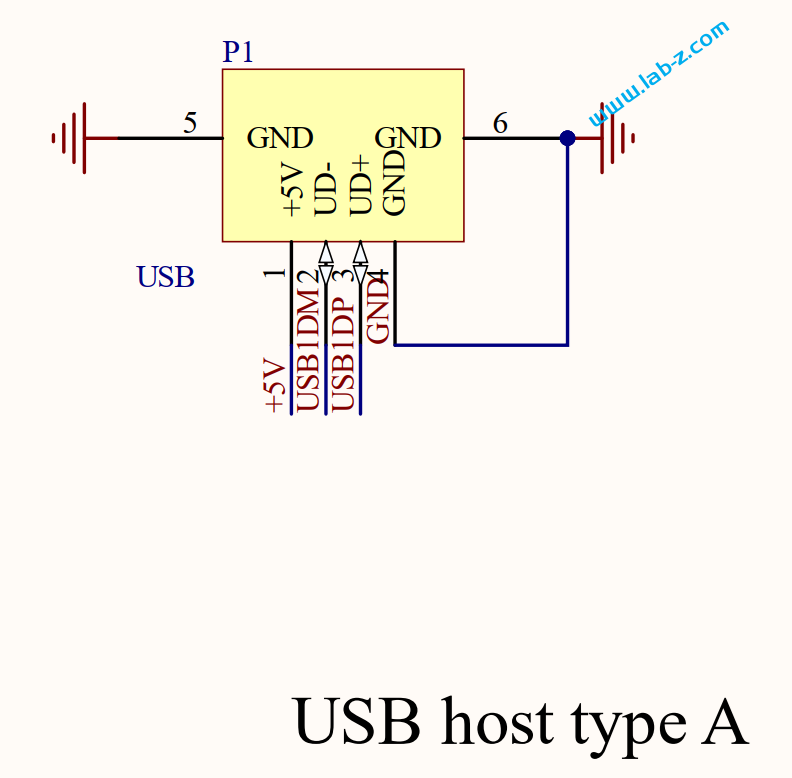
2.P1(USB1),虽然是USB母头,但是只能当作 USB Device 使用,不支持 USB Host功能;
两个USB 都可以作为USB下载接口使用。
二.代码的下载
官方提供了下面的例程:
|-- USBD

|      |-- CH372:模拟自定义USB设备(CH372设备),端点1,3下传,2,4上传,端点1下传的数据从端点3上传,不取反,端点2下传的数据从端点4上传,取反。

|      |-- Compatibility_HID:模拟HID设备,数据通过串口上下传

|      |-- CompositeKM:模拟键盘和鼠标,使用IO模拟按键,同时模拟数据可以通过串口2上传。

|      |-- MSC_U-Disk: 模拟简单U盘,可选使用片内Flash或外部SPI-Flash

|-- USBFS

|      |-- DEVICE

|      |      |-- CH372:模拟自定义USB设备(CH372设备),端点1,3下传,2,4上传,端点1下传的数据从端点3上传,不取反,端点2下传的数据从端点4上传,取反。

|      |      |-- Compatibility_HID:模拟HID设备,数据通过串口上下传。

|      |      |-- CompositeKM:模拟键盘和鼠标,使用IO模拟按键,同时模拟数据可以通过串口2上传。

|      |      |-- MSC_U-Disk: 模拟简单U盘,可选使用片内Flash或外部SPI-Flash

|      |      |-- SimulateCDC:模拟一个CDC串口,使用串口1收发。

|      |      |-- SimulateCDC-HID:模拟一个CDC串口,使用串口1收发,HID中断端点下发数据取反上传。

|      |-- HOST_IAP

|      |      |-- APP: 与HOST_IAP配套使用的APP,工程修改了程序起始位置,编译后需自行将文件转化为bin文件并重命名为APP.bin

|      |      |-- HOST_IAP:  基于U盘读取文件例程整理的主机U盘IAP例程,从U盘内读取名称位APP.bin的文件,写入内部flash,校验后自动跳转。

|      |-- HOST_KM: 主机操作键鼠,获取键鼠上传的端点的数据并打印,支持U口下1级hub

|      |-- HOST_MTP_FileSystem:枚举过程的USB主机到一个支持MTP和PTP协议的设备,支持MTP和PTP协议,并读取其文件

|      |-- Udisk_Lib:U盘文件系统库文件
可以根据需要使用 IDE 打开,编译完成后即可进行烧写,个人推荐方法如下:
- 使用USB线连接主机到任意一个USB接口;
- 使用关闭开发板供电开关
3.按住Download按钮,拨动开关重新上电
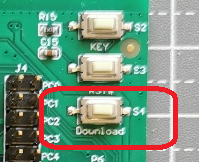
4.这时设备中就会出现如下设备
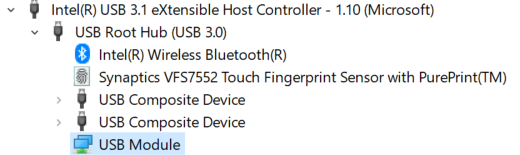
5.使用WCHISPTOOL 选中 CH32V208,需要注意第一次需要去掉保护,之后重复上面步骤2-5即可下载
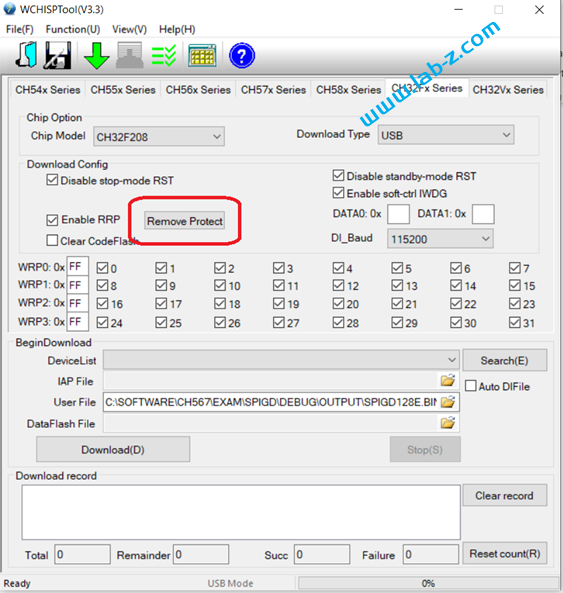
下载之后,重启评估板即可工作
Step2FPGA(1) 环境的搭建
一直有学习 FPGA的想法,这次下定决心花时间来学习FPGA。因为 FPGA 相关知识能够帮助更好的理解硬件知识,同时可以使用FPGA来实现验证自己的想法。我选择的开发板和教材是 “至芯携手特权同学Altera Cyclone IV EP4CE6 FPGA开发板NIOSII”:
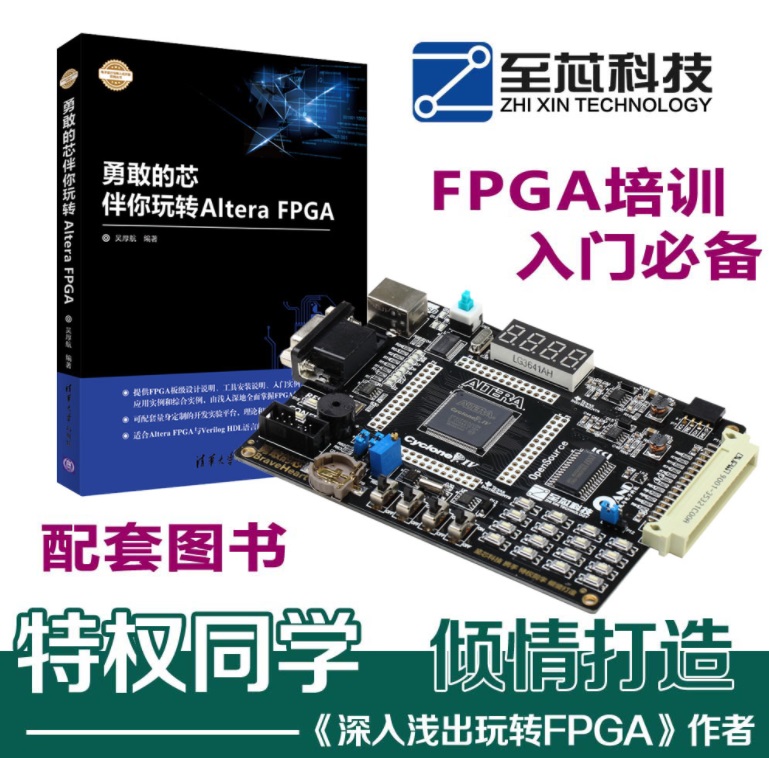
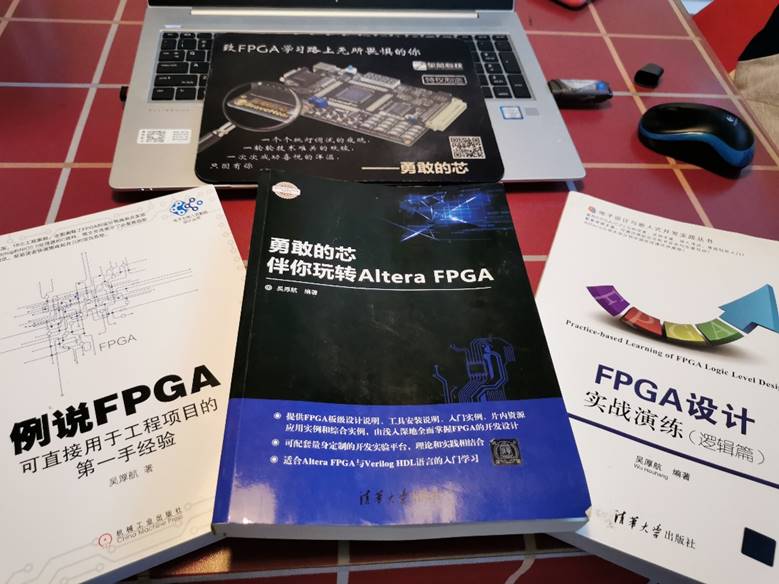
教材是《勇敢的芯伴你玩转 Altera FPGA》《例说FPGA》《FPGA设计 实战演练(逻辑篇)》,作者都是吴厚航先生(特权同学)。
这套书籍和套件是我在 2018年购买的,但是一直没有坚持下去。和学习单片机一样,最大的敌人并不是内容的难度,而是自己是否能够不断坚持学习。因此,这次开始新的系列。
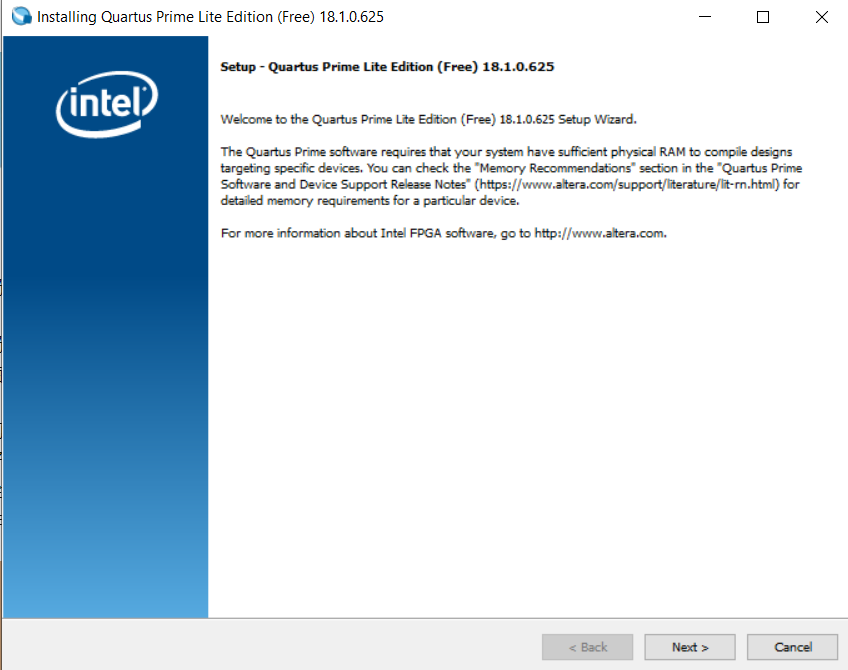
教材上使用的软件比较老(Quartus 13),在新的操作系统上有问题必须升级,这次选择 Quartus 18 的版本。安装文件是QuartusLiteSetup-18.1.0.625-windows.exe
推荐使用默认路径进行安装,一路Next即可
安装占用大约7G 的空间。
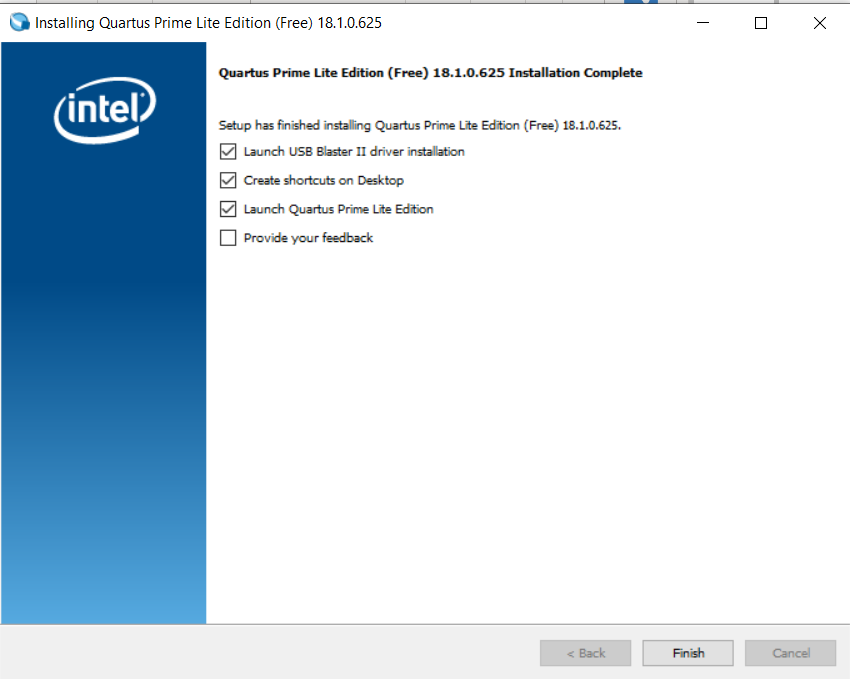
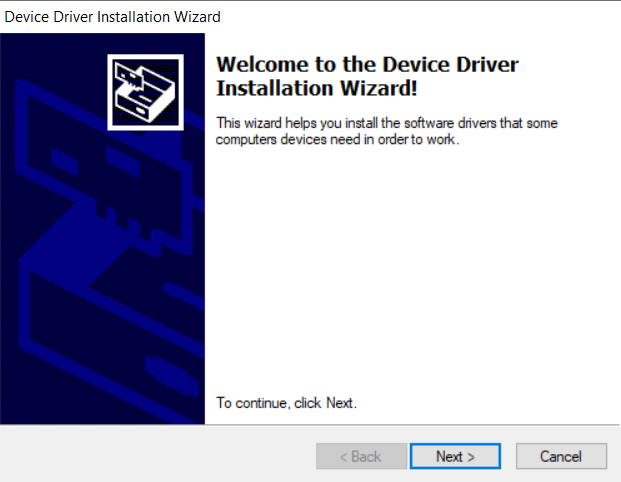
点击 “Finish” 按钮后会自动继续安装 USB-Blaster(下载器):
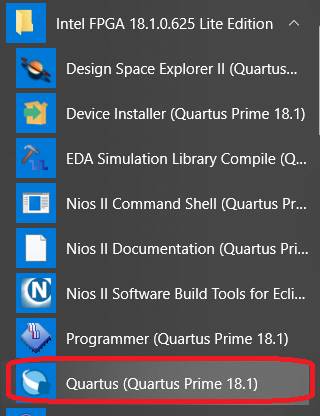
接下来可以从 Windows 菜单中启动 Quartus:
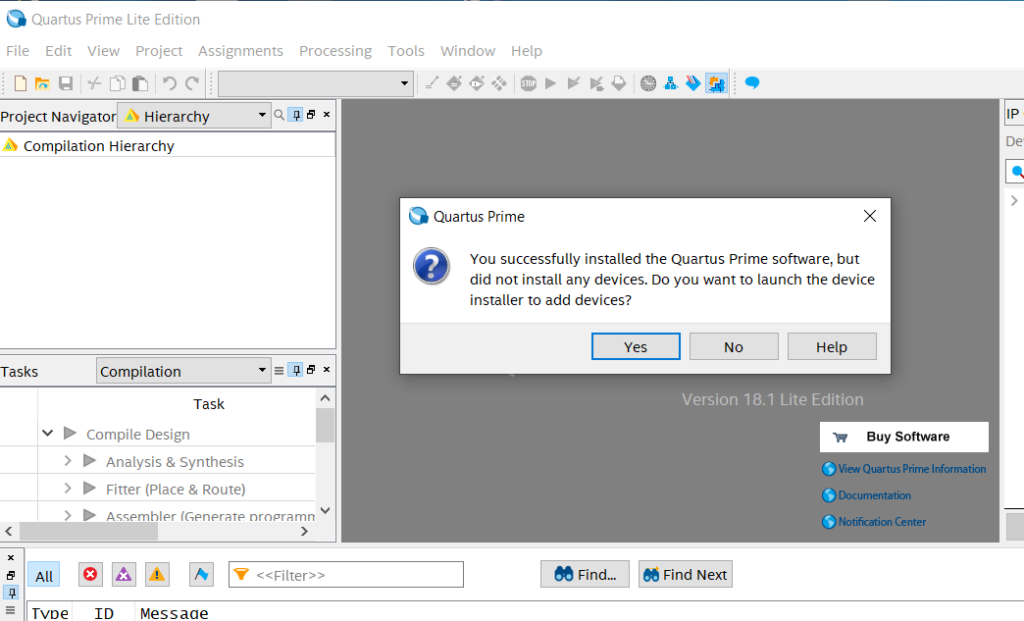
启动后会提示目前没有安装任何 Devices ,需要安装Device Package(这个类似于 Keil 安装好之后,需要安装某一个型号的单片机的支持文件;又好比在 Arduino IDE 上使用 ESP32 需要先从 Board Manger上安装 ESP32支持包):
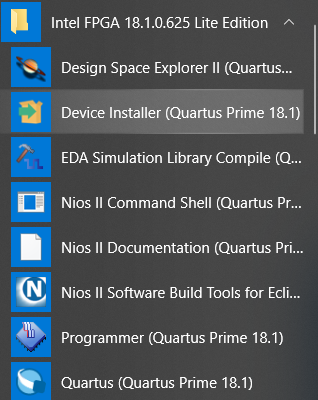
关闭上面的软件再回到 Start Menu 选择“Device Installer”
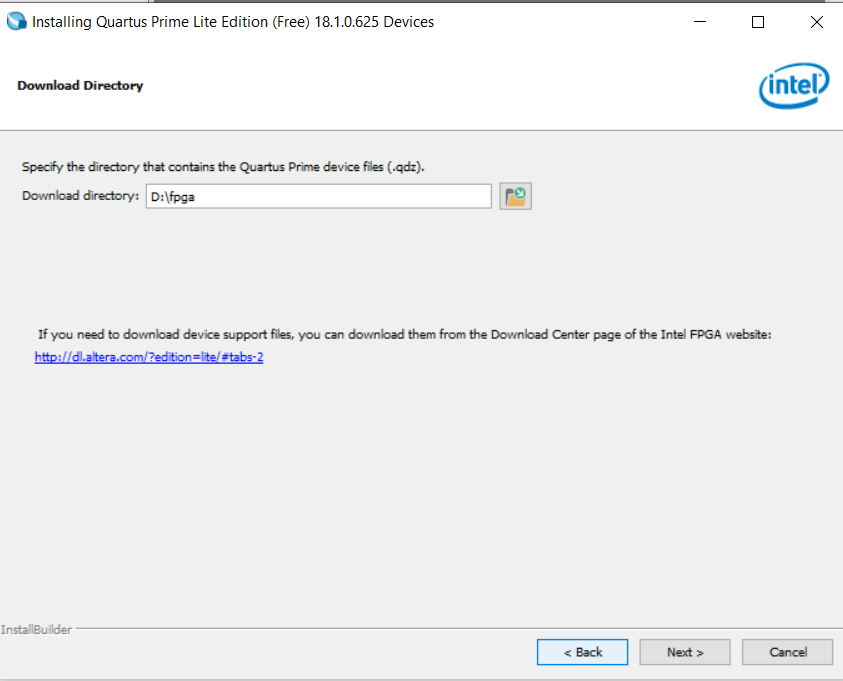
在这个页面选择存放着 Devices 支持文件的路径(文件后缀是 .qdz)
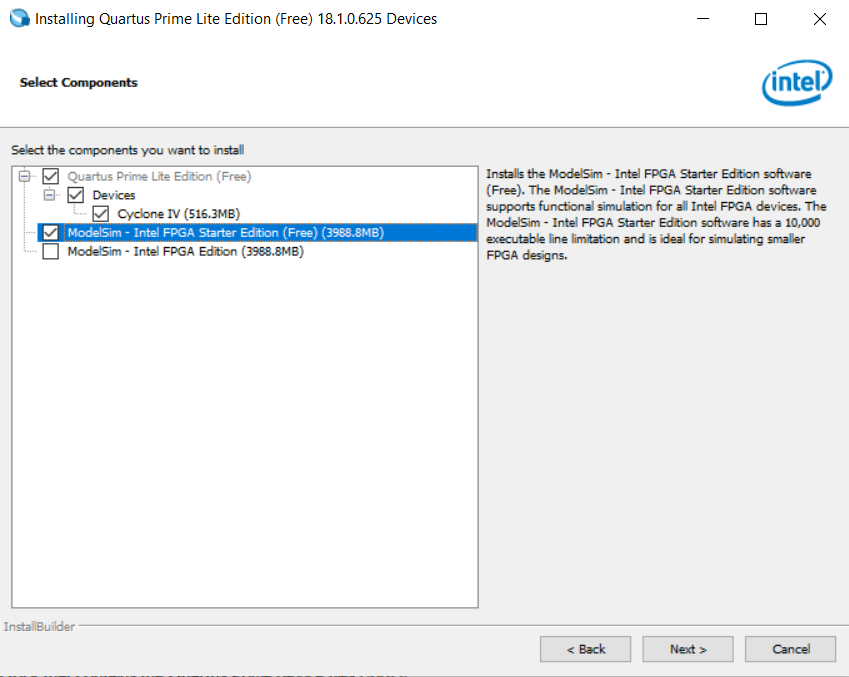
接下来需要选择要安装的功能如下:
- Cyclone IV (其中有开发板的FPGA型号)
- ModelSim (模拟仿真工具,Starter Edition 是免费的,下面的是需要额外购买的收费版本)
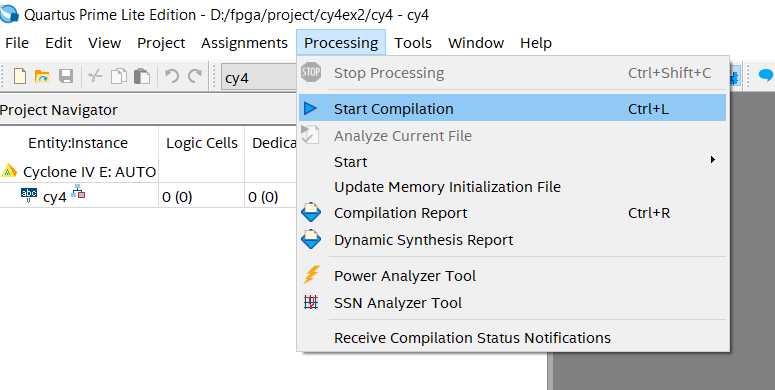
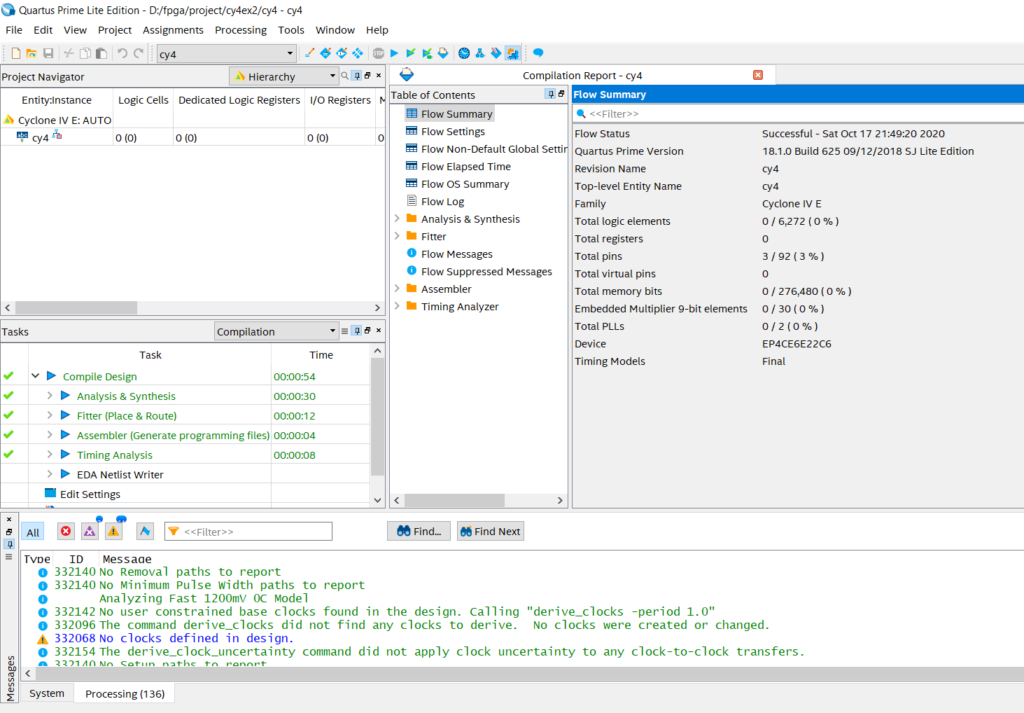
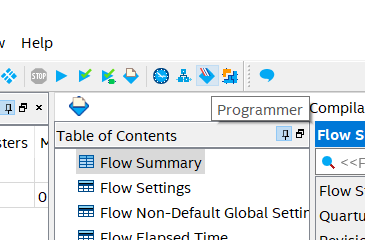
再次启动 Quartus,选择 File->Open Project 打开开发板例子 cy4ex2 项目 cy4.qpf 文件。项目中的各种设置都已经准备好了,使用 Processing -> Start Compilation 即可直接编译:
接下来使用 “Programmer” 功能将编译后的结果下载到开发板中:
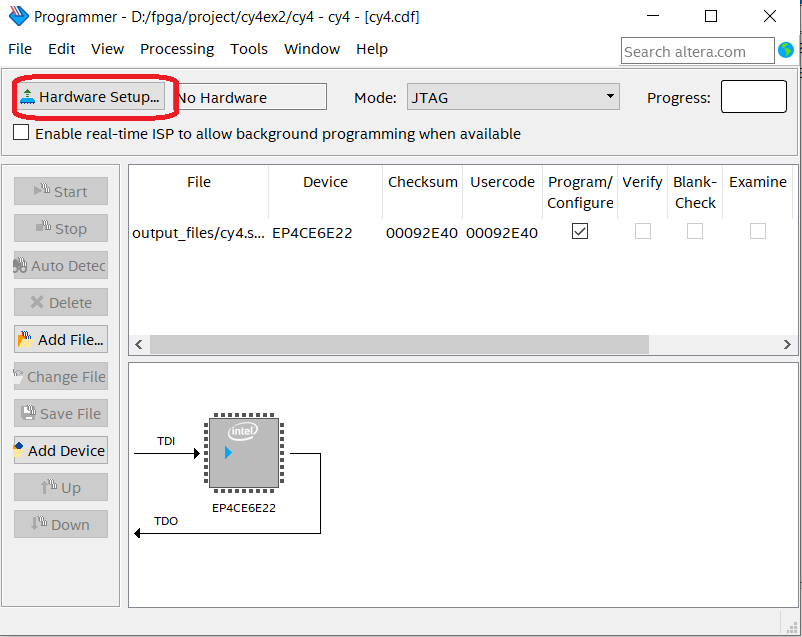
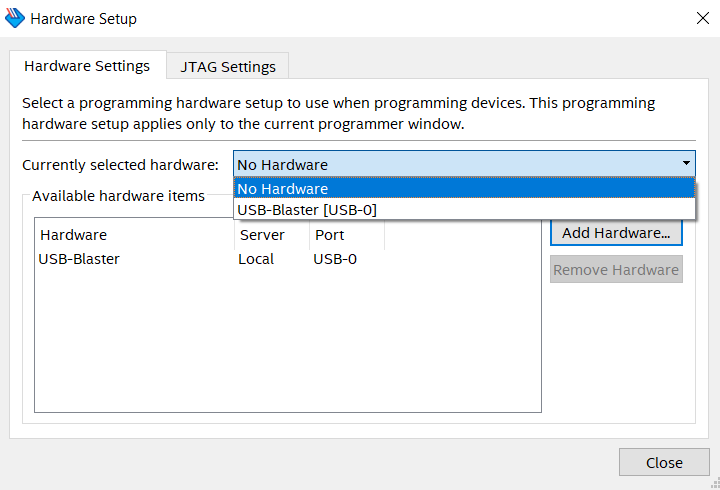
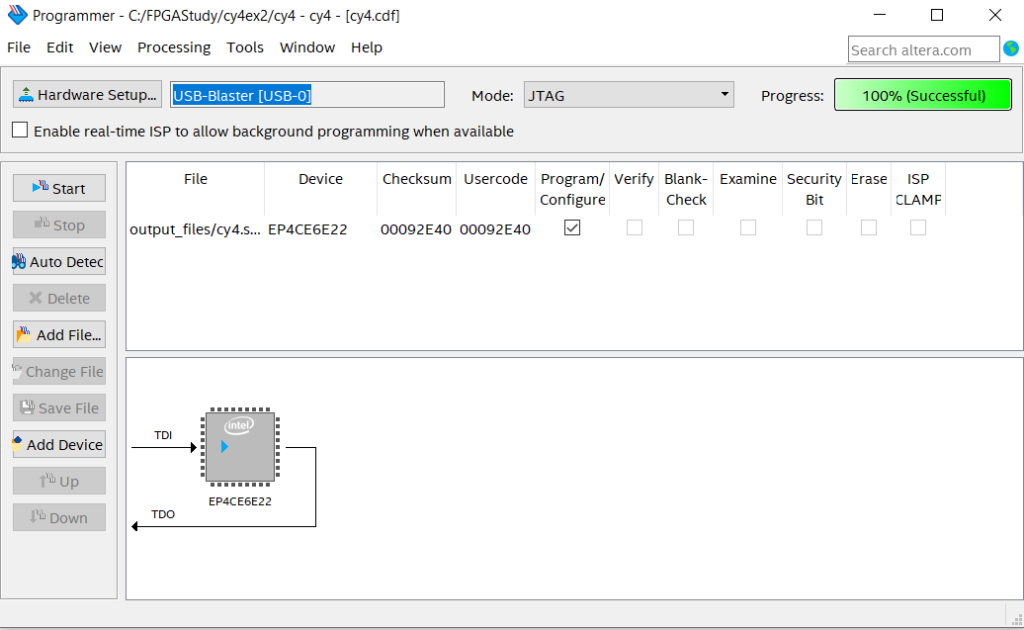
特别注意,烧写时需要给开发板上电。成功之后,板子上的蜂鸣器一直会发出Beep声。
至此,已经踏出了第一步开始了 FPGA之旅。
一个非常简单的UEFI Application开发框架
通常情况下,我们需要使用 EDK2 来进行 UEFI Shell Application 的开发。这次介绍的是一个用来开发 UEFI Shell Application的框架。项目地址如下:
从名字可以看出,作者的目标是用来开发BootLoader,类似的我们可以用来开发UEFI Shell Application。
相比EDK2,这种方法的优点主要是:
- 小巧简单。容量只有十几兆,编译起来非常快,另外方便我们研究具体的实现;
- 编译环境时 Visual Studio,方便我们阅读代码
具体使用方法是:
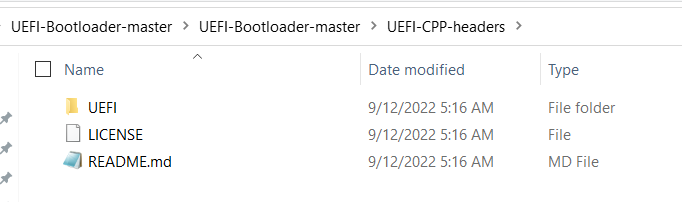
1.在 https://github.com/VioletGiraffe/UEFI-Bootloader 下载代码
2.在https://github.com/VioletGiraffe/UEFI-CPP-headers 下载需要的头文件
3.将2下载的内容解压到 UEFI-CPP-headers目录下
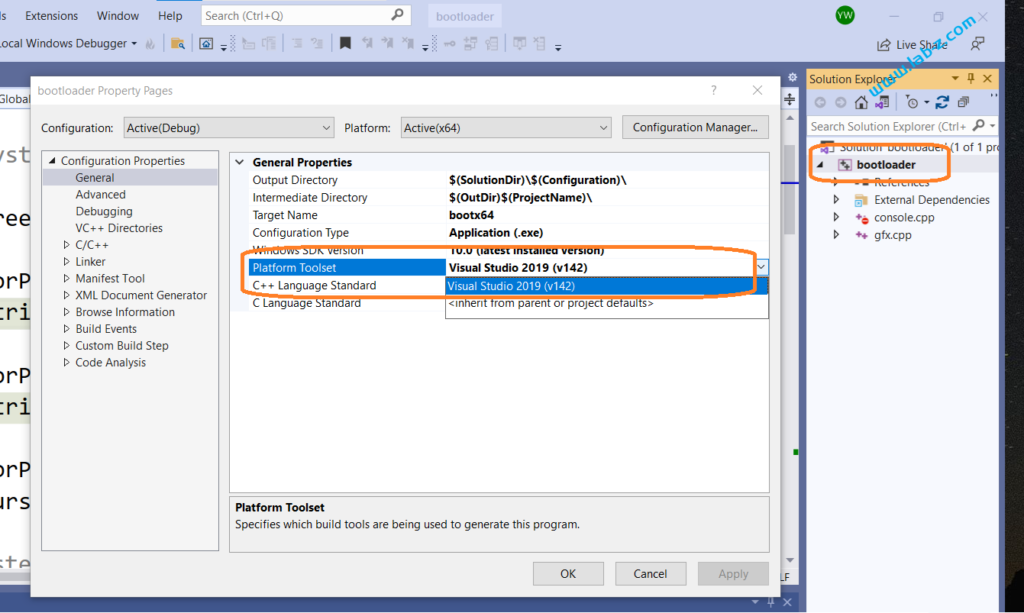
4.Visual Studio 打开bootloader.sln文件
5.这个项目作者使用 VS2017,所以需要修改一下 Platform Toolset 为你当前使用的编译器。这里我是用的是 VS2019,修改如下:
6.直接 Build即可生成 BootX64.efi
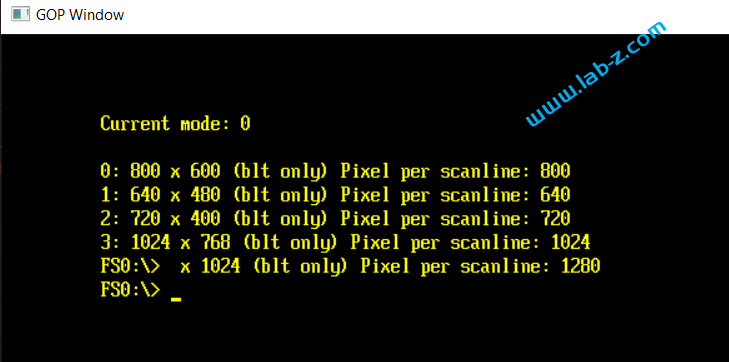
在WinHost 模拟环境中运行这个程序可以看到屏幕上输出了信息:
有兴趣的朋友可以直接去前面提到的项目主页或者在这里直接下载:
Step to UEFI (271)资源打包再研究
在之前的文章中介绍过直接将 BMP文件存放在EFI 文件中 【参考1】,本文继续研究如何将其他格式的文件放在EFI 中的方法。
首先,我搜索了一下,没有发现直接将其他格式按照类似的方法放在EFI文件中的方法(从Win32编程的角度来说,这个是以Resource/资源文件的方式存放)。其次,如果将文件直接修改后缀为BMP,在编译过程中,工具会对资源文件进行检查,如果不是BMP将会报错。对于这种,可以将二进制文件通过加文件头的方式伪装成一个BMP文件。但是这样做估计会比较麻烦。
在阅读代码的过程中,处理BMP文件的代码位于 \BaseTools\Source\Python\AutoGen\GenC.py 文件中,可以看到支持三种图形格式,分别是PNG、JPG和BMP。对于后两者,都有针对这种类型的文件分析动作。
if File.Ext.upper() == '.PNG':
        TempBuffer = pack('B', EFI_HII_IIBT_IMAGE_PNG)
        TempBuffer += pack('I', len(Buffer))
        TempBuffer += Buffer
    elif File.Ext.upper() == '.JPG':
        ImageType, = struct.unpack('4s', Buffer[6:10])
        if ImageType != b'JFIF':
            EdkLogger.error("build", FILE_TYPE_MISMATCH, "The file %s is not a standard JPG file." % File.Path)
        TempBuffer = pack('B', EFI_HII_IIBT_IMAGE_JPEG)
        TempBuffer += pack('I', len(Buffer))
        TempBuffer += Buffer
    elif File.Ext.upper() == '.BMP':
        TempBuffer, TempPalette = BmpImageDecoder(File, Buffer, PaletteIndex, FileObj.TransParent)
        if len(TempPalette) > 1:
            PaletteIndex += 1
            NewPalette = pack('H', len(TempPalette))
            NewPalette += TempPalette
            PaletteBuffer += NewPalette
            PaletteStr = WriteLine(PaletteStr, '// %s: %s: %s' % (DecToHexStr(PaletteIndex - 1, 4), ID, DecToHexStr(PaletteIndex - 1, 4)))
            TempPaletteList = AscToHexList(NewPalette)
            PaletteStr = WriteLine(PaletteStr, CreateArrayItem(TempPaletteList, 16) + '\n')
    ImageBuffer += TempBuffer
    BufferStr = WriteLine(BufferStr, '// %s: %s: %s' % (DecToHexStr(Index, 4), ID, DecToHexStr(Index, 4)))
    TempBufferList = AscToHexList(TempBuffer)
    BufferStr = WriteLine(BufferStr, CreateArrayItem(TempBufferList, 16) + '\n')

    StringH.Append(Line)
    Index += 1
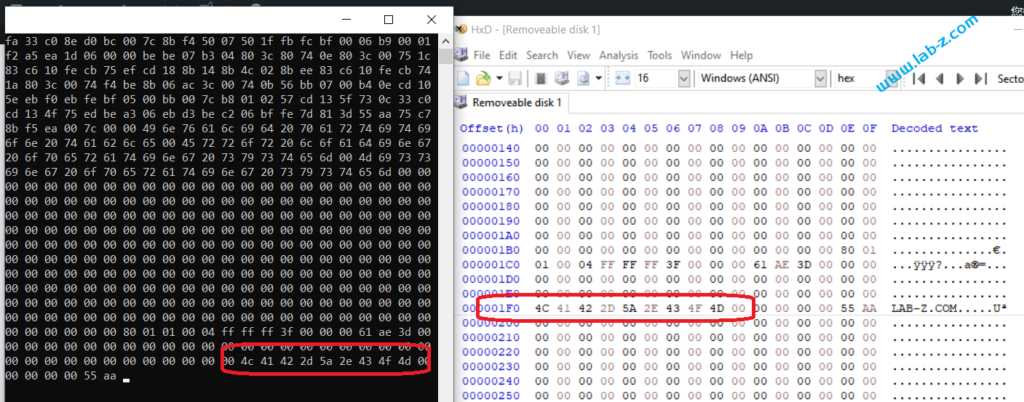
于是,首先将【参考1】中的BMP文件后缀修改为 PNG ,然后重新编译。我们知道BMP文件开头的数值是 42 4D 76 6B,使用工具直接查看:

结合之前的知识,结合前面 PNG 打包的如下代码:
TempBuffer = pack('B', EFI_HII_IIBT_IMAGE_PNG)
                                    TempBuffer += pack('I', len(Buffer))
                                    TempBuffer += Buffer
猜测格式应该是:
EFI_HII_PACKAGE_LIST_HEADER
EFI_HII_IMAGE_PACKAGE_HDR
Type(EFI_HII_IIBT_IMAGE_PNG==0x19)
Length(len(Buffer)) //这里也就是我们放入的 BMP 的大小
针对上面的内容,编写如下代码进行验证:
/** @file
  Logo DXE Driver, install Edkii Platform Logo protocol.

Copyright (c) 2016 - 2017, Intel Corporation. All rights reserved.<BR>
This program and the accompanying materials
are licensed and made available under the terms and conditions of the BSD License
which accompanies this distribution.  The full text of the license may be found at
http://opensource.org/licenses/bsd-license.php

THE PROGRAM IS DISTRIBUTED UNDER THE BSD LICENSE ON AN "AS IS" BASIS,
WITHOUT WARRANTIES OR REPRESENTATIONS OF ANY KIND, EITHER EXPRESS OR IMPLIED.

**/


#include <Uefi.h>
#include <Library/UefiLib.h>
#include <Library/ShellCEntryLib.h>
#include <Protocol/HiiDatabase.h>
#include <Protocol/GraphicsOutput.h>
#include <Protocol/HiiImageEx.h>
#include <Protocol/PlatformLogo.h>
#include <Protocol/HiiPackageList.h>
#include <Library/UefiBootServicesTableLib.h>
#include <Library/DebugLib.h>
#include <Library/PrintLib.h>
#include <Library/MemoryAllocationLib.h>
#include <Library/BaseLib.h>
#include <Library/UefiApplicationEntryPoint.h>
#include  <Library/ShellLib.h>

#define EFI_GRAPHICS_OUTPUT_PROTOCOL_GUID \
  { \
    0x9042a9de, 0x23dc, 0x4a38, {0x96, 0xfb, 0x7a, 0xde, 0xd0, 0x80, 0x51, 0x6a } \
  }

static EFI_GUID GraphicsOutputProtocolGuid = EFI_GRAPHICS_OUTPUT_PROTOCOL_GUID;

//DO NOT REMOVE IMAGE_TOKEN (IMG_LOGO)

/**
  Entrypoint of this module.

  This function is the entrypoint of this module. It installs the Edkii
  Platform Logo protocol.

  @param  ImageHandle       The firmware allocated handle for the EFI image.
  @param  SystemTable       A pointer to the EFI System Table.

  @retval EFI_SUCCESS       The entry point is executed successfully.

**/
EFI_STATUS
EFIAPI
UefiMain (
  IN EFI_HANDLE        ImageHandle,
  IN EFI_SYSTEM_TABLE  *SystemTable
)
{
  EFI_STATUS                  Status;


  EFI_HII_PACKAGE_LIST_HEADER *PackageListHeader;
  EFI_HII_IMAGE_PACKAGE_HDR   *ImageHeader;
  UINT8                       *ImageData;
  UINTN                       FileSize;
  EFI_FILE_HANDLE             FileHandle;

        //Step1. Get Package List Header Address

        //
        // Retrieve HII package list from ImageHandle
        //
        Status = gBS->OpenProtocol (
                        ImageHandle,
                        &gEfiHiiPackageListProtocolGuid,
                        (VOID **) &PackageListHeader,
                        ImageHandle,
                        NULL,
                        EFI_OPEN_PROTOCOL_GET_PROTOCOL
                        );
        if (EFI_ERROR (Status)) {
          Print(L"HII Image Package with logo not found in PE/COFF resource section\n");
          return Status;
        }


        Print(L"PackageList :\nGUID=[%g] Length=[%X]\n",
                      PackageListHeader->PackageListGuid,
                      PackageListHeader->PackageLength);

        //Step2. Parser HII Image
        ImageHeader=(EFI_HII_IMAGE_PACKAGE_HDR*)(PackageListHeader+1);
        ImageData=(UINT8 *)(ImageHeader+1);

        FileSize=ImageData[1]+(ImageData[2]<<8)+(ImageData[3]<<16)+(ImageData[4]<<24);
        Print(L"Type: 0x%x  Size:%d\n",ImageData[0],FileSize);

        //Create a new file
        Status = ShellOpenFileByName(L"dump.bin",
                                        (SHELL_FILE_HANDLE *)&FileHandle,
                                        EFI_FILE_MODE_READ |
                                        EFI_FILE_MODE_WRITE|
                                        EFI_FILE_MODE_CREATE,
                                    0);
        if(Status != RETURN_SUCCESS) {
                Print(L"CreatFile failed [%r]!\n",Status);
                return EFI_SUCCESS;
            }
        Status = ShellWriteFile(FileHandle,
                        &FileSize,
                        &ImageData[5]);

        //Close the source file
        ShellCloseFile(&FileHandle);

        Print(L"Dump.bin is generated!\n");

  return Status;
}
运行结果:
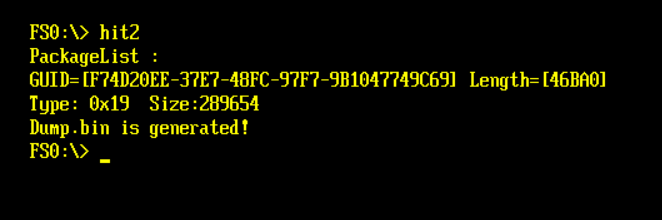
使用 Beyond Compare 可以看到dump.bin 和TestImage.png内容完全相同。
本文提到的完整文件:
参考:
1. https://www.lab-z.com/stu169bmp/ BMP 放在 EFI 文件中(下)
Step to UEFI (270)EDK2: Win Host卡死的问题的解决方法
古语有云:“内事不决问百度,外事不决问谷歌”。对于我来说 Windows 下面有搞不懂的问题就直接问Windows专家天杀了。
最近偶然用到EDK2自带的模拟环境,偶尔会遇到运行WinHost.exe之后卡死,键盘无法输入的问题。之前也有热心的朋友提到过,这是因为输入法导致的。果真,在运行WinHost.exe 之前关闭输入法即可解决问题。
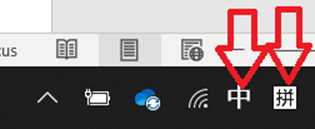
这两个都要关闭
很明显问题是WinHost Windows下输入法有冲突,于是请教天杀,经过一夜的分析天杀很快给出了建议:
产生问题的原因是在代码在处理WM_IME_SETCONTEXT时出问题了,自绘制窗口需要响应输入法的这个消息。在模拟器中,用户没有输入中文的需求,因此直接禁用输入法是最简单的解决方法。
代码修改的方法是在\EmulatorPkg\Win\Host\WinGopScreen.c 文件中首先使用LoadLibraryEx()函数加载ImmDisableIME函数,然后调用之即可。
typedef WINBASEAPI BOOL  (WINAPI *ImmDisableIMEProc) (DWORD unnamedParam1);
typedef WINBASEAPI HIMC  (WINAPI *ImmAssociateContextProc) (HWND unnamedParam1, HIMC unnamedParam2);

/**
  This thread simulates the end of WinMain () application. Each Window needs
  to process its events. The messages are dispatched to
  WinNtGopThreadWindowProc ().
  Be very careful since WinNtGopThreadWinMain () and WinNtGopThreadWindowProc ()
  are running in a separate thread. We have to do this to process the events.

  @param  lpParameter            Handle of window to manage.

  @return if a WM_QUIT message is returned exit.

**/
DWORD
WINAPI
WinNtGopThreadWinMain (
  LPVOID  lpParameter
  )
{
  MSG                    Message;
  GRAPHICS_PRIVATE_DATA  *Private;
  RECT                   Rect;

//LABZ_Debug_Start
  HMODULE               Module;
  ImmDisableIMEProc     ImmDisable;

  Module = LoadLibraryEx (L"imm32.dll", NULL, DONT_RESOLVE_DLL_REFERENCES);
  ImmDisable = (ImmDisableIMEProc)GetProcAddress(Module, "ImmDisableIME");

  if (ImmDisable)
      ImmDisable(GetCurrentThreadId ());
//LABZ_Debug_End

  Private = (GRAPHICS_PRIVATE_DATA *)lpParameter;
  ASSERT (NULL != Private);
经过测试,上述代码运行之后不会有卡死的问题。有兴趣的朋友可以自行实验。
Step to UEFI (269)PRINT 前缀的研究
众所周知,在编写 UEFI Shell Application的时候,使用 PRINT(L”My String”) 可以非常容易的在屏幕上输出字符串。偶然机会看到了关于前缀“L”的介绍【参考1】。它能够决定后面的字符串的编码方式。简单介绍如下:
- Ordinary character literals of type
char, for example'a' - UTF-8 character literals of type
char(char8_tin C++20), for exampleu8'a' - Wide-character literals of type
wchar_t, for exampleL'a' - UTF-16 character literals of type
char16_t, for exampleu'a' - UTF-32 character literals of type
char32_t, for exampleU'a'
编写一个简单的代码进行测试,使用上述四种前缀来定义字符串,然后在代码中输出字符串对应的内存数值:
#include  <Uefi.h>
#include  <Library/UefiLib.h>
#include  <Library/ShellCEntryLib.h>

CHAR8  *s1="www.lab-z.com";
CHAR16 *s2=L"www.lab-z.com";
CHAR16 *s3=u"www.lab-z.com";
CHAR16 *s4=(CHAR16 *)U"www.lab-z.com";

UINTN OUTPUTCHAR(CHAR8 *p,UINTN Length) {
    UINTN i=0;
    for (;i<Length;i++) {
        Print(L"%02X  ",p[i]);
    }
    return 0;
}

INTN
EFIAPI
ShellAppMain (
  IN UINTN Argc,
  IN CHAR16 **Argv
  )
{
  Print(L"S1:[");OUTPUTCHAR((CHAR8*)s1,14);Print(L"]\n");
  Print(L"S2:[");OUTPUTCHAR((CHAR8*)s2,14*2);Print(L"]\n");
  Print(L"S3:[");OUTPUTCHAR((CHAR8*)s3,14*2);Print(L"]\n");
  Print(L"S4:[");OUTPUTCHAR((CHAR8*)s4,14*4);Print(L"]\n");

  return(0);
}
可以看出:
- 不加前缀,直接定义为 ASCII对应的数值;
- L 前缀,会使用 UTF-16 编码;
- u(小写)前缀,和L 一样,都是 UTF-16 编码;
- U(大写)前缀,将会使用UTF-32编码。
我们经常在GCC 编写的 UEFI 代码中看到使用u的定义方式,看起来这个应该是C语言标准的写法,具体可以在【参考2】和【参考3】看到。
参考: