/* The ESP32 has four SPi buses, however as of right now only two of
 * them are available to use, HSPI and VSPI. Simply using the SPI API
 * as illustrated in Arduino examples will use HSPI, leaving VSPI unused.
 *
 * However if we simply intialise two instance of the SPI class for both
 * of these buses both can be used. However when just using these the Arduino
 * way only will actually be outputting at a time.
 *
 * Logic analyser capture is in the same folder as this example as
 * "multiple_bus_output.png"
 *
 * created 30/04/2018 by Alistair Symonds
 */
#include <SPI.h>

static const int spiClk = 1000000; // 1 MHz

//uninitalised pointers to SPI objects
SPIClass * vspi = NULL;
SPIClass * hspi = NULL;

void setup() {
  //initialise two instances of the SPIClass attached to VSPI and HSPI respectively
  vspi = new SPIClass(VSPI);
  hspi = new SPIClass(HSPI);

  //clock miso mosi ss

  //initialise vspi with default pins
  //SCLK = 18, MISO = 19, MOSI = 23, SS = 5
  vspi->begin();
  //alternatively route through GPIO pins of your choice
  //hspi->begin(0, 2, 4, 33); //SCLK, MISO, MOSI, SS

  //initialise hspi with default pins
  //SCLK = 14, MISO = 12, MOSI = 13, SS = 15
  hspi->begin();
  //alternatively route through GPIO pins
  //hspi->begin(25, 26, 27, 32); //SCLK, MISO, MOSI, SS

  //set up slave select pins as outputs as the Arduino API
  //doesn't handle automatically pulling SS low
  pinMode(5, OUTPUT); //VSPI SS
  pinMode(15, OUTPUT); //HSPI SS

}

// the loop function runs over and over again until power down or reset
void loop() {
  //use the SPI buses
  vspiCommand();
  hspiCommand();
  delay(100);
}

void vspiCommand() {
  byte data = 0b01010101; // junk data to illustrate usage

  //use it as you would the regular arduino SPI API
  vspi->beginTransaction(SPISettings(spiClk, MSBFIRST, SPI_MODE0));
  digitalWrite(5, LOW); //pull SS slow to prep other end for transfer
  vspi->transfer(data);
  digitalWrite(5, HIGH); //pull ss high to signify end of data transfer
  vspi->endTransaction();
}

void hspiCommand() {
  byte stuff = 0b11001100;

  hspi->beginTransaction(SPISettings(spiClk, MSBFIRST, SPI_MODE0));
  digitalWrite(15, LOW);
  hspi->transfer(stuff);
  digitalWrite(15, HIGH);
  hspi->endTransaction();
}
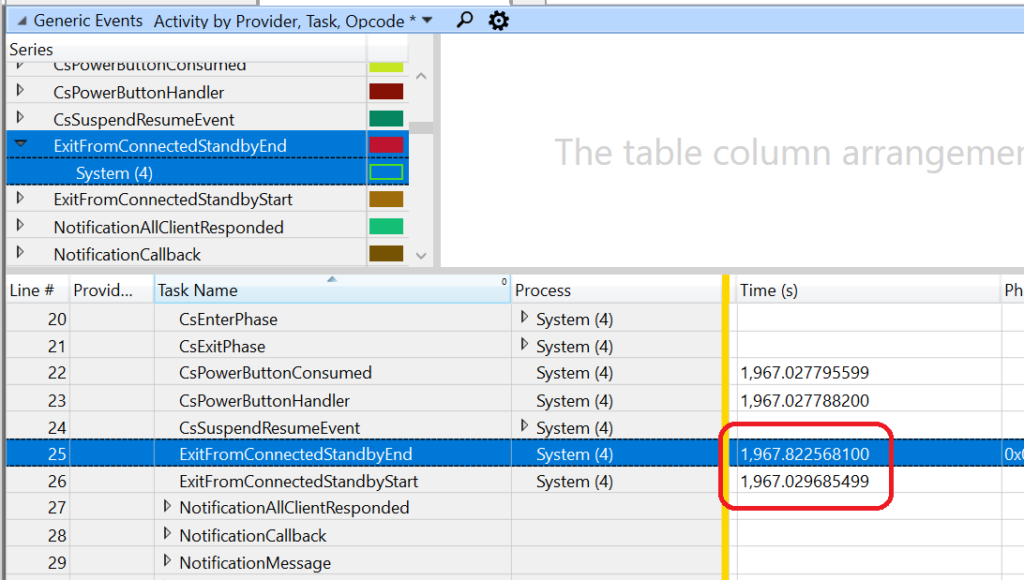
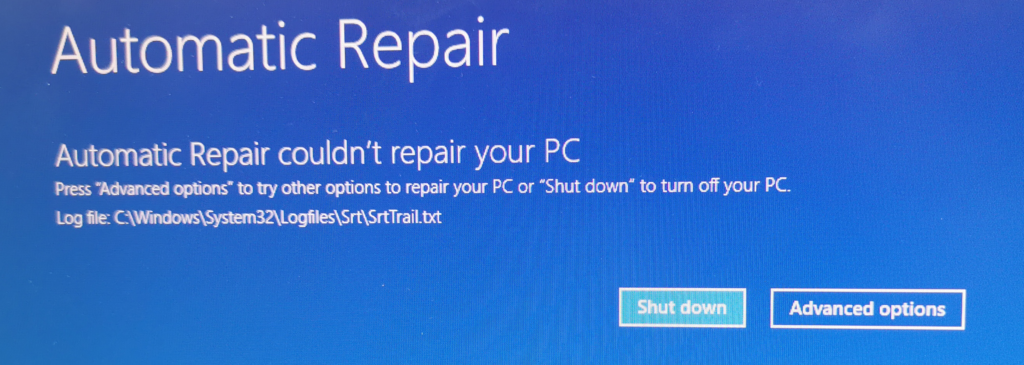
Startup Repair diagnosis and repair log
---------------------------
Last successful boot time: 5/19/2020 11:39:04 PM (GMT)
Number of repair attempts: 1
Session details
---------------------------
System Disk = \Device\Harddisk0
Windows directory = C:\Windows
AutoChk Run = 0
Number of root causes = 1
Test Performed:
---------------------------
Name: Check for updates
Result: Completed successfully. Error code = 0x0
Time taken = 0 ms
Test Performed:
---------------------------
Name: System disk test
Result: Completed successfully. Error code = 0x0
Time taken = 0 ms
Test Performed:
---------------------------
Name: Disk failure diagnosis
Result: Completed successfully. Error code = 0x0
Time taken = 0 ms
Test Performed:
---------------------------
Name: Disk metadata test
Result: Completed successfully. Error code = 0x0
Time taken = 141 ms
Test Performed:
---------------------------
Name: Disk metadata test
Result: Completed successfully. Error code = 0x0
Time taken = 0 ms
Test Performed:
---------------------------
Name: Target OS test
Result: Completed successfully. Error code = 0x0
Time taken = 16 ms
Test Performed:
---------------------------
Name: Volume content check
Result: Completed successfully. Error code = 0x0
Time taken = 31 ms
Test Performed:
---------------------------
Name: Boot manager diagnosis
Result: Completed successfully. Error code = 0x0
Time taken = 0 ms
Test Performed:
---------------------------
Name: System boot log diagnosis
Result: Completed successfully. Error code = 0x0
Time taken = 0 ms
Test Performed:
---------------------------
Name: Event log diagnosis
Result: Completed successfully. Error code = 0x0
Time taken = 0 ms
Test Performed:
---------------------------
Name: Internal state check
Result: Completed successfully. Error code = 0x0
Time taken = 0 ms
Test Performed:
---------------------------
Name: Check for installed LCU
Result: Completed successfully. Error code = 0x0
Time taken = 4515 ms
Test Performed:
---------------------------
Name: Check for installed driver updates
Result: Completed successfully. Error code = 0x0
Time taken = 750 ms
Test Performed:
---------------------------
Name: Check for pending package install
Result: Completed successfully. Error code = 0x0
Time taken = 1625 ms
Test Performed:
---------------------------
Name: Boot status test
Result: Completed successfully. Error code = 0x0
Time taken = 0 ms
Test Performed:
---------------------------
Name: Setup state check
Result: Completed successfully. Error code = 0x0
Time taken = 94 ms
Test Performed:
---------------------------
Name: Registry hives test
Result: Completed successfully. Error code = 0x0
Time taken = 469 ms
Test Performed:
---------------------------
Name: Windows boot log diagnosis
Result: Completed successfully. Error code = 0x0
Time taken = 0 ms
Root cause found:
---------------------------
Boot critical file c:\windows\system32\drivers\msdmfilt.sys is corrupt.
Repair action: File repair
Result: Failed. Error code = 0x57
Time taken = 1063 ms
---------------------------
---------------------------
#include <Uefi.h>
#include <Library/UefiLib.h>
#include <Library/ShellCEntryLib.h>
#include <Library/IoLib.h>
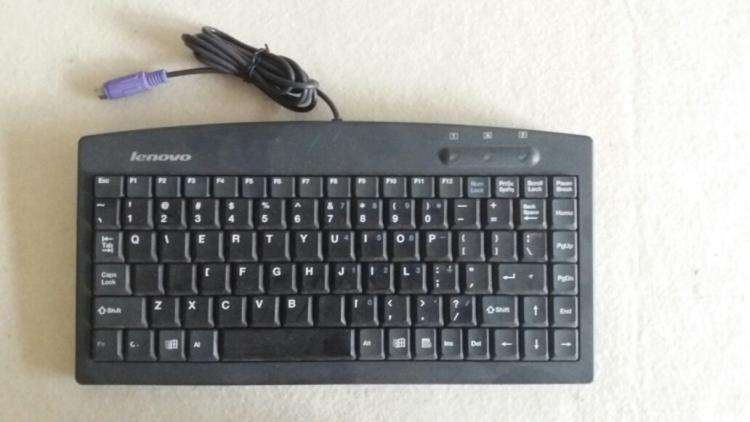
#include "Ps2Keyboard.h"
extern EFI_BOOT_SERVICES *gBS;
extern EFI_SYSTEM_TABLE *gST;
extern EFI_RUNTIME_SERVICES *gRT;
EFI_GUID gEfiSimpleTextInputExProtocolGuid =
{0xdd9e7534, 0x7762, 0x4698,
{ 0x8c, 0x14, 0xf5, 0x85, 0x17, 0xa6, 0x25, 0xaa } };
UINTN
EFIAPI
MicroSecondDelay (
IN UINTN MicroSeconds
)
{
gBS->Stall(MicroSeconds);
return MicroSeconds;
}
/**
Write data register.
@param ConsoleIn Pointer to instance of KEYBOARD_CONSOLE_IN_DEV
@param Data value wanted to be written
**/
VOID
KeyWriteDataRegister (
IN KEYBOARD_CONSOLE_IN_DEV *ConsoleIn,
IN UINT8 Data
)
{
IoWrite8 (ConsoleIn->DataRegisterAddress, Data);
}
/**
Read data register .
@param ConsoleIn Pointer to instance of KEYBOARD_CONSOLE_IN_DEV
@return return the value
**/
UINT8
KeyReadDataRegister (
IN KEYBOARD_CONSOLE_IN_DEV *ConsoleIn
)
{
return IoRead8 (ConsoleIn->DataRegisterAddress);
}
/**
Read status register.
@param ConsoleIn Pointer to instance of KEYBOARD_CONSOLE_IN_DEV
@return value in status register
**/
UINT8
KeyReadStatusRegister (
IN KEYBOARD_CONSOLE_IN_DEV *ConsoleIn
)
{
return IoRead8 (ConsoleIn->StatusRegisterAddress);
}
/**
wait for a specific value to be presented on
8042 Data register by keyboard and then read it,
used in keyboard commands ack
@param ConsoleIn Pointer to instance of KEYBOARD_CONSOLE_IN_DEV
@param Value the value wanted to be waited.
@retval EFI_TIMEOUT Fail to get specific value in given time
@retval EFI_SUCCESS Success to get specific value in given time.
**/
EFI_STATUS
KeyboardWaitForValue (
IN KEYBOARD_CONSOLE_IN_DEV *ConsoleIn,
IN UINT8 Value
)
{
UINT8 Data;
UINT32 TimeOut;
UINT32 SumTimeOut;
UINT32 GotIt;
GotIt = 0;
TimeOut = 0;
SumTimeOut = 0;
//
// Make sure the initial value of 'Data' is different from 'Value'
//
Data = 0;
if (Data == Value) {
Data = 1;
}
//
// Read from 8042 (multiple times if needed)
// until the expected value appears
// use SumTimeOut to control the iteration
//
while (1) {
//
// Perform a read
//
for (TimeOut = 0; TimeOut < KEYBOARD_TIMEOUT; TimeOut += 30) {
if (KeyReadStatusRegister (ConsoleIn) & 0x01) {
Data = KeyReadDataRegister (ConsoleIn);
break;
}
MicroSecondDelay (30);
}
SumTimeOut += TimeOut;
if (Data == Value) {
GotIt = 1;
break;
}
if (SumTimeOut >= KEYBOARD_WAITFORVALUE_TIMEOUT) {
break;
}
}
//
// Check results
//
if (GotIt == 1) {
return EFI_SUCCESS;
} else {
return EFI_TIMEOUT;
}
}
//
//\MdeModulePkg\Bus\Isa\Ps2KeyboardDxe\Ps2KbdCtrller.c
//
/**
write key to keyboard
@param ConsoleIn Pointer to instance of KEYBOARD_CONSOLE_IN_DEV
@param Data value wanted to be written
@retval EFI_TIMEOUT The input buffer register is full for putting new value util timeout
@retval EFI_SUCCESS The new value is sucess put into input buffer register.
**/
EFI_STATUS
KeyboardWrite (
IN KEYBOARD_CONSOLE_IN_DEV *ConsoleIn,
IN UINT8 Data
)
{
UINT32 TimeOut;
UINT32 RegEmptied;
TimeOut = 0;
RegEmptied = 0;
//
// wait for input buffer empty
//
for (TimeOut = 0; TimeOut < KEYBOARD_TIMEOUT; TimeOut += 30) {
if ((KeyReadStatusRegister (ConsoleIn) & 0x02) == 0) {
RegEmptied = 1;
break;
}
MicroSecondDelay (30);
}
if (RegEmptied == 0) {
return EFI_TIMEOUT;
}
//
// Write it
//
KeyWriteDataRegister (ConsoleIn, Data);
return EFI_SUCCESS;
}
//
//\MdeModulePkg\Bus\Isa\Ps2KeyboardDxe\Ps2KbdCtrller.c
//
/**
Show keyboard status lights according to
indicators in ConsoleIn.
@param ConsoleIn Pointer to instance of KEYBOARD_CONSOLE_IN_DEV
@return status of updating keyboard register
**/
EFI_STATUS
UpdateStatusLights (
IN KEYBOARD_CONSOLE_IN_DEV *ConsoleIn
)
{
EFI_STATUS Status;
UINT8 Command;
//
// Send keyboard command
//
Status = KeyboardWrite (ConsoleIn, 0xed);
if (EFI_ERROR (Status)) {
return Status;
}
KeyboardWaitForValue (ConsoleIn, 0xfa);
//
// Light configuration
//
Command = 0;
if (ConsoleIn->CapsLock) {
Command |= 4;
}
if (ConsoleIn->NumLock) {
Command |= 2;
}
if (ConsoleIn->ScrollLock) {
Command |= 1;
}
Status = KeyboardWrite (ConsoleIn, Command);
if (EFI_ERROR (Status)) {
return Status;
}
KeyboardWaitForValue (ConsoleIn, 0xfa);
return Status;
}
int
EFIAPI
main (
IN int Argc,
IN CHAR16 **Argv
)
{
EFI_STATUS Status;
EFI_SIMPLE_TEXT_INPUT_EX_PROTOCOL *ConIn;
KEYBOARD_CONSOLE_IN_DEV *ConsoleIn;
UINTN HandleIndex, HandleCount;
EFI_HANDLE *DevicePathHandleBuffer = NULL;
UINTN i;
//
//Get all the Handles that have SimpleTextInputEx Protocol
//
Status = gBS->LocateHandleBuffer(
ByProtocol,
&gEfiSimpleTextInputExProtocolGuid,
NULL,
&HandleCount,
&DevicePathHandleBuffer);
//
//Open SimpleTextInputEx Protocol on each device
//
for (HandleIndex = 0; HandleIndex < HandleCount; HandleIndex++)
{
Status = gBS->HandleProtocol(
DevicePathHandleBuffer[HandleIndex],
&gEfiSimpleTextInputExProtocolGuid,
(VOID**)&ConIn);
if (EFI_ERROR(Status))
{
Print(L"ERROR : Open ConIn fail.\n");
gBS->FreePool(DevicePathHandleBuffer);
return 0;
}
//Get KEYBOARD_CONSOLE_IN_DEV by SimpleTextInputEx Protocol
ConsoleIn = TEXT_INPUT_EX_KEYBOARD_CONSOLE_IN_DEV_FROM_THIS (ConIn);
//Check the signature if it's what we want
if (ConsoleIn->Signature==KEYBOARD_CONSOLE_IN_DEV_SIGNATURE) {
// Turn Off all LEDs
ConsoleIn->CapsLock=0;
ConsoleIn->NumLock=0;
ConsoleIn->ScrollLock=0;
UpdateStatusLights(ConsoleIn);
for (i=0;i<20;i++) {
ConsoleIn->NumLock=1;
UpdateStatusLights(ConsoleIn);
MicroSecondDelay(300000UL);
ConsoleIn->NumLock=0;
UpdateStatusLights(ConsoleIn);
MicroSecondDelay(300000UL);
ConsoleIn->CapsLock=1;
UpdateStatusLights(ConsoleIn);
MicroSecondDelay(300000UL);
ConsoleIn->CapsLock=0;
UpdateStatusLights(ConsoleIn);
MicroSecondDelay(300000UL);
ConsoleIn->ScrollLock=1;
UpdateStatusLights(ConsoleIn);
MicroSecondDelay(300000UL);
ConsoleIn->ScrollLock=0;
UpdateStatusLights(ConsoleIn);
MicroSecondDelay(300000UL);
}
} //if (ConsoleIn->Signature
} //for (HandleIndex = 0;
gBS->FreePool(DevicePathHandleBuffer);
return Status;
}
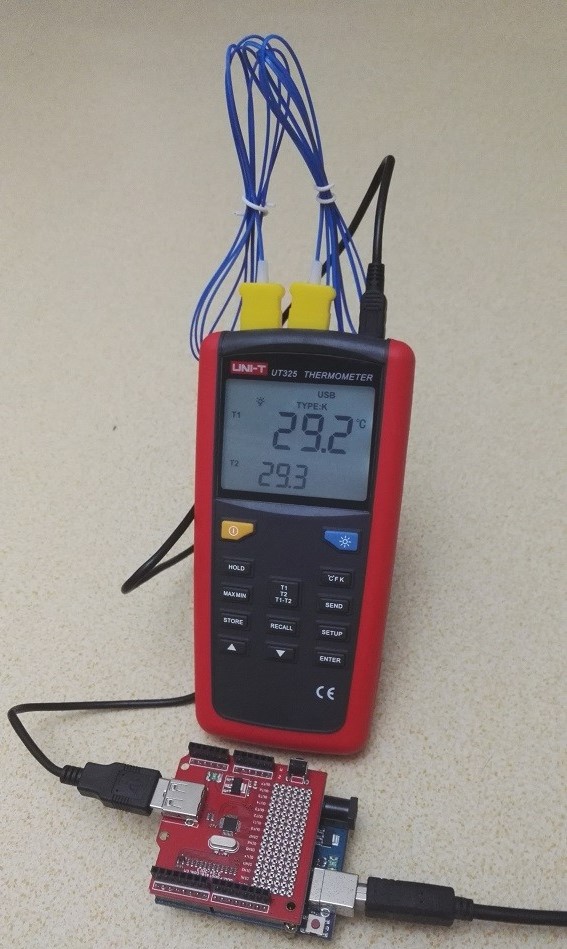
/*------------------------------------------------------------------------------------------------------------------
 *    Author: György Kovács                                                                                         |
 *    Created: 28 Mar 2019                                                                                          |
 *    Description: Basic usage of CH376 with hardware serial                                                        |
 *    Thanks for the idea to Scott C , https://arduinobasics.blogspot.com/2015/05/ch376s-usb-readwrite-module.html  |
 *------------------------------------------------------------------------------------------------------------------
 */


#include <Ch376msc.h>

//..............................................................................................................................
// Leave the default jumper settings for the baud rate (9600) on the CH376, the library will set it up the chosen speed(HW serial only)
Ch376msc flashDrive(Serial1, 115200); // Ch376 object with hardware Serial1 on arduino mega baudrate: 9600, 19200, 57600, 115200
//..............................................................................................................................
 // buffer for reading
char adatBuffer[255];// max length 255 = 254 char + 1 NULL character
//..............................................................................................................................
// strings for writing to file
char adat[]="Vivamus nec nisl molestie, blandit diam vel, varius mi. Fusce luctus cursus sapien in vulputate.\n";
char adat2[] = "Lorem ipsum dolor sit amet, consectetur adipiscing elit. Duis efficitur ac est eu pharetra. \n";
//..............................................................................................................................
unsigned long totSect = 0;
unsigned long freeSect = 0;
byte percentg = 0;
byte tmpCommand; //used to store data coming from serial port
boolean readMore;
static char helpString[]= {"h:Print this help\n\n1:Create\n2:Append\n3:Read\n4:Read date/time\n"
            "5:Modify date/time\n6:Delete\n7:List dir\n8:Print free space"
            "\n9:Open/Create folder(s)/subfolder(s)"};

void setup() {
  Serial.begin(115200);
  flashDrive.init();
  printInfo(helpString);
}

void loop() {
	if(flashDrive.checkIntMessage()){
		if(flashDrive.getDeviceStatus()){
			Serial.println(F("Flash drive attached!"));
		} else {
			Serial.println(F("Flash drive detached!"));
		}
	}
  if(Serial.available()){
    tmpCommand = Serial.read();                      //read incoming bytes from the serial monitor
    if(((tmpCommand > 48)&&(tmpCommand < 58)) && !flashDrive.driveReady()){ // if the data is ASCII 1 - 9 and no flash drive are attached
       printInfo("Attach flash drive first!");
      tmpCommand = 10; // change the command byte
    }
     switch (tmpCommand) {

      case 49: //1
        printInfo("COMMAND1: Create and write data to file : TEST1.TXT");    // Create a file called TEST1.TXT
          flashDrive.setFileName("TEST1.TXT");  //set the file name
          flashDrive.openFile();                //open the file

          for(int a = 0; a < 20; a++){          //write text from string(adat) to flash drive 20 times
            flashDrive.writeFile(adat, strlen(adat)); //string, string length
          }
          flashDrive.closeFile();               //at the end, close the file
        printInfo("Done!");
        break;
//*****************************************************************************************************************************************************
      case 50: //2
        printInfo("COMMAND2: Append data to file: TEST1.TXT");               // Append data to the end of the file.
        flashDrive.setFileName("TEST1.TXT");  //set the file name
        if(flashDrive.openFile() == ANSW_USB_INT_SUCCESS){               //open the file
        	flashDrive.moveCursor(CURSOREND);     //if the file exist, move the "virtual" cursor at end of the file, with CURSORBEGIN we actually rewrite our old file
        	//flashDrive.moveCursor(flashDrive.getFileSize()); // is almost the same as CURSOREND, because we put our cursor at end of the file
        }
        for(int a = 0; a < 20; a++){          //write text from string(adat) to flash drive 20 times
        	if(flashDrive.getFreeSectors()){ //check the free space on the drive
        		flashDrive.writeFile(adat2, strlen(adat2)); //string, string length
        	} else {
        		printInfo("Disk full");
        	}
        }
        flashDrive.closeFile();               //at the end, close the file
        printInfo("Done!");
        break;
//*****************************************************************************************************************************************************
      case 51: //3
        printInfo("COMMAND3: Read File: TEST1.TXT");                         // Read the contents of this file on the USB disk, and display contents in the Serial Monitor
        flashDrive.setFileName("TEST1.TXT");  //set the file name
        flashDrive.openFile();                //open the file
        readMore = true;
                //read data from flash drive until we reach EOF
        while(readMore){ // our temporary buffer where we read data from flash drive and the size of that buffer
        	readMore = flashDrive.readFile(adatBuffer, sizeof(adatBuffer));
        	Serial.print(adatBuffer);          //print the contents of the temporary buffer
        }
        flashDrive.closeFile();               //at the end, close the file
        printInfo("Done!");
        break;
//*****************************************************************************************************************************************************
      case 52: //4
        printInfo("COMMAND4: Read File date/time: TEST1.TXT");      // Read the date and time of file, default 2004.01.01 - 00:00:00
        flashDrive.setFileName("TEST1.TXT");            //set the file name
        flashDrive.openFile();                          //open the file
                //print informations about the file
          Serial.println(flashDrive.getFileName());
          Serial.print(flashDrive.getYear());
          Serial.print("y\t");
          Serial.print(flashDrive.getMonth());
          Serial.print("m\t");
          Serial.print(flashDrive.getDay());
          Serial.print("d\t");
          Serial.print(flashDrive.getHour());
          Serial.print("h\t");
          Serial.print(flashDrive.getMinute());
          Serial.print("m\t");
          Serial.print(flashDrive.getSecond());
          Serial.println('s');
        flashDrive.closeFile();                         //at the end, close the file
        printInfo("Done!");
        break;
//*****************************************************************************************************************************************************
      case 53: //5
        printInfo("COMMAND5: Modify File date/time: TEST1.TXT");    // Modify the file date/time and save
        flashDrive.setFileName("TEST1.TXT");  //set the file name
        flashDrive.openFile();                //open the file

          flashDrive.setYear(2019);
          flashDrive.setMonth(12);
          flashDrive.setDay(19);
          flashDrive.setHour(03);
          flashDrive.setMinute(38);
          flashDrive.setSecond(42);

          flashDrive.saveFileAttrb();           //save the changed data
        flashDrive.closeFile();               //and yes again, close the file after when you don`t use it
        printInfo("Done!");
        break;
//*****************************************************************************************************************************************************
      case 54: //6
        printInfo("COMMAND6: Delete File: TEST1.TXT");                       // Delete the file named TEST1.TXT
        flashDrive.setFileName("TEST1.TXT");  //set the file name
        flashDrive.deleteFile();              //delete file
        printInfo("Done!");
        break;
//*****************************************************************************************************************************************************
      case 55: //7
        printInfo("COMMAND7: List directory");                          //Print all file names in the current directory
          while(flashDrive.listDir()){ // reading next file
            if(flashDrive.getFileAttrb() == ATTR_DIRECTORY){//directory
              Serial.print('/');
              Serial.println(flashDrive.getFileName()); // get the actual file name
            } else {
              Serial.print(flashDrive.getFileName()); // get the actual file name
              Serial.print(" : ");
              Serial.print(flashDrive.getFileSize()); // get the actual file size in bytes
              Serial.print(" >>>\t");
              Serial.println(flashDrive.getFileSizeStr()); // get the actual file size in formatted string
            }
          }
          printInfo("Done!");
        break;
//*****************************************************************************************************************************************************
      case 56: //8
    	  totSect = flashDrive.getTotalSectors(); // get the total sector number
    	  freeSect = flashDrive.getFreeSectors(); // get the available sector number
    	  percentg = map(freeSect,totSect,0,0,100); 		// convert it to percentage (0-100)
    	  Serial.print("Disk size in bytes: ");
    	  /*if the sector number is more than 8388607 (8388607 * 512 = 4294966784 byte = 4Gb (fits in a 32bit variable) )
    	    							 e.g. 8388608 * 512 = 4294967296 byte (32bit variable overflows) */
    	  if(totSect > 8388607){
    		  Serial.print(">4Gb");
    	  } else {
        	  Serial.print(totSect * SECTORSIZE);
    	  }
    	  Serial.print("\tFree space in bytes: ");
    	  if(freeSect > 8388607){
    		  Serial.print(">4Gb");
    	  } else {
        	  Serial.print(freeSect * SECTORSIZE);
    	  }
    	  Serial.print(F("\tDisk usage :"));
    	  Serial.print(percentg);
    	  Serial.print(F("%"));
    	  switch (flashDrive.getFileSystem()) { //1-FAT12, 2-FAT16, 3-FAT32
			case 1:
				Serial.println(F("\tFAT12 partition"));
				break;
			case 2:
				Serial.println(F("\tFAT16 partition"));
				break;
			case 3:
				Serial.println(F("\tFAT32 partition"));
				break;
			default:
				Serial.println(F("\tNo valid partition"));
				break;
		}
    	 break;
//*****************************************************************************************************************************************************
      case 57: //9
        switch(flashDrive.cd("/DIR1/DIR2/DIR3",1)){
          case ERR_LONGFILENAME: //0x01
            Serial.println(F("Directory name is too long"));
          break;

          case ANSW_USB_INT_SUCCESS: //0x14
          Serial.println(F("Directory created successfully"));
          break;

          case ANSW_ERR_OPEN_DIR: //0x41
          Serial.println(F("Directory opened successfully"));
          break;

          case ANSW_ERR_MISS_FILE: //0x42
          Serial.println(F("Directory doesn't exist"));
          break;

          case ANSW_ERR_FOUND_NAME: //0x43
          Serial.println(F("File exist with the given name"));
          break;

          default:

          break;
        }
      break;
//*****************************************************************************************************************************************************
      case 104: //h
    	  printInfo(helpString);
        break;
      default:
        break;
    }//end switch

  }//endif serial available

}//end loop

//Print information
void printInfo(char info[]){
  char * infoPtr = info;
  int infoLength = 0;
    while(*infoPtr){
      infoPtr++;
      infoLength++;
      if(infoLength > 40) break;
    }
    Serial.print(F("\n\n"));
    for(int a = 0; a < infoLength; a++){
      Serial.print('*');
    }
   Serial.println();
   Serial.println(info);
   for(int a = 0; a < infoLength; a++){
      Serial.print('*');
    }
   Serial.print(F("\n\n"));
}
// Invoke callback function if inTransfer completed successfully and callback function pointer is specified
   if(!rcode && p)
     ((USBReadParser*)p)->Parse(read, dataptr, total - left);
但是很明显,这里是调用设定的 callback 函数。
经过查找,最终确定实际生效的代码是hexdump.h 文件中下面的代码:
template <class BASE_CLASS, class LEN_TYPE, class OFFSET_TYPE>
void HexDumper<BASE_CLASS, LEN_TYPE, OFFSET_TYPE>::Parse(const LEN_TYPE len, const uint8_t *pbuf, const OFFSET_TYPE &offset __attribute__((unused))) {
        if(UsbDEBUGlvl >= 0x80) { // Fully bypass this block of code if we do not debug.
                for(LEN_TYPE j = 0; j < len; j++, byteCount++, byteTotal++) {
                        if(!byteCount) {
                                PrintHex<OFFSET_TYPE > (byteTotal, 0x80);
                                E_Notify(PSTR(": "), 0x80);
                        }
                        PrintHex<uint8_t > (pbuf[j], 0x80);
                        E_Notify(PSTR(" "), 0x80);

                        if(byteCount == 15) {
                                E_Notify(PSTR("\r\n"), 0x80);
                                byteCount = 0xFF;
                        }
                }
        }
}
因为其他地方对 UsbDEBUGlvl 赋值为 0x80,所以会输出一下信息用于Debug。
最近阅读 USB Host Shield 感觉风格不是很统一,比如,用于 Debug 的定义开关有很多处,估计是因为后来的代码是很多人合作的结果。