前面对于 RU.EFI 的研究告诉我们对于 X86 来说,访问硬件信息需要的基本操作有:
1. PCI 信息的访问
2. 访问IO Port 直接访问
3. IO Port Index/Data 方式的访问
4. Memory 的访问
5. Memory Index/Data 方式的访问
6. MSR 的访问
掌握了上述的访问方法就可以访问到 X86 上的全部空间和寄存器。下面逐项介绍在 WinDBG 中的访问方法。因为大多数情况下,WinDBG 是用于调试 Windows 软件本身而不是硬件,因此很多操作都是来自个人总结如果有错误或者遗漏,恳请及时指出。
1.PCI的访问
a. !pcitree 命令可以用来查看当前系统中的PCI总线和设备信息【参考1】
实例如下
0: kd> !pcitree
SYMSRV:  BYINDEX: 0x5
         C:\ProgramData\Dbg\sym
         pci.pdb
         96732E11A7284081C982C9A015D949A81
SYMSRV:  UNC: C:\ProgramData\Dbg\sym\pci.pdb\96732E11A7284081C982C9A015D949A81\pci.pdb - path not found
SYMSRV:  UNC: C:\ProgramData\Dbg\sym\pci.pdb\96732E11A7284081C982C9A015D949A81\pci.pd_ - path not found
SYMSRV:  UNC: C:\ProgramData\Dbg\sym\pci.pdb\96732E11A7284081C982C9A015D949A81\file.ptr - path not found
SYMSRV:  RESULT: 0x80070003
SYMSRV:  BYINDEX: 0x6
         C:\ProgramData\Dbg\sym*https://msdl.microsoft.com/download/symbols
         pci.pdb
         96732E11A7284081C982C9A015D949A81
SYMSRV:  UNC: C:\ProgramData\Dbg\sym\pci.pdb\96732E11A7284081C982C9A015D949A81\pci.pdb - path not found
SYMSRV:  UNC: C:\ProgramData\Dbg\sym\pci.pdb\96732E11A7284081C982C9A015D949A81\pci.pd_ - path not found
SYMSRV:  UNC: C:\ProgramData\Dbg\sym\pci.pdb\96732E11A7284081C982C9A015D949A81\file.ptr - path not found
SYMSRV:  HTTPGET: /download/symbols/pci.pdb/96732E11A7284081C982C9A015D949A81/pci.pdb
SYMSRV:  HttpQueryInfo: 801900c8 - HTTP_STATUS_OK
SYMSRV:  pci.pdb from https://msdl.microsoft.com/download/symbols:copied
SYMSRV:  PATH: C:\ProgramData\Dbg\sym\pci.pdb\96732E11A7284081C982C9A015D949A81\pci.pdb
SYMSRV:  RESULT: 0x00000000
DBGHELP: C:\ProgramData\Dbg\sym\pci.pdb\96732E11A7284081C982C9A015D949A81\pci.pdb cached to C:\ProgramData\Dbg\sym\pci.pdb\96732E11A7284081C982C9A015D949A81\pci.pdb
DBGHELP: pci - public symbols
        C:\ProgramData\Dbg\sym\pci.pdb\96732E11A7284081C982C9A015D949A81\pci.pdb
Bus 0x0 (FDO Ext ffffb106414d5a20)
  (d=0,  f=0) 80863e34 devext 0xffffb1063bfef1b0 devstack 0xffffb1063bfef060 0600 Bridge/HOST to PCI
  (d=2,  f=0) 80863ea0 devext 0xffffb1063bfee1b0 devstack 0xffffb1063bfee060 0300 Display Controller/VGA
  (d=8,  f=0) 80861911 devext 0xffffb1063bfed1b0 devstack 0xffffb1063bfed060 0880 Base System Device/'Other' base system device
  (d=12, f=0) 80869df9 devext 0xffffb1063bfec1b0 devstack 0xffffb1063bfec060 1180 Unknown Base Class/Unknown Sub Class
  (d=13, f=0) 80869dfc devext 0xffffb1063bfeb1b0 devstack 0xffffb1063bfeb060 0700 Simple Serial Communications Controller/Serial Port
  (d=14, f=0) 80869ded devext 0xffffb1063bfea1b0 devstack 0xffffb1063bfea060 0c03 Serial Bus Controller/USB
  (d=14, f=2) 80869def devext 0xffffb1063bfe91b0 devstack 0xffffb1063bfe9060 0500 Memory Controller/RAM
  (d=15, f=0) 80869de8 devext 0xffffb1063b4751b0 devstack 0xffffb1063b475060 0c80 Serial Bus Controller/Unknown Sub Class
  (d=16, f=0) 80869de0 devext 0xffffb1063b4671b0 devstack 0xffffb1063b467060 0780 Simple Serial Communications Controller/'Other'
  (d=1d, f=0) 80869db0 devext 0xffffb1063b4691b0 devstack 0xffffb1063b469060 0604 Bridge/PCI to PCI
  Bus 0x1 (FDO Ext ffffb106414e1a20)
    (d=0,  f=0) 144da802 devext 0xffffb106415d81b0 devstack 0xffffb106415d8060 0108 Mass Storage Controller/Unknown Sub Class
  (d=1f, f=0) 80869d84 devext 0xffffb1063b47b740 devstack 0xffffb1063b47b5f0 0601 Bridge/PCI to ISA
  (d=1f, f=3) 80869dc8 devext 0xffffb106414d01b0 devstack 0xffffb106414d0060 0401 Multimedia Device/Audio
  (d=1f, f=4) 80869da3 devext 0xffffb106415c21b0 devstack 0xffffb106415c2060 0c05 Serial Bus Controller/Unknown Sub Class
  (d=1f, f=5) 80869da4 devext 0xffffb106415c91b0 devstack 0xffffb106415c9060 0c80 Serial Bus Controller/Unknown Sub Class
Total PCI Root busses processed = 1
Total PCI Segments processed = 1
如果运行时出现类似下面的提示,需要使用.reload pci.sys 加载一下对应的 symbol
0: kd> !pcitree
Error retrieving address of PciFdoExtensionListHead
b. !pci 命令,参数比较多,这里直接给出常用的命令【参考2】
!pci 2 ff //列出当前系统中全部 PCI 设备
0: kd> !pci 2 ff
PCI Segment 0 Bus 0
00:0  8086:3e34.0b  Cmd[0006:.mb...]  Sts[0090:c....]  Intel Host Bridge  SubID:8086:7270
02:0  8086:3ea0.00  Cmd[0400:......]  Sts[0010:c....]  Intel VGA Compatible Controller  SubID:8086:2212
08:0  8086:1911.00  Cmd[0000:......]  Sts[0010:c....]  Intel Other System Peripheral  SubID:8086:7270
12:0  8086:9df9.30  Cmd[0002:.m....]  Sts[0010:c....]  Intel Other Signal Processing Controller  SubID:8086:7270
13:0  8086:9dfc.30  Cmd[0000:......]  Sts[0010:c....]  Intel Serial Controller  SubID:8086:7270
14:0  8086:9ded.30  Cmd[0406:.mb...]  Sts[0290:c....]  Intel Class:c:3:30  SubID:8086:7270
14:2  8086:9def.30  Cmd[0006:.mb...]  Sts[0010:c....]  Intel RAM Controller
15:0  8086:9de8.30  Cmd[0400:......]  Sts[0010:c....]  Intel Class:c:80:0  SubID:8086:7270
16:0  8086:9de0.30  Cmd[0406:.mb...]  Sts[0010:c....]  Intel Other Communications Controller  SubID:8086:7270
1d:0  8086:9db0.f0  Cmd[0407:imb...]  Sts[0010:c....]  Intel PCI-PCI Bridge 0->0x1-0x1
1f:0  8086:9d84.30  Cmd[0407:imb...]  Sts[0000:.....]  Intel ISA Bridge  SubID:8086:7270
1f:3  8086:9dc8.30  Cmd[0406:.mb...]  Sts[0010:c....]  Intel Audio Device  SubID:8086:7270
1f:4  8086:9da3.30  Cmd[0000:......]  Sts[0280:.....]  Intel SMBus Controller  SubID:8086:7270
1f:5  8086:9da4.30  Cmd[0402:.m....]  Sts[0000:.....]  Intel Class:c:80:0  SubID:8086:7270
PCI Segment 0 Bus 0x1
00:0  144d:a802.01  Cmd[0406:.mb...]  Sts[0010:c....]  Class:1:8:2  SubID:144d:a801
!pci f 0 2 0 0 0x200 //查看Bus 0, Device 2,function 0 上从 0 到 0x200的寄存器
0: kd> !pci f 0 2 0 0 0x200
PCI Segment 0 Bus 0
02:0  8086:3ea0.00  Cmd[0400:......]  Sts[0010:c....]  Intel VGA Compatible Controller  SubID:8086:2212
      cf8:80001000  IntPin:1  IntLine:0  Rom:0  cis:0  cap:40
      MEM[0]:cf000004  MPF[2]:d000000c  IO[4]:ffc1
      00000000:  3ea08086 00100400 03000000 00000000
      00000010:  cf000004 00000000 d000000c 00000000
      00000020:  0000ffc1 00000000 00000000 22128086
      00000030:  00000000 00000040 00000000 00000100
      00000040:  010c7009 7a6160b1 9615808c 00000000
      00000050:  000001c1 00008031 00000000 8e000001
      00000060:  00010000 00000000 00000000 00000000
      00000070:  0092ac10 10008000 00000000 00000000
      00000080:  00000000 00000000 00000000 00000000
      00000090:  00000000 00000000 00000000 00000000
      000000a0:  00000000 00000000 00000000 0000d005
      000000b0:  fee00358 00000000 00000000 00000000
      000000c0:  00000000 00000000 00000000 00000000
      000000d0:  00220001 00000003 00000000 00000000
      000000e0:  00000000 00000000 00008000 00000000
      000000f0:  00000000 00000000 00000000 8cb33018
      00000100:  2001001b 00001400 00000000 00000000
      00000110:  00000000 00000000 00000000 00000000
      00000120:  00000000 00000000 00000000 00000000
      00000130:  00000000 00000000 00000000 00000000
      00000140:  00000000 00000000 00000000 00000000
      00000150:  00000000 00000000 00000000 00000000
      00000160:  00000000 00000000 00000000 00000000
      00000170:  00000000 00000000 00000000 00000000
      00000180:  00000000 00000000 00000000 00000000
      00000190:  00000000 00000000 00000000 00000000
      000001a0:  00000000 00000000 00000000 00000000
      000001b0:  00000000 00000000 00000000 00000000
      000001c0:  00000000 00000000 00000000 00000000
      000001d0:  00000000 00000000 00000000 00000000
      000001e0:  00000000 00000000 00000000 00000000
      000001f0:  00000000 00000000 00000000 00000000
      00000200:  0001000f
2. IO Port 的访问
IO port to read and write【参考3】
| Function | Command | Description / mnemonic |
| Read IO port | ib, iw, id | Input from port (byte, word, double word) |
| Write IO port | ob, ow, od | Output to port (byte, word, double word) |
实例如下 :访问70/71 上面的 CMOS,这个位置是当前的Second 所以过了一段时间会有变化
0: kd> !ob 70 0
0: kd> !ib 71
00000071: 000000000059
0: kd> !ob 70 0
0: kd> !ib 71
00000071: 000000000004
3. Memory 的访问
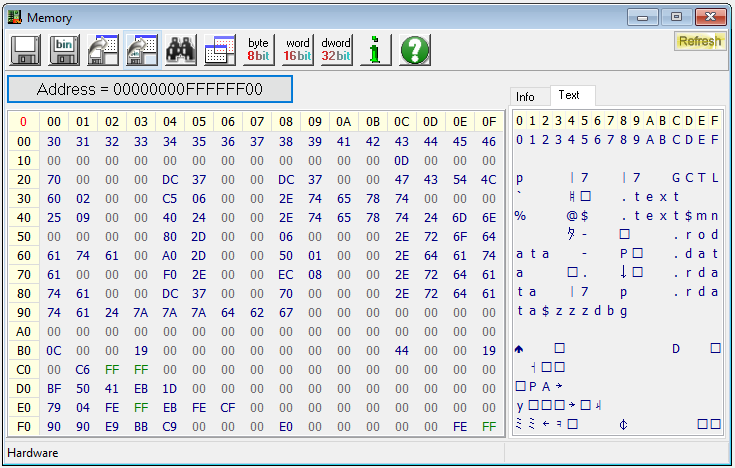
对于我们来说关注点通常只是物理内存,可以通过 !d* 命令来访问到【参考1】
实例如下 :!db 0xFFFFFF00 l 0x100 //按照Byte访问0xFFFFFF00,长度为 0x100 字节
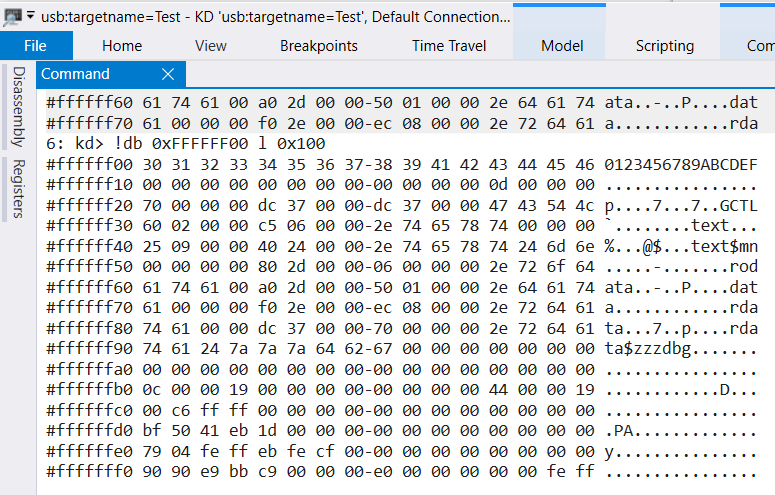
目标机上同时使用 RW Everything 查看,可以看到结果相同:
4. MSR 的访问
可以通过 rdmsr 和 wrmsr 来实现,例如:
0: kd> rdmsr 0x2ff
msr[2ff] = 00000000`00000c06
此外,CPUID也可以被看作是一种MSR 可以用 CPUID 指令进行访问【参考4】:
0: kd> !cpuid
CP  F/M/S  Manufacturer     MHz
 0  6,142,11 GenuineIntel    1992
 1  6,142,11 GenuineIntel    1992
 2  6,142,11 GenuineIntel    1992
 3  6,142,11 GenuineIntel    1992
 4  6,142,11 GenuineIntel    1992
 5  6,142,11 GenuineIntel    1992
 6  6,142,11 GenuineIntel    1992
 7  6,142,11 GenuineIntel    1992
不过看起来能够提供的信息还是比较有限的。
参考: