最近在用DFRobot 出品的 FireBeelte
做点东西玩,在使用中需要用到多个串口。当我在程序开始写上 Include softwareSerial.h 之后,编译报错。研究了一番发现目前这个平台没有支持 Software Serial (准确的说没有自带原生的库,但是看起来有几个第三方的库)。再研究一番发现还有更简单的实现。
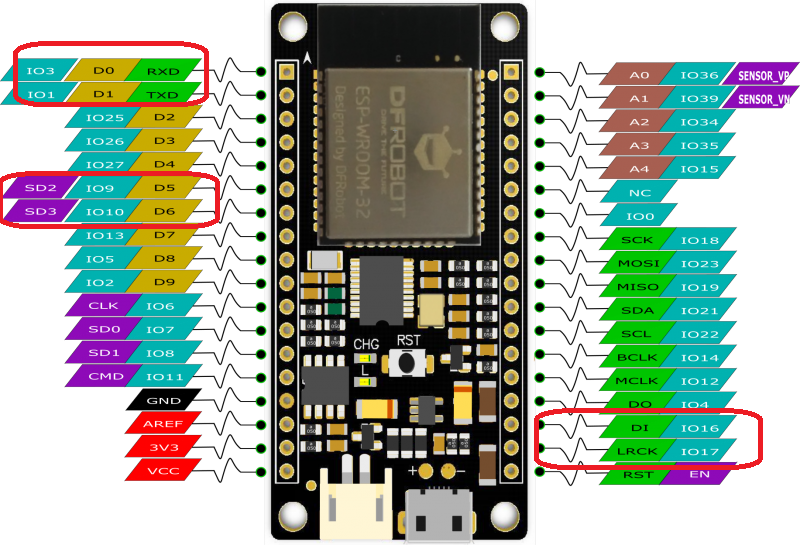
ESP32 支持了3个硬件串口(这样算起来不支持 Software Serial 也没有什么影响)。分别位于 IO3/1 , IO9/10 和 IO16/17。换成 Arduino IDE 的语言是 D0/0,
D5/6 和DI/LRCK。其中的IO3/1
已经给烧写程序使用,所以一般都是使用后面2组。
HardwareSerial Serial1(2);
//HardwareSerial Serial2(2);

void setup() {
  Serial.begin(115200);
  Serial1.begin(115200);
  //Serial2.begin(115200);
}

void loop() {

  if (Serial.available()) {      // If anything comes in Serial (USB),
    Serial1.write(Serial.read());   // read it and send it out Serial1 (pins 0 & 1)
  }

  if (Serial1.available()) {     // If anything comes in Serial1 (pins 0 & 1)
    Serial.write(Serial1.read());   // read it and send it out Serial (USB)
  }
}
#include <Uefi.h>
#include <Library/UefiLib.h>
#include <Library/DebugLib.h>
#include <Library/ShellCEntryLib.h>
/**
UEFI application entry point which has an interface similar to a
standard C main function.
The ShellCEntryLib library instance wrappers the actual UEFI application
entry point and calls this ShellAppMain function.
@param ImageHandle The image handle of the UEFI Application.
@param SystemTable A pointer to the EFI System Table.
@retval 0 The application exited normally.
@retval Other An error occurred.
**/
INTN
EFIAPI
ShellAppMain (
IN UINTN Argc,
IN CHAR16 **Argv
)
{
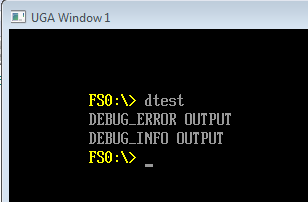
DEBUG ((DEBUG_ERROR, "DEBUG_ERROR OUTPUT\n"));
DEBUG ((DEBUG_INFO, "DEBUG_INFO OUTPUT\n"));
return EFI_SUCCESS;
}
/**
  Macro that calls DebugPrint().

  If MDEPKG_NDEBUG is not defined and the DEBUG_PROPERTY_DEBUG_PRINT_ENABLED
  bit of PcdDebugProperyMask is set, then this macro passes Expression to
  DebugPrint().

  @param  Expression  Expression containing an error level, a format string,
                      and a variable argument list based on the format string.


**/
#if !defined(MDEPKG_NDEBUG)
  #define DEBUG(Expression)        \
    do {                           \
      if (DebugPrintEnabled ()) {  \
        _DEBUG (Expression);       \
      }                            \
    } while (FALSE)
#else
  #define DEBUG(Expression)
#endif
其中用到的 _DEBUG 在同一个文件中:
/**
  Internal worker macro that calls DebugPrint().

  This macro calls DebugPrint() passing in the debug error level, a format
  string, and a variable argument list.
  __VA_ARGS__ is not supported by EBC compiler, Microsoft Visual Studio .NET 2003
  and Microsoft Windows Server 2003 Driver Development Kit (Microsoft WINDDK) version 3790.1830.

  @param  Expression  Expression containing an error level, a format string,
                      and a variable argument list based on the format string.

**/

#if !defined(MDE_CPU_EBC) && (!defined (_MSC_VER) || _MSC_VER > 1400)
  #define _DEBUG_PRINT(PrintLevel, ...)              \
    do {                                             \
      if (DebugPrintLevelEnabled (PrintLevel)) {     \
        DebugPrint (PrintLevel, ##__VA_ARGS__);      \
      }                                              \
    } while (FALSE)
  #define _DEBUG(Expression)   _DEBUG_PRINT Expression
#else
#define _DEBUG(Expression)   DebugPrint Expression
#endif
设置之后会 Link 到 \MdePkg\Library\UefiDebugLibConOut\DebugLib.c 文件上:
/**
  Returns TRUE if DEBUG() macros are enabled.

  This function returns TRUE if the DEBUG_PROPERTY_DEBUG_PRINT_ENABLED bit of
  PcdDebugProperyMask is set.  Otherwise FALSE is returned.

  @retval  TRUE    The DEBUG_PROPERTY_DEBUG_PRINT_ENABLED bit of PcdDebugProperyMask is set.
  @retval  FALSE   The DEBUG_PROPERTY_DEBUG_PRINT_ENABLED bit of PcdDebugProperyMask is clear.

**/
BOOLEAN
EFIAPI
DebugPrintEnabled (
  VOID
  )
{
  return (BOOLEAN) ((PcdGet8(PcdDebugPropertyMask) & DEBUG_PROPERTY_DEBUG_PRINT_ENABLED) != 0);
}
5.UEFI Platform Initialization Distribution Packaging Specification 当前最新版本 UEFI Platform Initialization Distribution Packaging Specification Version 1.1
/** @file
Logo DXE Driver, install Edkii Platform Logo protocol.
Copyright (c) 2016 - 2017, Intel Corporation. All rights reserved.<BR>
This program and the accompanying materials
are licensed and made available under the terms and conditions of the BSD License
which accompanies this distribution. The full text of the license may be found at
http://opensource.org/licenses/bsd-license.php
THE PROGRAM IS DISTRIBUTED UNDER THE BSD LICENSE ON AN "AS IS" BASIS,
WITHOUT WARRANTIES OR REPRESENTATIONS OF ANY KIND, EITHER EXPRESS OR IMPLIED.
**/
#include <Uefi.h>
#include <Library/UefiLib.h>
#include <Library/ShellCEntryLib.h>
#include <Protocol/HiiDatabase.h>
#include <Protocol/GraphicsOutput.h>
#include <Protocol/HiiImageEx.h>
#include <Protocol/PlatformLogo.h>
#include <Protocol/HiiPackageList.h>
#include <Library/UefiBootServicesTableLib.h>
#include <Library/DebugLib.h>
#include <Library/PrintLib.h>
#include <Library/MemoryAllocationLib.h>
#include <Library/BaseLib.h>
#include <Library/UefiApplicationEntryPoint.h>
#define EFI_GRAPHICS_OUTPUT_PROTOCOL_GUID \
{ \
0x9042a9de, 0x23dc, 0x4a38, {0x96, 0xfb, 0x7a, 0xde, 0xd0, 0x80, 0x51, 0x6a } \
}
static EFI_GUID GraphicsOutputProtocolGuid = EFI_GRAPHICS_OUTPUT_PROTOCOL_GUID;
//DO NOT REMOVE IMAGE_TOKEN (IMG_LOGO)
/**
Entrypoint of this module.
This function is the entrypoint of this module. It installs the Edkii
Platform Logo protocol.
@param ImageHandle The firmware allocated handle for the EFI image.
@param SystemTable A pointer to the EFI System Table.
@retval EFI_SUCCESS The entry point is executed successfully.
**/
EFI_STATUS
EFIAPI
UefiMain (
IN EFI_HANDLE ImageHandle,
IN EFI_SYSTEM_TABLE *SystemTable
)
{
EFI_STATUS Status;
EFI_HII_PACKAGE_LIST_HEADER *PackageListHeader;
EFI_HII_IMAGE_PACKAGE_HDR *ImageHeader;
EFI_HII_IMAGE_BLOCK *ImageBlocktType;
EFI_HII_IIBT_IMAGE_24BIT_BASE *ImageData;
EFI_GRAPHICS_OUTPUT_PROTOCOL *GraphicsOutput;
UINT16 i,j;
UINT8* RGB32;
//Step1. Get Package List Header Address
//
// Retrieve HII package list from ImageHandle
//
Status = gBS->OpenProtocol (
ImageHandle,
&gEfiHiiPackageListProtocolGuid,
(VOID **) &PackageListHeader,
ImageHandle,
NULL,
EFI_OPEN_PROTOCOL_GET_PROTOCOL
);
if (EFI_ERROR (Status)) {
Print(L"HII Image Package with logo not found in PE/COFF resource section\n");
return Status;
}
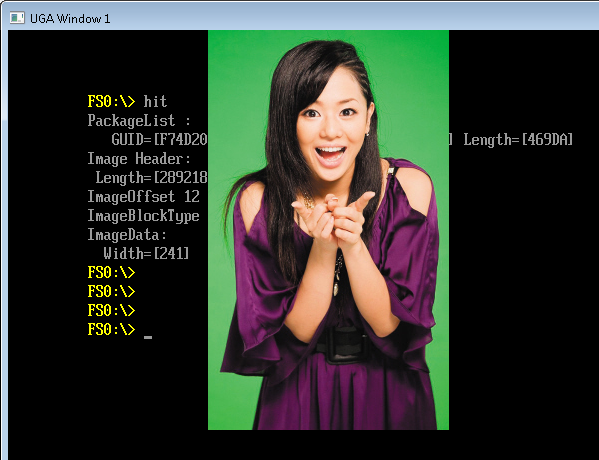
Print(L"PackageList :\n GUID=[%g] Length=[%X]\n",
PackageListHeader->PackageListGuid,
PackageListHeader->PackageLength);
//Step2. Parser HII Image
ImageHeader=(EFI_HII_IMAGE_PACKAGE_HDR*)(PackageListHeader+1);
Print(L"Image Header:\n Length=[%d] Type=[%d]\n",ImageHeader->Header.Length,ImageHeader->Header.Type);
Print(L"ImageOffset %d PalOffset %d\n",ImageHeader->ImageInfoOffset,ImageHeader->PaletteInfoOffset);
ImageBlocktType=(EFI_HII_IMAGE_BLOCK *)(ImageHeader+1);
Print(L"ImageBlockType %x\n",*ImageBlocktType);
ImageData=(EFI_HII_IIBT_IMAGE_24BIT_BASE *)(ImageBlocktType+1);
Print(L"ImageData:\n Width=[%d] Heigth=[%d]\n",ImageData->Width,ImageData->Height);
Status = gBS->LocateProtocol(&GraphicsOutputProtocolGuid, NULL, (VOID **) &GraphicsOutput);
if (EFI_ERROR(Status)) {
Print(L"Loading Graphics_Output_Protocol error!\n");
return EFI_SUCCESS;
}
//Step3. Get BMP Image
RGB32 = (UINT8*)AllocatePool(ImageData->Width * ImageData->Height *4);
for (j=0;j<ImageData->Height;j++) {
for (i=0;i<ImageData->Width;i++) {
RGB32[(j*ImageData->Width+i)*4] = ImageData->Bitmap[(j*ImageData->Width+i)].b;//Blue
RGB32[(j*ImageData->Width+i)*4+1]= ImageData->Bitmap[(j*ImageData->Width+i)].g; //Green
RGB32[(j*ImageData->Width+i)*4+2]= ImageData->Bitmap[(j*ImageData->Width+i)].r; //Red
RGB32[(j*ImageData->Width+i)*4+3]= 0;
}
}
//Step4. Show the Image
GraphicsOutput->Blt(
GraphicsOutput,
(EFI_GRAPHICS_OUTPUT_BLT_PIXEL *) RGB32,
EfiBltBufferToVideo,
0, 0,
200, 0,
ImageData->Width, ImageData->Height, 0);
FreePool(RGB32);
return Status;
}
HIIImageTest.idf #image IMG_LOGO TestImage.bmp
#image IMG_LOGO TestImage.bmp
HIIImageTest.inf
## @file
# The default logo bitmap picture shown on setup screen.
#
# Copyright (c) 2016 - 2017, Intel Corporation. All rights reserved.<BR>
#
# This program and the accompanying materials
# are licensed and made available under the terms and conditions of the BSD License
# which accompanies this distribution. The full text of the license may be found at
# http://opensource.org/licenses/bsd-license.php
# THE PROGRAM IS DISTRIBUTED UNDER THE BSD LICENSE ON AN "AS IS" BASIS,
# WITHOUT WARRANTIES OR REPRESENTATIONS OF ANY KIND, EITHER EXPRESS OR IMPLIED.
#
#
##
[Defines]
INF_VERSION = 0x00010005
BASE_NAME = hit
MODULE_UNI_FILE = LogoDxe.uni
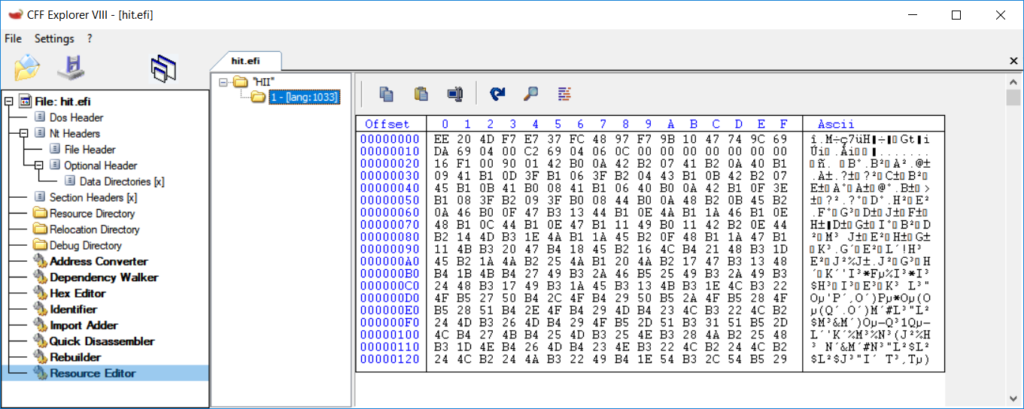
FILE_GUID = F74D20EE-37E7-48FC-97F7-9B1047749C69
MODULE_TYPE = UEFI_APPLICATION
VERSION_STRING = 1.0
ENTRY_POINT = UefiMain
#
# This flag specifies whether HII resource section is generated into PE image.
#
UEFI_HII_RESOURCE_SECTION = TRUE
#
# The following information is for reference only and not required by the build tools.
#
# VALID_ARCHITECTURES = IA32 X64
#
[Sources]
TestImage.bmp
HIIImageTest.c
HIIImageTest.idf
[Packages]
MdeModulePkg/MdeModulePkg.dec
MdePkg/MdePkg.dec
StdLib/StdLib.dec
ShellPkg/ShellPkg.dec
[LibraryClasses]
DebugLib
UefiApplicationEntryPoint
PrintLib
UefiLib
[Protocols]
gEfiHiiPackageListProtocolGuid ## PRODUCES CONSUMES
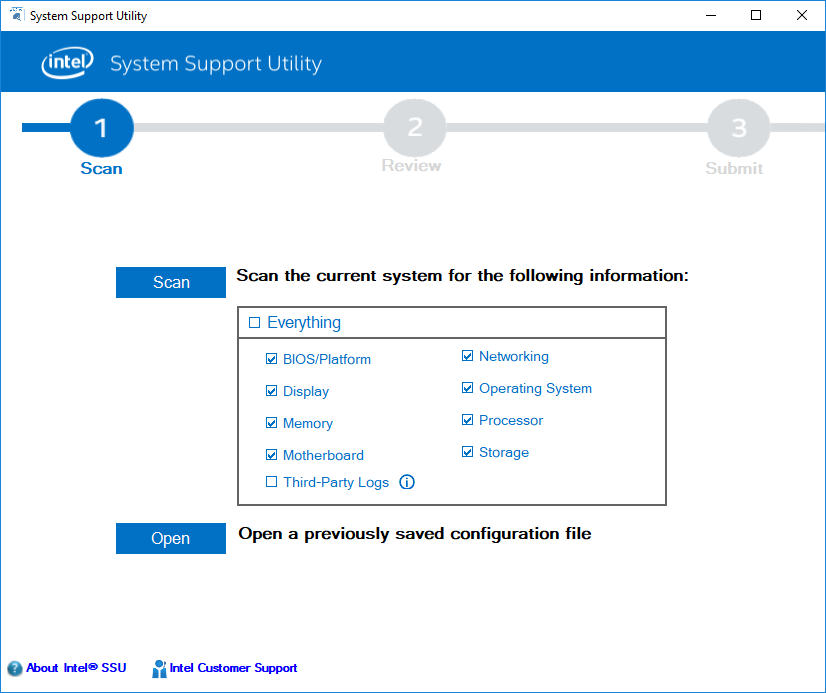
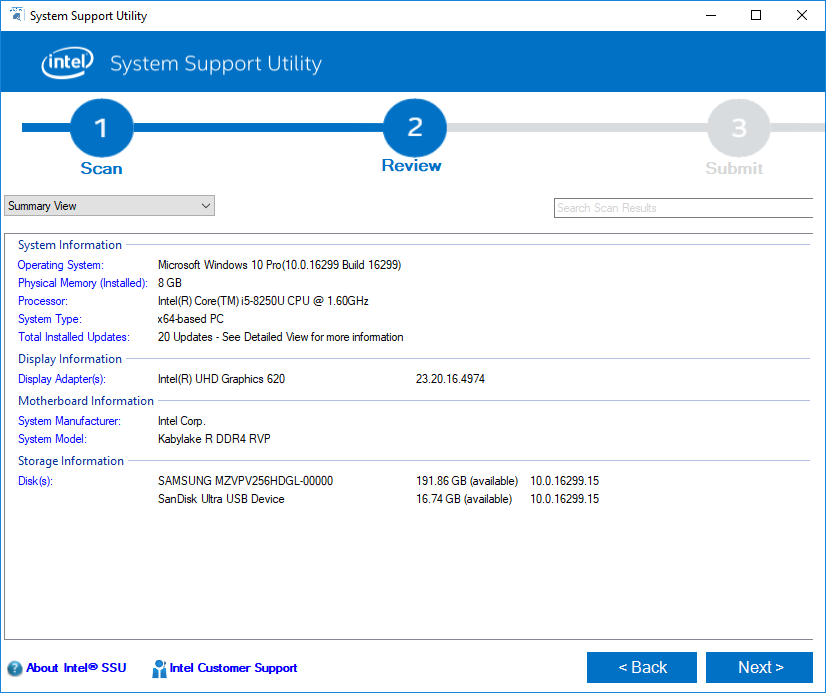
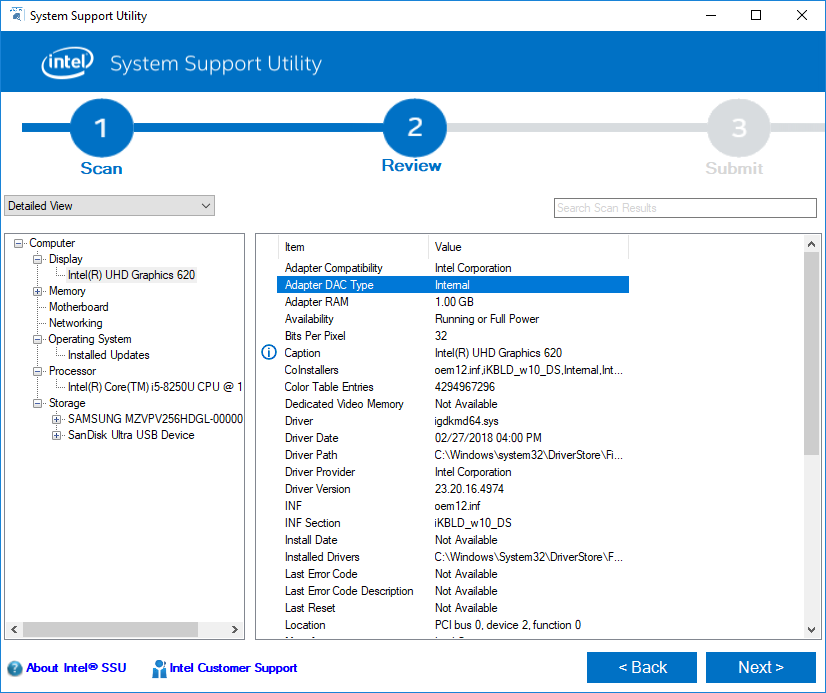
很多时候,为了分析研究现象,我们需要收集一些信息,比如:当前Windows版本,BIOS 版本或者 ME 版本等等。 Intel SSU 就是为此设计的。这个工具介绍如下:
Intel® System Support Utility. Intel® System Support Utility (Intel® SSU) is a standalone utility that performs a detailed scan and report of your computer system information and devices. Intel SSU produces an output file that can be saved, viewed, and shared by the user.