之前推荐过一个 Shell 下的 ACPI Table Dump工具【参考1】,没有 Source Code。从原理上来说没什么难度,只是比较麻烦一些而已。最近在https://github.com/andreiw 上看到他写的一些 UEFI Shell 工具组感觉很有意思,编译试验后逐次介绍给大家。这次介绍的是他写的 ACPI Dump 工具,在 【参考2】可以看到。
作者(Andrei Warkentin)对于这个工具的介绍如下:
# AcpiDump
AcpiDump will dump all of the ACPI tables to the same volume
the tool is located on. This is sometimes useful, but keep
in mind that some UEFI implementations can patch ACPI tables
on the way out during ExitBootServices, meaning you might
not get the same (correct) data if you dumped tables from
the OS proper.
An optional parameter specifies the path, relative to the
volume root, where to place the tables. E.g.:
fs16:> AcpiDump.efi
fs16:> AcpiDump.efi MyFunkySystem
The files produced can be loaded by [AcpiLoader](../AcpiLoader).
经过一些修改,他的工具可以独立在 UDK AppPkg 下编译通过,主程序如下:
#include <Uefi.h>
#include <Library/UefiLib.h>
#include <Library/UefiBootServicesTableLib.h>
#include "UtilsLib.h"

#include <IndustryStandard/Acpi.h>
#include <Protocol/LoadedImage.h>
#include <Library/PrintLib.h>
#include <Guid/Acpi.h>

#include <Library/ShellCEntryLib.h>

static RANGE_CHECK_CONTEXT RangeCheck;

static
EFI_STATUS
TableSave (
           IN EFI_HANDLE Handle,
           IN CHAR16 *VolSubDir,
           IN EFI_ACPI_DESCRIPTION_HEADER *Table
           )
{
  EFI_STATUS Status;
  static unsigned Index = 0;
  CHAR16 Path[3 + 4 + 1 + 3 + 1];

  if (Table == NULL) {
    Print(L"<skipping empty SDT entry\n");
    return EFI_NOT_FOUND;
  }

  Status = RangeIsMapped(&RangeCheck, (UINTN) Table, sizeof(EFI_ACPI_DESCRIPTION_HEADER));
  if (Status != EFI_SUCCESS) {
    Print(L"<could not validate mapping of table header: %r>\n", Status);
    return Status;
  }

  Print(L"Table %.4a @ %p (0x%x bytes)\n", &Table->Signature, Table, Table->Length);

  Status = RangeIsMapped(&RangeCheck, (UINTN) Table, Table->Length);
  if (Status != EFI_SUCCESS) {
    Print(L"<could not validate mapping of full table: %r>\n", Status);
    return Status;
  }

  Index = Index % 100;
  Path[0] = (CHAR16) ('0' + Index / 10);
  Path[1] = (CHAR16) ('0' + Index % 10);
  Path[2] = '-';
  Path[3] = ((CHAR8 *) &Table->Signature)[0];
  Path[4] = ((CHAR8 *) &Table->Signature)[1];
  Path[5] = ((CHAR8 *) &Table->Signature)[2];
  Path[6] = ((CHAR8 *) &Table->Signature)[3];
  Path[7] = L'.';
  Path[8] = L'a';
  Path[9] = L'm';
  Path[10] = L'l';
  Path[11] = L'\0';
  Index++;

  Status = FileSystemSave(Handle, VolSubDir, Path, Table, Table->Length);
  if (Status != EFI_SUCCESS) {
    //
    // FileSystemSave already does sufficient logging. We only
    // return failure if there was something wrong with the
    // table itself.
    //
    return EFI_SUCCESS;
  }

  return EFI_SUCCESS;
}

EFI_STATUS
EFIAPI
UefiMain (
          IN EFI_HANDLE ImageHandle,
          IN EFI_SYSTEM_TABLE *SystemTable
          )
{
  UINTN i;
  UINTN Argc;
  CHAR16 **Argv;
  EFI_STATUS Status;
  UINTN SdtEntrySize;
  EFI_PHYSICAL_ADDRESS SdtTable;
  EFI_PHYSICAL_ADDRESS SdtTableEnd;
  EFI_ACPI_DESCRIPTION_HEADER *Rsdt;
  EFI_ACPI_DESCRIPTION_HEADER *Xsdt;
  EFI_LOADED_IMAGE_PROTOCOL *ImageProtocol;
  EFI_ACPI_5_0_ROOT_SYSTEM_DESCRIPTION_POINTER *Rsdp;
  CHAR16 *VolSubDir;

  EFI_GUID AcpiGuids[2] = {
    EFI_ACPI_20_TABLE_GUID,
    ACPI_10_TABLE_GUID
  };

  VolSubDir = L".";
  Status = GetShellArgcArgv(ImageHandle, &Argc, &Argv);
  if (Status == EFI_SUCCESS && Argc > 1) {
    VolSubDir = Argv[1];
  }

  Status = InitRangeCheckContext(TRUE, TRUE, &RangeCheck);
  if (EFI_ERROR(Status)) {
    Print(L"Couldn't initialize range checking: %r\n", Status);
    return Status;
  }

  Print(L"Dumping tables to '\\%s'\n", VolSubDir);

  Status = gBS->HandleProtocol (ImageHandle, &gEfiLoadedImageProtocolGuid,
                                (void **) &ImageProtocol);
  if (Status != EFI_SUCCESS) {
    Print(L"Could not get loaded image device handle: %r\n", Status);
    goto done;
  }

  for (i = 0; i < 2; i++) {
    Rsdp = GetTable(&AcpiGuids[i]);
    if (Rsdp != NULL) {
      break;
    }
  }

  if (Rsdp == NULL) {
    Print(L"No ACPI support found\n");
    goto done;
  }

  if (Rsdp->Revision >= EFI_ACPI_2_0_ROOT_SYSTEM_DESCRIPTION_POINTER_REVISION) {
    Xsdt = (EFI_ACPI_DESCRIPTION_HEADER *) (UINTN) Rsdp->XsdtAddress;
  } else {
    Xsdt = NULL;
  }

  Status = EFI_NOT_FOUND;
  Rsdt = (EFI_ACPI_DESCRIPTION_HEADER *) (UINTN) Rsdp->RsdtAddress;
  if (Xsdt != NULL &&
      (Status = RangeIsMapped(&RangeCheck, (UINTN) Xsdt,
                              sizeof(EFI_ACPI_DESCRIPTION_HEADER)))
      == EFI_SUCCESS) {
    SdtTable = (UINTN) Xsdt;
    SdtTableEnd = SdtTable + Xsdt->Length;
    SdtEntrySize = sizeof(UINT64);
  } else if (Rsdt != NULL &&
             (Status = RangeIsMapped(&RangeCheck, (UINTN) Rsdt,
                                     sizeof(EFI_ACPI_DESCRIPTION_HEADER)))
             == EFI_SUCCESS) {
    SdtTable = (UINTN) Rsdt;
    SdtTableEnd = SdtTable + Rsdt->Length;
    SdtEntrySize = sizeof(UINT32);
  } else {
    Print(L"No valid RSDT/XSDT: %r\n", Status);
    goto done;
  }

  Status = RangeIsMapped(&RangeCheck, SdtTable, SdtTableEnd - SdtTable);
  if (Status != EFI_SUCCESS) {
    Print(L"Could not validate RSDT/XSDT mapping: %r\n", Status);
    goto done;
  }

  for (SdtTable += sizeof(EFI_ACPI_DESCRIPTION_HEADER);
       SdtTable < SdtTableEnd;
       SdtTable += SdtEntrySize) {
    EFI_ACPI_DESCRIPTION_HEADER *TableHeader;

    if (SdtEntrySize == sizeof(UINT32)) {
      TableHeader = (EFI_ACPI_DESCRIPTION_HEADER *) (UINTN) *(UINT32 *) SdtTable;
    } else {
      TableHeader = (EFI_ACPI_DESCRIPTION_HEADER *) (UINTN) *(UINT64 *) SdtTable;
    }

    Status = TableSave(ImageProtocol->DeviceHandle, VolSubDir, TableHeader);

    if (Status == EFI_SUCCESS &&
        TableHeader->Signature == EFI_ACPI_5_1_FIXED_ACPI_DESCRIPTION_TABLE_SIGNATURE) {
      EFI_ACPI_DESCRIPTION_HEADER *DsdtHeader;
      EFI_ACPI_DESCRIPTION_HEADER *FacsHeader;

      EFI_ACPI_5_1_FIXED_ACPI_DESCRIPTION_TABLE *Fadt = (void *) TableHeader;
      if (TableHeader->Revision >= 3 && Fadt->XDsdt != 0) {
        DsdtHeader = (EFI_ACPI_DESCRIPTION_HEADER *) (UINTN) Fadt->XDsdt;
      } else {
        DsdtHeader = (EFI_ACPI_DESCRIPTION_HEADER *) (UINTN) Fadt->Dsdt;
      }

      if (TableHeader->Revision >= 3 && Fadt->XFirmwareCtrl != 0) {
        FacsHeader = (EFI_ACPI_DESCRIPTION_HEADER *) (UINTN) Fadt->XFirmwareCtrl;
      } else {
        FacsHeader = (EFI_ACPI_DESCRIPTION_HEADER *) (UINTN) Fadt->FirmwareCtrl;
      }

      if (DsdtHeader != NULL) {
        TableSave(ImageProtocol->DeviceHandle, VolSubDir, DsdtHeader);
      } else {
        Print(L"No DSDT\n");
      }

      if (FacsHeader != NULL) {
        TableSave(ImageProtocol->DeviceHandle, VolSubDir, FacsHeader);
      } else {
        Print(L"No FACS\n");
      }
    }
  }

  Print(L"All done!\n");

done:
  CleanRangeCheckContext(&RangeCheck);
  return Status;
}
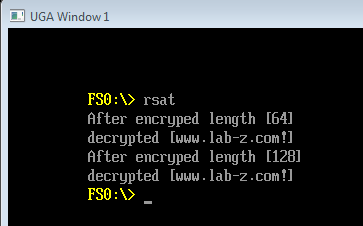
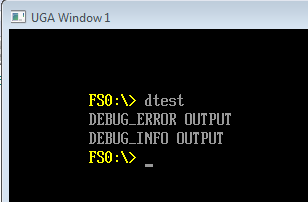
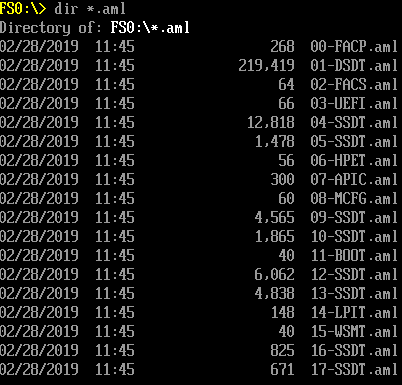
在KBL-R HDK 上的运行结果:

源代码和编译后的 EFI 程序可以在这里下载到:
参考: