EFI 文件使用的是 PE 格式(PE文件的全称是Portable Executable,意为可移植的可执行的文件,常见的EXE、DLL、OCX、SYS、COM都是PE文件,PE文件是微软Windows操作系统上的程序文件【参考1】),所以很多关于PE文件的知识在 EFI 文件上仍然是通用的。
我们编写一个代码来进行研究。功能非常简单,如果运行时加入 a 参数,那么打印一串字符,否则无任何动作。具体代码如下:
#include  <Uefi.h>
#include  <Library/UefiLib.h>
#include  <Library/ShellCEntryLib.h>

/***
  Print a welcoming message.

  Establishes the main structure of the application.

  @retval  0         The application exited normally.
  @retval  Other     An error occurred.
***/
INTN
EFIAPI
ShellAppMain (
  IN UINTN Argc,
  IN CHAR16 **Argv
  )
{
        if ((Argc>1)&&(Argv[1][0]=='a')) {
                Print(L"Hello there fellow Programmer.\n");
        }

  return(0);
}
此外在对应的 inf 文件加入下面一段:
[BuildOptions]
  MSFT:*_*_X64_CC_FLAGS  = /FAsc
编译之后,可以在\Build\AppPkg\DEBUG_VS2015x86\X64\AppPkg\Applications\EFIStudy\EFIStudy\DEBUG目录下看到 es.efi 和 es.map 文件。打开 es.map 文件,有如下 Section:
Start         Length     Name                   Class
 0001:00000000 000011aeH .text$mn                CODE
 0002:00000000 00000654H .rdata                  DATA
 0002:00000654 00000114H .rdata$zzzdbg           DATA
 0003:00000000 00000020H .data                   DATA
 0003:00000020 00000020H .bss                    DATA
 0004:00000000 00000084H .pdata                  DATA
 0005:00000000 0000007cH .xdata                  DATA
这些 Section 的作用是:
.rdata – 保存常量数据的节。这个可以对应C语言中的常数和常量字符串,同上面一样的原因,他们的初值被保存到了PE文件的次Section中,而不是在运行时被赋值。
.data – 保存数据的节,这个对应C语言中以初始化的全局变量数据。想想为什么你在源码里初始化一个全局变量后运行时这个变量的值正是你想要的那个?int a = 12;并不意味着CRT为你执行了一个赋值语句,而是a在PE文件中保存的位置已经被硬编码了一个12的值。这样loader加载程序时,你给的初值被从PE文件读取到了内存中变量a的位置,这样才使你的变量a有了初值。
.bss – (Block Start with Symbol) 这个section对应C程序中的全局未初始化变量。啥?你说C中未初始化的全局变量实际上全被初始化成了0?这是因为实际上操作系统是这样干的——你的全局未初始化变量由于没有初值,所以不需要将值像上面两个一样保存到PE文件中(所以.bss节除了描述信息之外不占据磁盘空间),但是.bss会描述一段内存区域,loader在加载.bss section时直接开辟这么一块包括所有未初始化数据的内存区域,然后直接将这区域清零。这就是C中全局未初始化数据之所以为零的原因了。
.pdata和 .xdata都存放的是异常处理相关的内容。
.text 是最重要的执行代码段 。如果我们想直接修改 EFI 文件中的代码,需要直接在 .text section 中查找修改。【参考2】【参考3】
使用 NikPEViwer(这是一个 Windows PE 文件查看工具) 打开 es.efi。在左侧的 .text 双击可以直接定位到 TEXT Section。
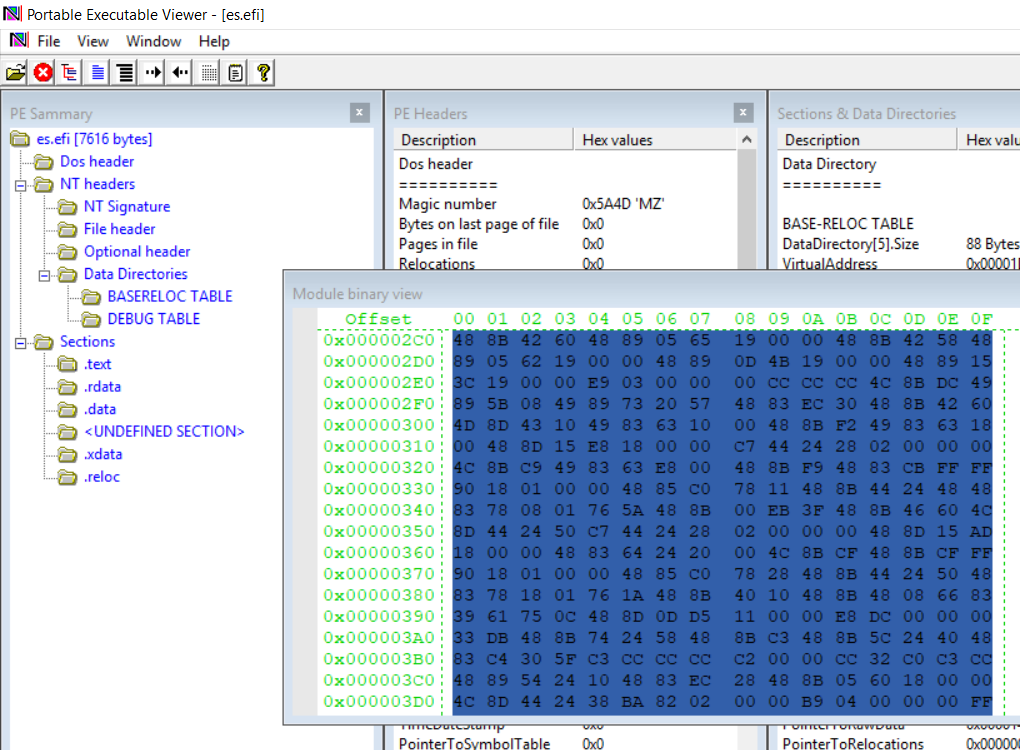
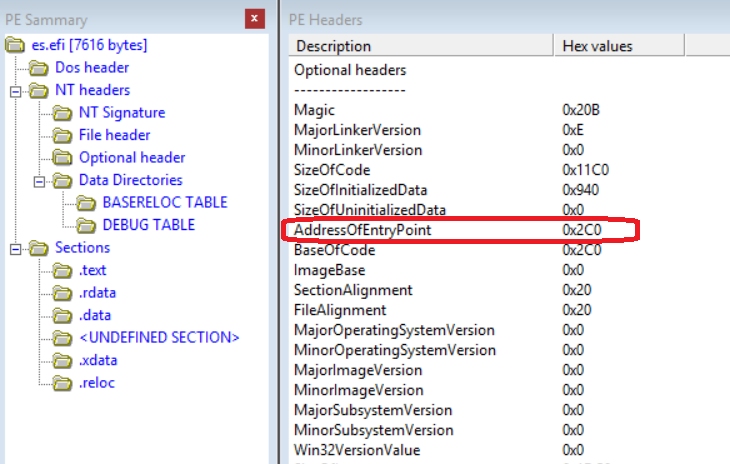
同样的,我们可以使用这个工具找到这个 EFI文件的EntryPoint为 0x2C0,具体是在 NT Headers-> Optional header –> AddressOfEntryPoint【参考5】
在编译之后的结果中查找,第一个条语句在
\Build\AppPkg\DEBUG_VS2015x86\X64\AppPkg\Applications\EFIStudy\EFIStudy\AutoGen.cod 文件中(从实习结果来看,这样生成的COD文件中有很多注释是不对的,所以具体要根据C语句和汇编语言对照来进行分析)
ProcessLibraryConstructorList PROC			; COMDAT
; File c:\buildbs\201903\mdepkg\library\uefibootservicestablelib\uefibootservicestablelib.c
; 62   :   gBS = SystemTable->BootServices;
  00000	48 8b 42 60	 mov	 rax, QWORD PTR [rdx+96]
  00004	48 89 05 00 00
	00 00		 mov	 QWORD PTR gBS, rax
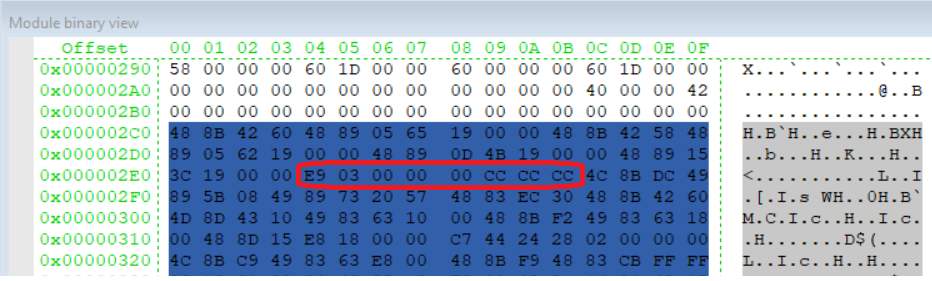
其中COD 文件列出的 0004 开始的 48 89 05 00 00 00 00 末尾的4字节00 是Link时才会确定的取值,因此和实际 48 89 05 19 00 00 00 是有差别的。
此外这个函数的末尾有一个 ret,但是最后生成的代码中是 E9 03 00 00 00 这个字样。
  0001d	48 89 15 00 00
	00 00		 mov	 QWORD PTR gST, rdx

; 208  : }

  00024	c3		 ret	 0
ProcessLibraryConstructorList ENDP
_TEXT	ENDS
反编译结果如下【参考4】:
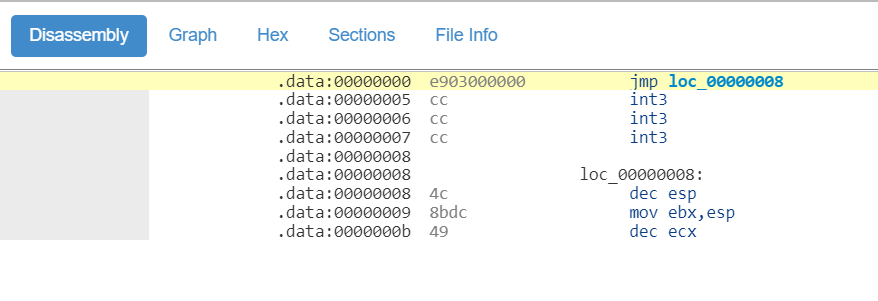
就是说在编译过程中 ret 被替换成跳转指令,跳转的位置是下一个函数。
ProcessModuleEntryPointList PROC			; COMDAT
; 232  : {
$LN27:
  00000	4c 8b dc	 mov	 r11, rsp
  00003	49 89 5b 08	 mov	 QWORD PTR [r11+8], rbx
  00007	49 89 73 20	 mov	 QWORD PTR [r11+32], rsi
  0000b	57		 push	 rdi
我们 C 代码中的判断条件if ((Argc>1)&&(Argv[1][0]==’a’)) { 也在这个 COD文件中,可以看到 000a2 处有一个 cmp ,之后000a6 会根据结果进行跳转:
; 33   :         if ((Argc>1)&&(Argv[1][0]=='a')) {

  0008e	48 8b 44 24 50	 mov	 rax, QWORD PTR EfiShellInterface$2[rsp]
  00093	48 83 78 18 01	 cmp	 QWORD PTR [rax+24], 1
  00098	76 1a		 jbe	 SHORT $LN18@ProcessMod
  0009a	48 8b 40 10	 mov	 rax, QWORD PTR [rax+16]
$LN25@ProcessMod:
  0009e	48 8b 48 08	 mov	 rcx, QWORD PTR [rax+8]
  000a2	66 83 39 61	 cmp	 WORD PTR [rcx], 97	; 00000061H
  000a6	75 0c		 jne	 SHORT $LN18@ProcessMod
对于我们来说,只要修改 jne 为 je (机器码74)即可完成目标。前面图片展示过,ProcessModuleEntryPointList 函数从0x2ec开始,因此,0006a 在文件中的偏移是 0x2ec+0xa6=0x392.直接查看这里是 75 修改为 74 (JE),保存为 esM.efi
修改之后可以直接在 Nt32 环境中测试:
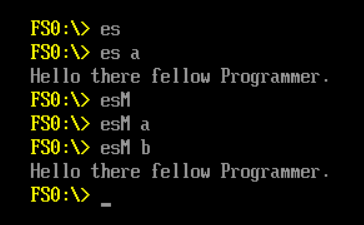
可以看到,修改之后输入 a 参数不会输出,反而输入其他参数会输出字符。
本文提到的源代码和 EFI 文件下载(注意:EFI文件并非试验中使用的,具体偏移可能有差别,只供参考)
通过上述试验我们可以了解下面的知识:
- 一个 EFI Application 从\MdePkg\Library\UefiBootServicesTableLib 中的UefiBootServicesTableLibConstructor 函数开始,到\ShellPkg\Library\UefiShellCEntryLib\UefiShellCEntryLib.c 中的ShellCEntryLib 函数;
- 如何通过 COD 文件计算一个代码在 EFI 文件中的偏移。
参考:
- https://baike.baidu.com/item/pe%E6%96%87%E4%BB%B6/6488140?fr=aladdin
- https://docs.microsoft.com/en-us/windows/win32/debug/pe-format 权威,建议以此为准
- https://blog.csdn.net/lj94093/article/details/50503964 windows PE结构解析
- https://onlinedisassembler.com/odaweb/ 一个在线反编译工具很好用
- The PE format is documented (in the loosest sense of the word) in the WINNT.H header file. About midway through WINNT.H is a section titled “Image Format.” This section starts out with small tidbits from the old familiar MS-DOS MZ format and NE format headers before moving into the newer PE information. WINNT.H provides definitions of the raw data structures used by PE files, but contains only a few useful comments to make sense of what the structures and flags mean. Whoever wrote the header file for the PE format (the name Michael J. O’Leary keeps popping up) is certainly a believer in long, descriptive names, along with deeply nested structures and macros. When coding with WINNT.H, it’s not uncommon to have expressions like this:
pNTHeader->
OptionalHeader.DataDirectory[IMAGE_DIRECTORY_ENTRY_DEBUG].VirtualAddress;
上述资料来自 https://docs.microsoft.com/en-us/previous-versions/ms809762(v=msdn.10)?redirectedfrom=MSDN