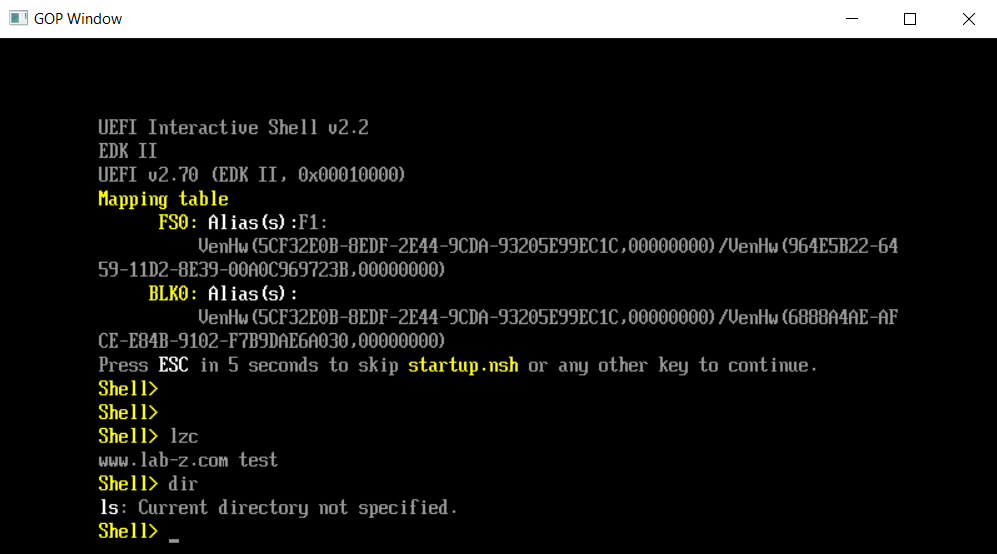
Shell 下命令代码可以在ShellPkg 中看到,具体的编译方法可以从【参考1】看到,这样的方法在 EDK202008仍然有效。这次实验的目标是编写一个自定义的Shell命令,更具体来说是在 Shell 中加入自定义的 command: lzc, 它的功能只是在屏幕上显示一段字符串表示这个命令已经运行。需要修改的文件如下:

1.UefiShellLevel3CommandsLib.uni 加入了一个帮助信息和显示字符串:
#string STR_GET_HELP_LZC          #language en-US ""
".TH lzc 0 "www.lab-z.com test command"\r\n"
".SH NAME\r\n"

#string STR_LZC_OUTPUT            #language en-US www.lab-z.com test\r\n
- UefiShellLevel3CommandsLib.inf 中[Sources.common]节加入 lzc.c 文件名
- UefiShellLevel3CommandsLib.h 中声明ShellCommandRunLzc 函数
/**
  Function for 'getmtc' command.

  @param[in] ImageHandle  Handle to the Image (NULL if Internal).
  @param[in] SystemTable  Pointer to the System Table (NULL if Internal).
**/
SHELL_STATUS
EFIAPI
ShellCommandRunLzc (
  IN EFI_HANDLE        ImageHandle,
  IN EFI_SYSTEM_TABLE  *SystemTable
  );
4.UefiShellLevel3CommandsLib.c 在其中加入代码,将我们定义的 lzc 这个命令插入到 Shell 中。这样当我们在 Shell 中输入 lzc 的时候,会运行ShellCommandRunLzc 函数:
ShellCommandRegisterCommandName(L"help",    ShellCommandRunHelp   , ShellCommandGetManFileNameLevel3, 3, L"", TRUE , gShellLevel3HiiHandle, STRING_TOKEN(STR_GET_HELP_HELP));
  ShellCommandRegisterCommandName(L"lzc",     ShellCommandRunLzc    , ShellCommandGetManFileNameLevel3, 3, L"", TRUE , gShellLevel3HiiHandle, STRING_TOKEN(STR_GET_HELP_LZC));

  ShellCommandRegisterAlias(L"type", L"cat");
5.lzc.c 真正实现我们自定义功能的代码:
/** @file
  Main file for LABZ Command Test shell level 3 function.

  (C) Copyright 2015 Hewlett-Packard Development Company, L.P.<BR>
  Copyright (c) 2009 - 2018, Intel Corporation. All rights reserved. <BR>
  SPDX-License-Identifier: BSD-2-Clause-Patent

**/

#include "UefiShellLevel3CommandsLib.h"

#include <Library/ShellLib.h>

/**
  Function for 'lzc' command.

  @param[in] ImageHandle  Handle to the Image (NULL if Internal).
  @param[in] SystemTable  Pointer to the System Table (NULL if Internal).
**/
SHELL_STATUS
EFIAPI
ShellCommandRunLzc (
  IN EFI_HANDLE        ImageHandle,
  IN EFI_SYSTEM_TABLE  *SystemTable
  )
{
  EFI_STATUS          Status;
  LIST_ENTRY          *Package;
  CHAR16              *ProblemParam;
  SHELL_STATUS        ShellStatus;

  ProblemParam        = NULL;
  ShellStatus         = SHELL_SUCCESS;

  //
  // initialize the shell lib (we must be in non-auto-init...)
  //
  Status = ShellInitialize();
  ASSERT_EFI_ERROR(Status);

  //
  // parse the command line
  //
  Status = ShellCommandLineParse (EmptyParamList, &Package, &ProblemParam, TRUE);
  if (EFI_ERROR(Status)) {
    if (Status == EFI_VOLUME_CORRUPTED && ProblemParam != NULL) {
      ShellPrintHiiEx(-1, -1, NULL, STRING_TOKEN (STR_GEN_PROBLEM), gShellLevel3HiiHandle, L"lzc", ProblemParam);
      FreePool(ProblemParam);
      ShellStatus = SHELL_INVALID_PARAMETER;
    } else {
      ASSERT(FALSE);
    }
  } else {
    //
    // check for "-?"
    //
    if (ShellCommandLineGetFlag(Package, L"-?")) {
      ASSERT(FALSE);
    } else if (ShellCommandLineGetRawValue(Package, 1) != NULL) {
      ShellPrintHiiEx(-1, -1, NULL, STRING_TOKEN (STR_GEN_TOO_MANY), gShellLevel3HiiHandle, L"lzc");
      ShellStatus = SHELL_INVALID_PARAMETER;
    } else {
      //
      // print it...
      //
      if (ShellStatus == SHELL_SUCCESS) {
        ShellPrintHiiEx(-1, -1, NULL, STRING_TOKEN (STR_LZC_OUTPUT),gShellLevel3HiiHandle);
      }
    }
    //
    // free the command line package
    //
    ShellCommandLineFreeVarList (Package);
  }

  return (ShellStatus);
}
首先在 EDK2 提供的模拟环境中实验,编译命令是:
build -p EmulatorPkg\EmulatorPkg.dsc -t VS2015x86 -a X64
运行 \edk202008\Build\EmulatorX64\DEBUG_VS2015x86\X64\WinHost.exe 结果如下:

接下来再使用下面的命令编译 Shell.efi
build -a X64 -p ShellPkg\ShellPkg.dsc -b RELEASE
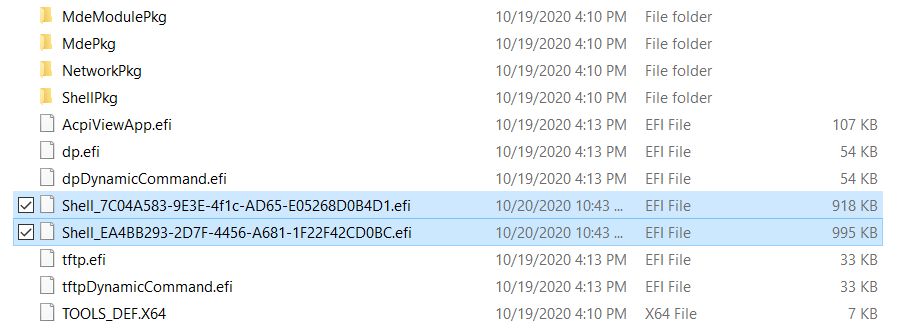
在edk202008\Build\Shell\RELEASE_VS2015x86\X64下面可以看到2个 Shell 文件:

上面的 Shell_7C04A583-9E3E-4f1c-AD65-E05268D0B4D1.efi 是从edk202008\ShellPkg\Application\Shell\Shell.inf 编译生成的:
[Defines]
  INF_VERSION                    = 0x00010006
  BASE_NAME                      = Shell
  FILE_GUID                      = 7C04A583-9E3E-4f1c-AD65-E05268D0B4D1 # gUefiShellFileGuid
  MODULE_TYPE                    = UEFI_APPLICATION
  VERSION_STRING                 = 1.0
  ENTRY_POINT                    = UefiMain
下面的Shell_EA4BB293-2D7F-4456-A681-1F22F42CD0BC.efi 是在\edk202008\ShellPkg\ShellPkg.dsc 中定义的:
#
  # Build a second version of the shell with all commands integrated
  #
  ShellPkg/Application/Shell/Shell.inf {
   <Defines>
      FILE_GUID = EA4BB293-2D7F-4456-A681-1F22F42CD0BC
    <PcdsFixedAtBuild>
      gEfiShellPkgTokenSpaceGuid.PcdShellLibAutoInitialize|FALSE
    <LibraryClasses>
      NULL|ShellPkg/Library/UefiShellLevel2CommandsLib/UefiShellLevel2CommandsLib.inf
      NULL|ShellPkg/Library/UefiShellLevel1CommandsLib/UefiShellLevel1CommandsLib.inf
      NULL|ShellPkg/Library/UefiShellLevel3CommandsLib/UefiShellLevel3CommandsLib.inf
      NULL|ShellPkg/Library/UefiShellDriver1CommandsLib/UefiShellDriver1CommandsLib.inf
      NULL|ShellPkg/Library/UefiShellInstall1CommandsLib/UefiShellInstall1CommandsLib.inf
      NULL|ShellPkg/Library/UefiShellDebug1CommandsLib/UefiShellDebug1CommandsLib.inf
      NULL|ShellPkg/Library/UefiShellNetwork1CommandsLib/UefiShellNetwork1CommandsLib.inf
      NULL|ShellPkg/Library/UefiShellNetwork2CommandsLib/UefiShellNetwork2CommandsLib.inf
      NULL|ShellPkg/Library/UefiShellAcpiViewCommandLib/UefiShellAcpiViewCommandLib.inf
  }
从注释上看,两者文件体积不同,大一些的中的 Command 会比较齐全。将这个文件改名BOOTX64.efi后放置在U盘 EFI\BOOT\ 目录下。从U盘启动后会自动进入Shell,然后输入 lzc 结果和上面相同。
参考: