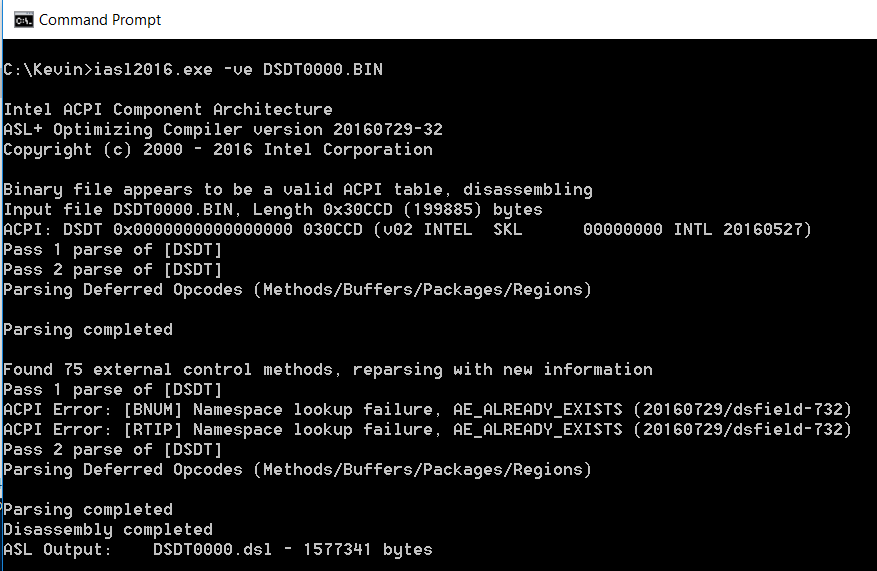
高考结束很多年了,班主任的音容笑貌仍然会出现在噩梦中,我仍然记得他在讲述虚数i的时候特别强调过时时刻刻牢记 i^2=-1,因为这是虚数和实数相互转换的门。
对于BIOS工程师来说SMI 就是当下OS和BIOS代码之间门。前面研究过了 gRT->GetVariable的Windows实现,因此,这里也可以作为非常简单的门。这次我们的目标是:在Shell 和 Windows下修改 Setup 的取值。比如说,我们当前的设计上需要更改四个Setup item才能去掉刷写BIOS的保护,这着实很麻烦,如果能自动修改就方便多了。
前文已经找到了BIOS对于Setup 限制访问的位置,经过研究,VarCheckLib.c 中的VarCheckLibSetVariableCheck() 函数会在 PlatformVarCheckLibNullClass.c 中的 mSetupVariableList[] 中查找 GUID 和 名称,对得上就会 Write Protect。为此,将 gSetupVariableGuid,L”Setup” 的定义去掉即可突破这个限制。
接下来,有2种实现的方法:
方法一:Windows Application直接对 Setup 变量的写入。这里选择 Setup 中的第二个UINT8 实验,对应的是 FastBoot 选项。
#define VariableGuidStr1     "{EC87D643-EBA4-4BB5-A1E5-3F3E36B20DA9}"
#define TestStr2             "Setup"

	printf("Check Setup");
	dwRet = GetFirmwareEnvironmentVariable(
		_T(TestStr2),
		_T(VariableGuidStr1),
		pBuffer,
		iBufferSize);
	printf("GetFirmwareEnvironmentVariable again, return value:%x\n", dwRet);
	Buffer[1] = 1;
	dwRet = SetFirmwareEnvironmentVariable(
		_T(TestStr2),
		_T(VariableGuidStr1),
		pBuffer,
		dwRet);
	printf("SetFirmwareEnvironmentVariable return value:%x\n", dwRet);
	printf("GetLastError:%x\n", GetLastError());

	printf("Check Setup again\n");

	dwRet = GetFirmwareEnvironmentVariable(
		_T(TestStr2),
		_T(VariableGuidStr1),
		pBuffer,
		iBufferSize);
	printf("GetFirmwareEnvironmentVariable again, return value:%x\n", dwRet);
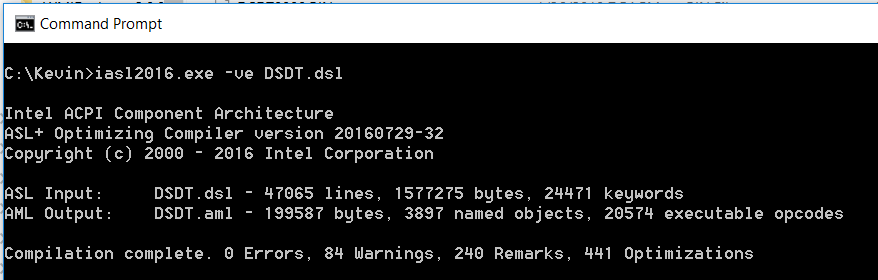
运行结果:
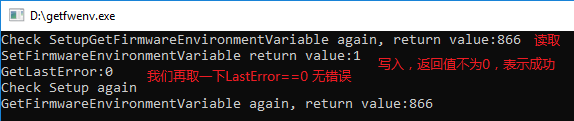
再进入 Setup检查,可以看到 Fast Boot 已经设置为 Disabled。
方法二:在代码中根据输入的 GUID 来判断,然后做出设定的动作。在 VariableSmmRuntimeDxe.c 中的 RuntimeGerviceGetVariable() 函数中加入对GUID 的判断,如果是我们期望的,那么就先取出 Setup Variable,修改之后再用 RuntimeServiceSetVariable()放回去。
/**
  This code finds variable in storage blocks (Volatile or Non-Volatile).

  Caution: This function may receive untrusted input.
  The data size is external input, so this function will validate it carefully to avoid buffer overflow.

  @param[in]      VariableName       Name of Variable to be found.
  @param[in]      VendorGuid         Variable vendor GUID.
  @param[out]     Attributes         Attribute value of the variable found.
  @param[in, out] DataSize           Size of Data found. If size is less than the
                                     data, this value contains the required size.
  @param[out]     Data               Data pointer.

  @retval EFI_INVALID_PARAMETER      Invalid parameter.
  @retval EFI_SUCCESS                Find the specified variable.
  @retval EFI_NOT_FOUND              Not found.
  @retval EFI_BUFFER_TO_SMALL        DataSize is too small for the result.

**/
EFI_STATUS
EFIAPI
RuntimeServiceGetVariable (
  IN      CHAR16                            *VariableName,
  IN      EFI_GUID                          *VendorGuid,
  OUT     UINT32                            *Attributes OPTIONAL,
  IN OUT  UINTN                             *DataSize,
  OUT     VOID                              *Data
  )
{
  EFI_STATUS                                Status;
  UINTN                                     PayloadSize;
  SMM_VARIABLE_COMMUNICATE_ACCESS_VARIABLE  *SmmVariableHeader;
  UINTN                                     TempDataSize;
  UINTN                                     VariableNameSize;

//LABZ_Start
  SETUP_DATA                   SetupData;
  UINTN                        VariableSize;
  UINT32                       VariableAttributes;

  if (CompareGuid (VendorGuid, &gLabZTestGuid)) { // 比较查看参数是否要触发

  VariableSize = sizeof (SETUP_DATA);
  Status = RuntimeServiceGetVariable (  //取Setup变量
                  L"Setup",
                  &gSetupVariableGuid,
                  &VariableAttributes,
                  &VariableSize,
                  &SetupData
                  );
  if (EFI_ERROR (Status)) {
    return Status;
  }
  SetupData.WakeOnRTCS5=1;  //修改选项值
  Status = RuntimeServiceSetVariable ( //将修改之后的结果回写
                  L"Setup",
                  &gSetupVariableGuid,
                  VariableAttributes,
                  VariableSize,
                  &SetupData
                  );
  ASSERT_EFI_ERROR(Status);

  }
//LABZ_End

  if (VariableName == NULL || VendorGuid == NULL || DataSize == NULL) {
    return EFI_INVALID_PARAMETER;
  }
在 KBL-R HDK 平台上实验,首先在Shell 中,为了便于实验编写一个测试程序,最主要的功能就是调用 gRT->GetVariable 发送gLabZTestGuid 来触发函数。
在 Windows下运行编译后的 Shell Application ,再进入 Setup查看是能够看到选项已经成功修改。
#define TestGuidStr          "{11111111-1111-1111-1111-111111111111}" //用这个定义只是方便

	dwRet = GetFirmwareEnvironmentVariable(
		_T(TestStr2),
		_T(TestGuidStr),
		pBuffer,
		iBufferSize);
	printf("GetFirmwareEnvironmentVariable again, return value:%x\n", dwRet);
仍然是成功的。
从上面可以看到,这个方法无论在 Shell 下还是 Windows下都能正常工作(虽然没有实验,但是我也相信支持 UEFI 的Linux也是可以使用的)。此外,作为参数的 GUID 足够多,能让我们灵活的处理各种情况。