通常情况下我们无需使用外部EEPROM 存储数据,因为 Arduino 本身有自带的。也许是因为这个原因我在网上搜索 Arduino 使用 AT24C02 的资料也很少。
最终在 https://github.com/tardate/Littl … 4C02/BasicReadWrite 搜索到了一个例子。
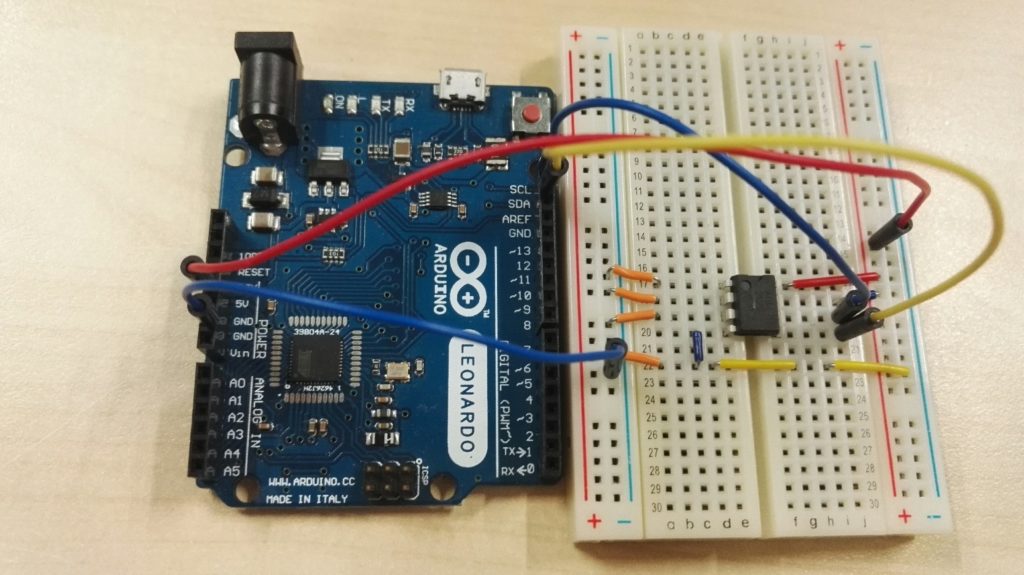
先说连接方法:
元件引脚如下:
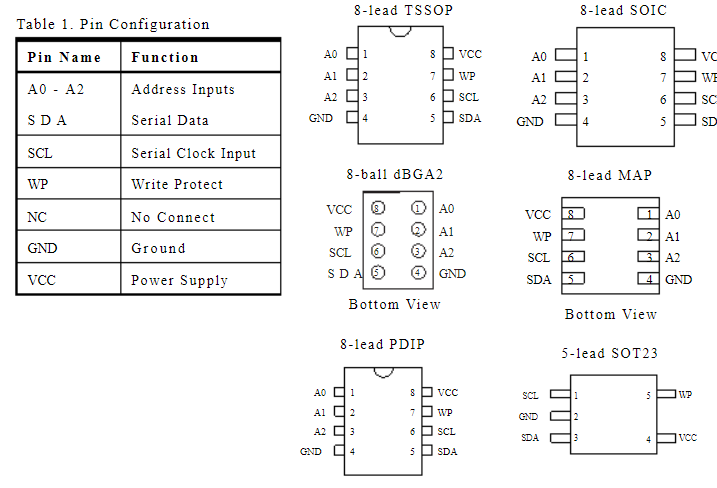
A0-A2 用于选择设备的地址,如果都为LOW,那么地址是 0x50
WP 是写保护,接HIGH 之后才能进行写入
/*
  EEPROM/AT24C02/BasicReadWrite
  Basic read/write operations to external EEPROM (AT24C02) with the Wire library
  Note: the addressing protocol used here is specific to AT24 models under 16k
  For info and circuit diagrams see https://github.com/tardate/Littl ... 4C02/BasicReadWrite
 */

#include <Wire.h>

#define DEVICE_ADDRESS 0x50 // must match AT24C02(A0,A1,A2) wiring
#define MEMORY_ADDRESS 0

byte data;

void setup() {
  Serial.begin(115200);
  Wire.begin();

  data = load_or_init_byte(MEMORY_ADDRESS);
  Serial.print("Memory on startup: ");
  Serial.println(data, DEC);
}

void loop() {
  data++;
  store_byte(MEMORY_ADDRESS, data);
  Serial.print("Storing: ");
  Serial.println(data, DEC);
  Serial.print("*Stored: ");
  Serial.println(load_byte(MEMORY_ADDRESS), DEC);
  delay(1000);
}

byte load_or_init_byte(uint8_t eeaddress) {
  byte data = load_byte(eeaddress);
  if(data==0xFF) {
    data = 0;
    store_byte(eeaddress, data);
  }
  return data;
}

// store +data+ byte at +eeaddress+
void store_byte(uint8_t eeaddress, byte data) {
  Wire.beginTransmission(DEVICE_ADDRESS);
  Wire.write(eeaddress);
  Wire.write(data);
  Wire.endTransmission();

  delay(20);
}

byte load_byte(uint8_t eeaddress) {
  byte data = 0xFF;

  Wire.beginTransmission(DEVICE_ADDRESS);
  Wire.write(eeaddress);
  Wire.endTransmission();

  Wire.requestFrom(DEVICE_ADDRESS,1);

  if (Wire.available()) data = Wire.read();

  return data;
}
