前面做过了 GDT 的解析,这次研究一下 IDT。
X86 上有2种中断模式:中断(interrupts)和异常(exceptions )
Interrupt 是异步,通常由 I/O 设备来生成,比如:设置一个定时器在某个时间之后发生;
Exception 是同步的,当处理器执行某个指令之后产生的。对于 Exception 还分为 faults, traps 和 abort. X86处理器对于上面两种处理方式相同,当某一个中断发生之后,CPU会通过 IDT来找到对应的处理函数。处理完成之后将控制权返回产生的位置。
X86处理器有32个预定义中断异常,余下224个可以由用户自己定义。每个IDT有一个定义的数值: vector。当然,我们更常见的是IRQXX 的说法,在X86中还有一套让 IRQ 和 Vector对应起来的机制,未来会继续研究。
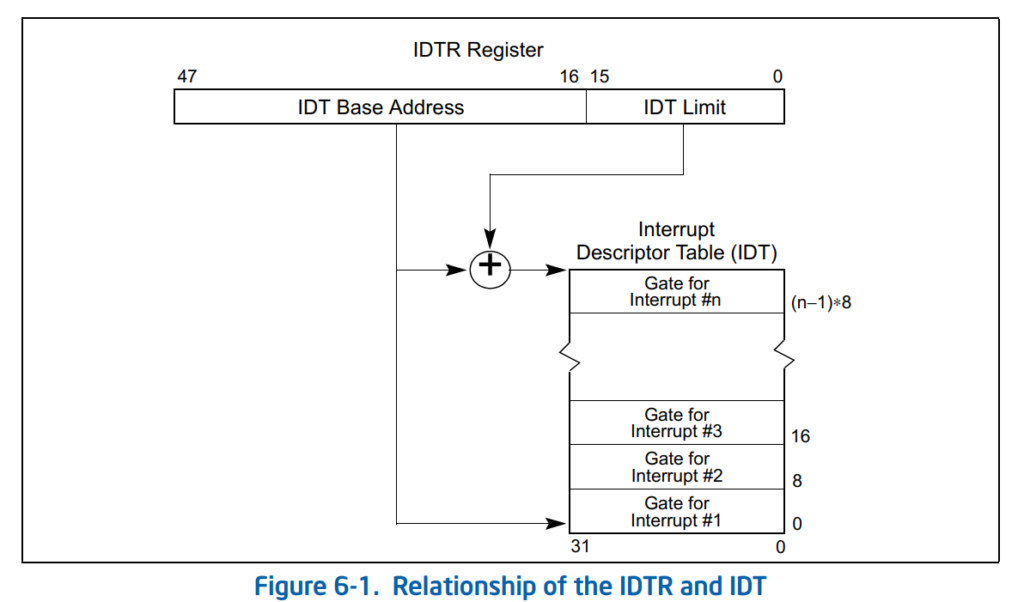
和 GDT 非常类似,可以通过 IDTR寄存器获得IDT 长度和它在内存中的位置。
其中的描述符定义在\MdePkg\Include\Library\BaseLib.h 文件中如下:
///
/// Byte packed structure for an x64 Interrupt Gate Descriptor.
///
typedef union {
  struct {
    UINT32  OffsetLow:16;   ///< Offset bits 15..0.
    UINT32  Selector:16;    ///< Selector.
    UINT32  Reserved_0:8;   ///< Reserved.
    UINT32  GateType:8;     ///< Gate Type.  See #defines above.
    UINT32  OffsetHigh:16;  ///< Offset bits 31..16.
    UINT32  OffsetUpper:32; ///< Offset bits 63..32.
    UINT32  Reserved_1:32;  ///< Reserved.
  } Bits;
  struct {
    UINT64  Uint64;
    UINT64  Uint64_1;
  } Uint128;
} IA32_IDT_GATE_DESCRIPTOR;
GateType可能是下面三种类型之一:
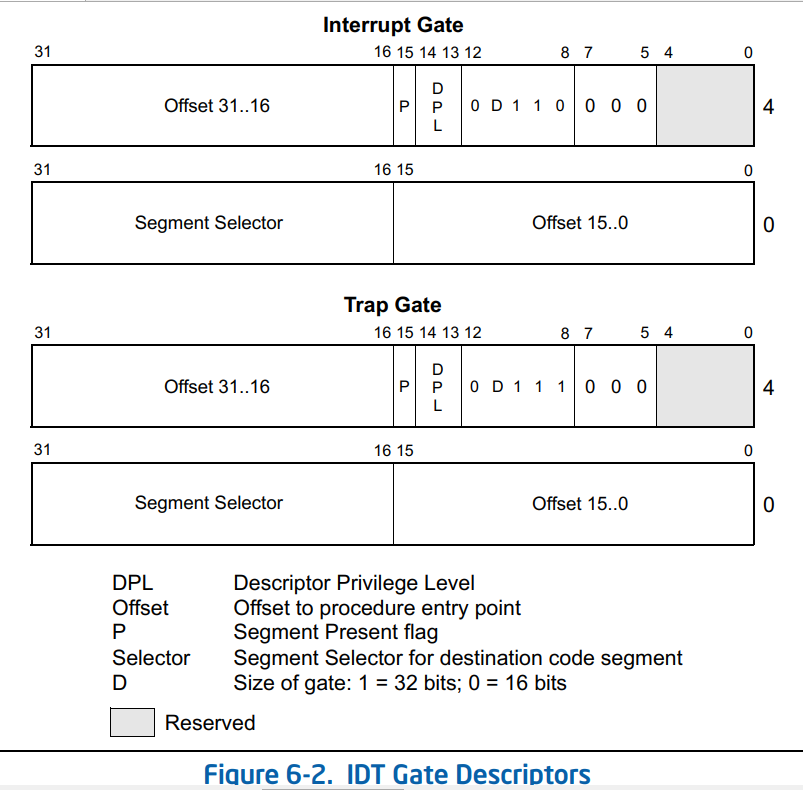
具体类型定义如下:
#define IA32_IDT_GATE_TYPE_TASK          0x85
#define IA32_IDT_GATE_TYPE_INTERRUPT_16  0x86
#define IA32_IDT_GATE_TYPE_TRAP_16       0x87
#define IA32_IDT_GATE_TYPE_INTERRUPT_32  0x8E
#define IA32_IDT_GATE_TYPE_TRAP_32       0x8F
接下来编程解析 Shell 下 IDT完整代码如下:
/** @file
  Application for Cryptographic Primitives Validation.

Copyright (c) 2009 - 2016, Intel Corporation. All rights reserved.<BR>
This program and the accompanying materials
are licensed and made available under the terms and conditions of the BSD License
which accompanies this distribution.  The full text of the license may be found at
http://opensource.org/licenses/bsd-license.php

THE PROGRAM IS DISTRIBUTED UNDER THE BSD LICENSE ON AN "AS IS" BASIS,
WITHOUT WARRANTIES OR REPRESENTATIONS OF ANY KIND, EITHER EXPRESS OR IMPLIED.

**/
#include <Uefi.h>
#include <Library/BaseLib.h>
#include <Library/BaseMemoryLib.h>
#include <Library/MemoryAllocationLib.h>
#include <Library/UefiLib.h>
#include <Library/UefiApplicationEntryPoint.h>
#include <Library/DebugLib.h>
#include <Protocol/PciIo.h>
#include <Library/ShellLib.h>

EFI_STATUS
EFIAPI
GDTMain (
  IN     EFI_HANDLE                 ImageHandle,
  IN     EFI_SYSTEM_TABLE           *SystemTable
  )
{
        IA32_DESCRIPTOR   Idtr;
        IA32_IDT_GATE_DESCRIPTOR         *IdtTable;
        UINT16            Index;
        UINT16            IdtEntryCount;

        ShellSetPageBreakMode(TRUE);

        AsmReadIdtr (&Idtr);
        IdtEntryCount = (UINT16) ((Idtr.Limit + 1) / sizeof (IA32_IDT_GATE_DESCRIPTOR));

        IdtTable = (IA32_IDT_GATE_DESCRIPTOR *) Idtr.Base;
        Print(L"IDTR=0x%lX\n",IdtTable);
        for (Index = 0; Index < IdtEntryCount; Index++) {
            Print(L"No.[%d] ",Index);
            Print(L"Selector[%d] ",IdtTable->Bits.Selector);
            Print(L"Type [0x%X] ",IdtTable->Bits.GateType);
            Print(L"Offset [0x%lX]\n",
                        (IdtTable->Bits.OffsetUpper<<32)|
                        (IdtTable->Bits.OffsetHigh <<16)|
                        (IdtTable->Bits.OffsetLow)
                        );
            IdtTable++;
        }
  return EFI_SUCCESS;
}
在实体机上运行结果如下:
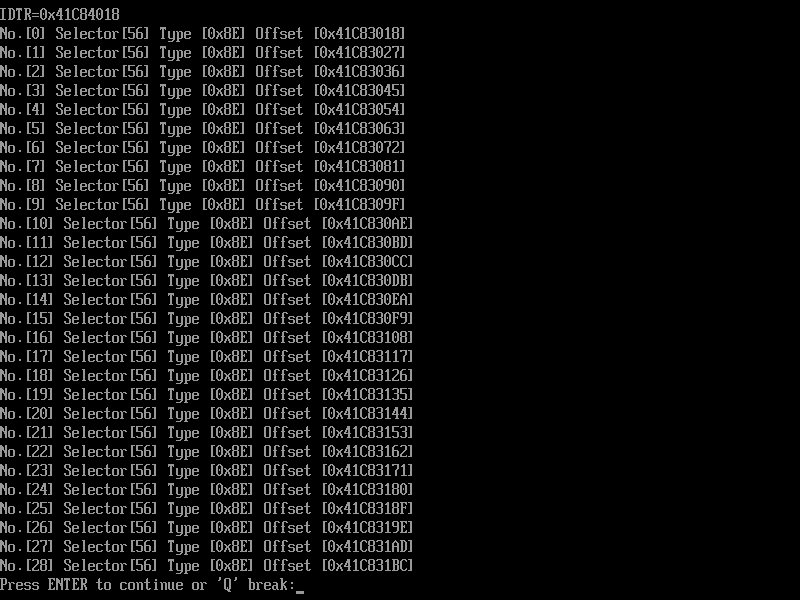
感觉最早实模式下的中断向量表非常类似,只是中断向量表一定是在内存从0开始的位置,而这个可以放置在内存的任何位置。
前面提到处理器有18个预定义的异常:
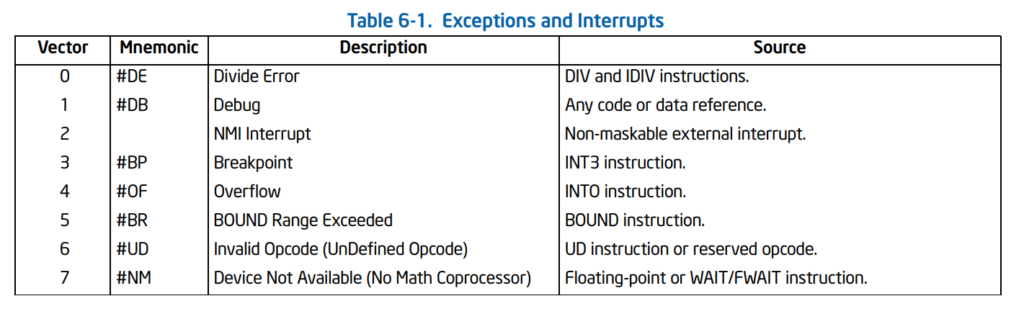
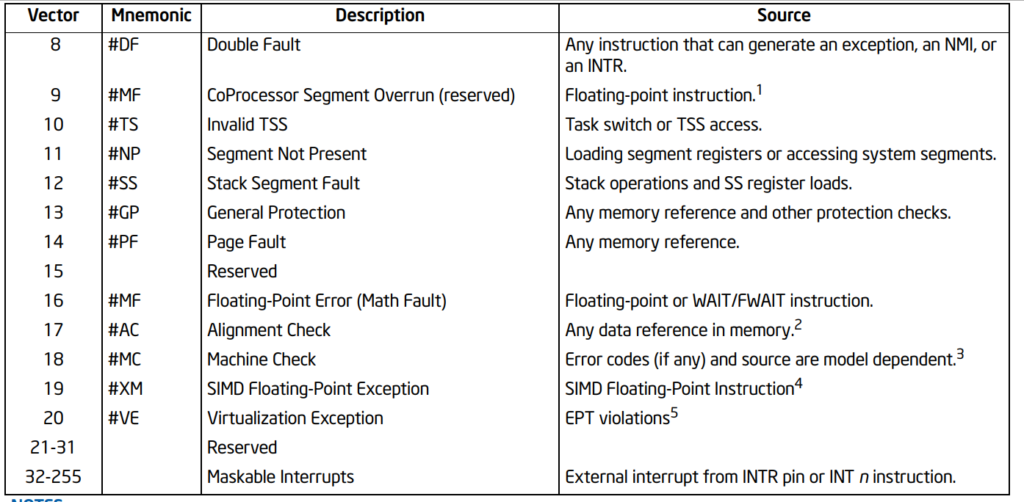
可以看到上面预定义了21个异常,此外还有11个被 Reserved 起来。
接下来我们用DCI来trace #DE(Divide Error)的处理。
首先编写一个产生 #DE 的代码。这个是除数为0错误。主要代码如下:
INTN
EFIAPI
ShellAppMain (
  IN UINTN Argc,
  IN CHAR16 **Argv
  )
{
        volatile x=0;

        //CpuDeadLoop();
        for (x = 0; x == 0;);

        x=x/x;

        return(0);
}
对应的汇编语言如下:
ShellAppMain PROC					; COMDAT

; 21   : {

$LN6:
  00000	48 89 54 24 10	 mov	 QWORD PTR [rsp+16], rdx
  00005	48 89 4c 24 08	 mov	 QWORD PTR [rsp+8], rcx
  0000a	48 83 ec 18	 sub	 rsp, 24

; 22   :         volatile x=0;

  0000e	c7 04 24 00 00
	00 00		 mov	 DWORD PTR x$[rsp], 0

; 23   :
; 24   :         //CpuDeadLoop();
; 25   :         for (x = 0; x == 0;);

  00015	c7 04 24 00 00
	00 00		 mov	 DWORD PTR x$[rsp], 0
$LN2@ShellAppMa:
  0001c	8b 04 24	 mov	 eax, DWORD PTR x$[rsp]
  0001f	85 c0		 test	 eax, eax
  00021	75 02		 jne	 SHORT $LN3@ShellAppMa
  00023	eb f7		 jmp	 SHORT $LN2@ShellAppMa
$LN3@ShellAppMa:

; 26   :
; 27   :         x=x/x;

  00025	8b 04 24	 mov	 eax, DWORD PTR x$[rsp]
  00028	8b 0c 24	 mov	 ecx, DWORD PTR x$[rsp]
  0002b	99		 cdq
  0002c	f7 f9		 idiv	 ecx
  0002e	89 04 24	 mov	 DWORD PTR x$[rsp], eax

; 28   :
; 29   :         return(0);

  00031	33 c0		 xor	 eax, eax

; 30   : }

  00033	48 83 c4 18	 add	 rsp, 24
  00037	c3		 ret	 0
ShellAppMain ENDP
为了便于观察这里面我们使用 for (x = 0; x == 0;); 等效于 CpuDeadLoop(); 可以让我们在运行的时候停下来。具体的调试操作如下:
1.先用 IDT 确定 Vector 0 的入口是 0x42254018 (这里和上一次查看的位置不同,这是一个安全特性,同样的BIOS每次运行各种 Table 的位置有所不同);
2.运行DETest.efi。运行之后会 Hang 在 Shell下。在调试机上运行 itp.halt() 停止;
3.使用 itp.threads[0].asm(“$”,20)查看停的位置
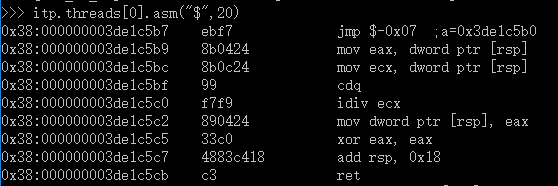
可以看到这里就是前面的 “eb f7 jmp SHORT $LN2@ShellAppMa”,是我们让CPU Dead loop 的代码。
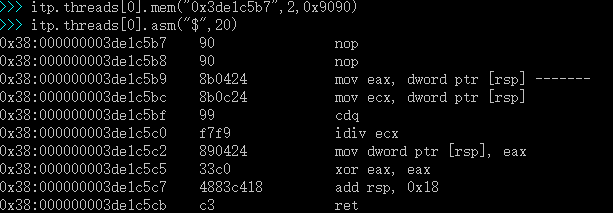
4.使用 itp.threads[0].mem 修改内存代码跳过去。再次查看,可以看到 jmp 已经被修改为 nop
5.使用 itp.threads[0].brnew(“0x42254018”,”exe global”) 加入一个断点,当运行到 vector 0 给出的内存位置时自动停止。这时,使用 itp.go() 即触发了了停在了入口。

6.使用命令查看当前位置的汇编代码

具体代码在 \UefiCpuPkg\Library\CpuExceptionHandlerLib\X64\ExceptionHandlerAsm.nasm 中:
AsmIdtVectorBegin:
%rep  32
    db      0x6a        ; push  #VectorNum
    db      ($ - AsmIdtVectorBegin) / ((AsmIdtVectorEnd - AsmIdtVectorBegin) / 32) ; VectorNum
    push    rax
    mov     rax, strict qword 0 ;    mov     rax, CommonInterruptEntry 【参考2】
    jmp     rax
%endrep
AsmIdtVectorEnd:
7.下面可以使用 itp.trheads[0].step 单步执行,最终代码跳入下面的代码段中
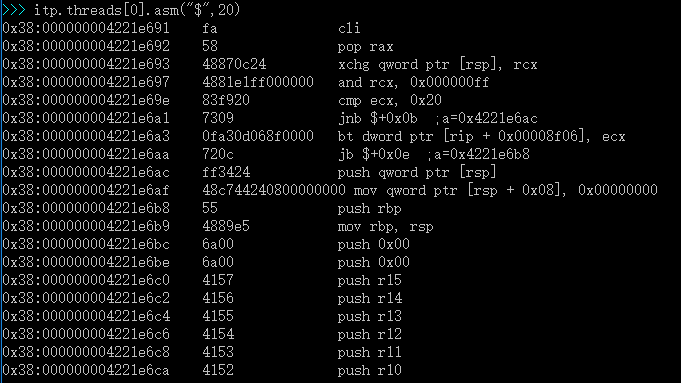
对应的代码还是上面还在提到的 ExceptionHandlerAsm.nasm 文件中:
global ASM_PFX(CommonInterruptEntry)
ASM_PFX(CommonInterruptEntry):
    cli
    pop     rax
    ;
    ; All interrupt handlers are invoked through interrupt gates, so
    ; IF flag automatically cleared at the entry point
    ;
    xchg    rcx, [rsp]      ; Save rcx into stack and save vector number into rcx
    and     rcx, 0xFF
    cmp     ecx, 32         ; Intel reserved vector for exceptions?
    jae     NoErrorCode
    bt      [ASM_PFX(mErrorCodeFlag)], ecx
    jc      HasErrorCode
这里使用的是在vector 0 入口地址下断点拦截的方式,除此之外,我还尝试了使用 step指令一直跟踪 到 idiv 指令的方法,会导致死机,具体原因不清楚。我记得有看过介绍性的文章,说 step 是通过不断在下一条指令之后插入 int 1来实现的,而这里我们同时在调试int0,有可能是因为这样的原因会导致冲突所以无法用 step 跟踪查看到。
参考:
- Intel® 64 and IA-32 Architectures Software Developer’s Manual Combined Volumes: 1, 2A, 2B, 2C, 2D, 3A, 3B, 3C, 3D and 4 P2903
- STRICT约束优化 :当汇编时将优化器打开到2或更高级别时,nasm会使用尺寸约束,会给(byte word dword qword tword)尽可能小的尺寸,可以使用关键字STRICT来制约这种优化。
强制一个特定的操作数为原来尺寸:
push strict dword 33
但当优化器关闭时,无论是否有strict,都会产生相同代码。 来自 https://yq.aliyun.com/articles/24926