
CH37X 系列是南京沁恒出品的一系列USB控制类的芯片,主要用途是用作 USB Host 实现 USB 设备的控制。具体列表如下【参考1】:
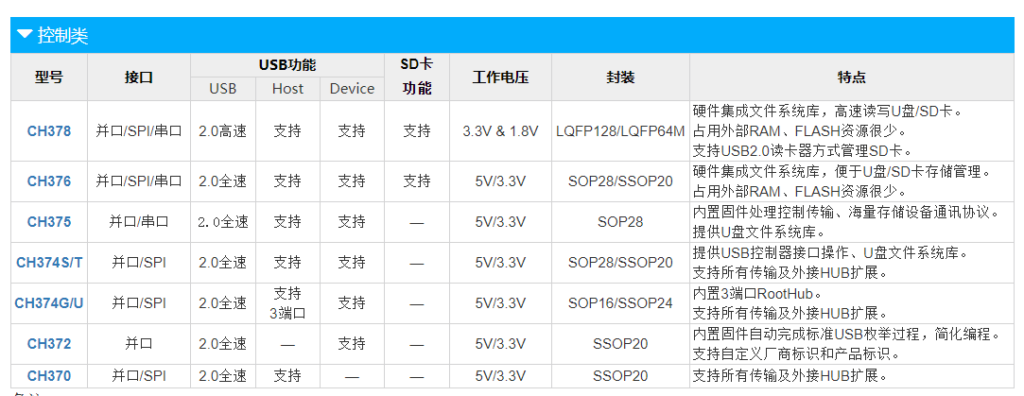
上面不同型号主要差别在于提供的接口,目前支持三种对单片机的接口,分别是并口 SPI和串口。此外就是是否硬件集成文件系统。如果集成了,那么可以通过简单的命令来实现文件系统级别的操作,否则需要主控芯片自己来实现,这对于主控的内存要求比较高,整体程序也会复杂得多。
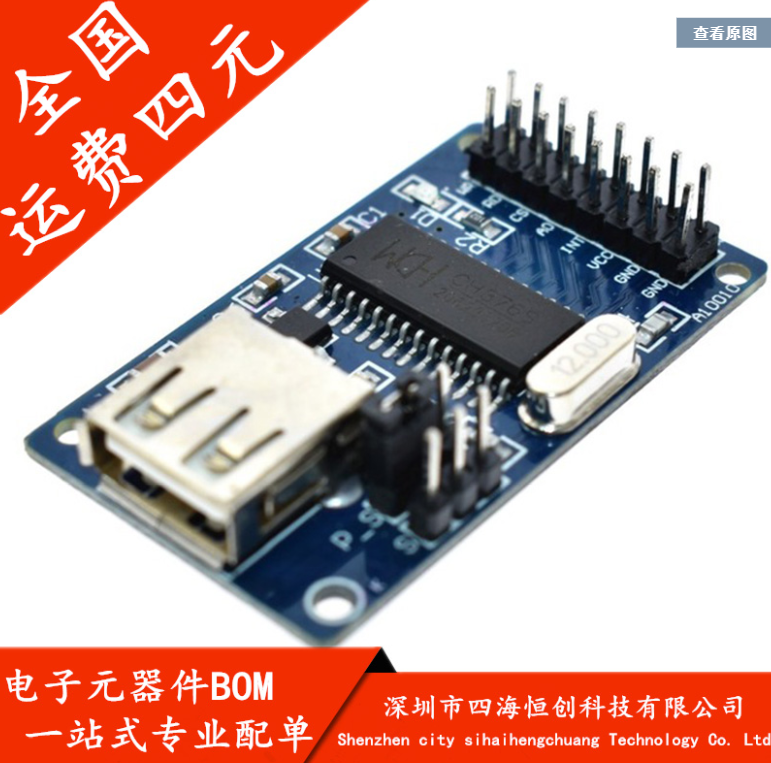
从上面可以看到,CH378 是当前最强的,但是因为封装更加负责以及比较新的原因(缺少资料),所以市面上最常见的还是 CH376,淘宝上的价格在20以内,应该也是比较容易接受的。这次试验就是基于 CH376 模块,特别注意是下面这种带有一个 2X3跳线的:
这款电路图如下:
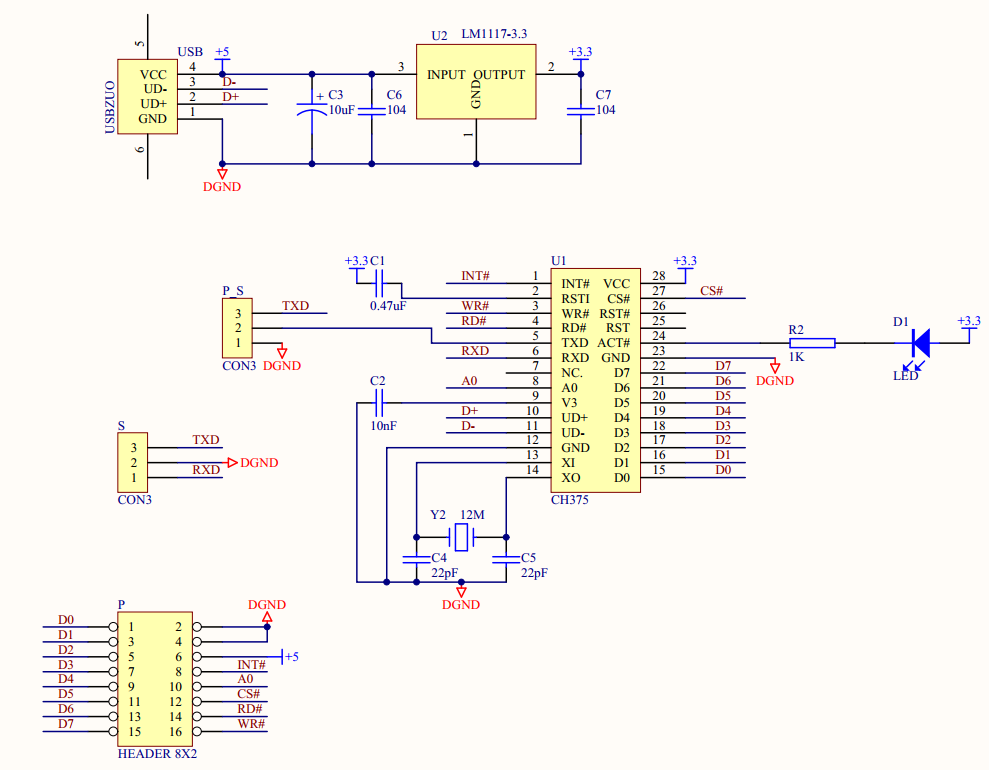
这个模块默认情况下使用串口通讯,跳线顺序如下:
P_S: GND TXD(CH376) TXD
S: RXD GND TXD
这个跳线决定初始时串口通讯速度,意思是如果能够通讯,那么可以通过修改寄存器的方式修改波特率从而实现更高的速度。
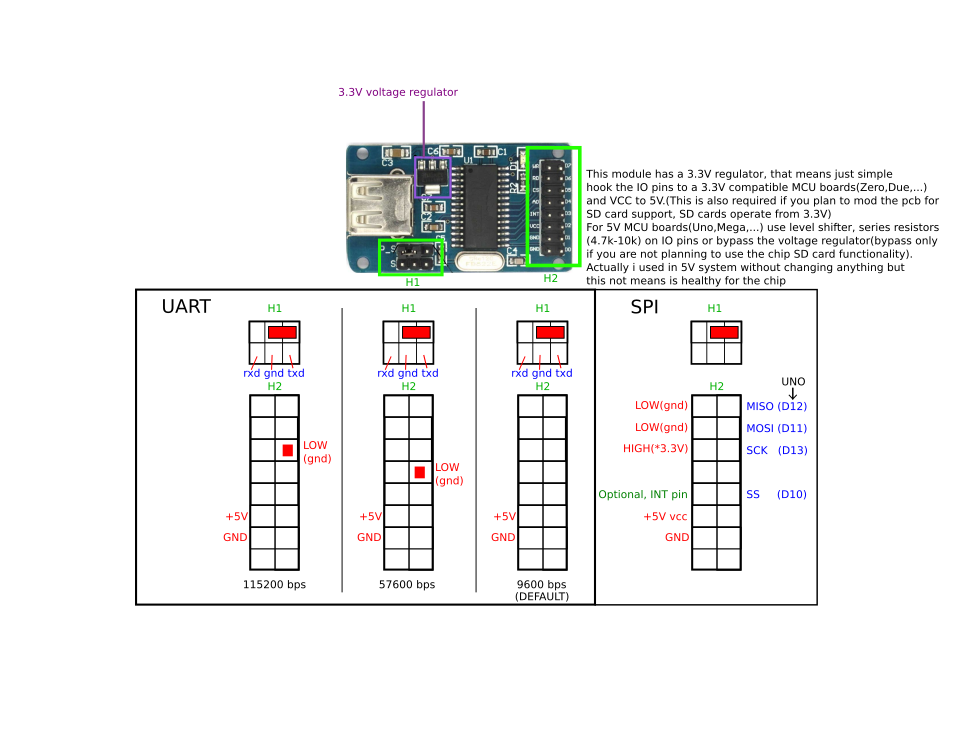
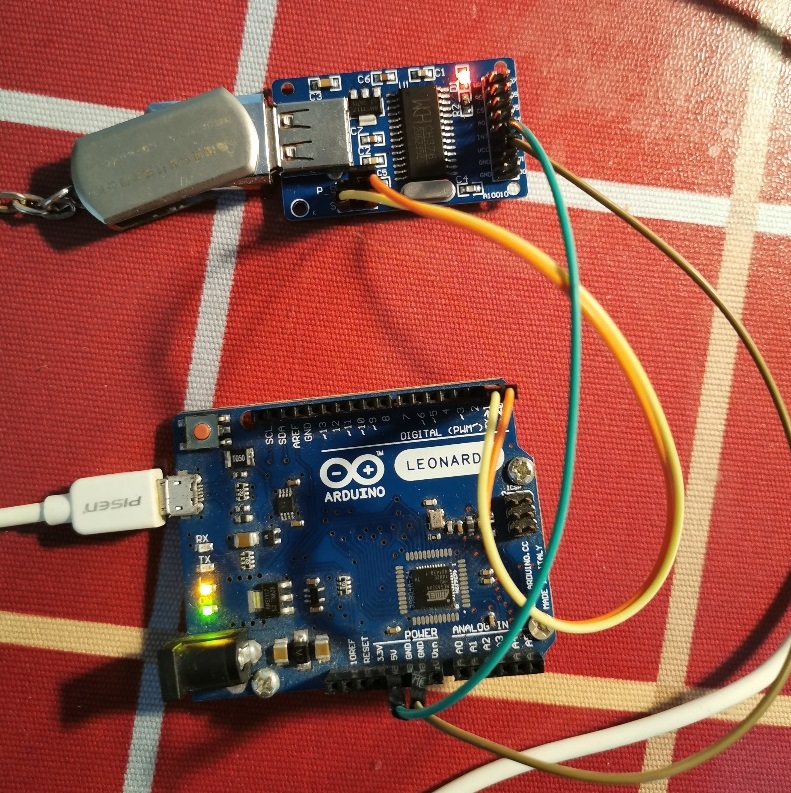
这次试验就是如何进行串口通讯 ,P_S 位置跳线是 TXD(CH376)和 TXD 短路。试验使用的是Arduino Leonardo,因为他带有一个额外的硬件串口(软件串口通常在 115200波特率下接收会有问题)。接线如下:
| Arduino Leonardo | CH376模块 |
| 5V | VCC |
| GND | GND |
| Pin0 RX | TXD |
| Pin1 TX | RXD |
测试代码是库中自带的 basicUsageHwSerial测试程序:
/*------------------------------------------------------------------------------------------------------------------
 *    Author: György Kovács                                                                                         |
 *    Created: 28 Mar 2019                                                                                          |
 *    Description: Basic usage of CH376 with hardware serial                                                        |
 *    Thanks for the idea to Scott C , https://arduinobasics.blogspot.com/2015/05/ch376s-usb-readwrite-module.html  |
 *------------------------------------------------------------------------------------------------------------------
 */


#include <Ch376msc.h>

//..............................................................................................................................
// Leave the default jumper settings for the baud rate (9600) on the CH376, the library will set it up the chosen speed(HW serial only)
Ch376msc flashDrive(Serial1, 115200); // Ch376 object with hardware Serial1 on arduino mega baudrate: 9600, 19200, 57600, 115200
//..............................................................................................................................
 // buffer for reading
char adatBuffer[255];// max length 255 = 254 char + 1 NULL character
//..............................................................................................................................
// strings for writing to file
char adat[]="Vivamus nec nisl molestie, blandit diam vel, varius mi. Fusce luctus cursus sapien in vulputate.\n";
char adat2[] = "Lorem ipsum dolor sit amet, consectetur adipiscing elit. Duis efficitur ac est eu pharetra. \n";
//..............................................................................................................................
unsigned long totSect = 0;
unsigned long freeSect = 0;
byte percentg = 0;
byte tmpCommand; //used to store data coming from serial port
boolean readMore;
static char helpString[]= {"h:Print this help\n\n1:Create\n2:Append\n3:Read\n4:Read date/time\n"
            "5:Modify date/time\n6:Delete\n7:List dir\n8:Print free space"
            "\n9:Open/Create folder(s)/subfolder(s)"};

void setup() {
  Serial.begin(115200);
  flashDrive.init();
  printInfo(helpString);
}

void loop() {
	if(flashDrive.checkIntMessage()){
		if(flashDrive.getDeviceStatus()){
			Serial.println(F("Flash drive attached!"));
		} else {
			Serial.println(F("Flash drive detached!"));
		}
	}
  if(Serial.available()){
    tmpCommand = Serial.read();                      //read incoming bytes from the serial monitor
    if(((tmpCommand > 48)&&(tmpCommand < 58)) && !flashDrive.driveReady()){ // if the data is ASCII 1 - 9 and no flash drive are attached
       printInfo("Attach flash drive first!");
      tmpCommand = 10; // change the command byte
    }
     switch (tmpCommand) {

      case 49: //1
        printInfo("COMMAND1: Create and write data to file : TEST1.TXT");    // Create a file called TEST1.TXT
          flashDrive.setFileName("TEST1.TXT");  //set the file name
          flashDrive.openFile();                //open the file

          for(int a = 0; a < 20; a++){          //write text from string(adat) to flash drive 20 times
            flashDrive.writeFile(adat, strlen(adat)); //string, string length
          }
          flashDrive.closeFile();               //at the end, close the file
        printInfo("Done!");
        break;
//*****************************************************************************************************************************************************
      case 50: //2
        printInfo("COMMAND2: Append data to file: TEST1.TXT");               // Append data to the end of the file.
        flashDrive.setFileName("TEST1.TXT");  //set the file name
        if(flashDrive.openFile() == ANSW_USB_INT_SUCCESS){               //open the file
        	flashDrive.moveCursor(CURSOREND);     //if the file exist, move the "virtual" cursor at end of the file, with CURSORBEGIN we actually rewrite our old file
        	//flashDrive.moveCursor(flashDrive.getFileSize()); // is almost the same as CURSOREND, because we put our cursor at end of the file
        }
        for(int a = 0; a < 20; a++){          //write text from string(adat) to flash drive 20 times
        	if(flashDrive.getFreeSectors()){ //check the free space on the drive
        		flashDrive.writeFile(adat2, strlen(adat2)); //string, string length
        	} else {
        		printInfo("Disk full");
        	}
        }
        flashDrive.closeFile();               //at the end, close the file
        printInfo("Done!");
        break;
//*****************************************************************************************************************************************************
      case 51: //3
        printInfo("COMMAND3: Read File: TEST1.TXT");                         // Read the contents of this file on the USB disk, and display contents in the Serial Monitor
        flashDrive.setFileName("TEST1.TXT");  //set the file name
        flashDrive.openFile();                //open the file
        readMore = true;
                //read data from flash drive until we reach EOF
        while(readMore){ // our temporary buffer where we read data from flash drive and the size of that buffer
        	readMore = flashDrive.readFile(adatBuffer, sizeof(adatBuffer));
        	Serial.print(adatBuffer);          //print the contents of the temporary buffer
        }
        flashDrive.closeFile();               //at the end, close the file
        printInfo("Done!");
        break;
//*****************************************************************************************************************************************************
      case 52: //4
        printInfo("COMMAND4: Read File date/time: TEST1.TXT");      // Read the date and time of file, default 2004.01.01 - 00:00:00
        flashDrive.setFileName("TEST1.TXT");            //set the file name
        flashDrive.openFile();                          //open the file
                //print informations about the file
          Serial.println(flashDrive.getFileName());
          Serial.print(flashDrive.getYear());
          Serial.print("y\t");
          Serial.print(flashDrive.getMonth());
          Serial.print("m\t");
          Serial.print(flashDrive.getDay());
          Serial.print("d\t");
          Serial.print(flashDrive.getHour());
          Serial.print("h\t");
          Serial.print(flashDrive.getMinute());
          Serial.print("m\t");
          Serial.print(flashDrive.getSecond());
          Serial.println('s');
        flashDrive.closeFile();                         //at the end, close the file
        printInfo("Done!");
        break;
//*****************************************************************************************************************************************************
      case 53: //5
        printInfo("COMMAND5: Modify File date/time: TEST1.TXT");    // Modify the file date/time and save
        flashDrive.setFileName("TEST1.TXT");  //set the file name
        flashDrive.openFile();                //open the file

          flashDrive.setYear(2019);
          flashDrive.setMonth(12);
          flashDrive.setDay(19);
          flashDrive.setHour(03);
          flashDrive.setMinute(38);
          flashDrive.setSecond(42);

          flashDrive.saveFileAttrb();           //save the changed data
        flashDrive.closeFile();               //and yes again, close the file after when you don`t use it
        printInfo("Done!");
        break;
//*****************************************************************************************************************************************************
      case 54: //6
        printInfo("COMMAND6: Delete File: TEST1.TXT");                       // Delete the file named TEST1.TXT
        flashDrive.setFileName("TEST1.TXT");  //set the file name
        flashDrive.deleteFile();              //delete file
        printInfo("Done!");
        break;
//*****************************************************************************************************************************************************
      case 55: //7
        printInfo("COMMAND7: List directory");                          //Print all file names in the current directory
          while(flashDrive.listDir()){ // reading next file
            if(flashDrive.getFileAttrb() == ATTR_DIRECTORY){//directory
              Serial.print('/');
              Serial.println(flashDrive.getFileName()); // get the actual file name
            } else {
              Serial.print(flashDrive.getFileName()); // get the actual file name
              Serial.print(" : ");
              Serial.print(flashDrive.getFileSize()); // get the actual file size in bytes
              Serial.print(" >>>\t");
              Serial.println(flashDrive.getFileSizeStr()); // get the actual file size in formatted string
            }
          }
          printInfo("Done!");
        break;
//*****************************************************************************************************************************************************
      case 56: //8
    	  totSect = flashDrive.getTotalSectors(); // get the total sector number
    	  freeSect = flashDrive.getFreeSectors(); // get the available sector number
    	  percentg = map(freeSect,totSect,0,0,100); 		// convert it to percentage (0-100)
    	  Serial.print("Disk size in bytes: ");
    	  /*if the sector number is more than 8388607 (8388607 * 512 = 4294966784 byte = 4Gb (fits in a 32bit variable) )
    	    							 e.g. 8388608 * 512 = 4294967296 byte (32bit variable overflows) */
    	  if(totSect > 8388607){
    		  Serial.print(">4Gb");
    	  } else {
        	  Serial.print(totSect * SECTORSIZE);
    	  }
    	  Serial.print("\tFree space in bytes: ");
    	  if(freeSect > 8388607){
    		  Serial.print(">4Gb");
    	  } else {
        	  Serial.print(freeSect * SECTORSIZE);
    	  }
    	  Serial.print(F("\tDisk usage :"));
    	  Serial.print(percentg);
    	  Serial.print(F("%"));
    	  switch (flashDrive.getFileSystem()) { //1-FAT12, 2-FAT16, 3-FAT32
			case 1:
				Serial.println(F("\tFAT12 partition"));
				break;
			case 2:
				Serial.println(F("\tFAT16 partition"));
				break;
			case 3:
				Serial.println(F("\tFAT32 partition"));
				break;
			default:
				Serial.println(F("\tNo valid partition"));
				break;
		}
    	 break;
//*****************************************************************************************************************************************************
      case 57: //9
        switch(flashDrive.cd("/DIR1/DIR2/DIR3",1)){
          case ERR_LONGFILENAME: //0x01
            Serial.println(F("Directory name is too long"));
          break;

          case ANSW_USB_INT_SUCCESS: //0x14
          Serial.println(F("Directory created successfully"));
          break;

          case ANSW_ERR_OPEN_DIR: //0x41
          Serial.println(F("Directory opened successfully"));
          break;

          case ANSW_ERR_MISS_FILE: //0x42
          Serial.println(F("Directory doesn't exist"));
          break;

          case ANSW_ERR_FOUND_NAME: //0x43
          Serial.println(F("File exist with the given name"));
          break;

          default:

          break;
        }
      break;
//*****************************************************************************************************************************************************
      case 104: //h
    	  printInfo(helpString);
        break;
      default:
        break;
    }//end switch

  }//endif serial available

}//end loop

//Print information
void printInfo(char info[]){
  char * infoPtr = info;
  int infoLength = 0;
    while(*infoPtr){
      infoPtr++;
      infoLength++;
      if(infoLength > 40) break;
    }
    Serial.print(F("\n\n"));
    for(int a = 0; a < infoLength; a++){
      Serial.print('*');
    }
   Serial.println();
   Serial.println(info);
   for(int a = 0; a < infoLength; a++){
      Serial.print('*');
    }
   Serial.print(F("\n\n"));
}
运行结果:插拔U盘有提示,输入 h 显示菜单,可以进行U盘读写等等文件操作

最后吐槽一下:CH37X 系列推出十多年了,很多年前我也入手过,但是不得不说这货太难用了,官网提供的资料看起来很全,但上手之后会发现缺少核心部分。现在能用是因为南京沁恒后来公布了一些具体 COMMAND (之前应该只有大客户才能拿到),这样玩家才有机会应用在 Arduino 上。相比之下,国外的芯片资料一直都很全。这也是为什么很多产品在第一版设计时不会考虑国产方案的原因。希望未来国产芯片在这方面能有所改观。
参考:
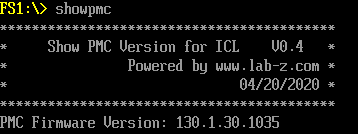
很多时候,我们需要得知当前系统中的 PMC Firmware版本。最简单的方法是进入 Setup 查看。但是不幸的是很多时候BIOS会主动隐藏这个选项。因此,编写一个 Shell 下的工具。用户可以直接获得当前系统 PMC版本号:
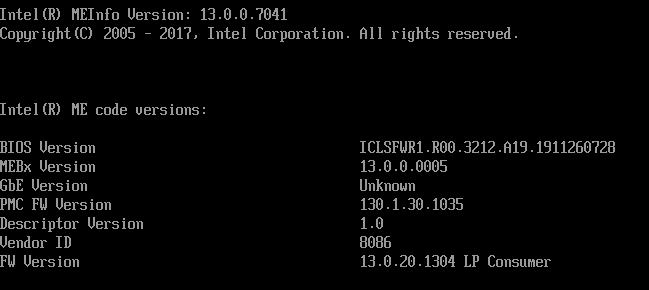
当然,除此之外还可以使用 MEInfo.efi (在 CSME Release Package 中)看到 PMC 的版本信息:
HP9800 是深圳宏品公司出品的功率计,带有USB 输出可以查看实时功率数值。


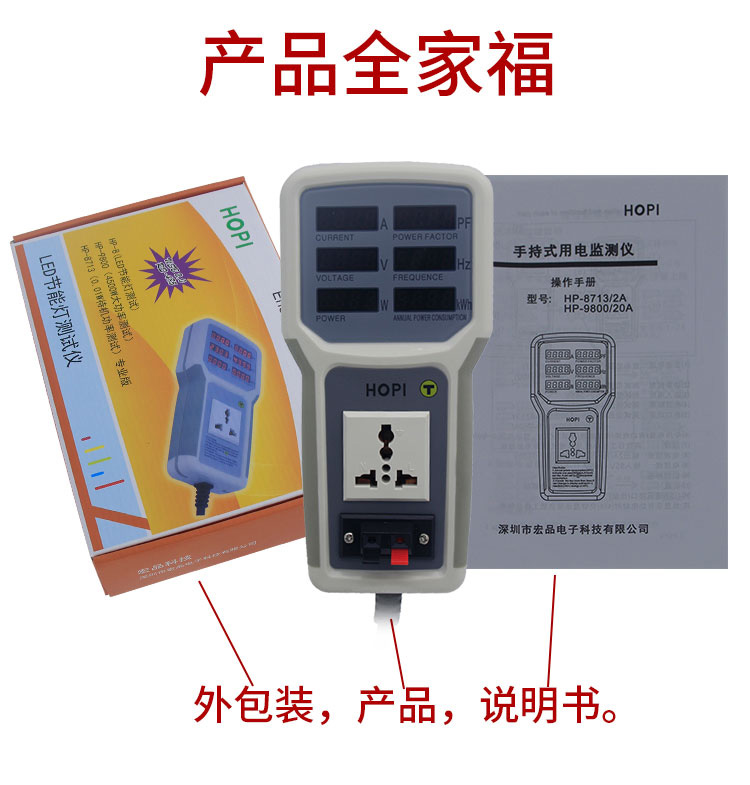
这里给出他的配套软件和说明链接:
https://pan.baidu.com/s/1II5y7y2SRb72Emc-7awXfw 提取码:17ye 复制这段内容后打开百度网盘手机App,操作更方便哦
问题:当我运行USB Host Shield Library 中关于 Pl2303 的例子(比如 pl2303_gprs_terminal)的时候,在串口会有下面的 Debug 信息:
Start
0000: 09 02 27 00 01 01 00 80 32 09 04 00 00 03 FF 00
0010: 00 00 07 05 81 03 0A 00 01 07 05 02 02 40 00 00
0020: 07 05 83 02 40 00 00
经过研究,产生的位置在 Usb.cpp 下面函数中
uint8_t USB::ctrlReq(uint8_t addr, uint8_t ep, uint8_t bmReqType, uint8_t bRequest, uint8_t wValLo, uint8_t wValHi, uint16_t wInd, uint16_t total, uint16_t nbytes, uint8_t* dataptr, USBReadParser *p) {
下面这个代码处:
// Invoke callback function if inTransfer completed successfully and callback function pointer is specified
   if(!rcode && p)
     ((USBReadParser*)p)->Parse(read, dataptr, total - left);
但是很明显,这里是调用设定的 callback 函数。
经过查找,最终确定实际生效的代码是hexdump.h 文件中下面的代码:
template <class BASE_CLASS, class LEN_TYPE, class OFFSET_TYPE>
void HexDumper<BASE_CLASS, LEN_TYPE, OFFSET_TYPE>::Parse(const LEN_TYPE len, const uint8_t *pbuf, const OFFSET_TYPE &offset __attribute__((unused))) {
        if(UsbDEBUGlvl >= 0x80) { // Fully bypass this block of code if we do not debug.
                for(LEN_TYPE j = 0; j < len; j++, byteCount++, byteTotal++) {
                        if(!byteCount) {
                                PrintHex<OFFSET_TYPE > (byteTotal, 0x80);
                                E_Notify(PSTR(": "), 0x80);
                        }
                        PrintHex<uint8_t > (pbuf[j], 0x80);
                        E_Notify(PSTR(" "), 0x80);

                        if(byteCount == 15) {
                                E_Notify(PSTR("\r\n"), 0x80);
                                byteCount = 0xFF;
                        }
                }
        }
}
因为其他地方对 UsbDEBUGlvl 赋值为 0x80,所以会输出一下信息用于Debug。
最近阅读 USB Host Shield 感觉风格不是很统一,比如,用于 Debug 的定义开关有很多处,估计是因为后来的代码是很多人合作的结果。
参考:
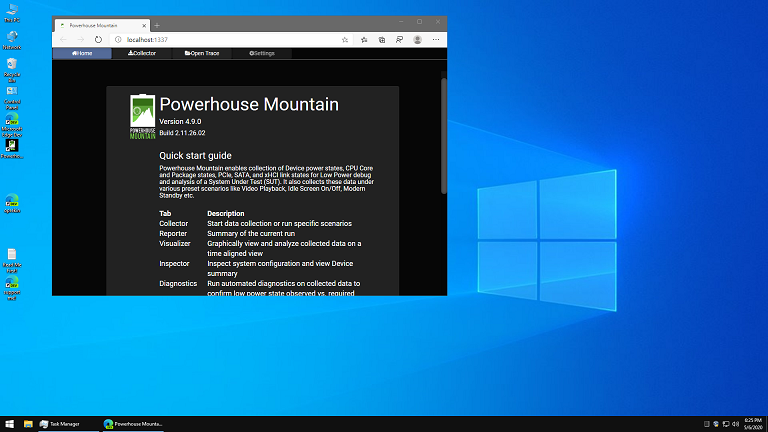
最近下载了一个 Win 10 lite 版本,专门用在虚拟机中配合 PHM 查看 Log (我不建议在工作机上安装 PHM ,因为在安装过程中会安装后一些服务会拖慢系统,导致系统降低,因此建议大家用额外的机器安装PHM 查看Log)。镜像来自下面的链接:
https://www.majorgeeks.com/files/details/windows_10_lite.html
这个版本具体的参数如下:
Technical Setup Details
| Full Name | Windows 10 Lite |
| Full Setup Size | 2.4 GB (For 32 Bit), 2.6 GB (For 64 Bit) |
| Compatibility | Compatible with 32 Bit (x86) / 64 Bit (x64) |
| Setup Type | Offline Installer / Full Standalone Setup |
| Developers | Microsoft |
Minimum System Requirements
| Memory (RAM) | Minimum 1 GB |
| HDD (Hard Disk Drive) | Minimum 16 GB Free Space Required |
| Processor | Intel Pentium 4 Or Advance |
在虚拟机中安装之后,还需要安装微软的 Edge 浏览器,之后就可以正常使用PHM。
链接: https://pan.baidu.com/s/1vlYXOvFDoDgfEBvbQKJ0-w 提取码: h6hn
参考:
1.https://www.lab-z.com/phm/ PowerHouse Mountain 的安装
之前介绍过祖国版的 USB Host Mini 【参考1】,这里介绍一些如何在 ESP32 上使用USB Host 功能。试验的板子是 DFRobot 的 FireBeelte:
来自【参考2】
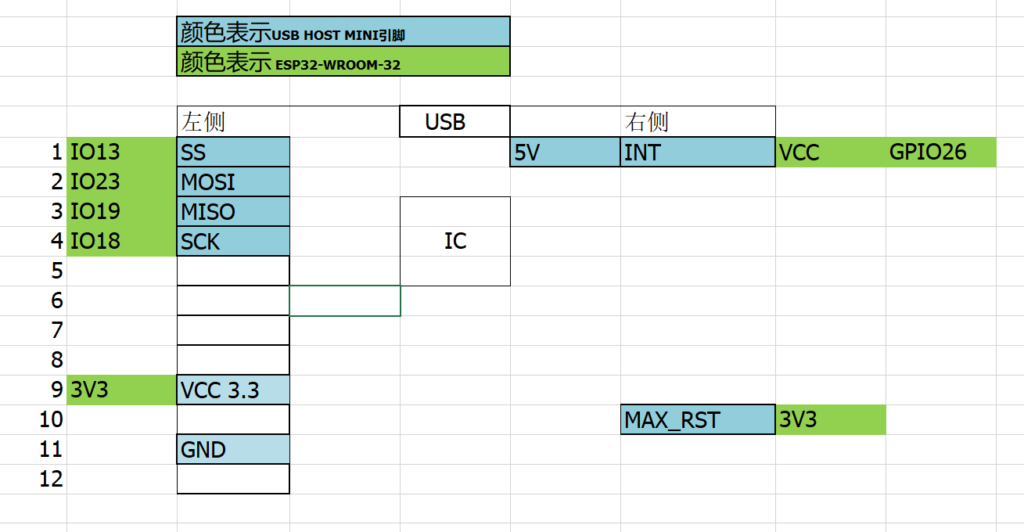
USB Host Mini 上有24个Pin, 但是实际用到的只有9个,按照下图将它和 FireBeelte 接起来即可:

USB Host Library 直接兼容 ES32 ,. 建议先运行 例子中的Board_QC 来验证板子是否工作正常。
下面是取得 USB 描述符的例子运行结果:
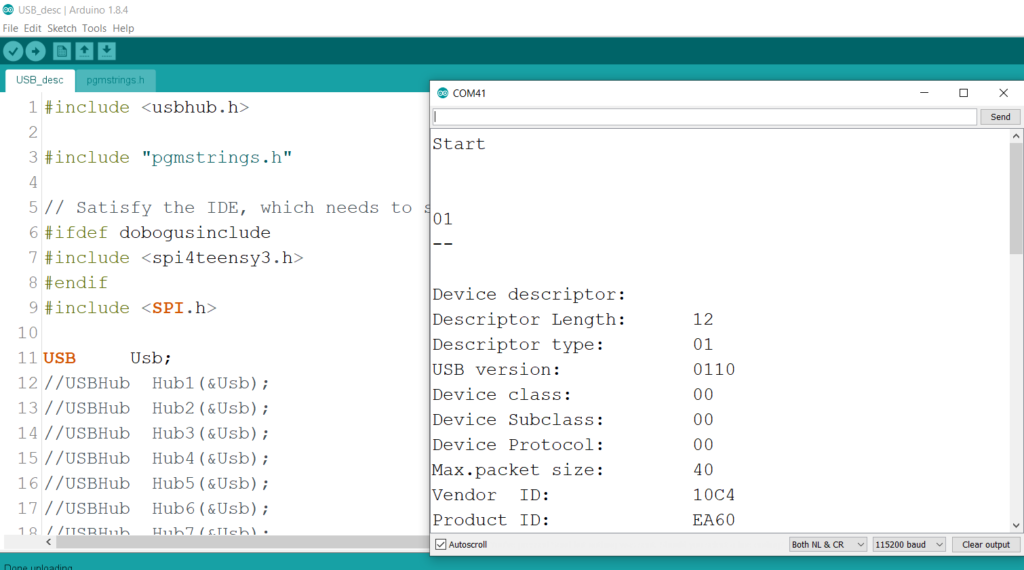
=========================================================
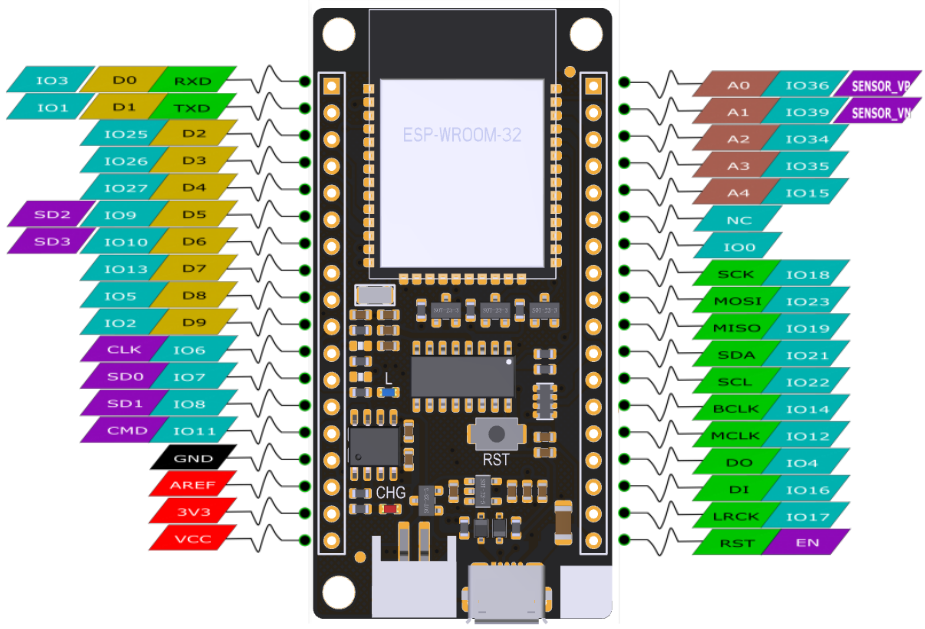
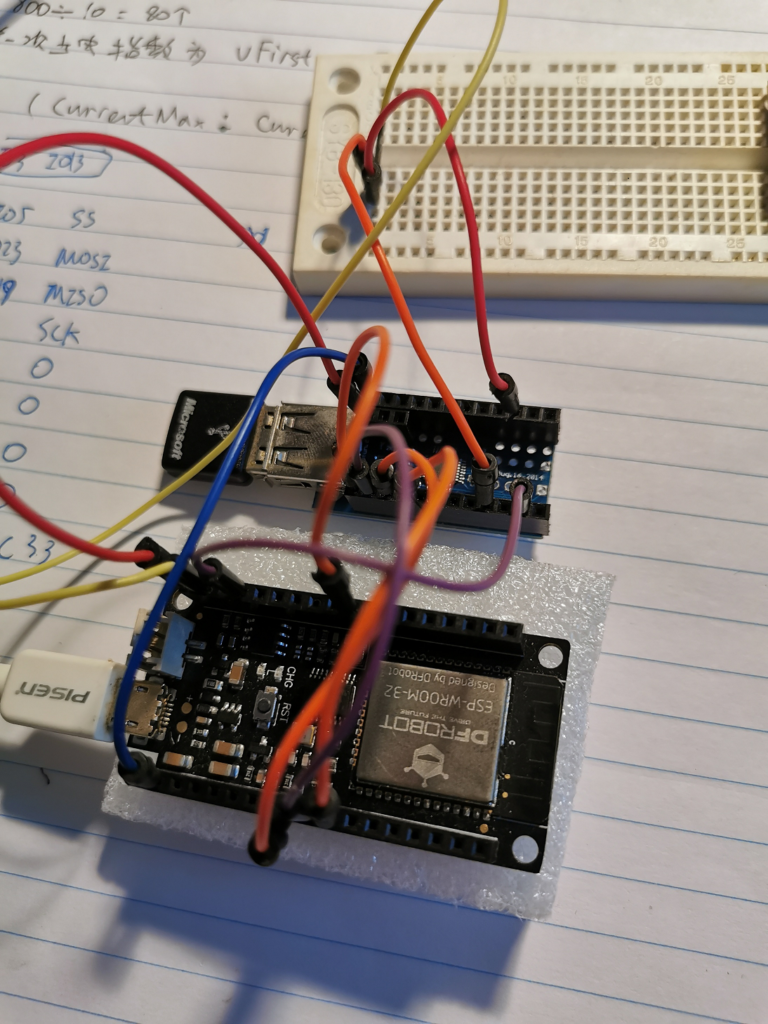
20201027 补充在 ESP32-WROOM-32 上的实验
连接方式:
库中代码修改:
1.USB_Host_Shield_Library_2.0\avrpins.h
// Pinout for ESP32 dev module

MAKE_PIN(P0, 0);
MAKE_PIN(P1, 1); // TX0
MAKE_PIN(P10, 10); // TX1
MAKE_PIN(P3, 3); // RX0
MAKE_PIN(P21, 21); // SDA
MAKE_PIN(P22, 22); // SCL
MAKE_PIN(P19, 19); // MISO
MAKE_PIN(P23, 23); // MOSI
MAKE_PIN(P18, 18); // SCK
//LabZ_Start
MAKE_PIN(P13, 13); // SS
MAKE_PIN(P26, 26); // INT
//LabZ_End
2.USB_Host_Shield_Library_2.0\UsbCore.h
#elif defined(ESP8266)
typedef MAX3421e<P15, P5> MAX3421E; // ESP8266 boards
#elif defined(ESP32)
//LABZ_Debug typedef MAX3421e<P5, P17> MAX3421E; // ESP32 boards
typedef MAX3421e<P13, P26> MAX3421E; // ESP32 boards  //LABZ_Debug
#else
typedef MAX3421e<P10, P9> MAX3421E; // Official Arduinos (UNO, Duemilanove, Mega, 2560, Leonardo, Due etc.), Intel Edison, Intel Galileo 2 or Teensy 2.0 and 3.x
#endif
3.USB_Host_Shield_Library_2.0\usbhost.h
#elif defined(ESP8266)
typedef SPi< P14, P13, P12, P15 > spi;
#elif defined(ESP32)
//LABZ_Debug typedef SPi< P18, P23, P19, P5 > spi;
typedef SPi< P18, P23, P19, P13 > spi; //LABZ_Debug
#else
#error "No SPI entry in usbhost.h"
#endif
参考:
WPA 是 Windows Performance Analyzer的缩写,主要用途是用来分析代码性能【参考1】。在Debug Modern Standby S0 相关问题的时候非常有用,比如:它可以告诉你谁在占用 CPU 使其处于S0状态,或者哪个中断将CPU 唤醒到S0。本文介绍一下这个工具的安装:
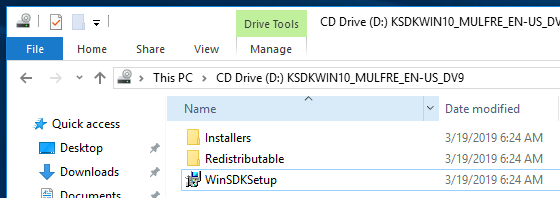
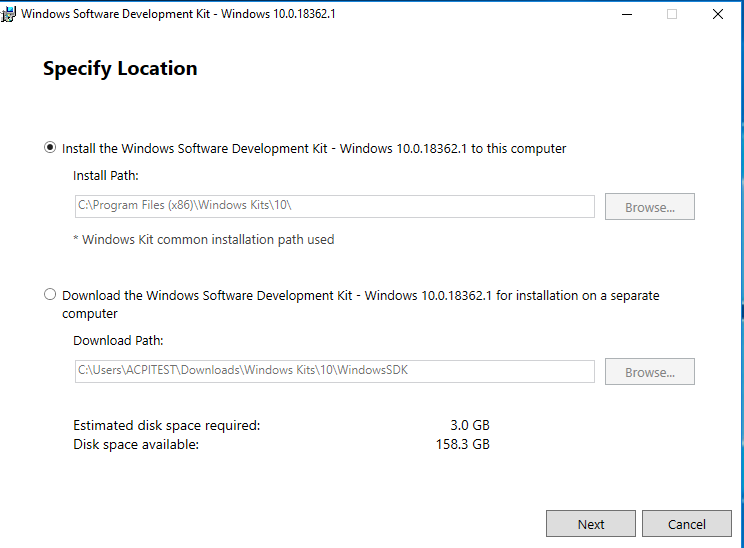
2.选择路径
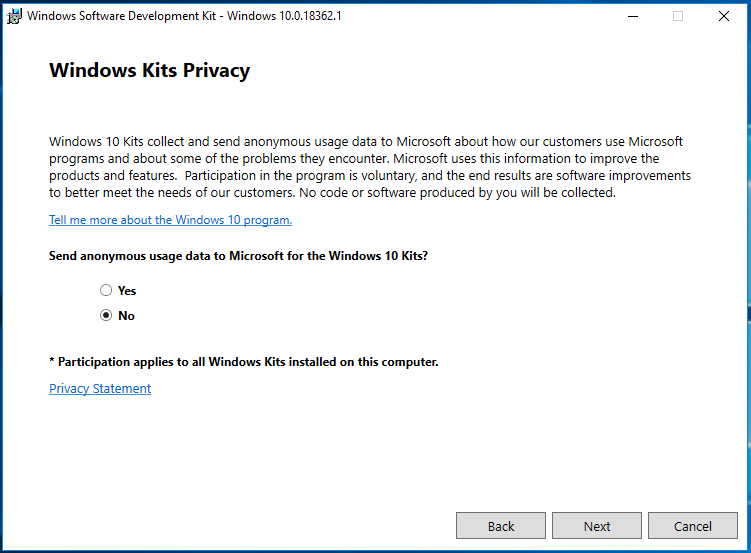
3.选择不要发送
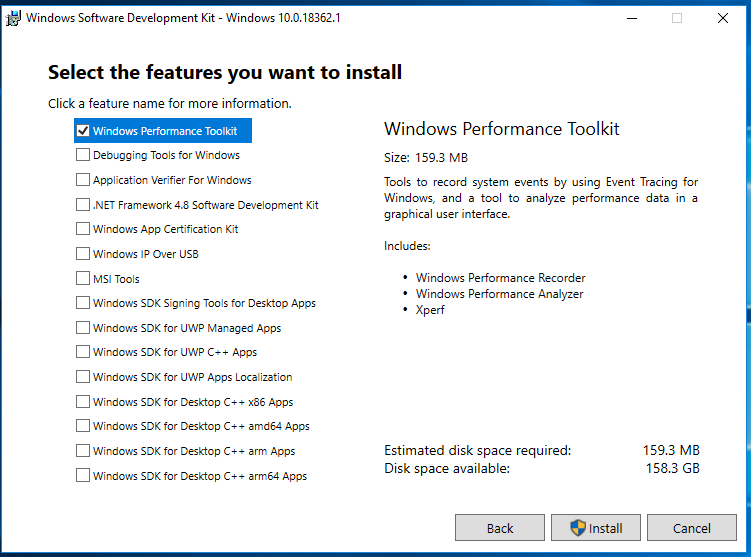
4.选中 “Windows Performance Toolkit” 这就是我们需要的 WPA。从提示可以看出,其中包括 Windows Performance Recorder (记录器),Windows Performance Analyzer (分析器)和 Xperf (分析单个程序性能的工具)
5.下面只需要等待安装完成即可
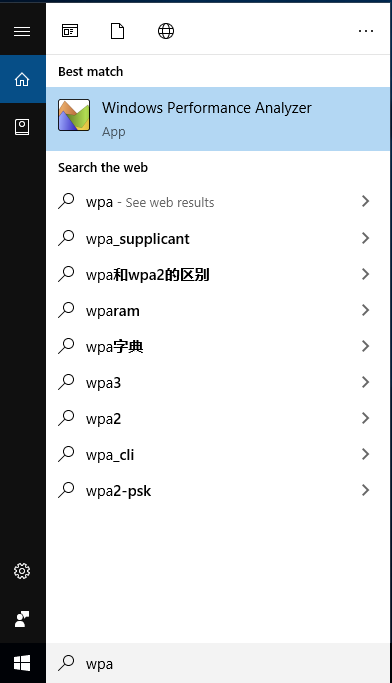
6.输入 WPA 即可启用
如果你系统中有 WPA,但是无法打开 etl 那么请检查你安装的版本是否和 etl 的相匹配。
参考:
1. https://docs.microsoft.com/en-us/windows-hardware/test/wpt/windows-performance-analyzer
理论上 Arduino 支持 ESP32 的主控板是非常简单的事情,在IDE 中操作就可以了。但是因为众所周知的原因经常会出现错误,这里就介绍一下另外的方法。
https://dl.espressif.com/dl/package_esp32_index.json
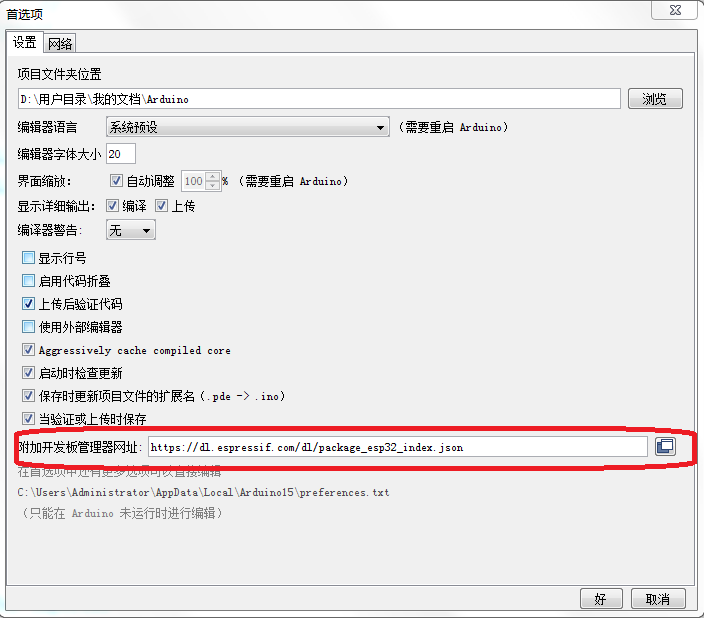
2.这里设置好之后可以直接到开发板管理器中搜索 ESP32,如果能够正常搜索到ESP32,然后顺利完成下载,那么久无需阅读下面部分。
上面Step2 失败,出现错误,需要手工操作如下:
A. 将 package_esp32_index.json 放在C:\Users\[用户名]\AppData\Local\Arduino15 下面。比如,我当前登录账号是 Administrator ,name 对应路径是
C:\Users\Administrator\AppData\Local\Arduino15;
B. 找到 C:\Users\[用户名]\AppData\Local\Arduino15\preferences.txt 文件中的下面两行修改为:
target_package=esp32
target_platform=esp32
C. 再次来到开发板管理器中,同样会出错,但是这次可以搜索到 esp32 的开发板了
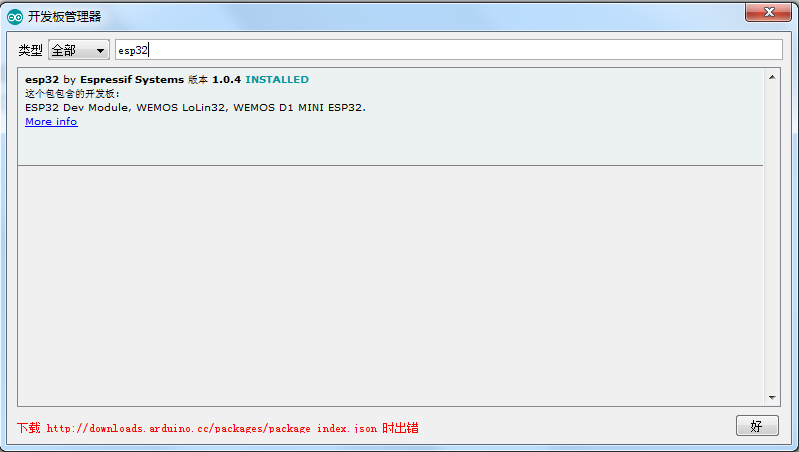
D. 在安装之前,将开发板Package和编译工具放置在下面的路径下:
C:\Users\[用户名Data\Local\Arduino15\staging\packages
E.选择你需要的版本,即可安装
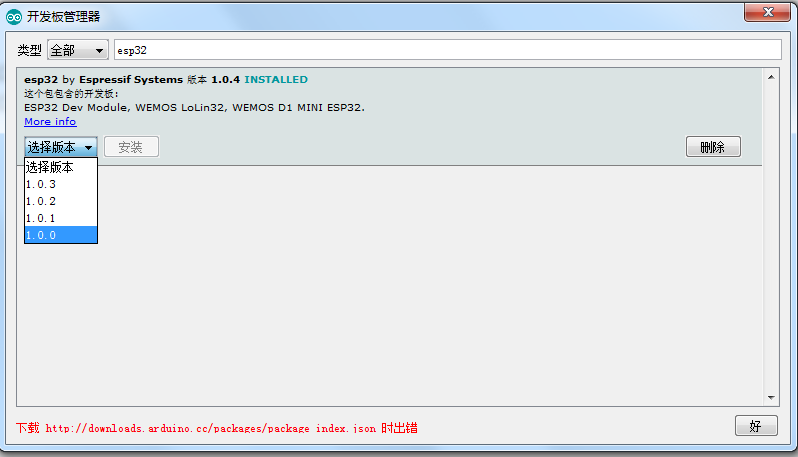
F. 从原理上将,Step A告诉Arduino 我要加入新板子,新板子的描述在 一个JSON文件中。Arduino 会根据描述在开发板管理器中加入这个板子的型号,同时尝试去JSON文件给出的网址下载开发包等等工具,同时因为 JSON 文件给出了这些文件的 Checksum,当 Arduino 发现目录下存在对应的文件后,不会再次下载而是会去校验,校验结果Pass即可继续安装,从而顺利完成 Arduino ESP32的安装。
所以上述动作能够“骗过” Arduino 在没有网络下载的情况下正常安装。
本文提到的安装包有如下文件
esp32-1.0.0.zip
esp32-1.0.1.zip
esp32-1.0.2.zip
esp32-1.0.3.zip
esp32-1.0.4.zip
esptool-2.3.1-windows.zip
esptool-2.6.0-windows.zip
esptool-2.6.1-windows.zip
mkspiffs-0.2.3-arduino-esp32-win32.zip
xtensa-esp32-elf-win32-1.22.0-80-g6c4433a-5.2.0.zip
可以在这里下载链接:https://pan.baidu.com/s/19GoaTbeSAGZ4ourMcWiCOg
提取码:sxsr