#include <stdio.h>
#include <string.h>
#include <stdint.h>
#include <windows.h>
// 显示缓冲区尺寸
#define BUFFER_WIDTH 160
#define BUFFER_HEIGHT 120
// 字符尺寸 (8x8像素)
#define CHAR_WIDTH 8
#define CHAR_HEIGHT 8
// 计算可显示的字符数量
#define CHARS_PER_ROW (BUFFER_WIDTH / CHAR_WIDTH) // 20个字符
#define CHARS_PER_COL (BUFFER_HEIGHT / CHAR_HEIGHT) // 15行
// 显示缓冲区
uint8_t display_buffer[BUFFER_HEIGHT][BUFFER_WIDTH];
// 修正后的ASCII字符字体数据 (8x8像素,可见字符32-126)
const uint8_t ascii_font[95][8] = {
// 空格 (32)
{0x00, 0x00, 0x00, 0x00, 0x00, 0x00, 0x00, 0x00},
// ! (33)
{0x18, 0x18, 0x18, 0x18, 0x18, 0x00, 0x18, 0x00},
// " (34)
{0x6C, 0x6C, 0x6C, 0x00, 0x00, 0x00, 0x00, 0x00},
// # (35)
{0x6C, 0x6C, 0xFE, 0x6C, 0xFE, 0x6C, 0x6C, 0x00},
// $ (36)
{0x30, 0x7C, 0xC0, 0x78, 0x0C, 0xF8, 0x30, 0x00},
// % (37)
{0x00, 0xC6, 0xCC, 0x18, 0x30, 0x66, 0xC6, 0x00},
// & (38)
{0x38, 0x6C, 0x38, 0x76, 0xDC, 0xCC, 0x76, 0x00},
// ' (39)
{0x60, 0x60, 0xC0, 0x00, 0x00, 0x00, 0x00, 0x00},
// ( (40)
{0x18, 0x30, 0x60, 0x60, 0x60, 0x30, 0x18, 0x00},
// ) (41)
{0x60, 0x30, 0x18, 0x18, 0x18, 0x30, 0x60, 0x00},
// * (42)
{0x00, 0x66, 0x3C, 0xFF, 0x3C, 0x66, 0x00, 0x00},
// + (43)
{0x00, 0x30, 0x30, 0xFC, 0x30, 0x30, 0x00, 0x00},
// , (44)
{0x00, 0x00, 0x00, 0x00, 0x00, 0x30, 0x60, 0x00},
// - (45)
{0x00, 0x00, 0x00, 0xFC, 0x00, 0x00, 0x00, 0x00},
// . (46)
{0x00, 0x00, 0x00, 0x00, 0x00, 0x30, 0x30, 0x00},
// / (47)
{0x06, 0x0C, 0x18, 0x30, 0x60, 0xC0, 0x80, 0x00},
// 0 (48)
{0x7C, 0xC6, 0xCE, 0xDE, 0xF6, 0xE6, 0x7C, 0x00},
// 1 (49)
{0x30, 0x70, 0x30, 0x30, 0x30, 0x30, 0xFC, 0x00},
// 2 (50)
{0x78, 0xCC, 0x0C, 0x38, 0x60, 0xCC, 0xFC, 0x00},
// 3 (51)
{0x78, 0xCC, 0x0C, 0x38, 0x0C, 0xCC, 0x78, 0x00},
// 4 (52)
{0x1C, 0x3C, 0x6C, 0xCC, 0xFE, 0x0C, 0x1E, 0x00},
// 5 (53)
{0xFC, 0xC0, 0xF8, 0x0C, 0x0C, 0xCC, 0x78, 0x00},
// 6 (54)
{0x38, 0x60, 0xC0, 0xF8, 0xCC, 0xCC, 0x78, 0x00},
// 7 (55)
{0xFC, 0xCC, 0x0C, 0x18, 0x30, 0x30, 0x30, 0x00},
// 8 (56)
{0x78, 0xCC, 0xCC, 0x78, 0xCC, 0xCC, 0x78, 0x00},
// 9 (57)
{0x78, 0xCC, 0xCC, 0x7C, 0x0C, 0x18, 0x70, 0x00},
// : (58)
{0x00, 0x30, 0x30, 0x00, 0x00, 0x30, 0x30, 0x00},
// ; (59)
{0x00, 0x30, 0x30, 0x00, 0x00, 0x30, 0x60, 0x00},
// < (60)
{0x18, 0x30, 0x60, 0xC0, 0x60, 0x30, 0x18, 0x00},
// = (61)
{0x00, 0x00, 0xFC, 0x00, 0x00, 0xFC, 0x00, 0x00},
// > (62)
{0x60, 0x30, 0x18, 0x0C, 0x18, 0x30, 0x60, 0x00},
// ? (63)
{0x78, 0xCC, 0x0C, 0x18, 0x30, 0x00, 0x30, 0x00},
// @ (64)
{0x7C, 0xC6, 0xDE, 0xDE, 0xDE, 0xC0, 0x78, 0x00},
// A (65)
{0x30, 0x78, 0xCC, 0xCC, 0xFC, 0xCC, 0xCC, 0x00},
// B (66)
{0xFC, 0x66, 0x66, 0x7C, 0x66, 0x66, 0xFC, 0x00},
// C (67)
{0x3C, 0x66, 0xC0, 0xC0, 0xC0, 0x66, 0x3C, 0x00},
// D (68)
{0xF8, 0x6C, 0x66, 0x66, 0x66, 0x6C, 0xF8, 0x00},
// E (69)
{0xFE, 0x62, 0x68, 0x78, 0x68, 0x62, 0xFE, 0x00},
// F (70)
{0xFE, 0x62, 0x68, 0x78, 0x68, 0x60, 0xF0, 0x00},
// G (71)
{0x3C, 0x66, 0xC0, 0xC0, 0xCE, 0x66, 0x3E, 0x00},
// H (72)
{0xCC, 0xCC, 0xCC, 0xFC, 0xCC, 0xCC, 0xCC, 0x00},
// I (73)
{0x78, 0x30, 0x30, 0x30, 0x30, 0x30, 0x78, 0x00},
// J (74)
{0x1E, 0x0C, 0x0C, 0x0C, 0xCC, 0xCC, 0x78, 0x00},
// K (75)
{0xE6, 0x66, 0x6C, 0x78, 0x6C, 0x66, 0xE6, 0x00},
// L (76)
{0xF0, 0x60, 0x60, 0x60, 0x62, 0x66, 0xFE, 0x00},
// M (77)
{0xC6, 0xEE, 0xFE, 0xFE, 0xD6, 0xC6, 0xC6, 0x00},
// N (78)
{0xC6, 0xE6, 0xF6, 0xDE, 0xCE, 0xC6, 0xC6, 0x00},
// O (79)
{0x38, 0x6C, 0xC6, 0xC6, 0xC6, 0x6C, 0x38, 0x00},
// P (80)
{0xFC, 0x66, 0x66, 0x7C, 0x60, 0x60, 0xF0, 0x00},
// Q (81)
{0x78, 0xCC, 0xCC, 0xCC, 0xDC, 0x78, 0x1C, 0x00},
// R (82)
{0xFC, 0x66, 0x66, 0x7C, 0x6C, 0x66, 0xE6, 0x00},
// S (83)
{0x78, 0xCC, 0xE0, 0x70, 0x1C, 0xCC, 0x78, 0x00},
// T (84)
{0xFC, 0xB4, 0x30, 0x30, 0x30, 0x30, 0x78, 0x00},
// U (85)
{0xCC, 0xCC, 0xCC, 0xCC, 0xCC, 0xCC, 0xFC, 0x00},
// V (86)
{0xCC, 0xCC, 0xCC, 0xCC, 0xCC, 0x78, 0x30, 0x00},
// W (87)
{0xC6, 0xC6, 0xC6, 0xD6, 0xFE, 0xEE, 0xC6, 0x00},
// X (88)
{0xC6, 0xC6, 0x6C, 0x38, 0x38, 0x6C, 0xC6, 0x00},
// Y (89)
{0xCC, 0xCC, 0xCC, 0x78, 0x30, 0x30, 0x78, 0x00},
// Z (90)
{0xFE, 0xC6, 0x8C, 0x18, 0x32, 0x66, 0xFE, 0x00},
// [ (91)
{0x78, 0x60, 0x60, 0x60, 0x60, 0x60, 0x78, 0x00},
// \ (92)
{0xC0, 0x60, 0x30, 0x18, 0x0C, 0x06, 0x02, 0x00},
// ] (93)
{0x78, 0x18, 0x18, 0x18, 0x18, 0x18, 0x78, 0x00},
// ^ (94)
{0x10, 0x38, 0x6C, 0xC6, 0x00, 0x00, 0x00, 0x00},
// _ (95)
{0x00, 0x00, 0x00, 0x00, 0x00, 0x00, 0x00, 0xFF},
// ` (96)
{0x30, 0x30, 0x18, 0x00, 0x00, 0x00, 0x00, 0x00},
// a (97)
{0x00, 0x00, 0x78, 0x0C, 0x7C, 0xCC, 0x76, 0x00},
// b (98)
{0xE0, 0x60, 0x60, 0x7C, 0x66, 0x66, 0xDC, 0x00},
// c (99)
{0x00, 0x00, 0x78, 0xCC, 0xC0, 0xCC, 0x78, 0x00},
// d (100)
{0x1C, 0x0C, 0x0C, 0x7C, 0xCC, 0xCC, 0x76, 0x00},
// e (101)
{0x00, 0x00, 0x78, 0xCC, 0xFC, 0xC0, 0x78, 0x00},
// f (102)
{0x38, 0x6C, 0x60, 0xF0, 0x60, 0x60, 0xF0, 0x00},
// g (103)
{0x00, 0x00, 0x76, 0xCC, 0xCC, 0x7C, 0x0C, 0xF8},
// h (104)
{0xE0, 0x60, 0x6C, 0x76, 0x66, 0x66, 0xE6, 0x00},
// i (105)
{0x30, 0x00, 0x70, 0x30, 0x30, 0x30, 0x78, 0x00},
// j (106)
{0x0C, 0x00, 0x0C, 0x0C, 0x0C, 0xCC, 0xCC, 0x78},
// k (107)
{0xE0, 0x60, 0x66, 0x6C, 0x78, 0x6C, 0xE6, 0x00},
// l (108)
{0x70, 0x30, 0x30, 0x30, 0x30, 0x30, 0x78, 0x00},
// m (109)
{0x00, 0x00, 0xCC, 0xFE, 0xFE, 0xD6, 0xC6, 0x00},
// n (110)
{0x00, 0x00, 0xF8, 0xCC, 0xCC, 0xCC, 0xCC, 0x00},
// o (111)
{0x00, 0x00, 0x78, 0xCC, 0xCC, 0xCC, 0x78, 0x00},
// p (112)
{0x00, 0x00, 0xDC, 0x66, 0x66, 0x7C, 0x60, 0xF0},
// q (113)
{0x00, 0x00, 0x76, 0xCC, 0xCC, 0x7C, 0x0C, 0x1E},
// r (114)
{0x00, 0x00, 0xDC, 0x76, 0x66, 0x60, 0xF0, 0x00},
// s (115)
{0x00, 0x00, 0x7C, 0xC0, 0x78, 0x0C, 0xF8, 0x00},
// t (116)
{0x10, 0x30, 0x7C, 0x30, 0x30, 0x34, 0x18, 0x00},
// u (117)
{0x00, 0x00, 0xCC, 0xCC, 0xCC, 0xCC, 0x76, 0x00},
// v (118)
{0x00, 0x00, 0xCC, 0xCC, 0xCC, 0x78, 0x30, 0x00},
// w (119)
{0x00, 0x00, 0xC6, 0xD6, 0xFE, 0xFE, 0x6C, 0x00},
// x (120)
{0x00, 0x00, 0xC6, 0x6C, 0x38, 0x6C, 0xC6, 0x00},
// y (121)
{0x00, 0x00, 0xCC, 0xCC, 0xCC, 0x7C, 0x0C, 0xF8},
// z (122)
{0x00, 0x00, 0xFC, 0x98, 0x30, 0x64, 0xFC, 0x00},
// { (123)
{0x1C, 0x30, 0x30, 0xE0, 0x30, 0x30, 0x1C, 0x00},
// | (124)
{0x18, 0x18, 0x18, 0x00, 0x18, 0x18, 0x18, 0x00},
// } (125)
{0xE0, 0x30, 0x30, 0x1C, 0x30, 0x30, 0xE0, 0x00},
// ~ (126)
{0x76, 0xDC, 0x00, 0x00, 0x00, 0x00, 0x00, 0x00}
};
// 清空显示缓冲区
void clear_buffer() {
memset(display_buffer, 0, sizeof(display_buffer));
}
// 在指定位置绘制单个字符
void draw_char(int x, int y, char c) {
if (c < 32 || c > 126) return; // 只支持可见ASCII字符
int char_index = c - 32;
const uint8_t* font_data = ascii_font[char_index];
for (int row = 0; row < CHAR_HEIGHT; row++) {
if (y + row >= BUFFER_HEIGHT) break;
uint8_t font_row = font_data[row];
for (int col = 0; col < CHAR_WIDTH; col++) {
if (x + col >= BUFFER_WIDTH) break;
if (font_row & (0x80 >> col)) {
display_buffer[y + row][x + col] = 1;
}
}
}
}
// 在指定字符位置绘制字符(自动计算像素位置)
void draw_char_at_pos(int char_x, int char_y, char c) {
if (char_x >= CHARS_PER_ROW || char_y >= CHARS_PER_COL) return;
int pixel_x = char_x * CHAR_WIDTH;
int pixel_y = char_y * CHAR_HEIGHT;
draw_char(pixel_x, pixel_y, c);
}
// 绘制字符串
void draw_string(int char_x, int char_y, const char* str) {
int x = char_x;
int y = char_y;
while (*str && y < CHARS_PER_COL) {
if (*str == '\n') {
x = char_x;
y++;
}
else {
if (x < CHARS_PER_ROW) {
draw_char_at_pos(x, y, *str);
x++;
}
else {
// 自动换行
x = char_x;
y++;
if (y < CHARS_PER_COL) {
draw_char_at_pos(x, y, *str);
x++;
}
}
}
str++;
}
}
// 打印缓冲区内容(用于调试)
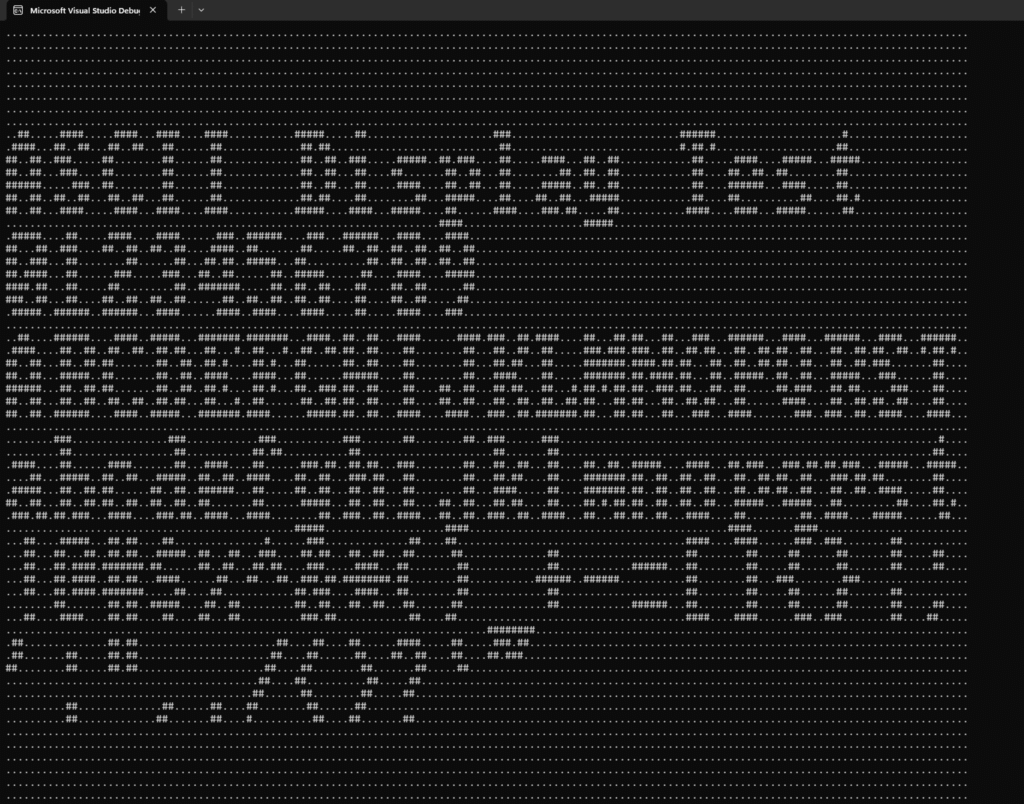
void print_buffer() {
for (int y = 0; y < BUFFER_HEIGHT; y++) {
for (int x = 0; x < BUFFER_WIDTH; x++) {
printf("%c", display_buffer[y][x] ? '#' : '.');
}
printf("\n");
}
}
void SetConsoleSize(int width, int height) {
HANDLE hConsole = GetStdHandle(STD_OUTPUT_HANDLE);
// 设置缓冲区大小
COORD bufferSize = { (SHORT)width, (SHORT)height };
SetConsoleScreenBufferSize(hConsole, bufferSize);
// 设置窗口大小
SMALL_RECT windowSize = { 0, 0, (SHORT)(width - 1), (SHORT)(height - 1) };
SetConsoleWindowInfo(hConsole, TRUE, &windowSize);
}
// 示例使用
int main() {
// 设置控制台为160列x120行
SetConsoleSize(160, 120);
// 清空缓冲区
clear_buffer();
// 绘制一些文本
draw_string(0, 1, "ASCII Display Test");
draw_string(0, 2, "0123456789");
draw_string(0, 3, "ABCDEFGHIJKLMNOPQRST");
draw_string(0, 4, "abcdefghijklmnopqrst");
draw_string(0, 5, "!@#$%^&*()_+-=[]{}|;");
draw_string(0, 6, "':\",./<>?`~");
print_buffer();
printf("Display buffer size: %dx%d pixels\n", BUFFER_WIDTH, BUFFER_HEIGHT);
printf("Character grid: %dx%d characters\n", CHARS_PER_ROW, CHARS_PER_COL);
printf("Output saved to display_output.pbm\n");
return 0;
}