64位 Ubuntu 下,可能出现出现一个能看到但是无法执行的可执行文件。尝试执行时,会出现 “bash: ./name: No such file or directory”的错误提示。
产生这个问题的一个原因可能是:你的可执行程序是 32位的,而系统是64位的,所以无法正常执行(当然在这步之前还请确定权限正确)。
最后解决方法是:用下面命令安装一个兼容库
sudo apt-get install ia32-libs
之后再尝试执行之前的程序
64位 Ubuntu 下,可能出现出现一个能看到但是无法执行的可执行文件。尝试执行时,会出现 “bash: ./name: No such file or directory”的错误提示。
产生这个问题的一个原因可能是:你的可执行程序是 32位的,而系统是64位的,所以无法正常执行(当然在这步之前还请确定权限正确)。
最后解决方法是:用下面命令安装一个兼容库
sudo apt-get install ia32-libs
之后再尝试执行之前的程序
这一系列文章是根据cutebunny 的BLOG “windows的磁盘操作” 写成的,主要是部分修改原作中的代码,使之兼容Unicode和Windows 7 64bit. 原文可以在下面的网址找到
http://cutebunny.blog.51cto.com 。 本文是参考 “windows的磁盘操作之三——获取和删除磁盘分区信息”写成。
程序实现了获得当前硬盘分区信息的功能。
// getpart.cpp : Defines the entry point for the console application.
//
#include "stdafx.h"
#include "windows.h"
int _tmain(int argc, _TCHAR* argv[])
{
HANDLE hDevice; // handle to the drive to be examined
BOOL result; // results flag
DWORD readed; // discard results
DWORD szNewLayout;
DRIVE_LAYOUT_INFORMATION_EX *dl = NULL;
DWORD i;
// 特别注意 DRIVE_LAYOUT_INFORMATION_EX 结构体的大小,即使只有一个分区,也需要预留出4个分区的大小
// 下面是预留了10个分区的大小。如果直接使用该结构体而不扩大大小会导致 GetLastError =0x7A
szNewLayout=sizeof(DRIVE_LAYOUT_INFORMATION_EX) + 10 * sizeof(PARTITION_INFORMATION_EX);
dl = (DRIVE_LAYOUT_INFORMATION_EX*) new BYTE[szNewLayout];
hDevice = CreateFile(
L"\\\\.\\PhysicalDrive0", // drive to open
GENERIC_READ | GENERIC_WRITE, // access to the drive
FILE_SHARE_READ | FILE_SHARE_WRITE, //share mode
NULL, // default security attributes
OPEN_EXISTING, // disposition
0, // file attributes
NULL // do not copy file attribute
);
if (hDevice == INVALID_HANDLE_VALUE) // cannot open the drive
{
fprintf(stderr, "CreateFile() Error: 0x%X\n", GetLastError());
}
result = DeviceIoControl(
hDevice, // handle to device
IOCTL_DISK_GET_DRIVE_LAYOUT_EX, // dwIoControlCode
NULL, // lpInBuffer
0, // nInBufferSize
dl, // output buffer
szNewLayout, // size of output buffer
&readed, // number of bytes returned
NULL // OVERLAPPED structure
);
if (!result)
{
fprintf(stderr, "IOCTL_DISK_GET_DRIVE_LAYOUT_EX Error: 0x%X\n", GetLastError());
(void)CloseHandle(hDevice);
}
if (dl->PartitionStyle == PARTITION_STYLE_MBR)
{
fprintf(stdout, "It's MBR\n", GetLastError());
}
if (dl->PartitionStyle == PARTITION_STYLE_GPT)
{
fprintf(stdout, "It's GPT\n", GetLastError());
}
if (dl->PartitionStyle == PARTITION_STYLE_RAW)
{
fprintf(stdout, "It's RAW\n", GetLastError());
}
//PartitionCount 这个参数不准确,它给出的是4的整数倍。要想准确,需要结构体中其他的来确定
//
//The number of partitions on the drive. On hard disks with the MBR layout,
//this value will always be a multiple of 4. Any partitions that are actually
//unused will have a partition type of PARTITION_ENTRY_UNUSED (0) set in the PartitionType
//member of the PARTITION_INFORMATION_MBR structure of the Mbr member of the
//PARTITION_INFORMATION_EX structure of the PartitionEntry member of this structure.
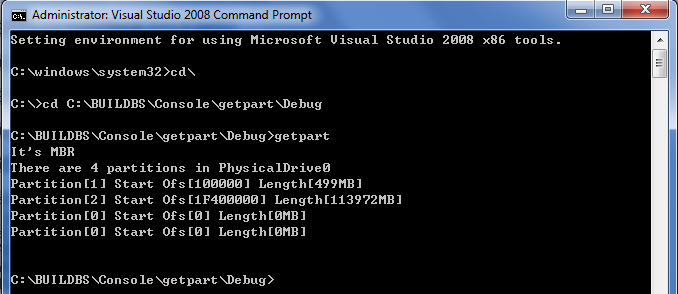
fprintf(stdout, "There are %d partitions in PhysicalDrive0\n", dl->PartitionCount);
for (i=0;i<dl->PartitionCount; i++)
{
fprintf(stdout, "Partition[%d] Start Ofs[%llX] Length[%lldMB]\n",
dl->PartitionEntry[i].PartitionNumber,
dl->PartitionEntry[i].StartingOffset,
dl->PartitionEntry[i].PartitionLength.QuadPart / 1024 /1024);
}
delete(dl);
getchar();
return 0;
}
运行结果如下 (注意,运行时需要管理员的权限)
参考:
1.cutebunny 的BLOG “windows的磁盘操作” 可以在这里下载 WindowsDisk
房屋在装修,因为是清包,事情很多,请了门口的上海黄腾装潢公司,更是纠缠不清,老婆动辄就被气哭。
唉,只能坚持下去了。
在编译UEFI 程序时,可能会遇到下面的提示信息,同时如果打开了 warning as error,编译过程就会停止下来。
Warning 1 warning C4996: ‘xxxx’: This function or variable may be unsafe. Consider using fopen_s instead. To disable deprecation, use _CRT_SECURE_NO_WARNINGS. See online help for details.
产生这个问题的原因是一些老的库函数中包含了不安全的函数,比如可能被溢出攻击的函数。解决方法是将这个函数替换成更安全的函数,替换函数大多数是在函数名后面加入一个”_s” (这段我没有验证过)。更简单的方法是在出现问题的文件开头加入下面的代码来关闭提示让编译进行下去
#pragma warning(disable:4996)
参考:
1.http://www.rosoo.net/a/200803/6911.html
2.http://blog.csdn.net/xuleilx/article/details/7281499
公司有要求,上班的时候笔记本必须锁死在 dock 上,然后不在的时候必须拔掉钥匙锁住,每天中午都会有专人检查。于是,用Arduino做了一个简单的报警装置。
用起来是这样的:
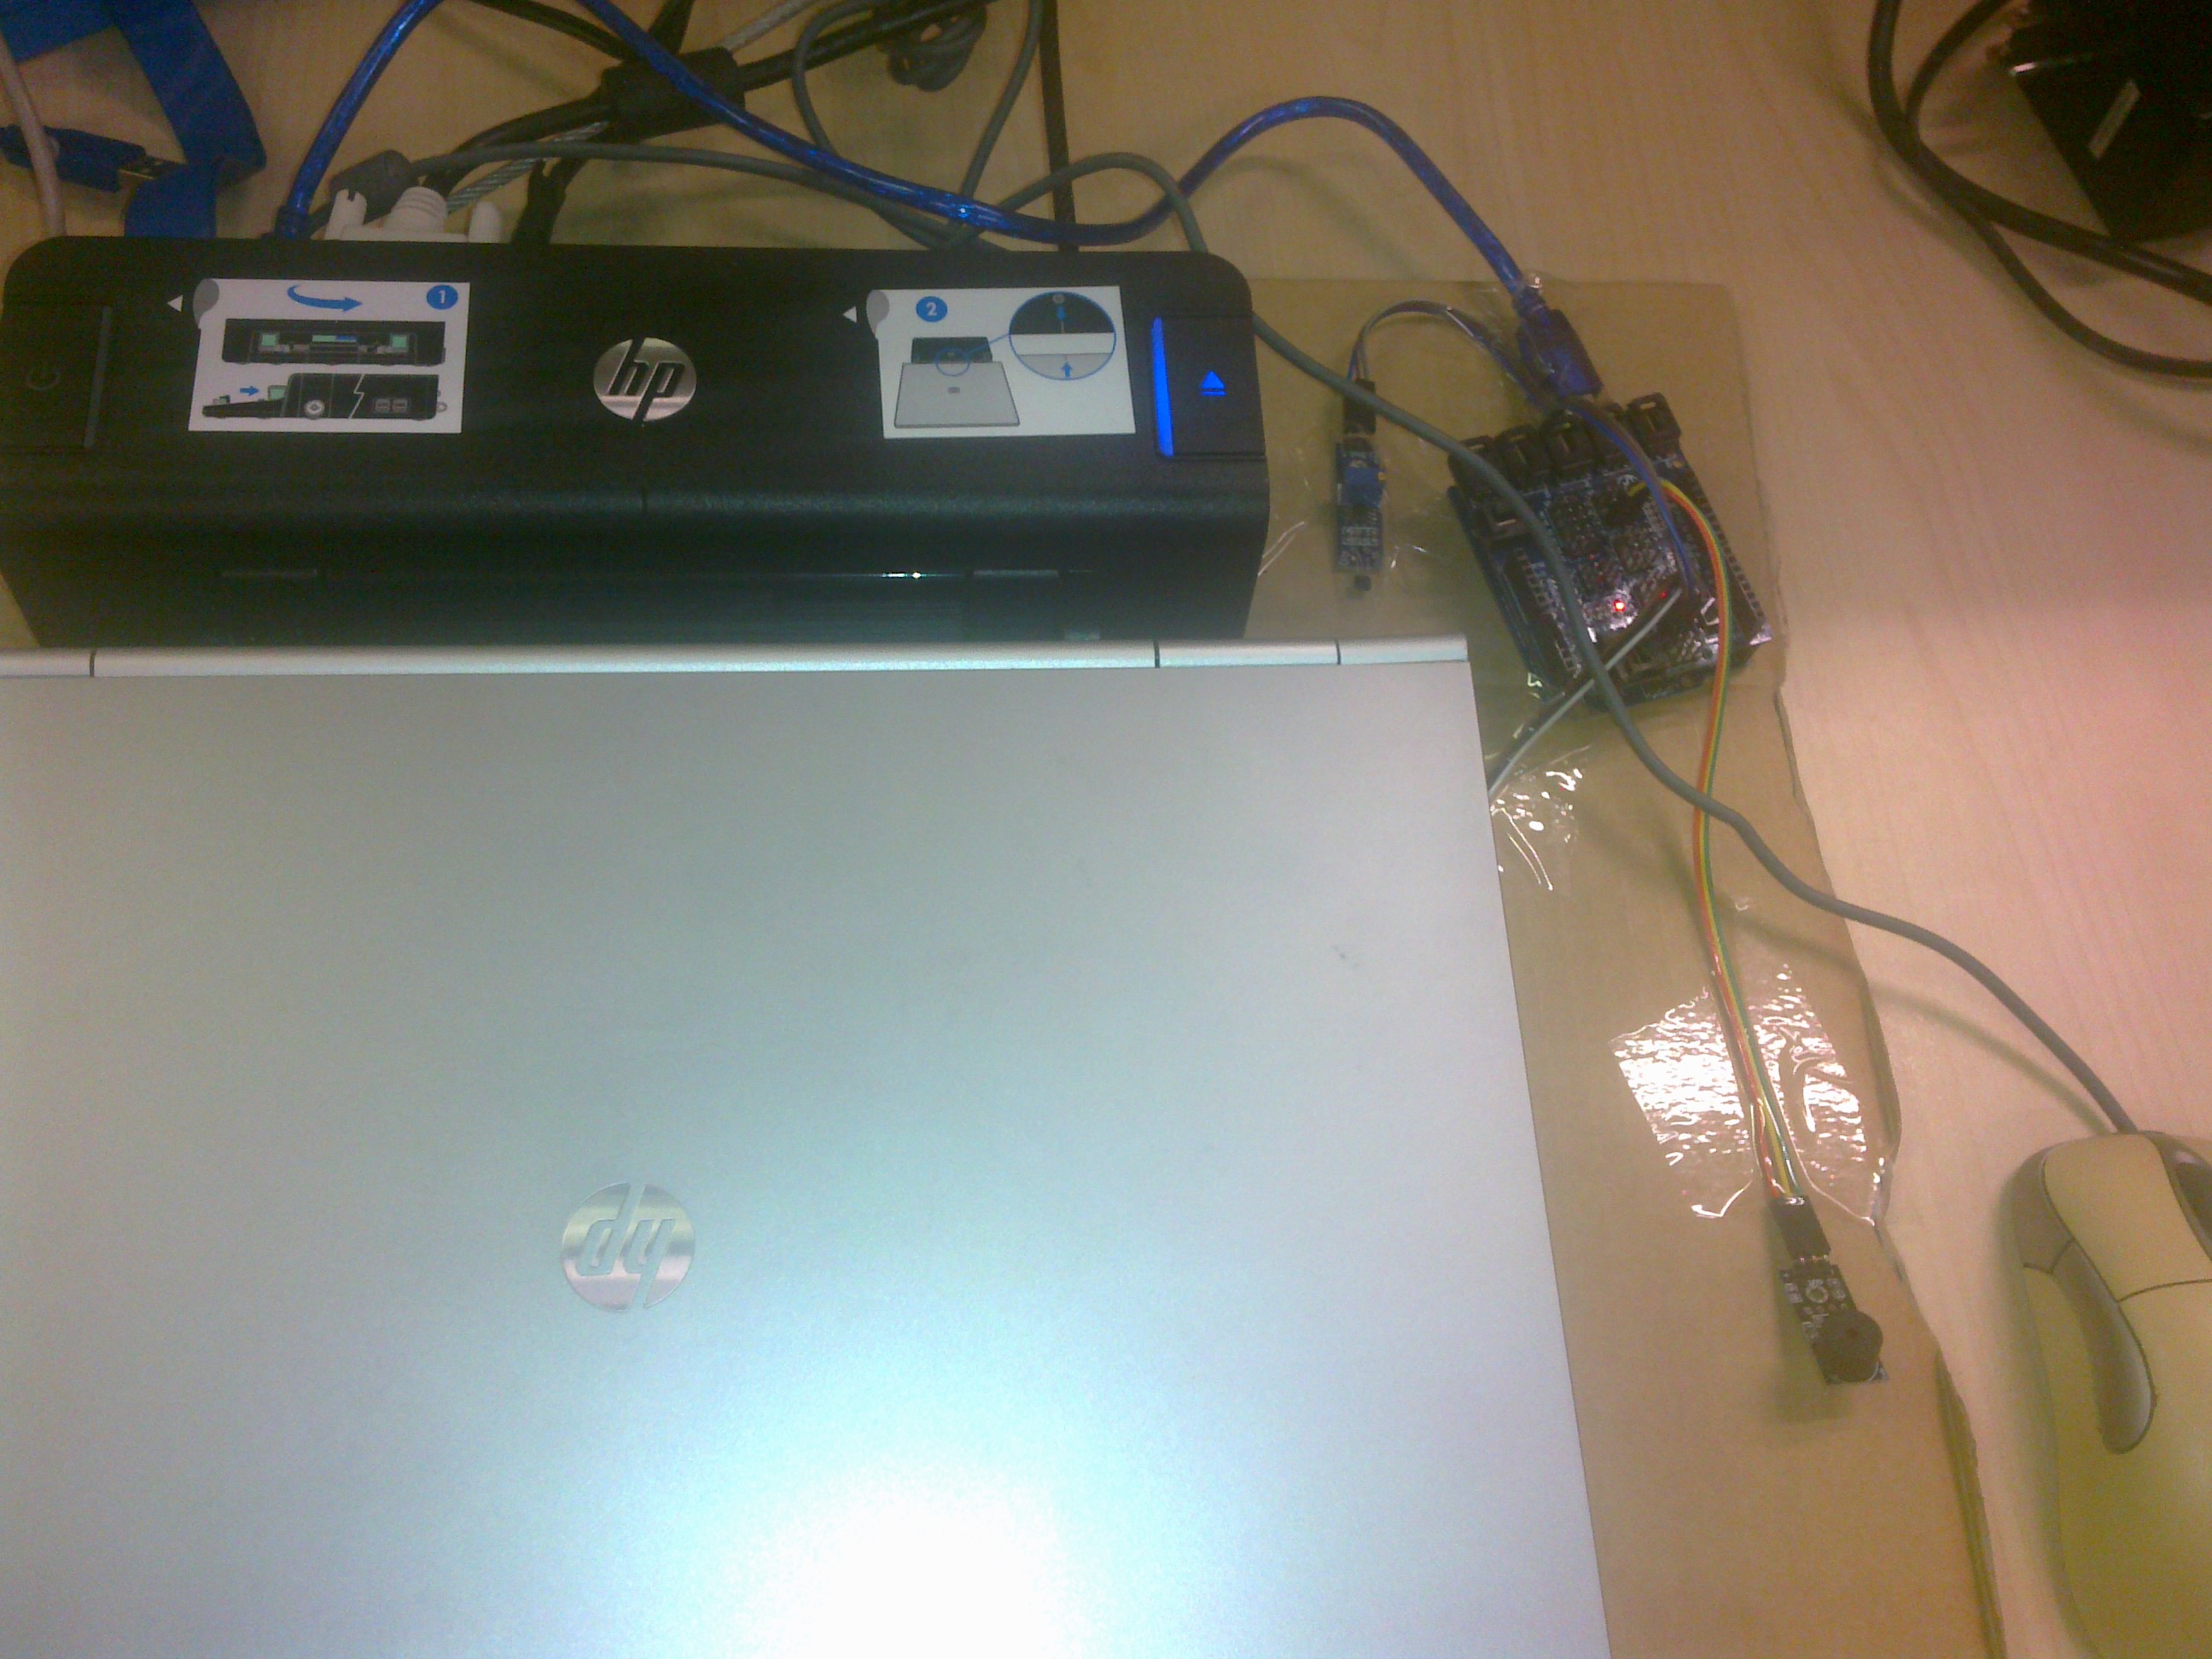
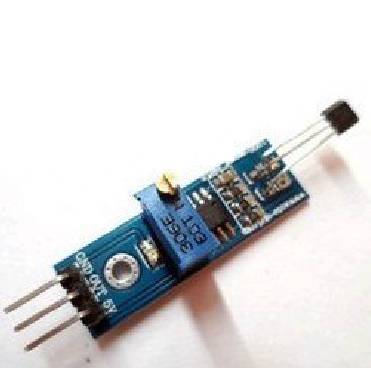
元件上除了 Arduino 本身,还用了2个霍尔效应管(霍尔开关)作为传感器
还有一个无源蜂鸣器作为报警装置
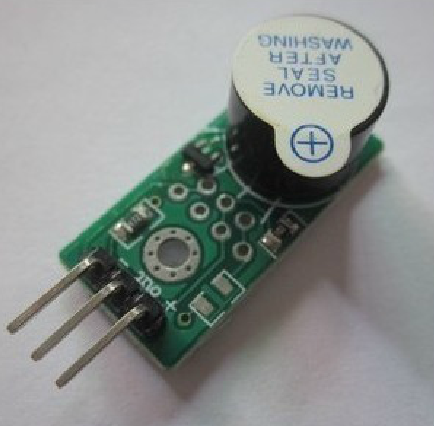
原理上来说,在笔记本底部安装一块磁铁,在钥匙上安装一块磁铁,同时将霍尔效应管放置在与之相对的位置。当笔记本底部的霍尔效应管感受到磁力,并且钥匙处也感受到磁力,就表明笔记本放在了dock上,并且钥匙没有拔掉,此时即发出报警声音。
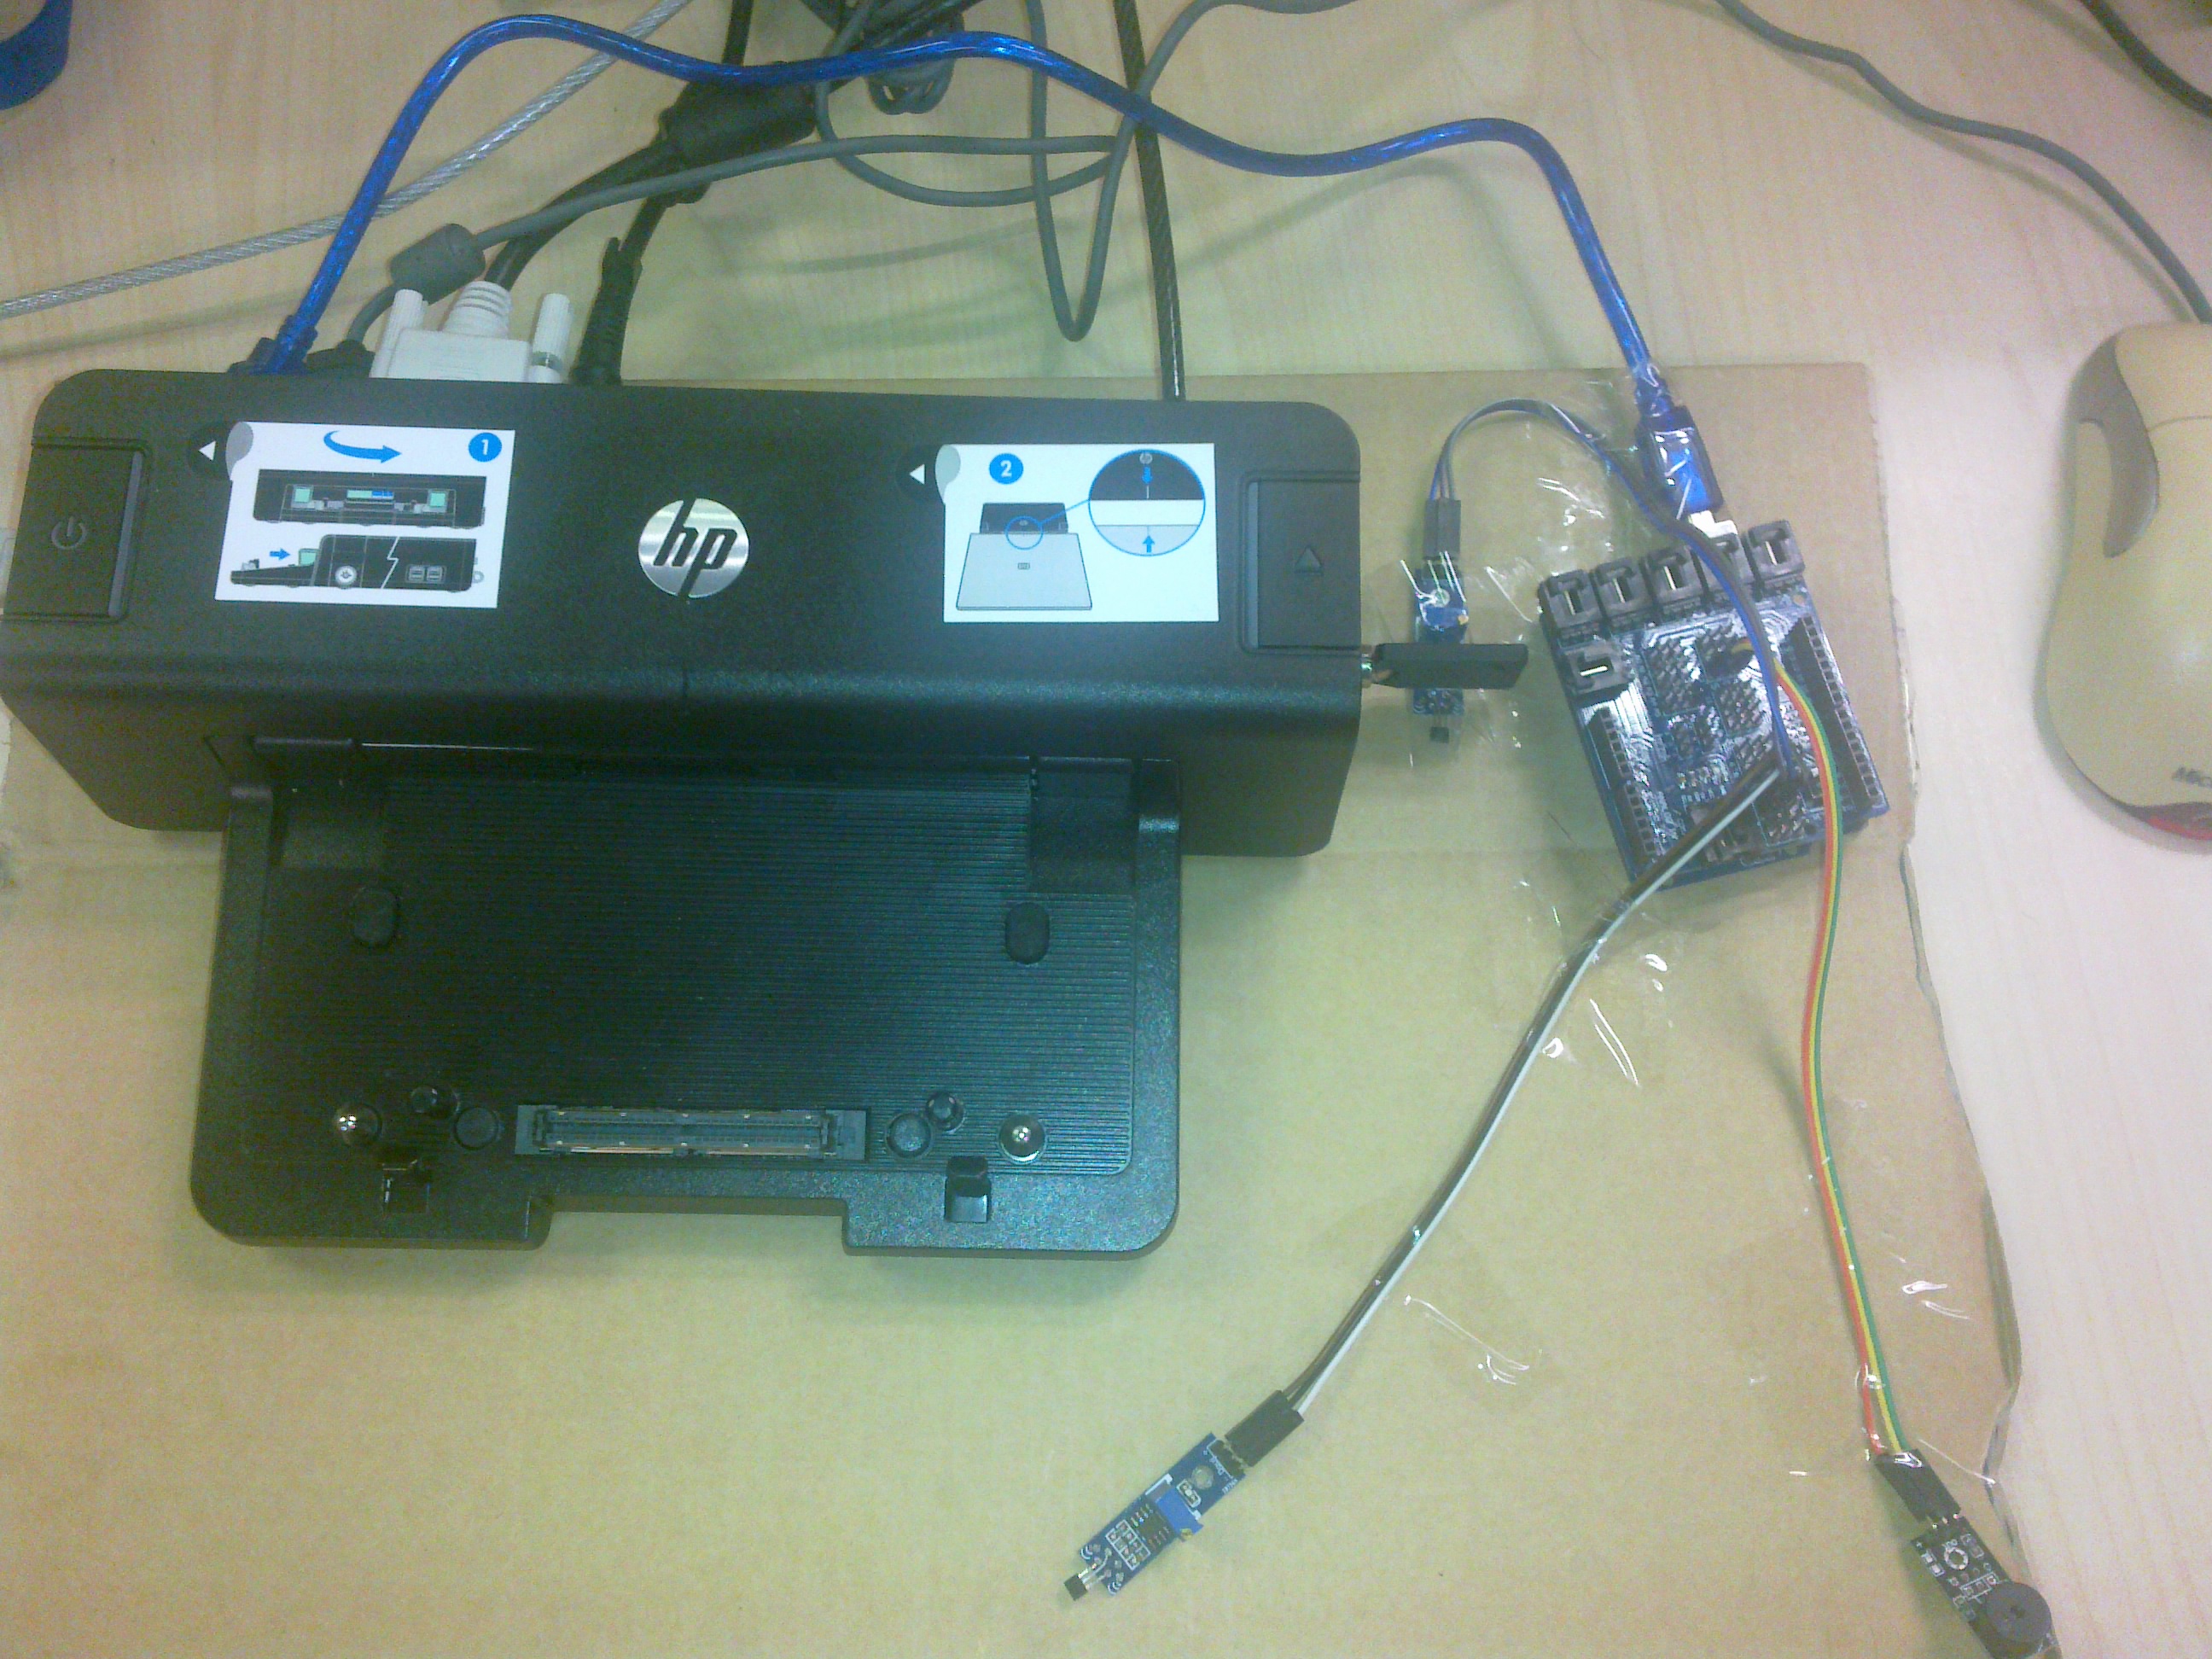
后来始料未及的是后来才知道,Lenovo 的笔记本dock在未锁定的状况下可以拔掉钥匙,就是说对于Lenovo的用户来说可能出现笔记本表面上看起来放置好了钥匙也拔掉了但是实际上没有锁住,而这样的情况是无法检测出来的。HP的笔记本没有这样的问题。但是鉴于上面的情况不能完全囊括,我的这个设计也就没有了多少意义。
代码如下
int KeyPin = 3; //钥匙处的霍尔开关管脚
int ButtomPin = 4; //底部的霍尔开关管脚
int BeepPin = 12; //蜂鸣器管脚
int LedPin = 13; //13Pin 上有个LED
void setup() {
pinMode(KeyPin, INPUT); //霍尔开关做输入
pinMode(ButtomPin, INPUT);//霍尔开关做输入
pinMode(BeepPin, OUTPUT); //蜂鸣器是输出
pinMode(LedPin, OUTPUT);
}
void loop() {
int i;
digitalWrite(LedPin,HIGH);
if (LOW == digitalRead(ButtomPin)) { //放回
if (LOW == digitalRead(KeyPin))
{
for(i=0;i<200;i++) //蜂鸣器响声持续时间 { digitalWrite(BeepPin,HIGH); //产生1KHz的脉冲 delayMicroseconds(500); digitalWrite(BeepPin,LOW); delayMicroseconds(500); } digitalWrite(BeepPin,LOW); delay(1000); } } digitalWrite(BeepPin,LOW); //delay(1000); digitalWrite(LedPin,LOW); }
EDK2 在编译过程中会用到很多工具,比如编译处理Setup菜单的 VfrConmpiler.exe。部分工具是C编写的,部分是Python编写的。本文介绍如何重新编译Windows下面,C编写的这类工具。全部的工具存放在 BaseTools 目录下。Windows编译过程中用到的工具可以在 BaseTools\Bin\Win32下面找到。(实际上我只在Windows下编译过 EDK2)
编译的方法是:
1. 运行EDK2代码根目录下的 edksetup.bat
2. 进入BaseTools目录下运行 toolsetup.bat
3. 运行NMake即可全部重新编译
运行结果如下图,出现Error的原因是我们没有安装Python Freeze 这个工具(这个工具是用来将Python编写的程序封装成Windows EXE的工具)。
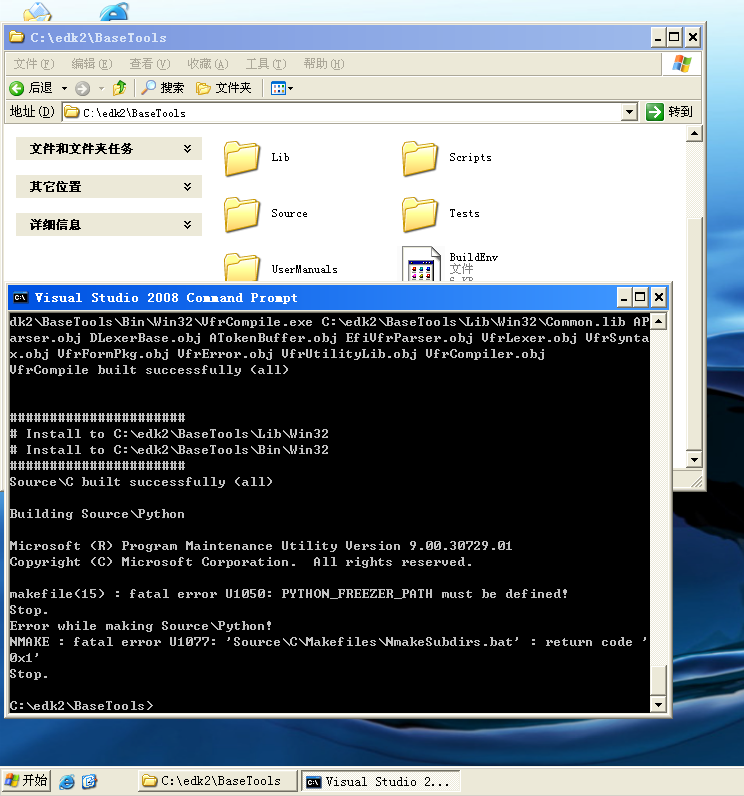
全部编译时间上会比较长,我们可以单独编译。比如,我们修改 VolInfo 的Source Code,之后进入 \basetools\Source\c\Volinfo 目录下,使用 nmake 即可编译 (前面提到的1 2两步还是要做的)
www.lab-z.com
Zoologist
2013-8-2
在上一版的基础上进行了升级,加入和修改了如下功能
1.使用运行目录下的INI文件,保存每次搜索的 Tag String 和 文件类型,以及文件最后运行时的窗口位置和大小
2.加入文件是否为 Unicode 的判断,比如,目前使用的 *.uni 就是 unicode文件在上一版无法正常处理
3.任务完成时在
参考:
1. http://www.2cto.com/kf/201208/149623.html 判断文件的编码格式(Unicode;Utf-8;Ansi;Unicode Big Endian)