通过WriteFile对硬盘发送数据

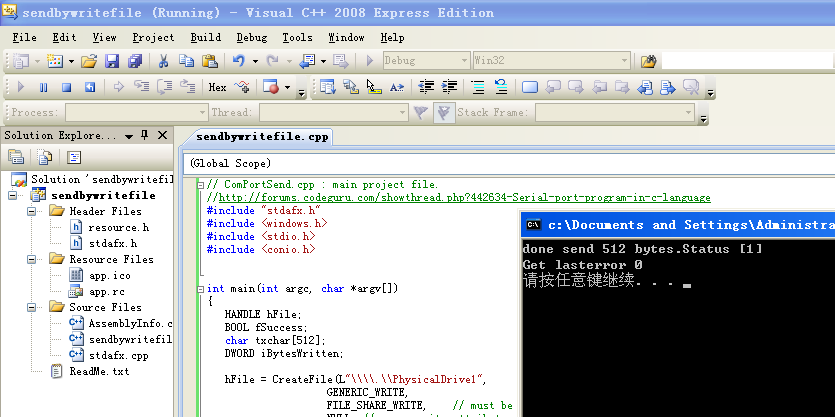
下面这个程序首先用 CreateFile 打开 PhysicalDiskX 然后使用 CreateFile 向里面写入数据。

#include "stdafx.h"
#include <windows.h>
#include <stdio.h>
#include <conio.h>

int main(int argc, char *argv[])
{
   HANDLE hFile;
   BOOL fSuccess;
   char txchar[512];
   DWORD iBytesWritten;

   hFile = CreateFile(L"\\\\.\\PhysicalDrive1",
                    GENERIC_WRITE,
                    FILE_SHARE_WRITE,    // must be opened with exclusive-access
                    NULL, // no security attributes
                    OPEN_EXISTING, // must use OPEN_EXISTING
                    0,    // not overlapped I/O
                    NULL  // hTemplate must be NULL for comm devices
                    );

   if (hFile == INVALID_HANDLE_VALUE) 
   {
       // Handle the error.
        printf ("CreateFile failed with error %d.\n", GetLastError());
		system("PAUSE");
        return (1);
   }

   txchar[0]='l'; txchar[1]='a';txchar[2]='b';txchar[3]='z';

   //有资料说用这个函数对磁盘写的最小值是 512 bytes 我实验了一下如果小于此会出现error
   fSuccess=WriteFile(hFile, &txchar, 512, &iBytesWritten,NULL);
   printf ("done send %d bytes.Status [%d] \n", iBytesWritten,fSuccess,iBytesWritten);
   printf ("Get lasterror %d\n", GetLastError());

   system("PAUSE");
   CloseHandle(hFile);

   return (0);
}


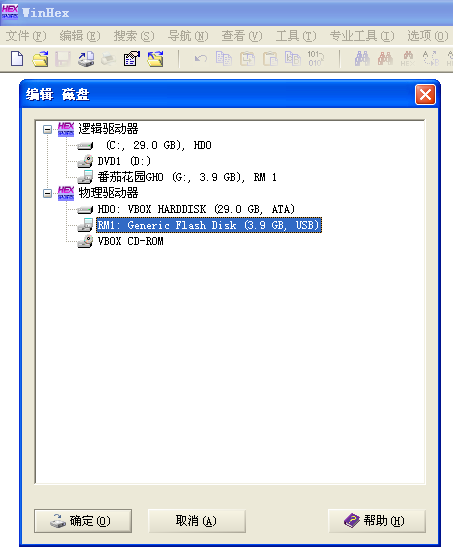
我的实验是在虚拟机中进行的。特别提醒:本次实验可能会损害你的数据,请务必小心。如果系统有安装杀毒软件,有可能被判定为病毒行为。实验的目标盘是一个U盘,盘符为 G:

a

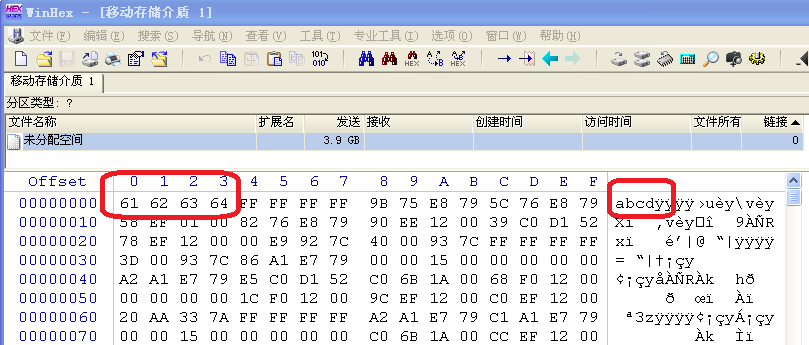
之后,先用 Winhex 打开,我们可以看到开始的几个字符是 abcd

b

运行我们的程序(可以看到发送 512 Bytes Status=1 表示 Success GetLastError=0 表示无错误)
c

我们需要重新打开一次硬盘(WinHex有磁盘修改感知功能,但是在这里不好用)
e

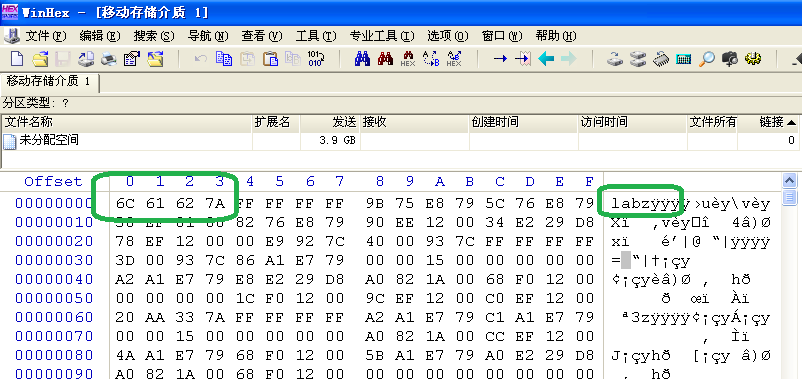
我们可以看到最开始的几个字符被修改了,这说明我们的程序是由效果的的。
d

完整的程序下载:

sendbywritefile

参考:

1.http://msdn.microsoft.com/en-us/library/windows/desktop/aa365747(v=vs.85).aspx MSDN WriteFile function

2.http://msdn.microsoft.com/en-us/library/windows/desktop/ms681382(v=vs.85).aspx MSDN System Error 对于确定 GetLastError 返回值很有用

3.http://msdn.microsoft.com/en-us/library/windows/desktop/aa363858(v=vs.85).aspx MSDN CreateFile function

小问题:UEFI 下,Print 怎样显示十进制的64位的无符号数呢?

有人【参考1】,提了一个问题:UEFI 下,Print 怎样显示十进制的64位的无符号数呢?

首先查了一下资料【参考2】

printfll

于是,试试 %llu 看看, ll 表示 long long, u表示十进制无符号数,代码

int
EFIAPI
main (
  IN int Argc,
  IN char **Argv
  )
{

  printf("%llu\n",0xffffffffL);  

  return EFI_SUCCESS;
}


执行结果

quest1

参考:

1.http://biosren.com/viewthread.php?tid=7419&highlight= UEFI 下,Print 怎样显示十进制的64位的无符号数呢?

2.http://www.cplusplus.com/reference/cstdio/printf/

Step to UEFI (18) —– CLib 获得 ImageHandle

前面介绍了,用CLib我们可以编写出普通C语言一样的代码。入口是 main (int Argc, char **Argv),但是如何获得当前的 ImageHandle 呢?【参考1】给出了一个答案。查看实际的入口ShellCEntryLib (ShellPkg\Library\UefiShellCEntryLib\UefiShellCEntryLib.c)

EFI_STATUS
EFIAPI
ShellCEntryLib (
  IN EFI_HANDLE        ImageHandle,
  IN EFI_SYSTEM_TABLE  *SystemTable
  )
{
  INTN                           ReturnFromMain;
  EFI_SHELL_PARAMETERS_PROTOCOL *EfiShellParametersProtocol;
  EFI_SHELL_INTERFACE           *EfiShellInterface;
  EFI_STATUS                    Status;


就是说 Shell Call进来的时候实际上和普通的EFI 程序没有差别,都是给了ImageHandle的,只是后面调用的时候去掉了。调用的顺序是 ShellCEntryLib –> ShellAppMain –> main.c(自己写的),所以如果我们能够加入一个参数,那么可以直接把ImageHandle传进去。
那就手动加入这个参数吧,需要修改的文件和内容如下:
1. ShellPkg\Library\UefiShellCEntryLib\UefiShellCEntryLib.c

if (!EFI_ERROR(Status)) {
    //
    // use shell 2.0 interface
    //
    ReturnFromMain = ShellAppMain (
					   ImageHandle,  //


2. ShellPkg\Inlcude\Library\ShellCEntryLib.h

INTN
EFIAPI
ShellAppMain (
  IN EFI_HANDLE        ImageHandle, //


3. StdLib\LibC\Main\Main.c

INTN
EFIAPI
ShellAppMain (
IN EFI_HANDLE ImageHandle, //<——-Added
IN UINTN Argc,
IN CHAR16 **Argv
)

4.我们自己的程序 main.c ,和之前文章提到的只有main被修改了

/** @file
    A simple, basic, application showing how the Hello application could be
    built using the "Standard C Libraries" from StdLib.

    Copyright (c) 2010 - 2011, Intel Corporation. All rights reserved.<BR>
    This program and the accompanying materials
    are licensed and made available under the terms and conditions of the BSD License
    which accompanies this distribution. The full text of the license may be found at
    http://opensource.org/licenses/bsd-license.

    THE PROGRAM IS DISTRIBUTED UNDER THE BSD LICENSE ON AN "AS IS" BASIS,
    WITHOUT WARRANTIES OR REPRESENTATIONS OF ANY KIND, EITHER EXPRESS OR IMPLIED.
**/
#include  <Uefi.h>
#include  <Library/UefiLib.h>
#include  <Library/ShellCEntryLib.h>

#include  <stdio.h>
#include  <stdlib.h>
#include <wchar.h>

extern EFI_BOOT_SERVICES             *gBS;
extern EFI_SYSTEM_TABLE				 *gST;
extern EFI_RUNTIME_SERVICES 		 *gRT;

//SimpleTextInputEx.harderr
//#define	EFI_SHIFT_STATE_VALID		0x80000000
//#define EFI_LEFT_CONTROL_PRESSED	0x00000002

EFI_STATUS
EFIAPI
NotificationFunction(
	IN EFI_KEY_DATA	*KeyData
)
{
	printf("This is a test from www.lab-z.com \n");		
	return(EFI_SUCCESS);
}

/***
  Demonstrates basic workings of the main() function by displaying a
  welcoming message.

  Note that the UEFI command line is composed of 16-bit UCS2 wide characters.
  The easiest way to access the command line parameters is to cast Argv as:
      wchar_t **wArgv = (wchar_t **)Argv;

  @retval  0         The application exited normally.
  @retval  Other     An error occurred.
***/
int
EFIAPI
main (
  IN EFI_HANDLE        ImageHandle,  //


之后还是使用 build –a IA32 –p AppPkg\AppPkg.dsc 来编译,之前如果里面还有编译器他的Application,那么需要从 AppPkg.dsc中先去掉其余的Application。
编译之,通过;运行之和之前的结果一样,好用。

buildimge

本文提到的程序可以在这里下载
Main

上面的程序看起来有些复杂,还会破坏自己的编译环境,后面我会继续研究找到更好的解决方法。就是这样。

参考:
1. 论坛上有人提出了类似的问题
http://biosren.com/viewthread.php?tid=4651&highlight=ShellCentrylib
一直有這個疑問~
目前寫的Shell APP的進入點,參數都是argc,argv
那要怎麼得到他的ImageHandle呢?

UefiShellCEntryLib.c
EFI_STATUS
EFIAPI
ShellCEntryLib (
IN EFI_HANDLE ImageHandle,
IN EFI_SYSTEM_TABLE *SystemTable
)

MyShellApp.c
INTN
EFIAPI
ShellAppMain (
IN UINTN Argc,
IN CHAR16 **Argv
)

实验 DS1307 RTC 模块

之前入手过一个 DS1307 模块,但是一直没有实验,今天拿出来玩玩。

实验之前先研究硬件,上面有一个电池,上面写的是 Rechargable ,拆下电池用万用表测试了一下,没有电。不过后来连接USB之后由拔下来稍微放置了一点时间再插上,发现计时仍在继续。应该是充进去一点电了。

1

I2C 接口的,接线很简单【参考1】:

ds1307con

接下来测试程序,当然为了简单起见还是直接用库。但是不知道为什么连续找了几个库编译都无法完成。最终,找到一个好用的库【参考2】

编写简单的测试程序如下

#include <Wire.h>
#include "DS1307A.h"
DS1307A ds = DS1307A(2000);
DS1307A_RAM ram;
void setup()
{     
    Serial.begin(9600);                //init serial

    //ds.setDate(2014,10,1);
    //ds.setTime(20,17,40);
    //ds.setWeek(MONDAY);

}  
void loop()   
{ 
    Time t = ds.getTime();

    Serial.print( t.year);
    Serial.print(".");     
    Serial.print(t.month);     
    Serial.print(".");     
    Serial.print(t.date);     
    Serial.print("  ");     
    Serial.print(t.hour);     
    Serial.print(":");     
    Serial.print(t.minute);     
    Serial.print(":");     
    Serial.print(t.second);     

    Serial.println(); 

    //Serial.print(ds.getDateString("YMD",'-'));
    //Serial.print(" ");
    //Serial.println(ds.getTimeString("HMS",':'));    

    delay(1000);

}


运行结果如下

DS1307

代码和测试程序在此 DS1307

参考:

1.http://www.geek-workshop.com/forum.php?mod=viewthread&tid=207&extra=&highlight=ds1307&page=4 arduino学习笔记27 – DS1307 RTC时钟芯片与DS18B20数字温度传感器实验 (特别提醒,这篇文章中给出的库编译无法通过)

2.http://www.geek-workshop.com/thread-2317-1-1.html 自己封装的arduino1.0.1时钟库,使用DS1307芯片
你可以在这里下载文章中提到的库 DS1307A

====================================================================================================================================================================
2015/04/24 特别注意:这个模块对电压比较敏感,特别如果你是 Pro Micro之类的板子,VCC出来的电压可能是 4.6V ,这时候是无法正常工作的,会出现各种稀奇古怪的问题。

VS2008 等待按键

通常我们在 Console 的程序中需要等待按键之类的,通常使用的都是:conio.h中的getch() 或者 stdio.h中的getchar()【参考1】。美中不足的是,这两个函数都会一直在那里等待按键,不会去做其他的事情。如果我们需要实现类似Pascal语言中 Keypress 函数,“检查一下是否有按键,没有的话我继续做其他事情”的功能,就需要其他函数了。

那就是 conio.h中的kbhit()

#include "stdafx.h"
#include<conio.h>
#include<stdio.h>
#include "windows.h"

using namespace System;

int main(array<System::String ^> ^args)
{
  int i=0;
  while (!kbhit())
  {
	  printf("lab-z.com [%d]\n",i++);
	  Sleep(200);
  }
  system("PAUSE");
  return 0;
}


运行结果

keypressed
参考:

1.http://baike.baidu.com/view/7942479.htm 阻塞函数

Step to UEFI (17) —– Application中注册一个快捷键

前面介绍过如何在 Shell 下实现暂停和中断运行。这里介绍如何实现在Application中注册一个“热键”,当按下这个键的时候去做另外的事情。

根据资料,需要使用EFI_SIMPLE_TEXT_INPUT_EX_PROTOCOL 的 RegisterKeyNotify 【参考1,2】

具体的参考代码在ShellProtocol.c

KeyData.KeyState.KeyToggleState = 0;
KeyData.Key.ScanCode = 0;
KeyData.KeyState.KeyShiftState = EFI_SHIFT_STATE_VALID|EFI_LEFT_CONTROL_PRESSED;
KeyData.Key.UnicodeChar = L’c’;

Status = SimpleEx->RegisterKeyNotify(
SimpleEx,
&KeyData,
NotificationFunction,
&ShellInfoObject.CtrlCNotifyHandle1);

查阅Spec【参考3】,有如下资料

reg2

reg1

简单的说,第一个参数是EFI_SIMPLE_TEXT_INPUT_EX_PROTOCOL 的实例,第二个参数是按键信息,第三个参数是当按键发生时会被CallBack的函数,第四个参数是注册的Handle(第四个我也不太理解,琢磨一下应该是用来记录这个注册动作的东西,有了这个东西后面可以用来取消这次的注册)。

写一个简单的程序进行测试,在一个循环中,当按下 ctrl+s 的时候,自动在屏幕上输出字符串:

/** @file
    A simple, basic, application showing how the Hello application could be
    built using the "Standard C Libraries" from StdLib.

    Copyright (c) 2010 - 2011, Intel Corporation. All rights reserved.<BR>
    This program and the accompanying materials
    are licensed and made available under the terms and conditions of the BSD License
    which accompanies this distribution. The full text of the license may be found at
    http://opensource.org/licenses/bsd-license.

    THE PROGRAM IS DISTRIBUTED UNDER THE BSD LICENSE ON AN "AS IS" BASIS,
    WITHOUT WARRANTIES OR REPRESENTATIONS OF ANY KIND, EITHER EXPRESS OR IMPLIED.
**/
#include  <Uefi.h>
#include  <Library/UefiLib.h>
#include  <Library/ShellCEntryLib.h>

#include  <stdio.h>
#include  <stdlib.h>
#include <wchar.h>

extern EFI_BOOT_SERVICES             *gBS;
extern EFI_SYSTEM_TABLE				 *gST;
extern EFI_RUNTIME_SERVICES 		 *gRT;

EFI_STATUS
EFIAPI
NotificationFunction(
	IN EFI_KEY_DATA	*KeyData
)
{
	printf("This is a test from www.lab-z.com \n");		
	return(EFI_SUCCESS);
}

/***
  Demonstrates basic workings of the main() function by displaying a
  welcoming message.

  Note that the UEFI command line is composed of 16-bit UCS2 wide characters.
  The easiest way to access the command line parameters is to cast Argv as:
      wchar_t **wArgv = (wchar_t **)Argv;

  @param[in]  Argc    Number of argument tokens pointed to by Argv.
  @param[in]  Argv    Array of Argc pointers to command line tokens.

  @retval  0         The application exited normally.
  @retval  Other     An error occurred.
***/
int
EFIAPI
main (
	IN EFI_HANDLE		ImageHandle,
	IN EFI_SYSTEM_TABLE *SystemTable
  )
{
	EFI_SIMPLE_TEXT_INPUT_EX_PROTOCOL *SimpleEx;
	EFI_KEY_DATA	KeyData;
	EFI_STATUS		Status;
	EFI_HANDLE		CtrlCNotifyHandle = NULL;
	INTN			i;

 	Status = gBS -> OpenProtocol(
		gST -> ConsoleInHandle,
		&gEfiSimpleTextInputExProtocolGuid,
		(VOID**)&SimpleEx,
		ImageHandle,
		NULL,
		EFI_OPEN_PROTOCOL_GET_PROTOCOL);

	if (EFI_ERROR(Status)) {
		printf("OpenProtocol ERROR!!\n");
	}		

	KeyData.KeyState.KeyToggleState = 0;
	KeyData.Key.ScanCode			= 0;
	KeyData.KeyState.KeyShiftState 	= EFI_SHIFT_STATE_VALID | EFI_LEFT_CONTROL_PRESSED;
	KeyData.Key.UnicodeChar			= L's';

	Status = SimpleEx -> RegisterKeyNotify (
			SimpleEx,
			&KeyData,
			NotificationFunction,
			&CtrlCNotifyHandle);

	for (i=0;i<200;i++) 
	 {
		printf("Test\n");		
		gBS -> Stall (5000);
      }

	Status = SimpleEx -> UnregisterKeyNotify(SimpleEx, CtrlCNotifyHandle);

  return EFI_SUCCESS;
}


运行结果(模拟坏境中测试的)

regkey

代码下载

registerkey

参考:
1. http://biosren.com/viewthread.php?tid=6666&highlight=RegisterKeyNotify
如何在UEFI shell做一個類似key board hook的方式?
2. http://biosren.com/viewthread.php?tid=6579&highlight=RegisterKeyNotify
UEFI HotKey事件
3. UEFI Specification 2.4 P440

给USB HID设备发送数据

image

《圈圈教你玩USB》 第五章 提到可以自己设计一个HID设备,于是,进行实验,刷新他的 Firmware 运行他的测试程序,在 Win7 3和64 下都不需要安装驱动程序,直接使用应用程序即可。

usb0device

《圈圈教你玩USB》 第五章 带的 Firmware 程序和Windows下的应用程序:

用户自定义HID设备上位机应用程序及源代码包

用户自定义HID设备下位机固件源代码包

自己动手直接编写一个 VS2008 程序来对这个设备发送数据(主要是我一直没法再 VS2008下成功编译他的Application)

//http://blog.csdn.net/xuxinhua/article/details/6329182
#include "stdafx.h"
#include <stdio.h>
#include <tchar.h>
#include <windows.h>
#include <setupapi.h>
extern "C" {
void __stdcall
HidD_GetHidGuid (
   OUT   LPGUID   HidGuid
   );
typedef struct _HIDD_ATTRIBUTES {
    ULONG   Size; // = sizeof (struct _HIDD_ATTRIBUTES)

    //
    // Vendor ids of this hid device
    //
    USHORT  VendorID;
    USHORT  ProductID;
    USHORT  VersionNumber;

    //
    // Additional fields will be added to the end of this structure.
    //
} HIDD_ATTRIBUTES, *PHIDD_ATTRIBUTES;

BOOLEAN __stdcall
HidD_GetAttributes (
    IN  HANDLE              HidDeviceObject,
    OUT PHIDD_ATTRIBUTES    Attributes
    );
}

#pragma comment( lib, "hid.lib" )
#pragma comment( lib, "setupapi.lib" )

int main(array<System::String ^> ^args)
{
	 GUID HidGuid;
	 BOOL Result;

	//获取HID设备的接口类GUDI
		HidD_GetHidGuid(&HidGuid);
	//输出一下看看GUID
		printf("HID GUID: {%08X-%04X-%04X-%02X%02X-%02X%02X%02X%02X%02X%02X}\n"
		   , HidGuid.Data1, HidGuid.Data2, HidGuid.Data3
		   , HidGuid.Data4[0], HidGuid.Data4[1], HidGuid.Data4[2], HidGuid.Data4[3], HidGuid.Data4[4]
		   , HidGuid.Data4[5], HidGuid.Data4[6], HidGuid.Data4[7] );
	
	//根据获得的GUID枚举HID设备
	HDEVINFO hDevInfo = SetupDiGetClassDevs( &HidGuid, NULL, 0, DIGCF_PRESENT|DIGCF_DEVICEINTERFACE );
    if( INVALID_HANDLE_VALUE != hDevInfo )
    {
        SP_DEVICE_INTERFACE_DATA strtInterfaceData = { sizeof(SP_DEVICE_INTERFACE_DATA) };
        for( DWORD index=0; SetupDiEnumDeviceInterfaces(hDevInfo,NULL,&HidGuid,index,&strtInterfaceData); ++index )
        {
            char buf[1000];
            SP_DEVICE_INTERFACE_DETAIL_DATA& strtDetailData = (SP_DEVICE_INTERFACE_DETAIL_DATA&)buf[0];
            strtDetailData.cbSize = sizeof(SP_DEVICE_INTERFACE_DETAIL_DATA);
            if( SetupDiGetDeviceInterfaceDetail(hDevInfo,&strtInterfaceData,&strtDetailData,_countof(buf),NULL,NULL) )
            {
                printf("[%d] path: %ls\n", index, strtDetailData.DevicePath);
				
				//这里打开的有可能是USB键盘鼠标这样比较特别的设备(只能查询)
                HANDLE hUsb = CreateFile( strtDetailData.DevicePath, 
							NULL, FILE_SHARE_WRITE, 
							NULL, OPEN_EXISTING, 
							FILE_ATTRIBUTE_NORMAL|FILE_FLAG_OVERLAPPED, 
							NULL );
	
                // 查询设备标识
                HIDD_ATTRIBUTES strtAttrib = { sizeof(HIDD_ATTRIBUTES) };
				Result=HidD_GetAttributes(hUsb,&strtAttrib);
                
				//所以这里要关闭一下,后面找到我们自己的设备确定可以写入再打开一次
			    CloseHandle( hUsb );
                
				if(TRUE==Result)
                    {
						if ((0x8888==strtAttrib.VendorID) && 
						   (0x6==strtAttrib.ProductID))	//找到我们自己的设备
						     {
								printf("VendorID : %hX\n", strtAttrib.VendorID );
								printf("ProductID: %hX\n", strtAttrib.ProductID );
								printf("VerNumber: %hX\n", strtAttrib.VersionNumber );
	
								//确定是我们自己的设备,再打开一次,注意我们这里使用的是同步发送
								hUsb = CreateFile( strtDetailData.DevicePath, 
												   GENERIC_WRITE, FILE_SHARE_WRITE, 
												   NULL, OPEN_EXISTING, 
												   FILE_ATTRIBUTE_NORMAL, NULL );
		
								//发送报告的缓冲区,1字节报告ID+8字节报告数据。
								UCHAR WriteReportBuffer[9];
								DWORD lpNumberOfBytesWritten;
								UINT LastError;
									
								WriteReportBuffer[0]=0x00;
								WriteReportBuffer[1]=0x75;
									
								//调用WriteFile函数发送数据
								Result=WriteFile(hUsb,
												WriteReportBuffer,
											    9,
											    &lpNumberOfBytesWritten,
										       	NULL);
								//如果函数返回失败,则可能是真的失败,也可能是IO挂起
								if(Result==FALSE)
										{
											//获取最后错误代码
												LastError=GetLastError();
											//看是否是真的IO挂		
												if((LastError==ERROR_IO_PENDING)||(LastError==ERROR_SUCCESS))
													{ return TRUE;	}
												//否则,是函数调用时发生错误,显示错误代码
												else	
													{
														printf("Sending error:%d \n",LastError);
														//如果最后错误为1,说明该设备不支持该函数。
														if(LastError==1)
														{printf("This device doesn't support WriteFile function \n");}
													}


										}

                				CloseHandle( hUsb );
								}//if ((0x8888==strtAttrib.VendorID) && 
					}		//if(TRUE==Result)
            }	// if( SetupDiGetDeviceInterfaceDetail(hDevInfo,&strtInterfaceData,&strtDetailData,_countof(buf),NULL,NULL) )

        }	//for( DWORD index=0;
        
		if( GetLastError() != ERROR_NO_MORE_ITEMS )
			{printf("No more items!\n"); }

        SetupDiDestroyDeviceInfoList( hDevInfo );
    }	//if( INVALID_HANDLE_VALUE != hDevInfo )

	system("PAUSE");
    return 0;
}


运行结果:

usb0

程序下载

HidSend

Arduino 四位数码管实验

手上有一只四位数码管,型号是F5461BH 首先直接测试发现,他是共阳极的。

管脚分布如下【参考1】,注意这是正面视图(不知道为什么,大多数文章中给出来的都是背面旋转后的视图):

4diga

(一般来说判断管脚的方法是“4位数码管总共有12个引脚,小数点朝下正放在面前时,左下角为1,其他管脚顺序为逆时针旋转。左上角为最大的12号管脚。”这里引用的图片顺序标记错了,上面是修正后的结果 2014/10/13)

从电路图的角度说,应该是这样的【参考2】:

4digb

很多朋友在使用【参考1】中的程序的时候会发现始终显示为0.这是下面的代码导致的

  if (digitalRead(13) == HIGH)
  {
    n = 0;
  }


因为原文中并没有要求Pin13连接什么东西,所以会出现Pin13悬空的情况,结果这个Pin读取结果一直为 High, n不断被赋值为0,看起来就是一串0.刚开始我也遇到这个问题,检查了很多次线路,最终检查代码才发现问题。

具体代码如下:

//设置阴极接口
int a = 1;
int b = 2;
int c = 3;
int d = 4;
int e = 5;
int f = 6;
int g = 7;
int p = 8;
//设置阳极接口
int d4 = 9;
int d3 = 10;
int d2 = 11;
int d1 = 12;
//设置变量
long n = 0;
int x = 100;
int del = 55;  //此处数值对时钟进行微调
  
byte segs[7] = { a, b, c, d, e, f, g };
 
byte seven_seg_digits[10][7] = { { 0,0,0,0,0,0,1 },  // = 0
                                 { 1,0,0,1,1,1,1 },  // = 1
                                 { 0,0,1,0,0,1,0 },  // = 2
                                 { 0,0,0,0,1,1,0 },  // = 3
                                 { 1,0,0,1,1,0,0 },  // = 4
                                 { 0,1,0,0,1,0,0 },  // = 5
                                 { 0,1,0,0,0,0,0 },  // = 6
                                 { 0,0,0,1,1,1,1 },  // = 7
                                 { 0,0,0,0,0,0,0 },  // = 8
                                 { 0,0,0,0,1,0,0 }   // = 9
                             }; 
 
void setup()
{
  pinMode(d1, OUTPUT);
  pinMode(d2, OUTPUT);
  pinMode(d3, OUTPUT);
  pinMode(d4, OUTPUT);
  pinMode(a, OUTPUT);
  pinMode(b, OUTPUT);
  pinMode(c, OUTPUT);
  pinMode(d, OUTPUT);
  pinMode(e, OUTPUT);
  pinMode(f, OUTPUT);
  pinMode(g, OUTPUT);
  pinMode(p, OUTPUT);
}
 
void loop()
{
  clearLEDs();
  pickDigit(1);
  lightSegments((n/x/1000)%10);
  delayMicroseconds(del);
 
  clearLEDs();
  pickDigit(2);
  lightSegments((n/x/100)%10);
  delayMicroseconds(del);
 
  clearLEDs();
  pickDigit(3);
  dispDec(3);
  lightSegments((n/x/10)%10);
  delayMicroseconds(del);
 
  clearLEDs();
  pickDigit(4);
  lightSegments(n/x%10);
  delayMicroseconds(del);
 
  n++;
 
  if (digitalRead(13) == HIGH)
  {
    //n = 0;
  }
}
 
void pickDigit(int x)  //定义pickDigit(x),其作用是开启dx端口
{
  digitalWrite(d1, LOW);
  digitalWrite(d2, LOW);
  digitalWrite(d3, LOW);
  digitalWrite(d4, LOW);
 
  switch(x)
  {
  case 1: 
    digitalWrite(d1, HIGH); 
    break;
  case 2: 
    digitalWrite(d2, HIGH); 
    break;
  case 3: 
    digitalWrite(d3, HIGH); 
    break;
  default: 
    digitalWrite(d4, HIGH); 
    break;
  }
}
 
void dispDec(int x)  //设定开启小数点
{
  digitalWrite(p, LOW);
}
 
void clearLEDs()  //清屏
{
  digitalWrite(a, HIGH);
  digitalWrite(b, HIGH);
  digitalWrite(c, HIGH);
  digitalWrite(d, HIGH);
  digitalWrite(e, HIGH);
  digitalWrite(f, HIGH);
  digitalWrite(g, HIGH);
  digitalWrite(p, HIGH);
}
 
 
// 点亮对应数字的数码管
void lightSegments(int x) {
  for (int i = 0; i < 7; i++) {
    digitalWrite(segs[i], seven_seg_digits[x][i]);
  }
}


具体实物:

4digc

http://www.tudou.com/programs/view/ZaV8YxX1s5k/?resourceId=414535982_06_02_99

参考:

1. http://www.geek-workshop.com/forum.php?mod=viewthread&tid=82&extra=&highlight=%CA%FD%C2%EB%B9%DC&page=3
2. http://www.geek-workshop.com/forum.php?mod=viewthread&tid=82&highlight=%CA%FD%C2%EB%B9%DC arduino学习笔记13 – 4位数码管实验
3. http://blog.csdn.net/yingcloud/article/details/19032663 Arduino系列教程-015 四位数码管

Step to UEFI (16) —– CLIB下获得 SystemTable

在引入 CLIB 之前,获得 SystemTable 等等是非常简单的事情,入口参数上直接就能取得。但是引入了 CLIB 之后似乎没有那么直白了。研究了一下发现,用下面的语句可以轻松解决:

extern EFI_SYSTEM_TABLE *gST;

随手写个程序测试

/** @file
    A simple, basic, application showing how the Hello application could be
    built using the "Standard C Libraries" from StdLib.

    Copyright (c) 2010 - 2011, Intel Corporation. All rights reserved.<BR>
    This program and the accompanying materials
    are licensed and made available under the terms and conditions of the BSD License
    which accompanies this distribution. The full text of the license may be found at
    http://opensource.org/licenses/bsd-license.

    THE PROGRAM IS DISTRIBUTED UNDER THE BSD LICENSE ON AN "AS IS" BASIS,
    WITHOUT WARRANTIES OR REPRESENTATIONS OF ANY KIND, EITHER EXPRESS OR IMPLIED.
**/
#include  <Uefi.h>
#include  <Library/UefiLib.h>
#include  <Library/ShellCEntryLib.h>

#include  <stdio.h>
#include <wchar.h>

extern EFI_SYSTEM_TABLE             *gST;

/***
  Demonstrates basic workings of the main() function by displaying a
  welcoming message.

  Note that the UEFI command line is composed of 16-bit UCS2 wide characters.
  The easiest way to access the command line parameters is to cast Argv as:
      wchar_t **wArgv = (wchar_t **)Argv;

  @param[in]  Argc    Number of argument tokens pointed to by Argv.
  @param[in]  Argv    Array of Argc pointers to command line tokens.

  @retval  0         The application exited normally.
  @retval  Other     An error occurred.
***/
int
EFIAPI
main (
  IN int Argc,
  IN char **Argv
  )
{
	gST -> ConOut -> OutputString (gST->ConOut,L"Hello,www.lab-z.com\n");
	
  return EFI_SUCCESS;
}


运行结果

gst

程序太简单就不上了。

【补充】在 http://biosren.com/viewthread.php?tid=7295&highlight= 有个朋友问了同样的问题,最后他的解决方式是:

加入头文件 #include Library/UefiBootServicesTableLib.h ,这个头文件的内容是

#ifndef __UEFI_BOOT_SERVICES_TABLE_LIB_H__
#define __UEFI_BOOT_SERVICES_TABLE_LIB_H__

///
/// Cache the Image Handle
///
extern EFI_HANDLE gImageHandle;

///
/// Cache pointer to the EFI System Table
///
extern EFI_SYSTEM_TABLE *gST;

///
/// Cache pointer to the EFI Boot Services Table
///
extern EFI_BOOT_SERVICES *gBS;

#endif

所以和前面提到的解决方法还是相同的

Step to UEFI (15) —– 命令行参数 Again

前面介绍过 UEFI 下获得命令行参数的方法。这次尝试用 C Lib 来实现。

需要获取的参数直接用下面的代码进行输出

for (i=0;i<Argc; i++)
{
printf(“Arg[%d]: %s\n”,i,Argv[i]);
}

惊奇的发现,只能输出每个参数的第一个字母,一下子蒙了。琢磨了好长时间,忽然想起来这个应该是 unicode导致的。正常情况下

“abc”这样的ascii在unicode中会被存为 “97 00 98 0 99 0”,遇到 00 printf 自动就给截断了

顺手查了一下 \StdLib\Include\stdio.h ,其中提到了这个事情

If an l length modifier is present, the argument shall be a
pointer to the initial element of an array of wchar_t type. Wide
characters from the array are converted to multibyte characters
(each as if by a call to the wcrtomb function, with the conversion
state described by an mbstate_t object initialized to zero before
the first wide character is converted) up to and including a
terminating null wide character. The resulting multibyte characters
are written up to (but not including) the terminating null
character (byte). If no precision is specified, the array shall
contain a null wide character. If a precision is specified, no more
than that many bytes are written (including shift sequences, if
any), and the array shall contain a null wide character if, to
equal the multibyte character sequence length given by the
precision, the function would need to access a wide character one
past the end of the array. In no case is a partial multibyte
character written.

那我再试试

for (i=0;i<Argc; i++)
{
printf(“Arg[%d]: %ls\n”,i,Argv[i]);
}

结果依旧。不知道为什么了,如果有了解的朋友可以给我写邮件告诉我。

好在我们还有 Print 和 wprintf 可以绕过去。最后写了一个程序,主要代码如下

#include  <Uefi.h>
#include  <Library/UefiLib.h>
#include  <Library/ShellCEntryLib.h>

#include  <stdio.h>
#include <wchar.h>
/***
  Demonstrates basic workings of the main() function by displaying a
  welcoming message.

  Note that the UEFI command line is composed of 16-bit UCS2 wide characters.
  The easiest way to access the command line parameters is to cast Argv as:
      wchar_t **wArgv = (wchar_t **)Argv;

  @param[in]  Argc    Number of argument tokens pointed to by Argv.
  @param[in]  Argv    Array of Argc pointers to command line tokens.

  @retval  0         The application exited normally.
  @retval  Other     An error occurred.
***/
int
EFIAPI
main (
  IN int Argc,
  IN char **Argv
  )
{
  int i;
  printf("You have input %d args\n",Argc);

  printf("\nExp1. If we use \" printf(\"Arg[%%d]: %%s\\n\",i,Argv[i]);\n");
  for (i=0;i<Argc; i++)  
   {
	printf("Arg[%d]: %s\n",i,Argv[i]);
   }
  
  printf("\nExp2. If we use \" printf(\"Arg[%%d]: %%ls\\n\",i,Argv[i]);\n");
  for (i=0;i<Argc; i++)  
   {
	printf("Arg[%d]: %ls\n",i,Argv[i]);
   }
   
  printf("\nExp3. If we use \" Print(L\"Arg[%%d]: %%s\\n\",i,Argv[i]);\n");
  for (i=0;i<Argc; i++)  
   {
	Print(L"Arg[%d]: %s\n",i,Argv[i]);
   }

  printf("\nExp4. If we use \" wprintf(L\"Arg[%%d]: %%s\\n\",i,Argv[i]);\n");
  for (i=0;i<Argc; i++)  
   {
	wprintf(L"Arg[%d]: %ls\n",i,Argv[i]);
   }   
  return EFI_SUCCESS;
}


最终的运行结果

argv

代码下载:Main (和前面几篇文章一样,请用 AppPkg 编译)