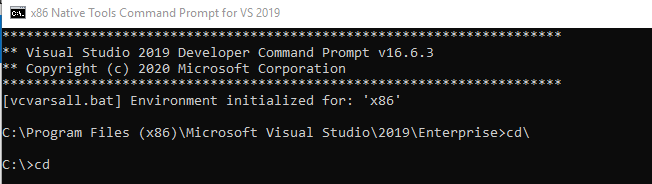
测试 MS 功能, WDTF 是必须的,但是每次通过 WDK 安装会比较麻烦【参考1】,因此制作了一个 WDTF 安装器,运行之后界面如下:

上部显示当前 Windows 版本,中间按钮选择你要安装的,点击之后即可自动完成安装。
需要注意的是:这个版本带有自校验功能,如果你发现无法运行,那么最好进行杀毒避免因为病毒干扰测试。
参考:
1.http://www.lab-z.com/wdtfin/ WDTF的安装
测试 MS 功能, WDTF 是必须的,但是每次通过 WDK 安装会比较麻烦【参考1】,因此制作了一个 WDTF 安装器,运行之后界面如下:

上部显示当前 Windows 版本,中间按钮选择你要安装的,点击之后即可自动完成安装。
需要注意的是:这个版本带有自校验功能,如果你发现无法运行,那么最好进行杀毒避免因为病毒干扰测试。
参考:
1.http://www.lab-z.com/wdtfin/ WDTF的安装
using System;
using System.Collections.Generic;
using System.Linq;
using System.Text;
using System.Threading.Tasks;
namespace ConsoleApplication3
{
class Program
{
static void Main(string[] args)
{
Console.WriteLine(System.Reflection.Assembly.GetExecutingAssembly().Location);
Console.ReadKey();
}
}
}

最近在 CML-V 的 RVP 上测试 MS Stress,开始使用 Samsung 的一款,后来发现总会有 fail 的情况发生(大约是 2/5 )。后来换了 Toshiba 的KXG6AZNVT02 这款(PCIE NVME M.2接口),首先感觉是速度明显变快(这个应该和容量有关系,这款是 1T 容量的);轻松跑了一晚上(30s idle, 15 min sleep ),50次都 Pass。
如果你在测试Stress 的时候遇到 fail 的情况不妨找这款进行实验,或者说多换几个NVME硬盘试试看。
20200811 补充, 使用这个硬盘在 CML-S RVP 上关闭各种设备只保留 NVME 之后测试得到的结果:

需要说明的是:
1.SLPS0 是低有效,意思是睡下之后应该是低,醒来的时候变高。上图测试点是在LED 上,所以是反的,即高为睡,低为醒来;
2.最好的状态下,180S SLPS0 会自动唤醒一次,这个是正常现象。
市面上最常见的 Arduino Pro Micro 是5V的,除此之外还有一种是 3.3V的,他们之间的区别除了电压之外还有主频不同,5V版本是16MHz,3.3V的是8Mhz。
前一段我入手了一个3.3V版本的,主要目标是给 USB Host Mini 使用。拿到手之后错误的使用了 Leonardo进行上传,马上板子就变砖了。所以,这里特别强调必须使用LilyPad USB 编译上传!

讲完了使用下面讲如何恢复,找出了 USBTinyISP(极客工坊出品的)。


接线顺序:
| USBTinyISP | Pro Micro 3.3V |
| 1.MISO | D14.MISO |
| 2.VCC | RAW(特别注意不是VCC) |
| 3.SCK | D15.SCLK |
| 4.MOSI | D16.MOSI |
| 5.RESET | RST |
| 6.GND | GND |
之后使用 Arduino 自带刷Bootloader的功能最稳妥(板子要选好 LilyPad)

写入之后还会读取校验,之后板子就恢复正常了。
参考:
1.https://www.sparkfun.com/products/12640 这里可以找到电路图
这里做一个简单的实验:上电之后让 ThinkerNode NB-IoT上的 LED 实现红色的呼吸灯效果,按下 Set键之后切换为绿色呼吸灯。
硬件方面:
1. ThinkerNode NB-IoT 上面的 LED 是一个 WS2812B,可以实现任意的颜色

2.板子上的 SET按钮是接在 D3 Pin上的,按下时拉低。

RGB_LED.Breathing() 是设置一次呼吸灯效果的函数,设置一次之后是一个周期,意思是运行一次会实现一个完整的亮灭周期,如果想持续亮灭,那么需要定时运行这个函数。根据上面的资料编写如下代码:
#include <DFRobot_NeoPixel.h>
unsigned long elsp;
byte CurrentColor;
void setup() {
RGB_LED.begin();
//中等亮度
RGB_LED.setBrightness(MIDDLE);
//初始为红色
CurrentColor=RED;
RGB_LED.setColor(RED);
//设置呼吸灯,前面一个是亮的时间长度,后面一个是灭的时间长度
// 这里是亮 2秒,灭1秒的意思
RGB_LED.Breathing(2000, 1000);
pinMode(D3,INPUT);
elsp=millis();
}
void loop() {
//如果按下 SET 键,那么切换为绿色呼吸灯
if (digitalRead(D3)==LOW) {
RGB_LED.setColor(GREEN);
CurrentColor=GREEN;
}
//如果时间超过3秒,那么刷新一次设置
if (millis()-elsp>2000+1000)
{
RGB_LED.setColor(CurrentColor);
RGB_LED.Breathing(2000, 1000);
elsp=millis();
}
}
之前介绍过 Windows 下替换 ACPI Table 的方法【参考1】,该方法可以替换 DSDT,但是最近工作中遇到需要修改的ACPI内容并不在 DSDT中,而是存放在 SSDT 中的情况,同时一个系统中还会有多个 SSDT。
打开注册表,在 Computer\HKEY_LOCAL_MACHINE\HARDWARE\ACPI 查找你需要的SSDT:

当然你可以先用 RW Everything 查看 ACPI Table 更加直观,SSDT 有很多个,彼此的 Signature 是相同的但是OEM Table ID 是不同的字符串:

确定你要修改的SSDT,这里使用 OEM Table ID 为 “U_Rvp ”的这个 SSDT作为实验的目标:

上面提到的 U_Rvp 的 SSDT,在注册表中名称是SSD6:

接下来的操作和之前的类似
1.asl /tab=ssd6 /c保存成二进制文件:

2. 使用 iasl2016 -ve SSD60000.bin反编译之

3.修改代码,加入我们自定义的设备挂在 I2C 下面

4.再编译为 AML

5.asl /loadtable SSD60000.aml 加载这个 table

6.重启,进入设备管理器查看,再I2c 下面出现的一个 unknown 设备


参考:
1. http://www.lab-z.com/arcpi/
2024年2月2日
iasl.exe -ve dsdt.iiii 其中的 -ve 意思是只输出错误信息,不输出 warning
iasl.exe -h 输出帮助信息
最近在使用 EDK201903 的时候遇到了一个奇怪的问题, 错误信息如下:
ScanMem32Wrapper.c
c:\buildbs\stable201903\Build\NT32X64\DEBUG_VS2015x86\X64\MdePkg\Library\BaseLib\BaseLib\OUTPUT\X64\LongJump.iii:22: fatal: unable to open include file `Nasm.inc’
NMAKE : fatal error U1077: ‘C:\nasm\nasm.EXE’ : return code ‘0x1’
Stop.
具体代码在 \MdePkg\Library\BaseLib\X64\LongJump.nasm 。 就是说在编译过程中编译器发现找不到 Nasm.inc 这个文件。
; Module Name:
;
; LongJump.Asm
;
; Abstract:
;
; Implementation of _LongJump() on x64.
;
;------------------------------------------------------------------------------
%include "Nasm.inc"
DEFAULT REL
SECTION .text
extern ASM_PFX(PcdGet32 (PcdControlFlowEnforcementPropertyMask))
在 \MdePkg\Include\X64 目录下有这个文件。
经过搜索,在 https://bugzilla.tianocore.org/show_bug.cgi?id=2719 有提到这个问题,但是我没看明白问题的原因。一个解决方法是将这个文件拷贝到 \MdePkg\Library\BaseLib\X64 下面,再次编译即可通过。
这个问题挺奇怪, EDK2 201903 我已经使用了很长时间,不知道为什么突然又出现这样的错误。
前面介绍了直接驱动 GC9A01 的方法,最近花了点时间将代码 Porting 到 Adafruit_GFX 库上,这样用户可以直接调用库函数来实现在屏幕上的绘制。
下面的测试代码和之前的 ILI9341 库中的graphicstest内容相同,可以方便的进行参考:
/***************************************************
This is a library for the GC9A01 IPS SPI display.
Originally written by Limor Fried/Ladyada for
Adafruit Industries.
Modified by Zoologist@ www.lab-z.com
****************************************************/
#include <Adafruit_GFX.h> // Core graphics library by Adafruit
#include <Arduino_GC9A01.h> // Hardware-specific library for GC9A01 (with or without CS pin)
#include <SPI.h>
/*如果你用DFRobot 的TinkerNode 那么可以使用下面的定义
#define TFT_DC D9
#define TFT_RST D2
#define TFT_CS D8 // only for displays with CS pin
#define TFT_MOSI MOSI // for hardware SPI data pin (all of available pins)
#define TFT_SCLK SCK // for hardware SPI sclk pin (all of available pins)
*/
//如果你使用 esp-wroom-32,那么可以考虑使用下面的定义
#define TFT_DC 15
#define TFT_RST 2
#define TFT_CS 19 // only for displays with CS pin
#define TFT_MOSI 23 // for hardware SPI data pin (all of available pins)
#define TFT_SCLK 18 // for hardware SPI sclk pin (all of available pins)
//You can use different type of hardware initialization
//using hardware SPI (11, 13 on UNO; 51, 52 on MEGA; ICSP-4, ICSP-3 on DUE and etc)
Arduino_GC9A01 tft = Arduino_GC9A01(TFT_DC, TFT_RST,TFT_CS ); //for display CS pin
//Arduino_GC9A01 tft = Arduino_GC9A01(TFT_DC, TFT_RST); //for display with without CS pin
//or you can use software SPI on all available pins (slow)
//Arduino_GC9A01 tft = Arduino_GC9A01(TFT_DC, TFT_RST, TFT_MOSI, TFT_SCLK); //for display without CS pin
//Arduino_GC9A01 tft = Arduino_GC9A01(TFT_DC, TFT_RST, TFT_MOSI, TFT_SCLK, TFT_CS); //for display with CS pin
//Arduino_GC9A01 tft = Arduino_GC9A01(-1, TFT_RST, TFT_MOSI, TFT_SCLK, TFT_CS); //for display with CS pin and DC via 9bit SPI
void setup(void) {
Serial.begin(115200);
Serial.println("Hello! GC9A01 TFT Test");
tft.init(240, 240); // initialize a GC9A01 chip, 240x240 pixels
Serial.println(F("Benchmark Time (microseconds)"));
delay(10);
Serial.print(F("Screen fill "));
Serial.println(testFillScreen());
delay(500);
Serial.print(F("Text "));
Serial.println(testText());
delay(3000);
Serial.print(F("Lines "));
Serial.println(testLines(GC9A01_CYAN));
delay(500);
Serial.print(F("Horiz/Vert Lines "));
Serial.println(testFastLines(GC9A01_RED, GC9A01_BLUE));
delay(500);
Serial.print(F("Rectangles (outline) "));
Serial.println(testRects(GC9A01_GREEN));
delay(500);
Serial.print(F("Rectangles (filled) "));
Serial.println(testFilledRects(GC9A01_YELLOW, GC9A01_MAGENTA));
delay(500);
Serial.print(F("Circles (filled) "));
Serial.println(testFilledCircles(10, GC9A01_MAGENTA));
Serial.print(F("Circles (outline) "));
Serial.println(testCircles(10, GC9A01_WHITE));
delay(500);
Serial.print(F("Triangles (outline) "));
Serial.println(testTriangles());
delay(500);
Serial.print(F("Triangles (filled) "));
Serial.println(testFilledTriangles());
delay(500);
Serial.print(F("Rounded rects (outline) "));
Serial.println(testRoundRects());
delay(500);
Serial.print(F("Rounded rects (filled) "));
Serial.println(testFilledRoundRects());
delay(500);
Serial.println(F("Done!"));
}
void loop() {
for(uint8_t rotation=0; rotation<4; rotation++) {
tft.setRotation(rotation);
testText();
delay(1000);
}
}
unsigned long testFillScreen() {
unsigned long start = micros();
tft.fillScreen(GC9A01_BLACK);
tft.fillScreen(GC9A01_RED);
tft.fillScreen(GC9A01_GREEN);
tft.fillScreen(GC9A01_BLUE);
//tft.fillScreen(GC9A01_BLACK);
return micros() - start;
}
unsigned long testText() {
tft.fillScreen(GC9A01_RED);
unsigned long start = micros();
tft.setCursor(0, 0);
tft.setTextColor(GC9A01_WHITE); tft.setTextSize(1);
tft.println("Hello World!");
tft.setTextColor(GC9A01_YELLOW); tft.setTextSize(2);
tft.println(1234.56);
tft.setTextColor(GC9A01_RED); tft.setTextSize(3);
tft.println(0xDEADBEEF, HEX);
tft.println();
tft.setTextColor(GC9A01_GREEN);
tft.setTextSize(5);
tft.println("Groop");
tft.setTextSize(2);
tft.println("I implore thee,");
tft.setTextSize(1);
tft.println("my foonting turlingdromes.");
tft.println("And hooptiously drangle me");
tft.println("with crinkly bindlewurdles,");
tft.println("Or I will rend thee");
tft.println("in the gobberwarts");
tft.println("with my blurglecruncheon,");
tft.println("see if I don't!");
return micros() - start;
}
unsigned long testLines(uint16_t color) {
unsigned long start, t;
int x1, y1, x2, y2,
w = tft.width(),
h = tft.height();
tft.fillScreen(GC9A01_RED);
x1 = y1 = 0;
y2 = h - 1;
start = micros();
for(x2=0; x2<w; x2+=6) tft.drawLine(x1, y1, x2, y2, color);
x2 = w - 1;
for(y2=0; y2<h; y2+=6) tft.drawLine(x1, y1, x2, y2, color);
t = micros() - start; // fillScreen doesn't count against timing
tft.fillScreen(GC9A01_BLACK);
x1 = w - 1;
y1 = 0;
y2 = h - 1;
start = micros();
for(x2=0; x2<w; x2+=6) tft.drawLine(x1, y1, x2, y2, color);
x2 = 0;
for(y2=0; y2<h; y2+=6) tft.drawLine(x1, y1, x2, y2, color);
t += micros() - start;
tft.fillScreen(GC9A01_BLACK);
x1 = 0;
y1 = h - 1;
y2 = 0;
start = micros();
for(x2=0; x2<w; x2+=6) tft.drawLine(x1, y1, x2, y2, color);
x2 = w - 1;
for(y2=0; y2<h; y2+=6) tft.drawLine(x1, y1, x2, y2, color);
t += micros() - start;
tft.fillScreen(GC9A01_BLACK);
x1 = w - 1;
y1 = h - 1;
y2 = 0;
start = micros();
for(x2=0; x2<w; x2+=6) tft.drawLine(x1, y1, x2, y2, color);
x2 = 0;
for(y2=0; y2<h; y2+=6) tft.drawLine(x1, y1, x2, y2, color);
return micros() - start;
}
unsigned long testFastLines(uint16_t color1, uint16_t color2) {
unsigned long start;
int x, y, w = tft.width(), h = tft.height();
tft.fillScreen(GC9A01_BLACK);
start = micros();
for(y=0; y<h; y+=5) tft.drawFastHLine(0, y, w, color1);
for(x=0; x<w; x+=5) tft.drawFastVLine(x, 0, h, color2);
return micros() - start;
}
unsigned long testRects(uint16_t color) {
unsigned long start;
int n, i, i2,
cx = tft.width() / 2,
cy = tft.height() / 2;
tft.fillScreen(GC9A01_BLACK);
n = min(tft.width(), tft.height());
start = micros();
for(i=2; i<n; i+=6) {
i2 = i / 2;
tft.drawRect(cx-i2, cy-i2, i, i, color);
}
return micros() - start;
}
unsigned long testFilledRects(uint16_t color1, uint16_t color2) {
unsigned long start, t = 0;
int n, i, i2,
cx = tft.width() / 2 - 1,
cy = tft.height() / 2 - 1;
tft.fillScreen(GC9A01_BLACK);
n = min(tft.width(), tft.height());
for(i=n; i>0; i-=6) {
i2 = i / 2;
start = micros();
tft.fillRect(cx-i2, cy-i2, i, i, color1);
t += micros() - start;
// Outlines are not included in timing results
tft.drawRect(cx-i2, cy-i2, i, i, color2);
yield();
}
return t;
}
unsigned long testFilledCircles(uint8_t radius, uint16_t color) {
unsigned long start;
int x, y, w = tft.width(), h = tft.height(), r2 = radius * 2;
tft.fillScreen(GC9A01_BLACK);
start = micros();
for(x=radius; x<w; x+=r2) {
for(y=radius; y<h; y+=r2) {
tft.fillCircle(x, y, radius, color);
}
}
return micros() - start;
}
unsigned long testCircles(uint8_t radius, uint16_t color) {
unsigned long start;
int x, y, r2 = radius * 2,
w = tft.width() + radius,
h = tft.height() + radius;
// Screen is not cleared for this one -- this is
// intentional and does not affect the reported time.
start = micros();
for(x=0; x<w; x+=r2) {
for(y=0; y<h; y+=r2) {
tft.drawCircle(x, y, radius, color);
}
}
return micros() - start;
}
unsigned long testTriangles() {
unsigned long start;
int n, i, cx = tft.width() / 2 - 1,
cy = tft.height() / 2 - 1;
tft.fillScreen(GC9A01_BLACK);
n = min(cx, cy);
start = micros();
for(i=0; i<n; i+=5) {
tft.drawTriangle(
cx , cy - i, // peak
cx - i, cy + i, // bottom left
cx + i, cy + i, // bottom right
tft.color565(i, i, i));
}
return micros() - start;
}
unsigned long testFilledTriangles() {
unsigned long start, t = 0;
int i, cx = tft.width() / 2 - 1,
cy = tft.height() / 2 - 1;
tft.fillScreen(GC9A01_BLACK);
start = micros();
for(i=min(cx,cy); i>10; i-=5) {
start = micros();
tft.fillTriangle(cx, cy - i, cx - i, cy + i, cx + i, cy + i,
tft.color565(0, i*10, i*10));
t += micros() - start;
tft.drawTriangle(cx, cy - i, cx - i, cy + i, cx + i, cy + i,
tft.color565(i*10, i*10, 0));
yield();
}
return t;
}
unsigned long testRoundRects() {
unsigned long start;
int w, i, i2,
cx = tft.width() / 2 - 1,
cy = tft.height() / 2 - 1;
tft.fillScreen(GC9A01_BLACK);
w = min(tft.width(), tft.height());
start = micros();
for(i=0; i<w; i+=6) {
i2 = i / 2;
tft.drawRoundRect(cx-i2, cy-i2, i, i, i/8, tft.color565(i, 0, 0));
}
return micros() - start;
}
unsigned long testFilledRoundRects() {
unsigned long start;
int i, i2,
cx = tft.width() / 2 - 1,
cy = tft.height() / 2 - 1;
tft.fillScreen(GC9A01_BLACK);
start = micros();
for(i=min(tft.width(), tft.height()); i>20; i-=6) {
i2 = i / 2;
tft.fillRoundRect(cx-i2, cy-i2, i, i, i/8, tft.color565(0, i, 0));
yield();
}
return micros() - start;
}
测试视频:
完整的代码和库文件下载:
最近在研究段代码的时候遇到了一个奇怪的问题,经过简化,错误可以用下面的代码表示:
#include <stdio.h>
struct stBlockX
{
int value; // Decodes to.
int length; // Length in bits.
unsigned short int code; // 2 byte code (variable length)
} ;
stBlockX m_blocks[1024];
int
main (
IN int Argc,
IN char **Argv
)
{
puts("Hello there fellow Programmer.");
puts("Welcome to the world of EDK II.");
return 0;
}
编译错误是 C2061:
d:\test\AppPkg\Applications\C2061\C2061.c(27): error C2061: syntax error: identifier 'm_blocks'
d:\test\AppPkg\Applications\C2061\C2061.c(27): error C2059: syntax error: ';'
d:\test\AppPkg\Applications\C2061\C2061.c(27): error C2059: syntax error: '['
Building ... d:\test\AppPkg\Applications\Sockets\GetAddrInfo\GetAddrInfo.inf [X64]
NMAKE : fatal error U1077: '"C:\Program Files (x86)\Microsoft Visual Studio 14.0\Vc\bin\x86_amd64\cl.exe"' : return code '0x2'
Stop.
有兴趣的朋友可以先看一下代码猜测一下原因。

经过研究,出现问题是原因是上面的定义出现错误,应该是定义为一种类型,实际上只是定于了一个变量,修改为下面这种就能够通过编译并且正常工作了。
typedef struct
{
int value; // Decodes to.
int length; // Length in bits.
unsigned short int code; // 2 byte code (variable length)
} stBlockX;
stBlockX m_blocks[1024];
参考:
1. https://blog.csdn.net/wangjun_huster/article/details/60480192 type struct 和struct的区别
最近使用 ESP32 做的一个俄罗斯方块游戏机,是立创的一个比赛的项目。具体代码在 https://diy.szlcsc.com/p/Zoologist/ji-yuesp32-di-e-luo-si-fang-kuai-you-hu-ji。
话说 ESP32 真的很强大,价格也不贵,这样下去完全可以取代Uno(最新的一款 ESP32 支持 USB Device可以实现很多有趣的功能)
另外,研究了一下 WordPress 插入 Bilibili 网站视频的方法(直接插入会使得视频画面很小),代码如下【参考1】:
<iframe frameborder="no" height="400" src="//player.bilibili.com/player.html?aid=412935552&cid=186803402&page=1" width="100%"></iframe>