阅读《UEFI原理与编程》,第八章,开发UEFI服务。其中提到了 Protocol的私有数据。
之前我们介绍过 EFI_LOADED_IMAGE_PROTOCOL,在【参考1】的程序中,就有涉及到LOADED_IMAGE_PRIVATE_DATA,简单的说,定义的 PROTOCOL是这个结构体的一部分,就能够找到整个LOADED_IMAGE_PRIVATE_DATA的结构体,从而获得一些额外的信息。
总结一下,这样的私有数据是这样定义的:
#define PROTOCOLNAME_PRIVATE_DATA_SIGNATURE   SIGNATURE_32('p','r','t','9')
typedef struct {
  UINTN     Signature;
  UINTN	    Var1;
  PROTOCOLNAME _PROTOCOL   PROTOCOLNAME;
} PROTOCOLNAME_PRIVATE_DATA;

#define PROTOCOLNAME _PRIVATE_DATA_FROM_THIS(a) \
     CR(a, PROTOCOLNAME_PRIVATE_DATA, PROTOCOLNAME, PROTOCOLNAME _PRIVATE_DATA_SIGNATURE)
在初始化的时候,要创建一个实际的PROTOCOLNAME_PRIVATE_DATA,然后初始化需要的变量,最后像其他的Protocol安装一样,将PROTOCOLNAME_PRIVATE_DATA. PROTOCOLNAME 安装到合适的Handle上即可。
编写代码测试一下,基于之前我们写的 PrintDriver 代码,先修改 Print9.h。加入了下面的定义:
#define PRINT9_PRIVATE_DATA_SIGNATURE   SIGNATURE_32('p','r','t','9')

typedef struct {
  UINTN     Signature;
  UINTN		Var1;
  /// loaded PROTOCOLNAME
  EFI_PRINT9_PROTOCOL   PRINT9;
} EFI_PRINT9_PRIVATE_DATA;

#define EFI_PRINT9_PRIVATE_DATA_FROM_THIS(a) \
          CR(a, EFI_PRINT9_PRIVATE_DATA, PRINT9, PRINT9_PRIVATE_DATA_SIGNATURE)
之后修改print.c。 这个 driver实现的功能很简单,每次调用UnicodeSPrint 函数的时候,会自动显示 EFI_PRINT9_PRIVATE_DATA 中的 Var1,并且增加1.
#include <PiDxe.h>
#include  <Library/UefiLib.h>
#include "Print9.h"
#include <Library/PrintLib.h>
#include <Library/UefiBootServicesTableLib.h>
#include <Library/DebugLib.h>
#include <Library/UefiDriverEntryPoint.h>
#include <Library/MemoryAllocationLib.h>
EFI_PRINT9_PRIVATE_DATA  *Image;
EFI_HANDLE  mPrintThunkHandle = NULL;
extern EFI_SYSTEM_TABLE			 *gST;

//Copied from \MdeModulePkg\Library\DxePrintLibPrint2Protocol\PrintLib.c
UINTN
EFIAPI
MyUnicodeSPrint (
  OUT CHAR16        *StartOfBuffer,
  IN  UINTN         BufferSize,
  IN  CONST CHAR16  *FormatString,
  ...
  )
{
  VA_LIST Marker;
  UINTN   NumberOfPrinted=1;
  CHAR16  *Buffer=L"12345678";

  VA_START (Marker, FormatString);
  //NumberOfPrinted = UnicodeVSPrint (StartOfBuffer, BufferSize, FormatString, Marker);
  VA_END (Marker);

  UnicodeSPrint(Buffer,8,L"%d",Image->Var1);
  gST->ConOut->OutputString(gST->ConOut,Buffer);
  Image->Var1++;
  return NumberOfPrinted;
}

/**
  The user Entry Point for Print module.

  This is the entry point for Print DXE Driver. It installs the Print2 Protocol.

  @param[in] ImageHandle    The firmware allocated handle for the EFI image.
  @param[in] SystemTable    A pointer to the EFI System Table.

  @retval EFI_SUCCESS       The entry point is executed successfully.
  @retval Others            Some error occurs when executing this entry point.

**/
EFI_STATUS
EFIAPI
PrintEntryPoint (
  IN EFI_HANDLE           ImageHandle,
  IN EFI_SYSTEM_TABLE     *SystemTable
  )
{
	EFI_STATUS  Status=EFI_SUCCESS;

	//
	// Allocate a new image structure
	//
	Image = AllocateZeroPool (sizeof(EFI_PRINT9_PRIVATE_DATA));
	if (Image == NULL) {
		Status = EFI_OUT_OF_RESOURCES;
		goto Done;
	}

    Image->Signature         = PRINT9_PRIVATE_DATA_SIGNATURE;

	Image->PRINT9.UnicodeBSPrint=UnicodeBSPrint;
	Image->PRINT9.UnicodeSPrint=MyUnicodeSPrint;
  	Image->PRINT9.UnicodeBSPrintAsciiFormat=UnicodeBSPrintAsciiFormat;
  	Image->PRINT9.UnicodeSPrintAsciiFormat=UnicodeSPrintAsciiFormat;
  	Image->PRINT9.UnicodeValueToString=UnicodeValueToString;
  	Image->PRINT9.AsciiBSPrint=AsciiBSPrint;
  	Image->PRINT9.AsciiSPrint=AsciiSPrint;
  	Image->PRINT9.AsciiBSPrintUnicodeFormat=AsciiBSPrintUnicodeFormat;
  	Image->PRINT9.AsciiSPrintUnicodeFormat=AsciiSPrintUnicodeFormat;
  	Image->PRINT9.AsciiValueToString=AsciiValueToString;

	Status = gBS->InstallMultipleProtocolInterfaces (
                  &mPrintThunkHandle,
                  &gEfiPrint9ProtocolGuid,
				  &Image->PRINT9,
                  NULL
                  );
    ASSERT_EFI_ERROR (Status);

Done:

  return Status;
}
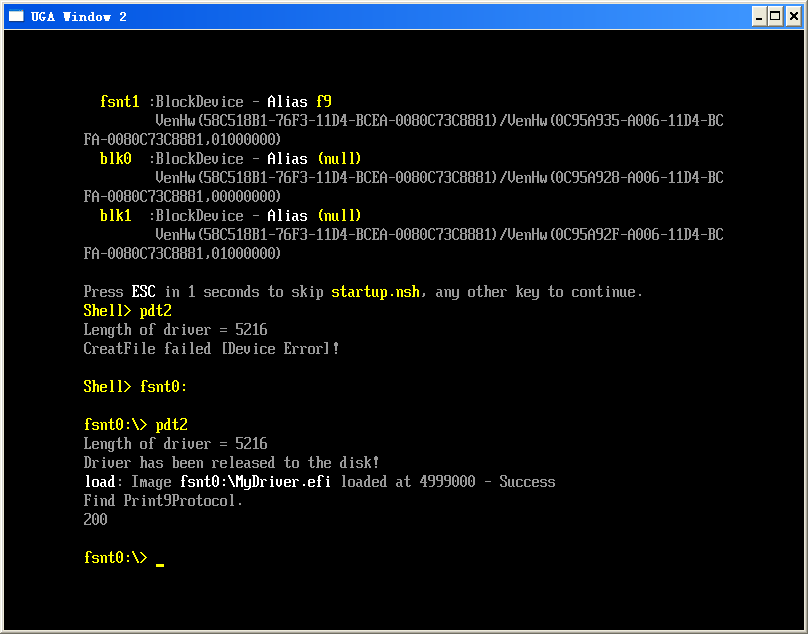
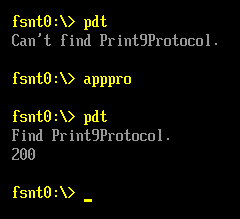
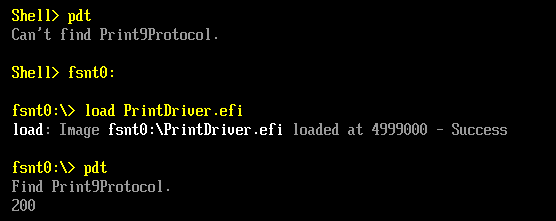
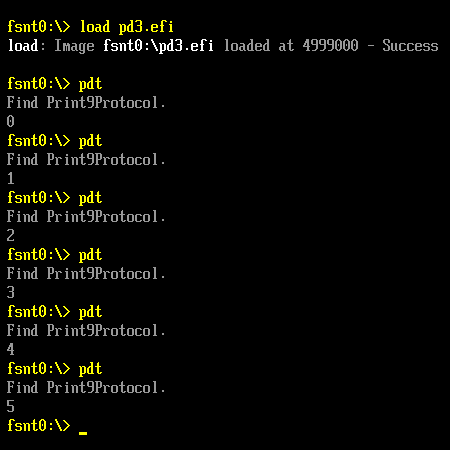
测试这个 Protocol 使用的还是之前的 pdt.efi,运行结果如下:
完整的代码下载
参考:
1. Step to UEFI (48) —– 被加载程序的ENTRYPOINT