Step to UEFI (107)取得USB DISK 的序列号

继续前面的话题,这次研究如何取得一个USB DISK的信息。最先想到的还是使用 DISK INFO PROTOCOL,不过到了实际编写代码的时候发现:我根本不知道返回值是什么格式。在代码中搜索了几次 gEfiDiskInfoUsbInterfaceGuid 发现无人使用。之后为了弄清楚格式,直接创建了一个256bytes大小的内存,还是用 identify 来获得返回值,最后发现:返回值是空的。因此,也就是说虽然 USB DISK上有安装这个 protocol,但是根本就是一个空的而已。
再调整思路,首先用 DISK INFO PROTOCOL取得USB DISK 的 Handle ,然后,在这个Handle上打开 USBIO,EFI_USB_IO_PROTOCOL.UsbGetStringDescriptor 可以用来取得描述符中相关的字符串【参考1】,具体结构可以在 \EdkCompatibilityPkg\Foundation\Include\IndustryStandard\usb.h 找到:

typedef struct {
  UINT8           Length;
  UINT8           DescriptorType;
  UINT16          BcdUSB;
  UINT8           DeviceClass;
  UINT8           DeviceSubClass;
  UINT8           DeviceProtocol;
  UINT8           MaxPacketSize0;
  UINT16          IdVendor;
  UINT16          IdProduct;
  UINT16          BcdDevice;
  UINT8           StrManufacturer;
  UINT8           StrProduct;
  UINT8           StrSerialNumber;
  UINT8           NumConfigurations;
} EFI_USB_DEVICE_DESCRIPTOR;


最后,用这个 函数来取得需要的字符串。

完整的代码:

#include  <Uefi.h>
#include  <Library/UefiLib.h>
#include  <Library/ShellCEntryLib.h>
#include  <Protocol/DiskInfo.h>
#include  <Library/BaseMemoryLib.h>
#include  <Protocol/IdeControllerInit.h>
#include <Library/MemoryAllocationLib.h>
#include  <Protocol/UsbIo.h>

extern EFI_BOOT_SERVICES         *gBS;
extern EFI_HANDLE				 gImageHandle;

EFI_GUID gEfiDiskInfoProtocolGuid = { 0xD432A67F, 0x14DC, 0x484B, 
					{ 0xB3, 0xBB, 0x3F, 0x02, 0x91, 0x84, 0x93, 0x27 }};
EFI_GUID gEfiDiskInfoUsbInterfaceGuid   = { 0xCB871572, 0xC11A, 0x47B5, 
					{ 0xB4, 0x92, 0x67, 0x5E, 0xAF, 0xA7, 0x77, 0x27 }};

EFI_GUID  gEfiUsbIoProtocolGuid   = { 0x2B2F68D6, 0x0CD2, 0x44CF, 
					{ 0x8E, 0x8B, 0xBB, 0xA2, 0x0B, 0x1B, 0x5B, 0x75 }};					

int
EFIAPI
main (
  IN int Argc,
  IN CHAR16 **Argv
  )
{
    EFI_STATUS 	Status;
    UINTN 		HandleIndex, NumHandles;
    EFI_HANDLE 	*ControllerHandle = NULL;
	EFI_DISK_INFO_PROTOCOL	*DiskInfoProtocol;	
	EFI_USB_IO_PROTOCOL 			*USBIO;
	EFI_USB_DEVICE_DESCRIPTOR     DeviceDescriptor;
	CHAR16                       *Manufacturer;
	CHAR16                       *Product;
	CHAR16                       *SerialNumber;
	
    Status = gBS->LocateHandleBuffer(
            ByProtocol,
            &gEfiDiskInfoProtocolGuid,
            NULL,
            &NumHandles,
            &ControllerHandle);
	
    for (HandleIndex = 0; HandleIndex < NumHandles; HandleIndex++) {
        Status = gBS->OpenProtocol(
                ControllerHandle[HandleIndex],
                &gEfiDiskInfoProtocolGuid, 
                (VOID**)&DiskInfoProtocol,
                gImageHandle,
                NULL,
                EFI_OPEN_PROTOCOL_GET_PROTOCOL
                );		
        if (EFI_ERROR(Status)) {
            continue;
        } 

		//We only deal with USB
		if (!(CompareGuid (
				&DiskInfoProtocol->Interface, 
				&gEfiDiskInfoUsbInterfaceGuid))) {	
				continue;
			}	
			
        Status = gBS->OpenProtocol(
                ControllerHandle[HandleIndex],
                &gEfiUsbIoProtocolGuid, 
                (VOID**)&USBIO,
                gImageHandle,
                NULL,
                EFI_OPEN_PROTOCOL_GET_PROTOCOL
                );		
        if (EFI_ERROR(Status)) {
			Print(L"ERROR : Open USBIO fail.\n");
            continue;
        } 
		
		Status = USBIO->UsbGetDeviceDescriptor
							(USBIO, &DeviceDescriptor);     
		if (EFI_ERROR(Status))
		{
			Print(L"ERROR : Get Device Descriptor fail.\n");
			return 0;
		}		
		
		Print(L"VendorID = %04X\nProductID = %04X\n", 
                              DeviceDescriptor.IdVendor, 
                              DeviceDescriptor.IdProduct);  

		Status = USBIO->UsbGetStringDescriptor (
                    USBIO,
                    0x0409, 			// English
                    DeviceDescriptor.StrManufacturer,
                    &Manufacturer
                    );
		if (EFI_ERROR (Status)) {
				Manufacturer = L"";
		}

		Status = USBIO->UsbGetStringDescriptor (
                    USBIO,
                    0x0409, 			// English
                    DeviceDescriptor.StrProduct,
                    &Product
                    );
		if (EFI_ERROR (Status)) {
				Product = L"";	}
				
				
		Status = USBIO->UsbGetStringDescriptor (
                    USBIO,
                    0x0409, 			// English
                    DeviceDescriptor.StrSerialNumber,
                    &SerialNumber
                    );
		if (EFI_ERROR (Status)) {
				SerialNumber = L"";}
		
		Print(L"     Manufacturer :  %s\n",Manufacturer);
		Print(L"     Product      :  %s\n",Product);
		Print(L"     Serial Number:  %s\n",SerialNumber);		
						  
							  
	}
  return EFI_SUCCESS;
}


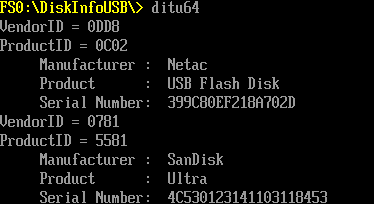
运行结果:
ditu1

完整的代码和程序下载:
diskinfousb

另外,还可以直接枚举 USBIO 然后检查对应的 Class发现是USB MASS Storage 即是U盘,然后再重复上面取得字符串信息的动作。

参考:
1. UEFI Spec 2.4 P835 EFI_USB_IO_PROTOCOL.UsbGetStringDescriptor()
Step to UEFI (105)DiskinfoProtocol

这次介绍一下用来取得系统上硬盘信息的 Protocol: EFI_DISK_INFO_PROTOCOL。

在\MdePkg\Include\Protocol\DiskInfo.h 有他的原型:

///
/// Forward declaration for EFI_DISK_INFO_PROTOCOL
///
typedef struct _EFI_DISK_INFO_PROTOCOL  EFI_DISK_INFO_PROTOCOL;
///
/// The EFI_DISK_INFO_PROTOCOL provides controller specific information.
///
struct _EFI_DISK_INFO_PROTOCOL {
  ///
  /// A GUID that defines the format of buffers for the other member functions 
  /// of this protocol.
  ///
  EFI_GUID                  Interface;
  ///
  /// Return the results of the Inquiry command to a drive in InquiryData. Data
  /// format of Inquiry data is defined by the Interface GUID.
  ///
  EFI_DISK_INFO_INQUIRY     Inquiry;
  ///
  /// Return the results of the Identify command to a drive in IdentifyData. Data
  /// format of Identify data is defined by the Interface GUID.
  ///
  EFI_DISK_INFO_IDENTIFY    Identify;
  ///
  /// Return the results of the Request Sense command to a drive in SenseData. Data
  /// format of Sense data is defined by the Interface GUID.
  ///
  EFI_DISK_INFO_SENSE_DATA  SenseData;
  ///
  /// Specific controller. 
  ///
  EFI_DISK_INFO_WHICH_IDE   WhichIde;
};


更详细的介绍可以在 PI Specification 1.4 上找到。
对于不同类型的设备,比如 IDE 和 USB ,返回的数据格式是不同的。枚举到这个 PROTOCOL 之后需要检查EFI_GUID Interface 通过不同的GUID得知当前设备的类型。
下面先编写一个简单的 Demo,检查 GUID ,判断当前设备的类型:

#include  <Uefi.h>
#include  <Library/UefiLib.h>
#include  <Library/ShellCEntryLib.h>
#include  <Protocol/DiskInfo.h>
#include  <Library/BaseMemoryLib.h>

extern EFI_BOOT_SERVICES         *gBS;

extern EFI_HANDLE				 gImageHandle;

EFI_GUID gEfiDiskInfoProtocolGuid = { 0xD432A67F, 0x14DC, 0x484B, 
					{ 0xB3, 0xBB, 0x3F, 0x02, 0x91, 0x84, 0x93, 0x27 }};

EFI_GUID gEfiDiskInfoIdeInterfaceGuid   = { 0x5E948FE3, 0x26D3, 0x42B5, 
					{ 0xAF, 0x17, 0x61, 0x02, 0x87, 0x18, 0x8D, 0xEC }};
EFI_GUID gEfiDiskInfoScsiInterfaceGuid  = { 0x08F74BAA, 0xEA36, 0x41D9, 
					{ 0x95, 0x21, 0x21, 0xA7, 0x0F, 0x87, 0x80, 0xBC }};
EFI_GUID gEfiDiskInfoUsbInterfaceGuid   = { 0xCB871572, 0xC11A, 0x47B5, 
					{ 0xB4, 0x92, 0x67, 0x5E, 0xAF, 0xA7, 0x77, 0x27 }};
EFI_GUID gEfiDiskInfoAhciInterfaceGuid  = { 0x9e498932, 0x4abc, 0x45af, 
					{ 0xa3, 0x4d, 0x02, 0x47, 0x78, 0x7b, 0xe7, 0xc6 }};
EFI_GUID gEfiDiskInfoNvmeInterfaceGuid  = { 0x3ab14680, 0x5d3f, 0x4a4d, 
					{ 0xbc, 0xdc, 0xcc, 0x38, 0x0, 0x18, 0xc7, 0xf7 }};
EFI_GUID gEfiDiskInfoUfsInterfaceGuid   = { 0x4b3029cc, 0x6b98, 0x47fb, 
					{ 0xbc, 0x96, 0x76, 0xdc, 0xb8, 0x4, 0x41, 0xf0 }};
int
EFIAPI
main (
  IN int Argc,
  IN CHAR16 **Argv
  )
{
    EFI_STATUS Status;
    UINTN HandleIndex, NumHandles;
    EFI_HANDLE *ControllerHandle = NULL;
	EFI_DISK_INFO_PROTOCOL	*DiskInfoProtocol;
	
    Status = gBS->LocateHandleBuffer(
            ByProtocol,
            &gEfiDiskInfoProtocolGuid,
            NULL,
            &NumHandles,
            &ControllerHandle);
	
    for (HandleIndex = 0; HandleIndex < NumHandles; HandleIndex++) {
        Status = gBS->OpenProtocol(
                ControllerHandle[HandleIndex],
                &gEfiDiskInfoProtocolGuid, 
                (VOID**)&DiskInfoProtocol,
                gImageHandle,
                NULL,
                EFI_OPEN_PROTOCOL_GET_PROTOCOL
                );		
        if (EFI_ERROR(Status)) {
            continue;
        } 
		
		Print(L"Device[%d] GUID: %g",
				HandleIndex,
				DiskInfoProtocol->Interface);
		if (CompareGuid (
				&DiskInfoProtocol->Interface, 
			&gEfiDiskInfoIdeInterfaceGuid)) {	
				Print(L" IDE HDD\n");
			}	
		if (CompareGuid (
				&DiskInfoProtocol->Interface, 
			&gEfiDiskInfoScsiInterfaceGuid)) {	
				Print(L" Scsi HDD\n");
			}	
		if (CompareGuid (
				&DiskInfoProtocol->Interface, 
			&gEfiDiskInfoUsbInterfaceGuid)) {	
				Print(L" USB HDD\n");
			}	
		if (CompareGuid (
				&DiskInfoProtocol->Interface, 
			&gEfiDiskInfoAhciInterfaceGuid)) {	
				Print(L" AHCI HDD\n");
			}	
		if (CompareGuid (
				&DiskInfoProtocol->Interface, 
			&gEfiDiskInfoNvmeInterfaceGuid)) {	
				Print(L" NVME HDD\n");
			}	
		if (CompareGuid (
				&DiskInfoProtocol->Interface, 
			&gEfiDiskInfoUfsInterfaceGuid)) {	
				Print(L" Ufs HDD\n");
			}				
	}

  return EFI_SUCCESS;
}


上述代码在UDK2014中编译通过,但是无法在 NT32环境下运行。于是在实体机KabyLake HDK 上实验, 板子上挂载了一个 SATA HDD 一个eMMC和两个USB Disk。运行结果如下:

dit

可以看出,当前的SATA 是AHCI 模式。此外, eMMC 设备是无法被识别出来的,也许后面会扩展到这种设备吧。
完整的代码下载:

diskinfotest

Step to UEFI Tips :介绍 BaseMemoryLib

最近在写代码时,需要用到一些关于 GUID 处理的函数。偶然间看到了 BaseMemoryLib.h 中有一些,顺便整理了一下这个库提供的函数。完整的头文件在 \MdePkg\Include\Library\BaseMemoryLib.h .


CopyMem   内存拷贝函数

SetMem       用8Bit来进行内存填充

SetMem16用 16Bit来进行内存填充

SetMem32用 32Bit来进行内存填充

SetMem64用 64Bit来进行内存填充

SetMemN  用 UINTN 来进行内存填充(UINTN在IA32下和 X64下大小不同)

ZeroMem  对指定内存清零

CompareMem  比较内存函数

ScanMem8   在内存中搜索一个 8Bit的指定值

ScanMem16   在内存中搜索一个 16Bit的指定值

ScanMem32   在内存中搜索一个 32Bit的指定值

ScanMem64   在内存中搜索一个 64Bit的指定值

ScanMemN     在内存中搜索UINTN大小的指定值

CopyGuid       复制一个 GUID 到另外一个 GUID中

CompareGuid  比较2个 GUID

ScanGuid         在内存中搜索一个给定的 GUID

IsZeroGuid       检查一个 GUID是否为0

IsZeroBuffer     检查一段内存是否为为全0


Step to UEFI (104)eMMC in the Shell

eMMC 应用在平板电脑上已经有一段时间了,本文给出了一个取得 eMMC CID 的例子。当然,你在其他资料上还会发现一些类似 MMC_INFO 之类的Protocol,但是根据我的实验,目前大多数系统只支持SD HOST IO 这一个 Protocol。此外,强烈建议一定在实体机上进行实验,避免出现费了很大力气编写代码,但是实际上第一步就无法完成的问题。
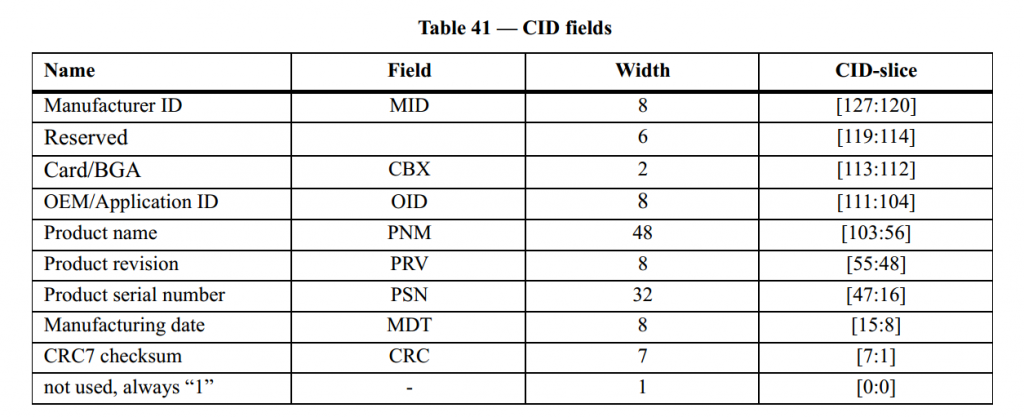
原理介绍:首先查找系统中的 SD_HOST_IO 的Protocol .目前看起来系统中只有一个这样的 Protocol ,所以我们用 LocateProtocol 就足够了。取得之后,通过这个 Protocol,对 eMMC 发送command。这个做法和 ATA 设备的 PassThrough Protocol很像。下面的代码是取得CID信息的,CID是用来识别eMMC一些基本信息的寄存器,比如 Serial Number,具体定义在 eMMC Specification中可以找到【参考1】 。
“8.2 CID register
The Card IDentification (CID) register is 128 bits wide. It contains the card identification information used during the card identification phase (MultiMediaCard protocol). Every individual flash or I/O card shall have an unique identification number. Every type of MultiMediaCard ROM cards (defined by content) shall have an unique identification number. Table 41 on page 112 lists these identifiers.The structure of the CID register is defined in the following sections”
image001

代码:

#include  <Uefi.h>
#include  <Library/UefiLib.h>
#include  <Library/ShellCEntryLib.h>
#include <Library/MemoryAllocationLib.h>
#include  <Protocol/BlockIo.h>

#include "SDHostIo.h"
#include "mmc.h"


EFI_GUID gEfiSdHostIoProtocolGuid = { 0xb63f8ec7, 0xa9c9, 0x4472, 
					{0xa4, 0xc0, 0x4d, 0x8b, 0xf3, 0x65, 0xcc, 0x51}};
 
//
// Command timeout will be max 100 ms 
//
#define  TIMEOUT_COMMAND     100

extern EFI_BOOT_SERVICES         *gBS;

EFI_STATUS
SendCommand (
  IN   EFI_SD_HOST_IO_PROTOCOL    *This,
  IN   UINT16                     CommandIndex,
  IN   UINT32                     Argument,
  IN   TRANSFER_TYPE              DataType,
  IN   UINT8                      *Buffer, OPTIONAL
  IN   UINT32                     BufferSize,    
  IN   RESPONSE_TYPE              ResponseType,
  IN   UINT32                     TimeOut,  
  OUT  UINT32                     *ResponseData
  )
/*++

  Routine Description:
    Send command by using Host IO protocol
  
  Arguments:
    This           - Pointer to EFI_SD_HOST_IO_PROTOCOL
    CommandIndex   - The command index to set the command index field of command register
    Argument       - Command argument to set the argument field of command register
    DataType       - TRANSFER_TYPE, indicates no data, data in or data out
    Buffer         - Contains the data read from / write to the device
    BufferSize     - The size of the buffer
    ResponseType   - RESPONSE_TYPE
    TimeOut        - Time out value in 1 ms unit
    ResponseData   - Depending on the ResponseType, such as CSD or card status

  Returns:  
    EFI_INVALID_PARAMETER
    EFI_UNSUPPORTED
    EFI_DEVICE_ERROR
    EFI_SUCCESS
 --*/   
{

  EFI_STATUS    Status;

  Status = This->SendCommand (
           This,
           CommandIndex,
           Argument,
           DataType,
           Buffer,
           BufferSize,
           ResponseType,
           TimeOut,
           ResponseData
           );
  if (!EFI_ERROR (Status)) {
    if (ResponseType == ResponseR1 || ResponseType == ResponseR1b) {
      //ASSERT(ResponseData != NULL);
	  Print(L"Error with code [%d]",(*ResponseData));
    }
  } else {
    This->ResetSdHost (This, Reset_DAT_CMD);
  }

  return Status;
}

int
EFIAPI
main (
  IN UINT32 Argc,
  IN CHAR16 **Argv
  )
{
	EFI_SD_HOST_IO_PROTOCOL   *SdHostIo;
	EFI_STATUS 		Status;	
	CID             CIDReg;
    OCR             OCRReg;
	UINT32          TimeOut=5000;
	
	Status = gBS->LocateProtocol (       
                  &gEfiSdHostIoProtocolGuid,
                  NULL,
                  &SdHostIo
                  );
	if (EFI_ERROR (Status)) {
		Print(L"No SdHost driver, Application is exiting!\n");
		return Status;
	}  	

    SdHostIo->EnableAutoStopCmd (SdHostIo, TRUE);
    SdHostIo->SetupDevice (SdHostIo);

    //
    // Go to Idle
    //
	SendCommand (
                SdHostIo,
                GO_IDLE_STATE,
                0,
                NoData,
                NULL,
                0,  
                ResponseNo,
                TIMEOUT_COMMAND,
                NULL
            );

    gBS->Stall (100 * 1000);

    //
    // Check voltage support, first time we use 0x40FF8080
    //
    SendCommand (
                SdHostIo,
				SEND_OP_COND,
                0x40FF8080,
                NoData,
                NULL,
                0,  
                ResponseR3,
                TIMEOUT_COMMAND,
                (UINT32*)&(OCRReg)
            );

    while (OCRReg.Busy != 1) {
		OCRReg.AccessMode = 0x02; // sector mode;
		SendCommand (
				  SdHostIo,
                  SEND_OP_COND,
                  *(UINT32*)&(OCRReg),
                  NoData,
                  NULL,
                  0,  
                  ResponseR3,
                  TIMEOUT_COMMAND,
                  (UINT32*)&(OCRReg)
                  );
						  
        gBS->Stall(100);

        TimeOut--;
        if (TimeOut == 0) {
            Print(L"Card is always busy\n");
            Status = EFI_TIMEOUT;
            goto Exit;
        } 
    } 

	SendCommand(
          SdHostIo,
          ALL_SEND_CID,
		0,
          NoData,
          NULL,
          0,  
          ResponseR2,
          TIMEOUT_COMMAND,
          (UINT32*)&(CIDReg)
          );
  
    Print (L" Product serial number      : %X\n",CIDReg.PSN);
    Print (L" Product revision           : %X\n",CIDReg.PRV);	
    Print (L" Product name               : %c%c%c%c%c%c\n",
								CIDReg.PNM[0],
								CIDReg.PNM[1],
								CIDReg.PNM[2],
								CIDReg.PNM[3],
								CIDReg.PNM[4],
								CIDReg.PNM[5]);
    Print (L" Manufacturer ID            : %X\n",CIDReg.MID);	
	
Exit:	
	return EFI_SUCCESS;
}

在kabyLake HDK 上运行结果:
image002

完整代码下载,其中还有代码生成的EFI程序,是 X64的。
getemmc

本文使用的头文件都是来自新版的 EDK2(比 UDK2015要新一些,我觉得UDK2017有可能会正式加入吧)【参考2】,有兴趣的读者可以自行查阅。
最后,既然有了CID,那么还可以读取一些关于 eMMC的其他信息,比如容量。请读者自己尝试完成。
最后的最后,推荐 Lenovo 出品的一款擦除 eMMC的工具,在 Shell 下运行,可以很快擦掉全部内容(应该使用 eMMC 的 Command 直接Erase的,所以能够达到很快的速度)。
gufd01ww

参考:
1. http://www.jedec.org/standards-documents/results/jesd84-b51 JESD84-A44.pdf
2. https://github.com/tianocore/edk2
3. http://support.lenovo.com/us/en/downloads/ds100934

Step to UEFI (103)Protocol 的私有数据

阅读《UEFI原理与编程》,第八章,开发UEFI服务。其中提到了 Protocol的私有数据。
之前我们介绍过 EFI_LOADED_IMAGE_PROTOCOL,在【参考1】的程序中,就有涉及到LOADED_IMAGE_PRIVATE_DATA,简单的说,定义的 PROTOCOL是这个结构体的一部分,就能够找到整个LOADED_IMAGE_PRIVATE_DATA的结构体,从而获得一些额外的信息。
总结一下,这样的私有数据是这样定义的:

#define PROTOCOLNAME_PRIVATE_DATA_SIGNATURE   SIGNATURE_32('p','r','t','9')
typedef struct {
  UINTN     Signature;
  UINTN	    Var1;
  PROTOCOLNAME _PROTOCOL   PROTOCOLNAME;           
} PROTOCOLNAME_PRIVATE_DATA;

#define PROTOCOLNAME _PRIVATE_DATA_FROM_THIS(a) \
     CR(a, PROTOCOLNAME_PRIVATE_DATA, PROTOCOLNAME, PROTOCOLNAME _PRIVATE_DATA_SIGNATURE)


在初始化的时候,要创建一个实际的PROTOCOLNAME_PRIVATE_DATA,然后初始化需要的变量,最后像其他的Protocol安装一样,将PROTOCOLNAME_PRIVATE_DATA. PROTOCOLNAME 安装到合适的Handle上即可。
编写代码测试一下,基于之前我们写的 PrintDriver 代码,先修改 Print9.h。加入了下面的定义:

#define PRINT9_PRIVATE_DATA_SIGNATURE   SIGNATURE_32('p','r','t','9')

typedef struct {
  UINTN     Signature;
  UINTN		Var1;
  /// loaded PROTOCOLNAME
  EFI_PRINT9_PROTOCOL   PRINT9;           
} EFI_PRINT9_PRIVATE_DATA;

#define EFI_PRINT9_PRIVATE_DATA_FROM_THIS(a) \
          CR(a, EFI_PRINT9_PRIVATE_DATA, PRINT9, PRINT9_PRIVATE_DATA_SIGNATURE)


之后修改print.c。 这个 driver实现的功能很简单,每次调用UnicodeSPrint 函数的时候,会自动显示 EFI_PRINT9_PRIVATE_DATA 中的 Var1,并且增加1.

#include <PiDxe.h>
#include  <Library/UefiLib.h>
#include "Print9.h"
#include <Library/PrintLib.h>
#include <Library/UefiBootServicesTableLib.h>
#include <Library/DebugLib.h>
#include <Library/UefiDriverEntryPoint.h>
#include <Library/MemoryAllocationLib.h>
EFI_PRINT9_PRIVATE_DATA  *Image;
EFI_HANDLE  mPrintThunkHandle = NULL;
extern EFI_SYSTEM_TABLE			 *gST;

//Copied from \MdeModulePkg\Library\DxePrintLibPrint2Protocol\PrintLib.c
UINTN
EFIAPI
MyUnicodeSPrint (
  OUT CHAR16        *StartOfBuffer,
  IN  UINTN         BufferSize,
  IN  CONST CHAR16  *FormatString,
  ...
  )
{
  VA_LIST Marker;
  UINTN   NumberOfPrinted=1;
  CHAR16  *Buffer=L"12345678";
  
  VA_START (Marker, FormatString);
  //NumberOfPrinted = UnicodeVSPrint (StartOfBuffer, BufferSize, FormatString, Marker);
  VA_END (Marker);
  
  UnicodeSPrint(Buffer,8,L"%d",Image->Var1);
  gST->ConOut->OutputString(gST->ConOut,Buffer); 
  Image->Var1++;
  return NumberOfPrinted;
}

/**
  The user Entry Point for Print module.

  This is the entry point for Print DXE Driver. It installs the Print2 Protocol.

  @param[in] ImageHandle    The firmware allocated handle for the EFI image.
  @param[in] SystemTable    A pointer to the EFI System Table.

  @retval EFI_SUCCESS       The entry point is executed successfully.
  @retval Others            Some error occurs when executing this entry point.

**/
EFI_STATUS
EFIAPI
PrintEntryPoint (
  IN EFI_HANDLE           ImageHandle,
  IN EFI_SYSTEM_TABLE     *SystemTable
  )
{
	EFI_STATUS  Status=EFI_SUCCESS;

	//
	// Allocate a new image structure
	//
	Image = AllocateZeroPool (sizeof(EFI_PRINT9_PRIVATE_DATA));
	if (Image == NULL) {
		Status = EFI_OUT_OF_RESOURCES;
		goto Done;
	}	
	
    Image->Signature         = PRINT9_PRIVATE_DATA_SIGNATURE;
  
	Image->PRINT9.UnicodeBSPrint=UnicodeBSPrint;
	Image->PRINT9.UnicodeSPrint=MyUnicodeSPrint;
  	Image->PRINT9.UnicodeBSPrintAsciiFormat=UnicodeBSPrintAsciiFormat;	
  	Image->PRINT9.UnicodeSPrintAsciiFormat=UnicodeSPrintAsciiFormat;	
  	Image->PRINT9.UnicodeValueToString=UnicodeValueToString;	
  	Image->PRINT9.AsciiBSPrint=AsciiBSPrint;	
  	Image->PRINT9.AsciiSPrint=AsciiSPrint;	
  	Image->PRINT9.AsciiBSPrintUnicodeFormat=AsciiBSPrintUnicodeFormat;	
  	Image->PRINT9.AsciiSPrintUnicodeFormat=AsciiSPrintUnicodeFormat;	
  	Image->PRINT9.AsciiValueToString=AsciiValueToString;	
	
	Status = gBS->InstallMultipleProtocolInterfaces (
                  &mPrintThunkHandle,
                  &gEfiPrint9ProtocolGuid, 
				  &Image->PRINT9,
                  NULL
                  );
    ASSERT_EFI_ERROR (Status);

Done:

  return Status;
}


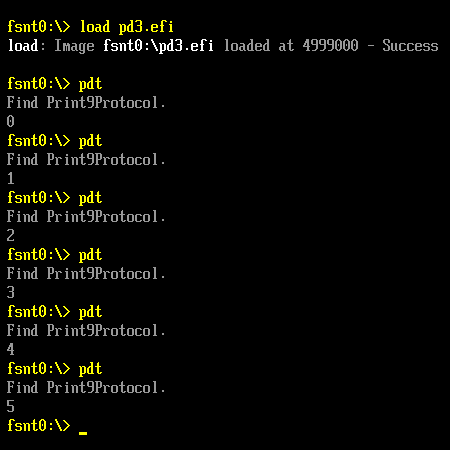
测试这个 Protocol 使用的还是之前的 pdt.efi,运行结果如下:

stu103

完整的代码下载

printdriver3

参考:
1. Step to UEFI (48) —– 被加载程序的ENTRYPOINT

Step to UEFI (102)Application 释放Driver

Windows下是不允许应用程序直接访问硬件的,必须通过驱动。类似 RW Everything这样的需要访问硬件的工具实际上是自带驱动的,当运行应用程序的时候会自动把驱动释放出去,然后通过加载驱动的方式再进行硬件的访问的。本文就介绍一下,如何在UEFI 中实现同样的功能。
我们有之前做出来的PrintDriver,用一个 Application 在编译期将它包进去,然后运行期释放到硬盘上,然后Load之,再按照Protocol的方式调用。
特别注意的地方是:我将之前的 PrintDriver.efi 用工具转换为C的字节定义,放在文件头中。用 Const 定义,保证它编译后会处于 .rdata段中。

代码如下:

#include  <Uefi.h>
#include  <Library/UefiLib.h>
#include  <Library/ShellCEntryLib.h>
#include  <Library/ShellLib.h>

#include "Print9.h"

EFI_GUID gEfiPrint9ProtocolGuid =
		{ 0xf05976ef, 0x83f1, 0x4f3d, 
			{ 0x86, 0x19, 0xf7, 0x59, 
				0x5d, 0x41, 0xe5, 0x61 } };

							
extern EFI_BOOT_SERVICES         *gBS;
extern EFI_SYSTEM_TABLE			 *gST;
extern EFI_RUNTIME_SERVICES 	 *gRT;

extern EFI_HANDLE 					 gImageHandle;

const CHAR8 MyDriver[] ={
#include	"Mydriver.h"
};

int
EFIAPI
main (
  IN int Argc,
  IN CHAR16 **Argv
  )
{
	EFI_PRINT9_PROTOCOL	*Print9Protocol;
	CHAR16			  *Buffer=L"12345678";
	RETURN_STATUS     Status;
	EFI_FILE_HANDLE   FileHandle;
	UINTN			  FileSize=sizeof(MyDriver);
	EFI_HANDLE        *HandleBuffer=(EFI_HANDLE)&MyDriver;
	CHAR16	  		  *CommandLine=L"load MyDriver.efi";
	EFI_STATUS  	  CmdStat;
  
    Print(L"Length of driver = %d \n",sizeof(MyDriver));

	//Create a new file
	Status = ShellOpenFileByName(L"MyDriver.efi", 
                               (SHELL_FILE_HANDLE *)&FileHandle,
                               EFI_FILE_MODE_READ |
							   EFI_FILE_MODE_WRITE|
							   EFI_FILE_MODE_CREATE, 
							   0);  
	if(Status != RETURN_SUCCESS) {
			Print(L"CreatFile failed [%r]!\n",Status);
			return EFI_SUCCESS;
      }	

	Status = ShellWriteFile(FileHandle,
			&FileSize,
			HandleBuffer
			);
	if(Status != RETURN_SUCCESS) {
			Print(L"Writefile failed [%r]!\n",Status);
			return EFI_SUCCESS;
      }				
    Print(L"Driver has been released to the disk!\n");	  
	
	//Close the source file
	ShellCloseFile(&FileHandle);
  
    Status = ShellExecute( &gImageHandle, CommandLine, FALSE, NULL, &CmdStat);
	if(Status != RETURN_SUCCESS) {
			Print(L"Driver load error!\n",Status);
			return EFI_SUCCESS;
      }		
	  
	// Search for the Print9 Protocol
    //
    Status = gBS->LocateProtocol(
      &gEfiPrint9ProtocolGuid,
      NULL,
      (VOID **)&Print9Protocol
     );
    if (EFI_ERROR(Status)) {
      Print9Protocol = NULL;
	  Print(L"Can't find Print9Protocol.\n");
	  return EFI_SUCCESS;
     }
	Print(L"Find Print9Protocol.\n"); 
	Print9Protocol->UnicodeSPrint(Buffer,8,L"%d",200);
	Print(L"%s\n",Buffer); 
	
	return EFI_SUCCESS;
}


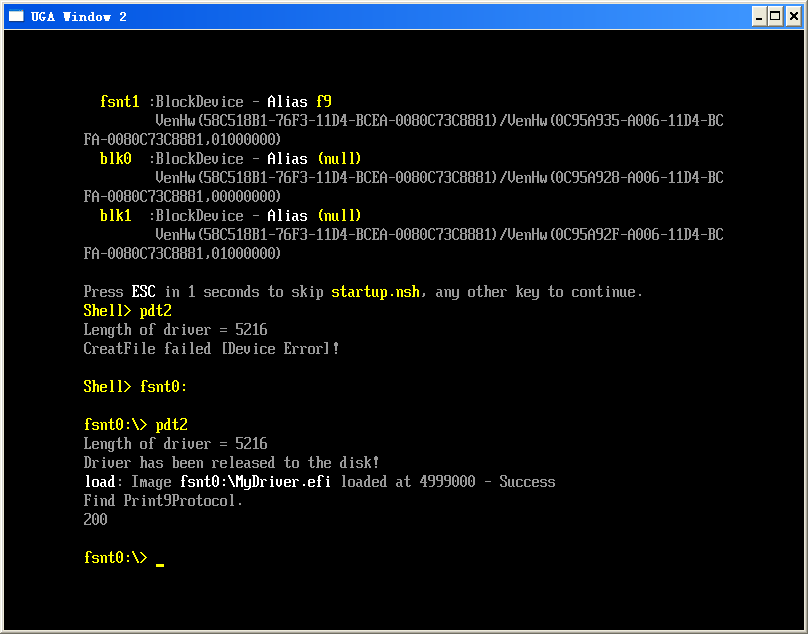
运行结果:
stu102

第一次加载失败的原因是因为当时处于 shell 下面,没有盘符,这样无法正常释放文件。第二次,在fsnt0: 下运行,驱动正常释放,可能够正常加载。所以取得了期望的结果。
最后提一下,PE格式段的问题。打开一个代码,比如之前测试驱动的Application PDT.EFI,查看编译期生成的 pdt.map :
Preferred load address is 00000000

Start Length Name Class
0001:00000000 000045e5H .text CODE
0002:00000000 0000186eH .rdata DATA
0002:00001870 0000006bH .rdata$debug DATA
0003:00000000 00000350H .data DATA
0003:00000360 00002850H .bss DATA

这些段的含义如下【参考1】:
.text 可执行代码段
数据段.bss、.rdata、.data
.rdata段表示只读的数据,比如字符串文字量、常量和调试目录信息。
.bss段表示应用程序的未初始化数据,包括所有函数或源模块中声明为static的变量。
.data段存储所有其它变量(除了出现在栈上的自动变量)。基本上,这些是应用程序或模块的全局变量。
所以我们希望,定义的数据段出现在 rdata 中,再查看我们的 pdt2.map,其中的 rdata段因为包括了我们定义的 Driver长度明显变大了。
Preferred load address is 00000000

Start Length Name Class
0001:00000000 000046c5H .text CODE
0002:00000000 00002e16H .rdata DATA
0002:00002e18 0000006eH .rdata$debug DATA
0003:00000000 00000350H .data DATA
0003:00000360 00002850H .bss DATA

完整的代码下载:
pdt2

参考:
1. http://blog.csdn.net/feidegengao/article/details/16966357 PE文件格式详解(下)

Step to UEFI (100)InstallProtocolInterface

前面介绍了很多“消费”Protocol的代码,这次试试自己生产一个 Protocol 试试。根据我的理解,产生的 protocol 可以挂接在任何的 Handle 上(DH 命令看到的都可以),提供服务的代码需要常驻内存,一般的 Application 是不会常驻内存的,驱动直接可以常驻内存。于是,我们实验编写一个驱动程序,使用 Load 来加载驱动产生自定义的 Protocol ,挂接在自身Image 的Handle上。
需要使用的主要服务是 InstallProtocolInterface,我们先看看它的定义和输入参数:

typedef
EFI_STATUS
(EFIAPI *EFI_INSTALL_PROTOCOL_INTERFACE)(
  IN OUT EFI_HANDLE               *Handle,          //安装到哪个Handle上
  IN     EFI_GUID                 *Protocol,               //安装的Protocol 的名字
  IN     EFI_INTERFACE_TYPE       InterfaceType,  ,  //目前只有一种类型:EFI_NATIVE_INTERFACE
  IN     VOID                     *Interface                  //Protocol的实例
  );


实际上,代码中更加常见的是InstallMultipleProtocolInterfaces, 这是因为 “ Installs a protocol interface on a device handle. If the handle does not exist, it is created and added to the list of handles in the system. InstallMultipleProtocolInterfaces() performs more error checking than InstallProtocolInterface(), so it is recommended that InstallMultipleProtocolInterfaces() be used in place of InstallProtocolInterface()” 因此,我们代码中会使用 InstallMultipleProtocolInterfaces 而不是前面提到的 InstallProtocolInterface。

/**
  Installs one or more protocol interfaces into the boot services environment.

  @param[in, out]  Handle       The pointer to a handle to install the new protocol interfaces on,
                                or a pointer to NULL if a new handle is to be allocated.
  @param  ...                   A variable argument list containing pairs of protocol GUIDs and protocol
                                interfaces.

  @retval EFI_SUCCESS           All the protocol interface was installed.
  @retval EFI_OUT_OF_RESOURCES  There was not enough memory in pool to install all the protocols.
  @retval EFI_ALREADY_STARTED   A Device Path Protocol instance was passed in that is already present in
                                the handle database.
  @retval EFI_INVALID_PARAMETER Handle is NULL.
  @retval EFI_INVALID_PARAMETER Protocol is already installed on the handle specified by Handle.

**/
typedef
EFI_STATUS
(EFIAPI *EFI_INSTALL_MULTIPLE_PROTOCOL_INTERFACES)(
  IN OUT EFI_HANDLE           *Handle,
  ...
  );


InstallMultipleProtocolInterfaces 服务支持一次性安装多个Protocol,所以接收的变量是可变数量的,看起来让人有眼晕的感觉。最简单的方法是照葫芦画瓢,我们在UDK2014的代码中找一下我们的“葫芦”。在MdeModulePkg中,有一个 PrintDxe,它会向系统中注册名称为Print2Protocol 的 Protocol。

先分析一下他的代码结构。主要文件有3个:

1. \MdeModulePkg\Universal\PrintDxe\PrintDxe.inf 可以看做是工程文件,特别注意,其中有用到gEfiPrint2ProtocolGuid 在 MdeModulePkg.dec 中有定义:

  ## Print protocol defines basic print functions to print the format unicode and ascii string.
  # Include/Protocol/Print2.h
  gEfiPrint2ProtocolGuid          = { 0xf05976ef, 0x83f1, 0x4f3d, { 0x86, 0x19, 0xf7, 0x59, 0x5d, 0x41, 0xe5, 0x38 } }


2 \MdeModulePkg\Universal\PrintDxe\Print.c 其中有这个 Protocol的实例,还有入口函数PrintEntryPoint。其中使用了InstallMultipleProtocolInterfaces 将mPrint2Protocol 安装到了mPrintThunkHandle(==0) 上面。

3. \MdeModulePkg\Include\Protocol\Print2.h 定义了提供的 Protocol 的结构。

struct _EFI_PRINT2_PROTOCOL {
  UNICODE_BS_PRINT                     UnicodeBSPrint;
  UNICODE_S_PRINT                      UnicodeSPrint;
  UNICODE_BS_PRINT_ASCII_FORMAT        UnicodeBSPrintAsciiFormat;
  UNICODE_S_PRINT_ASCII_FORMAT         UnicodeSPrintAsciiFormat;
  UNICODE_VALUE_TO_STRING              UnicodeValueToString;
  ASCII_BS_PRINT                       AsciiBSPrint;
  ASCII_S_PRINT                        AsciiSPrint;
  ASCII_BS_PRINT_UNICODE_FORMAT        AsciiBSPrintUnicodeFormat;
  ASCII_S_PRINT_UNICODE_FORMAT         AsciiSPrintUnicodeFormat;
  ASCII_VALUE_TO_STRING                AsciiValueToString;
};


更多的介绍可以在【参考1】中看到。
之后就可以尝试进行编译,需要在 MdeModulePkg.dec 中声明一次 gEfiPrint9ProtocolGuid ,注意我修改了GUID保证不会和原来的发生冲突。再在MdeModulePkg.dsc 中加入 PrintDxe.inf 加入的位置和我们之前编译过的GOP旋转驱动还有截图的驱动位置一样。

编译之后的结果可以直接在 NT32 模拟器下试验:
st1001
加载之后可以发现用 DH 命令列出当前的 Handle会多了一个image(如果我们再Load一次,那么还会多出来一个Image,我们的代码不完善,没有自动查找确认当前是否已经执行过一次的功能)
stu1002

我们编写一个简单的Application来调用这个 Protocol 测试:

#include  <Uefi.h>
#include  <Library/UefiLib.h>
#include  <Library/ShellCEntryLib.h>

#include "Print9.h"

EFI_GUID gEfiPrint9ProtocolGuid =
		{ 0xf05976ef, 0x83f1, 0x4f3d, 
			{ 0x86, 0x19, 0xf7, 0x59, 
				0x5d, 0x41, 0xe5, 0x61 } };

							
extern EFI_BOOT_SERVICES         *gBS;
extern EFI_SYSTEM_TABLE			 *gST;
extern EFI_RUNTIME_SERVICES 	 *gRT;

int
EFIAPI
main (
  IN int Argc,
  IN CHAR16 **Argv
  )
{
	EFI_PRINT9_PROTOCOL		*Print9Protocol;
	EFI_STATUS				Status;	
	CHAR16					*Buffer=L"12345678";
	// Search for the Print9 Protocol
    //
    Status = gBS->LocateProtocol(
      &gEfiPrint9ProtocolGuid,
      NULL,
      (VOID **)&Print9Protocol
     );
    if (EFI_ERROR(Status)) {
      Print9Protocol = NULL;
	  Print(L"Can't find Print9Protocol.\n");
	  return EFI_SUCCESS;
     }
	Print(L"Find Print9Protocol.\n"); 
	Print9Protocol->UnicodeSPrint(Buffer,8,L"%d",200);
	Print(L"%s\n",Buffer); 
	
	return EFI_SUCCESS;
}


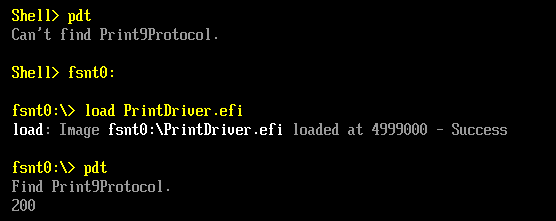
运行结果:
stu1003
首先运行的时候找不到对应的 Protocol,需要Load一次,再次运行就可以正常运行了。
本文提到的完整代码下载:

pdt

printdriver

参考:
1. http://feishare.com/attachments/065_EFI%20Howto,%20%20%20%E6%B3%A8%E5%86%8C%EF%BC%8C%E5%8F%91%E5%B8%83%EF%BC%8C%E4%BD%BF%E7%94%A8%E8%87%AA%E5%AE%9A%E4%B9%89%E7%9A%84protocol.pdf EFI Howto ,注册,发布,使用自定义的protocol

Step to UEFI (98)Shell加载EFI的分析

继续阅读《UEFI 原理与编程》,其中的第三章介绍了一个 EFI Application如何在 Shell下加载运行的。ShellProtocol.c中的InternalShellExecuteDevicePath 是具体实现这个功能的函数。
函数头:

/**
  internal worker function to load and run an image via device path.

  @param ParentImageHandle      A handle of the image that is executing the specified
                                command line.
  @param DevicePath             device path of the file to execute
  @param CommandLine            Points to the NULL-terminated UCS-2 encoded string
                                containing the command line. If NULL then the command-
                                line will be empty.
  @param Environment            Points to a NULL-terminated array of environment
                                variables with the format 'x=y', where x is the
                                environment variable name and y is the value. If this
                                is NULL, then the current shell environment is used.
                            
  @param[out] StartImageStatus  Returned status from gBS->StartImage.

  @retval EFI_SUCCESS       The command executed successfully. The  status code
                            returned by the command is pointed to by StatusCode.
  @retval EFI_INVALID_PARAMETER The parameters are invalid.
  @retval EFI_OUT_OF_RESOURCES Out of resources.
  @retval EFI_UNSUPPORTED   Nested shell invocations are not allowed.
**/
EFI_STATUS
EFIAPI
InternalShellExecuteDevicePath(
  IN CONST EFI_HANDLE               *ParentImageHandle,
  IN CONST EFI_DEVICE_PATH_PROTOCOL *DevicePath,
  IN CONST CHAR16                   *CommandLine OPTIONAL,
  IN CONST CHAR16                   **Environment OPTIONAL,
  OUT EFI_STATUS                    *StartImageStatus OPTIONAL
  )


第一步,先将 EFI Application加载到内存中,生成Image对象。取得这个对象的句柄为 NewHandle。

  //
  // Load the image with:
  // FALSE - not from boot manager and NULL, 0 being not already in memory
  //
  Status = gBS->LoadImage(
    FALSE,
    *ParentImageHandle,
    (EFI_DEVICE_PATH_PROTOCOL*)DevicePath,
    NULL,
    0,
    &NewHandle);

  if (EFI_ERROR(Status)) {
    if (NewHandle != NULL) {
      gBS->UnloadImage(NewHandle);
    }
    return (Status);
  }

第二步,取得命令行参数,将命令行的参数交给 NewHandle

 Status = gBS->OpenProtocol(
    NewHandle,
    &gEfiLoadedImageProtocolGuid,
    (VOID**)&LoadedImage,
    gImageHandle,
    NULL,
    EFI_OPEN_PROTOCOL_GET_PROTOCOL);

  if (!EFI_ERROR(Status)) {
    ASSERT(LoadedImage->LoadOptionsSize == 0);
    if (NewCmdLine != NULL) {
      LoadedImage->LoadOptionsSize  = (UINT32)StrSize(NewCmdLine);
      LoadedImage->LoadOptions      = (VOID*)NewCmdLine;
    }


看到这里我有一个问题:前面加载之后,为什么第二步就能够在被加载的Image上找到“EFI_Loaded_Image_Protocol”? 带着这样的问题追踪了代码。首先要找到 gBS->LoadImage 的真正实现代码,在\MdeModulePkg\Core\Dxe\DxeMain\DxeMain.c有定义,

//
// DXE Core Module Variables
//
EFI_BOOT_SERVICES mBootServices = {
  {
.................
.................
  (EFI_IMAGE_LOAD)                              CoreLoadImage,                            // LoadImage
.................
.................
}


再追CoreLoadImage代码在 \MdeModulePkg\Core\Dxe\Image\Image.c

/**
  Loads an EFI image into memory and returns a handle to the image.

  @param  BootPolicy              If TRUE, indicates that the request originates
                                  from the boot manager, and that the boot
                                  manager is attempting to load FilePath as a
                                  boot selection.
  @param  ParentImageHandle       The caller's image handle.
  @param  FilePath                The specific file path from which the image is
                                  loaded.
  @param  SourceBuffer            If not NULL, a pointer to the memory location
                                  containing a copy of the image to be loaded.
  @param  SourceSize              The size in bytes of SourceBuffer.
  @param  ImageHandle             Pointer to the returned image handle that is
                                  created when the image is successfully loaded.

  @retval EFI_SUCCESS             The image was loaded into memory.
  @retval EFI_NOT_FOUND           The FilePath was not found.
  @retval EFI_INVALID_PARAMETER   One of the parameters has an invalid value.
  @retval EFI_UNSUPPORTED         The image type is not supported, or the device
                                  path cannot be parsed to locate the proper
                                  protocol for loading the file.
  @retval EFI_OUT_OF_RESOURCES    Image was not loaded due to insufficient
                                  resources.
  @retval EFI_LOAD_ERROR          Image was not loaded because the image format was corrupt or not
                                  understood.
  @retval EFI_DEVICE_ERROR        Image was not loaded because the device returned a read error.
  @retval EFI_ACCESS_DENIED       Image was not loaded because the platform policy prohibits the 
                                  image from being loaded. NULL is returned in *ImageHandle.
  @retval EFI_SECURITY_VIOLATION  Image was loaded and an ImageHandle was created with a 
                                  valid EFI_LOADED_IMAGE_PROTOCOL. However, the current 
                                  platform policy specifies that the image should not be started.

**/
EFI_STATUS
EFIAPI
CoreLoadImage (
  IN BOOLEAN                    BootPolicy,
  IN EFI_HANDLE                 ParentImageHandle,
  IN EFI_DEVICE_PATH_PROTOCOL   *FilePath,
  IN VOID                       *SourceBuffer   OPTIONAL,
  IN UINTN                      SourceSize,
  OUT EFI_HANDLE                *ImageHandle
  )
{
  EFI_STATUS    Status;
  UINT64        Tick;
  EFI_HANDLE    Handle;

  Tick = 0;
  PERF_CODE (
    Tick = GetPerformanceCounter ();
  );

  Status = CoreLoadImageCommon (
             BootPolicy,
             ParentImageHandle,
             FilePath,
             SourceBuffer,
             SourceSize,
             (EFI_PHYSICAL_ADDRESS) (UINTN) NULL,
             NULL,
             ImageHandle,
             NULL,
             EFI_LOAD_PE_IMAGE_ATTRIBUTE_RUNTIME_REGISTRATION | EFI_LOAD_PE_IMAGE_ATTRIBUTE_DEBUG_IMAGE_INFO_TABLE_REGISTRATION
             );

  Handle = NULL; 
  if (!EFI_ERROR (Status)) {
    //
    // ImageHandle will be valid only Status is success. 
    //
    Handle = *ImageHandle;
  }

  PERF_START (Handle, "LoadImage:", NULL, Tick);
  PERF_END (Handle, "LoadImage:", NULL, 0);

  return Status;
}
在CoreLoadImageCommon 中可以找到加载安装EFI_Loaded_Image_Protocol 的代码。
  //
  //Reinstall loaded image protocol to fire any notifications
  //
  Status = CoreReinstallProtocolInterface (
             Image->Handle,
             &gEfiLoadedImageProtocolGuid,
             &Image->Info,
             &Image->Info
             );
  if (EFI_ERROR (Status)) {
    goto Done;
  }


就是说,在加载过程中,还要对Image 安装EFI_Loaded_Image_Protocol。因此,Load 的动作并不是简单的读取到内存中。

继续回到InternalShellExecuteDevicePath 代码中。

    //第三步,将修改好的ShellParamsProtocol 再安装到 Image上。
    //
    // Initialize and install a shell parameters protocol on the image.
    //
    ShellParamsProtocol.StdIn   = ShellInfoObject.NewShellParametersProtocol->StdIn;
    ShellParamsProtocol.StdOut  = ShellInfoObject.NewShellParametersProtocol->StdOut;
    ShellParamsProtocol.StdErr  = ShellInfoObject.NewShellParametersProtocol->StdErr;
    Status = UpdateArgcArgv(&ShellParamsProtocol, NewCmdLine, NULL, NULL);
    ASSERT_EFI_ERROR(Status);
    //
    // Replace Argv[0] with the full path of the binary we're executing:
    // If the command line was "foo", the binary might be called "foo.efi".
    // "The first entry in [Argv] is always the full file path of the
    //  executable" - UEFI Shell Spec section 2.3
    //
    ImagePath = EfiShellGetFilePathFromDevicePath (DevicePath);
    // The image we're executing isn't necessarily in a filesystem - it might
    // be memory mapped. In this case EfiShellGetFilePathFromDevicePath will
    // return NULL, and we'll leave Argv[0] as UpdateArgcArgv set it.
    if (ImagePath != NULL) {
      if (ShellParamsProtocol.Argv == NULL) {
        // Command line was empty or null.
        // (UpdateArgcArgv sets Argv to NULL when CommandLine is "" or NULL)
        ShellParamsProtocol.Argv = AllocatePool (sizeof (CHAR16 *));
        if (ShellParamsProtocol.Argv == NULL) {
          Status = EFI_OUT_OF_RESOURCES;
          goto UnloadImage;
        }
        ShellParamsProtocol.Argc = 1;
      } else {
        // Free the string UpdateArgcArgv put in Argv[0];
        FreePool (ShellParamsProtocol.Argv[0]);
      }
      ShellParamsProtocol.Argv[0] = ImagePath;
    }

    Status = gBS->InstallProtocolInterface(&NewHandle, &gEfiShellParametersProtocolGuid, EFI_NATIVE_INTERFACE, &ShellParamsProtocol);
    ASSERT_EFI_ERROR(Status);
//第四步,用 gBS->StartImage执行Image。
    //
    // now start the image and if the caller wanted the return code pass it to them...
    //
    if (!EFI_ERROR(Status)) {
      StartStatus      = gBS->StartImage(
                          NewHandle,
                          0,
                          NULL
                          );
      if (StartImageStatus != NULL) {
        *StartImageStatus = StartStatus;
      }


Step to UEFI (97)Shell下获得和设置环境变量

Shell 下可以通过 Set 命令获取和设置当前的环境变量。比如:在模拟环境下运行 Set 可以看到默认的 path 路径:
image001

这里介绍一下如何使用代码来实现这个功能。

首先介绍取得环境变量的函数,在 \ShellPkg\Include\Library\ShellLib.h 中可以看到他的原型。输入函数是要读取的环境变量名称。比如: path

/**
  Return the value of an environment variable.

  This function gets the value of the environment variable set by the
  ShellSetEnvironmentVariable function.

  @param[in] EnvKey             The key name of the environment variable.

  @retval NULL                  The named environment variable does not exist.
  @return != NULL               The pointer to the value of the environment variable.
**/
CONST CHAR16*
EFIAPI
ShellGetEnvironmentVariable (
  IN CONST CHAR16                *EnvKey
  );


其次,介绍一下设置环境变量的函数,同样在在 \ShellPkg\Include\Library\ShellLib.h 中可以看到他的原型。输入的参数是:环境变量名称,要设置的值,还有一个是该变量是否为易失的。如果设置为非易失,那么下次重新其中之后这个值还会存在Shell中。

/**
  Set the value of an environment variable.

  This function changes the current value of the specified environment variable. If the
  environment variable exists and the Value is an empty string, then the environment
  variable is deleted. If the environment variable exists and the Value is not an empty
  string, then the value of the environment variable is changed. If the environment
  variable does not exist and the Value is an empty string, there is no action. If the
  environment variable does not exist and the Value is a non-empty string, then the
  environment variable is created and assigned the specified value.

  This is not supported pre-UEFI Shell 2.0.

  @param[in] EnvKey             The key name of the environment variable.
  @param[in] EnvVal             The Value of the environment variable
  @param[in] Volatile           Indicates whether the variable is non-volatile (FALSE) or volatile (TRUE).

  @retval EFI_SUCCESS           The operation completed sucessfully
  @retval EFI_UNSUPPORTED       This operation is not allowed in pre-UEFI 2.0 Shell environments.
**/
EFI_STATUS
EFIAPI
ShellSetEnvironmentVariable (
  IN CONST CHAR16               *EnvKey,
  IN CONST CHAR16               *EnvVal,
  IN BOOLEAN                    Volatile
  );


编写一个测试的 Application

#include  <Uefi.h>
#include  <Library/UefiLib.h>
#include  <Library/ShellCEntryLib.h>

#include <Library/MemoryAllocationLib.h>
#include <Library/BaseMemoryLib.h>
#include <Protocol/UnicodeCollation.h>

#include  "ShellLib.h"

extern EFI_BOOT_SERVICES         *gBS;
extern EFI_SYSTEM_TABLE		*gST;
extern EFI_RUNTIME_SERVICES 	 *gRT;

int
EFIAPI
main (
  IN int Argc,
  IN CHAR16 **Argv
  )
{
  EFI_STATUS          Status;
  CONST CHAR16		  *Result;
  
  Result=ShellGetEnvironmentVariable(L"path");
  if (Result!=NULL) {
		Print(L"Get path=[%s]\n",Result);
	}
  
  Status=ShellSetEnvironmentVariable(L"labz1",L"100",TRUE);
  if (EFI_ERROR(Status)) {
		Print(L"Set Env. variable error\n",Result);
	}  

  Status=ShellSetEnvironmentVariable(L"labz2",L"200",FALSE);
  if (EFI_ERROR(Status)) {
		Print(L"Set Env. variable error\n",Result);
	}  
	
  Result=ShellGetEnvironmentVariable(L"labz1");
  if (Result!=NULL) {
		Print(L"Get labz1=[%s]\n",Result);
	}	
  
  return EFI_SUCCESS;
}


需要特别注意的地方是:在 NT32 模拟环境下,ShellSetEnvironmentVariable 函数无法使用:

image003
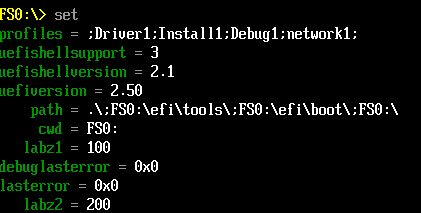
上面的代码首先显示一下当前的 path 变量,之后设置2个变量分别是 lab1=100和lab2=200.
下面的都是在实体机上进行测试的(测试平台:Kabylake HDK Board)

image005

运行之后我们再检查环境变量可以看到 labz1 和 labz2 已经设置进去了。
image006
重启之后,再次检查可以看到变量labz2仍然存在
image007
比如,某天你需要在BIOS中加入一个重启动测试的代码,可以考虑将重启次数放在环境变量中。

完整的代码下载 envtest

Step to UEFI (92)关于 ConOut 的奇怪实验

UEFI System Table 中的 ConOut-> OutputString 能够让我们直接在屏幕上输出字符串。这里介绍一种方法,能够让我们截获并且修改这个函数输出的字符串。

首先看一下 System Table 的定义在 \MdePkg\Include\Uefi\UefiSpec.h

///

/// EFI System Table

///

typedef struct {

///

/// The table header for the EFI System Table.

///

EFI_TABLE_HEADER                  Hdr;

///

/// A pointer to a null terminated string that identifies the vendor

/// that produces the system firmware for the platform.

///

CHAR16                            *FirmwareVendor;

///

/// A firmware vendor specific value that identifies the revision

/// of the system firmware for the platform.

///

UINT32                            FirmwareRevision;

///

/// The handle for the active console input device. This handle must support

/// EFI_SIMPLE_TEXT_INPUT_PROTOCOL and EFI_SIMPLE_TEXT_INPUT_EX_PROTOCOL.

///

EFI_HANDLE                        ConsoleInHandle;

///

/// A pointer to the EFI_SIMPLE_TEXT_INPUT_PROTOCOL interface that is

/// associated with ConsoleInHandle.

///

EFI_SIMPLE_TEXT_INPUT_PROTOCOL    *ConIn;

///

/// The handle for the active console output device.

///

EFI_HANDLE                        ConsoleOutHandle;

///

/// A pointer to the EFI_SIMPLE_TEXT_OUTPUT_PROTOCOL interface

/// that is associated with ConsoleOutHandle.

///

EFI_SIMPLE_TEXT_OUTPUT_PROTOCOL   *ConOut;

///

/// The handle for the active standard error console device.

/// This handle must support the EFI_SIMPLE_TEXT_OUTPUT_PROTOCOL.

///

EFI_HANDLE                        StandardErrorHandle;

///

/// A pointer to the EFI_SIMPLE_TEXT_OUTPUT_PROTOCOL interface

/// that is associated with StandardErrorHandle.

///

EFI_SIMPLE_TEXT_OUTPUT_PROTOCOL   *StdErr;

///

/// A pointer to the EFI Runtime Services Table.

///

EFI_RUNTIME_SERVICES              *RuntimeServices;

///

/// A pointer to the EFI Boot Services Table.

///

EFI_BOOT_SERVICES                 *BootServices;

///

/// The number of system configuration tables in the buffer ConfigurationTable.

///

UINTN                             NumberOfTableEntries;

///

/// A pointer to the system configuration tables.

/// The number of entries in the table is NumberOfTableEntries.

///

EFI_CONFIGURATION_TABLE           *ConfigurationTable;

} EFI_SYSTEM_TABLE;


其中的ConOut 是指向  EFI_SIMPLE_TEXT_OUTPUT_PROTOCOL  的指针

具体定义可以在 \MdePkg\Include\Protocol\SimpleTextOut.h 查到

///

/// The SIMPLE_TEXT_OUTPUT protocol is used to control text-based output devices.

/// It is the minimum required protocol for any handle supplied as the ConsoleOut

/// or StandardError device. In addition, the minimum supported text mode of such

/// devices is at least 80 x 25 characters.

///

struct _EFI_SIMPLE_TEXT_OUTPUT_PROTOCOL {

EFI_TEXT_RESET                Reset;

EFI_TEXT_STRING               OutputString;

EFI_TEXT_TEST_STRING          TestString;

EFI_TEXT_QUERY_MODE           QueryMode;

EFI_TEXT_SET_MODE             SetMode;

EFI_TEXT_SET_ATTRIBUTE        SetAttribute;

EFI_TEXT_CLEAR_SCREEN         ClearScreen;

EFI_TEXT_SET_CURSOR_POSITION  SetCursorPosition;

EFI_TEXT_ENABLE_CURSOR        EnableCursor;

///

/// Pointer to SIMPLE_TEXT_OUTPUT_MODE data.

///

EFI_SIMPLE_TEXT_OUTPUT_MODE   *Mode;

};

我们需要的是将  EFI_TEXT_STRING OutputString; 替换为我们自己的函数。

最终的代码如下

#include  <Uefi.h>
#include  <Library/UefiLib.h>
#include  <Library/ShellCEntryLib.h>


extern EFI_BOOT_SERVICES         *gBS;
extern EFI_SYSTEM_TABLE		  *gST;
extern EFI_RUNTIME_SERVICES 	 *gRT;

EFI_SYSTEM_TABLE	myST;
EFI_SYSTEM_TABLE	*pmyST=&myST;

EFI_SIMPLE_TEXT_OUTPUT_PROTOCOL	myConOut;

EFI_STATUS
myOut (
  IN EFI_SIMPLE_TEXT_OUTPUT_PROTOCOL        *This,
  IN CHAR16                                 *String
  )
{
	//Just a experiment, add a String to the output
	CHAR16 R[40]=L"LAB-Z:";
	StrCat(R,String);
	gST->ConOut->OutputString(This,R);
	
	return EFI_SUCCESS;
}
  
int
EFIAPI
main (
  IN int Argc,
  IN CHAR16 **Argv
  )
{	
    //Create a fake EFI_SYSTEM_TABLE named myST
	memcpy(&myST,gST,sizeof(EFI_SYSTEM_TABLE));	
	//Test this EFI_SYSTEM_TABLE
	  gST->ConOut->OutputString(  gST->ConOut,L"Test of gSt 1\n\r");
	pmyST->ConOut->OutputString(pmyST->ConOut,L"Test of pmyST 2\n\r");
	
	//Create a fake EFI_SIMPLE_TEXT_OUTPUT_PROTOCOL
	memcpy(&myConOut,gST->ConOut,sizeof(EFI_SIMPLE_TEXT_OUTPUT_PROTOCOL));	
    //Test the fake ConOut
	pmyST->ConOut=&myConOut;
	
	//If we use pmyST->ConOut it will be an error
	pmyST->ConOut->OutputString(gST->ConOut,L"Test of myConOut 3\n\r");
	
	//Replace OutputString function with our function
	pmyST->ConOut->OutputString=&myOut;
	pmyST->ConOut->OutputString(gST->ConOut,L"Test of myConOut 4\n\r");
	
	return EFI_SUCCESS;
}


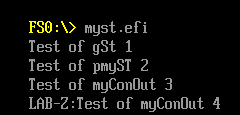
运行结果

image001

特别需要注意的地方,如果我们写成

pmyST->ConOut->OutputString(pmyST ->ConOut,L"Test of myConOut 3\n\r");

那么会碰到下面这个错误

image003

产生问题的代码在  \ShellPkg\Application\Shell\ConsoleLogger.c 中,看起来是向 Handle 安装另外一个 Protocol的时候出现报错信息。

  Status = gBS->InstallProtocolInterface(&gImageHandle, &gEfiSimpleTextOutProtocolGuid, EFI_NATIVE_INTERFACE, (VOID*)&((*ConsoleInfo)->OurConOut));
  if (EFI_ERROR(Status)) {
    SHELL_FREE_NON_NULL((*ConsoleInfo)->Buffer);
    SHELL_FREE_NON_NULL((*ConsoleInfo)->Attributes);
    SHELL_FREE_NON_NULL((*ConsoleInfo));
    *ConsoleInfo = NULL;
    return (Status);
  }

  gST->ConsoleOutHandle = gImageHandle;
  gST->ConOut           = &(*ConsoleInfo)->OurConOut;

  return (Status);


完整的代码下载:
MySt