前面实现了HP 鼠标数据的读取,下面继续研究 DELL 的鼠标。还是首先运行取得描述符的程序,结果如下:
Start
Device addressed… Requesting device descriptor.
Device descriptor:
Descriptor Length: 12
USB version: 1.10
Class: 00 Use class information in the Interface Descriptor
Subclass: 00
Protocol: 00
Max.packet size: 08
Vendor ID: 2188
Product ID: 0AE1
Revision ID: 0100
Mfg.string index: 00
Prod.string index: 01 Length: 38 Contents: USB OPTICAL MOUSE
Serial number index: 00
Number of conf.: 01
Configuration number 0
Total configuration length: 34 bytes
Configuration descriptor:
Total length: 0022
Number of interfaces: 01
Configuration value: 01
Configuration string: 00
Attributes: A0 Remote Wakeup
Max.power: 32 100ma
Interface descriptor:
Interface number: 00
Alternate setting: 00
Endpoints: 01
Class: 03 HID (Human Interface Device)
Subclass: 01
Protocol: 02
Interface string: 00
HID descriptor:
Descriptor length: 09 9 bytes
HID version: 1.11
Country Code: 0 Not Supported
Class Descriptors: 1
Class Descriptor Type: 22 Report
Class Descriptor Length:66 bytes
HID report descriptor:
Length: 1 Type: Global Tag: Usage Page Generic Desktop Controls Data: 01
Length: 1 Type: Local Tag: Usage Data: 02
Length: 1 Type: Main Tag: Collection Application (mouse, keyboard) Data: 01
Length: 1 Type: Global Tag: Report ID Data: 01
Length: 1 Type: Local Tag: Usage Data: 01
Length: 1 Type: Main Tag: Collection Physical (group of axes) Data: 00
Length: 1 Type: Global Tag: Usage Page Button Data: 09
Length: 1 Type: Local Tag: Usage Minimum Data: 01
Length: 1 Type: Local Tag: Usage Maximum Data: 03
Length: 1 Type: Global Tag: Logical Minimum Data: 00
Length: 1 Type: Global Tag: Logical Maximum Data: 01
Length: 1 Type: Global Tag: Report Count Data: 03
Length: 1 Type: Global Tag: Report Size Data: 01
Length: 1 Type: Main Tag: Input Data,Variable,Absolute,No Wrap,Linear,Preferred State,No Null Position,Non-volatile(Ignore for Input), Data: 02
Length: 1 Type: Global Tag: Report Count Data: 01
Length: 1 Type: Global Tag: Report Size Data: 05
Length: 1 Type: Main Tag: Input Constant,Array,Absolute,No Wrap,Linear,Preferred State,No Null Position,Non-volatile(Ignore for Input), Data: 01
Length: 1 Type: Global Tag: Usage Page Generic Desktop Controls Data: 01
Length: 1 Type: Local Tag: Usage Data: 30
Length: 1 Type: Local Tag: Usage Data: 31
Length: 2 Type: Global Tag: Logical Minimum Data: 00 Data: F8
Length: 2 Type: Global Tag: Logical Maximum Data: FF Data: 07
Length: 1 Type: Global Tag: Report Size Data: 0C
Length: 1 Type: Global Tag: Report Count Data: 02
Length: 1 Type: Main Tag: Input Data,Variable,Relative,No Wrap,Linear,Preferred State,No Null Position,Non-volatile(Ignore for Input), Data: 06
Length: 1 Type: Local Tag: Usage Data: 38
Length: 1 Type: Global Tag: Logical Minimum Data: 81
Length: 1 Type: Global Tag: Logical Maximum Data: 7F
Length: 1 Type: Global Tag: Report Size Data: 08
Length: 1 Type: Global Tag: Report Count Data: 01
Length: 1 Type: Main Tag: Input Data,Variable,Relative,No Wrap,Linear,Preferred State,No Null Position,Non-volatile(Ignore for Input), Data: 06
Length: 0 Type: Main Tag: End Collection
Length: 0 Type: Main Tag: End Collection
Endpoint descriptor:
Endpoint address: 01 Direction: IN
Attributes: 03 Transfer type: Interrupt
Max.packet size: 0006
Polling interval: 0A 10 ms
同样,尝试之前的 Get_Report 方式的程序,得到的却是不停的输出的错误信息:
Setup packet error: 7
Mouse Poll Error: 7
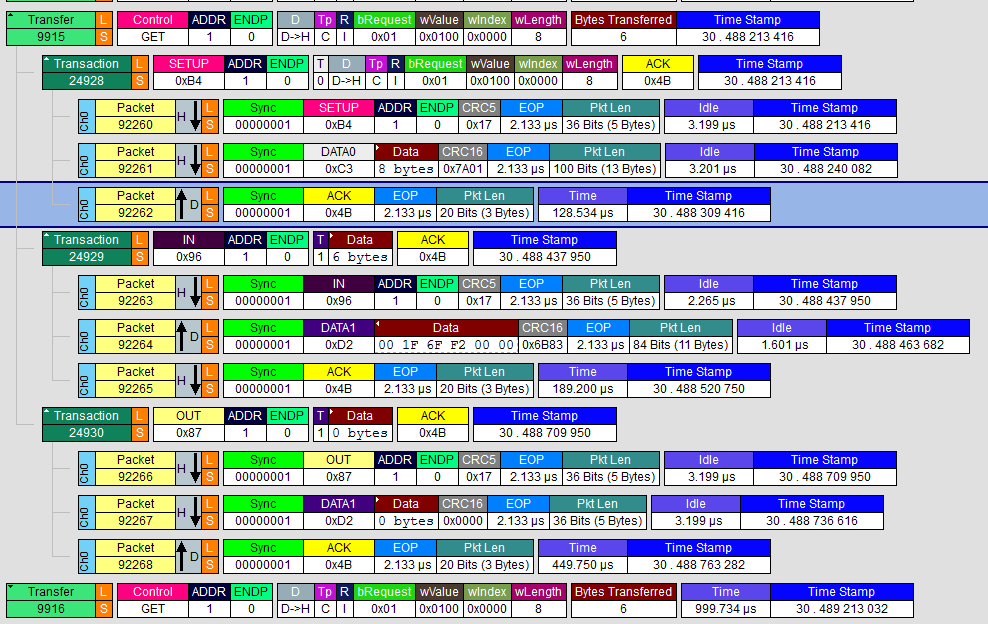
没有办法直接了解这个错误编号的含义,最后只能用逻辑分析仪分析产生问题的原因:
可以看到当发送Get_Report之后,Device 会返回STALL 。
对比之前能够正常工作的 HP 鼠标,收到 Get_Report 后,会返回 ACK 还会继续通讯。
查看资料上说,返回STALL有可能是因为设备不支持该指令…… Windows的设备经常会出现这样的情况:可以正常工作,但是未必完整的 follow 工业标准。
上面的方法行不通,只能用中断方式来获取数据。我去掉了切换 Boot Protocol 的代码
/* Mouse communication via interrupt endpoint  */
/* Assumes EP1 as interrupt IN ep              */
#include "max3421e.h"
#include "usb.h"

#define DEVADDR 1
#define CONFVALUE 1
#define EP_MAXPKTSIZE 5
EP_RECORD ep_record[ 2 ];  //endpoint record structure for the mouse


void setup();
void loop();

MAX3421E Max;
USB Usb;

void setup()
{
    Serial.begin( 115200 );
    Serial.println("Start");
    Max.powerOn();
    delay( 200 );
}

void loop()
{
 byte rcode;
    Max.Task();
    Usb.Task();
    if( Usb.getUsbTaskState() == USB_STATE_CONFIGURING ) {
        mouse1_init();
    }//if( Usb.getUsbTaskState() == USB_STATE_CONFIGURING...
    if( Usb.getUsbTaskState() == USB_STATE_RUNNING ) {  //poll the keyboard
        rcode = mouse1_poll();
        if( rcode ) {
          Serial.print("Mouse Poll Error: ");
          Serial.println( rcode, HEX );
        }//if( rcode...
    }//if( Usb.getUsbTaskState() == USB_STATE_RUNNING...
}
/* Initialize mouse */
void mouse1_init( void )
{
 byte rcode = 0;  //return code
 byte tmpdata;
 byte* byte_ptr = &tmpdata;
  /**/
  ep_record[ 0 ] = *( Usb.getDevTableEntry( 0,0 ));  //copy endpoint 0 parameters
  ep_record[ 1 ].MaxPktSize = EP_MAXPKTSIZE;
  ep_record[ 1 ].sndToggle = bmSNDTOG0;
  ep_record[ 1 ].rcvToggle = bmRCVTOG0;
  Usb.setDevTableEntry( 1, ep_record );              //plug kbd.endpoint parameters to devtable
  /* Configure device */
  rcode = Usb.setConf( DEVADDR, 0, CONFVALUE );
  if( rcode ) {
    Serial.print("Error configuring mouse. Return code : ");
    Serial.println( rcode, HEX );
    while(1);  //stop
  }//if( rcode...

  rcode = Usb.setIdle( DEVADDR, 0, 0, 0, tmpdata );
  if( rcode ) {
    Serial.print("Set Idle error. Return code : ");
    Serial.println( rcode, HEX );
    while(1);  //stop
  }

  rcode = Usb.getIdle( DEVADDR, 0, 0, 0, (char *)byte_ptr );
  if( rcode ) {
    Serial.print("Get Idle error. Return code : ");
    Serial.println( rcode, HEX );
    while(1);  //stop
  }
  Serial.print("Idle Rate: ");
  Serial.print(( tmpdata * 4 ), DEC );        //rate is returned in multiples of 4ms
  Serial.println(" ms");
  tmpdata = 0;
  rcode = Usb.setIdle( DEVADDR, 0, 0, 0, tmpdata );
  if( rcode ) {
    Serial.print("Set Idle error. Return code : ");
    Serial.println( rcode, HEX );
    while(1);  //stop
  }
  Usb.setUsbTaskState( USB_STATE_RUNNING );
  return;
}
/* Poll mouse via interrupt endpoint and print result */
/* assumes EP1 as interrupt endpoint                  */
byte mouse1_poll( void )
{
  byte rcode,i;
  char buf[ 6 ] = { 0 };                          //mouse report buffer

  unsigned long int libuf[ sizeof(buf) ];
  unsigned long int x;
  unsigned long int y;


  /* poll mouse */
  rcode = Usb.inTransfer( DEVADDR, 1, sizeof(buf), buf, 1 );  //

    if( rcode ) {  //error
      if( rcode == 0x04 ) {  //NAK
        rcode = 0;
      }
      return( rcode );
    }
    /* print buffer */
    if( buf[ 1 ] & 0x01 ) {
      Serial.println("Button1 pressed ");
    }
    if( buf[ 1 ] & 0x02 ) {
      Serial.println("Button2 pressed ");
    }
    if( buf[ 1 ] & 0x04 ) {
      Serial.println("Button3 pressed ");
    }

    for (int i=0;i<sizeof(buf);i++) {
       libuf[i]=(buf[i]) & 0xff;
    }

    /*
    Serial.print(libuf[0],HEX); Serial.print("  ");
    Serial.print(libuf[1],HEX); Serial.print("  ");
    Serial.print(libuf[2],HEX); Serial.print("  ");
    Serial.print(libuf[3],HEX); Serial.print("  ");
    Serial.print(libuf[4],HEX); Serial.print("  ");
    Serial.print(libuf[5],HEX); Serial.print("  ");
    Serial.println("");
    */

    Serial.print("X-axis: ");
    x=((libuf[3] & 0xF)<<8)+(libuf[2] & 0xFF );
    if (x & 0x800) {
      Serial.print("-");
      x = ((~x) & 0x7FF) +1;
    }

    Serial.print(x, HEX);  Serial.print("   ");

    Serial.print("Y-axis: ");
    y=(((libuf[3]>>4) & 0xF) +((libuf[4] & 0xFF )<<4));
    if (y & 0x800) {
      Serial.print("-");
      y = ((~y) & 0x7FF) +1;
    }
    Serial.print(y, HEX); Serial.print("   ");

    Serial.print("Wheel: ");
    Serial.println(buf [5] & 0xFF, HEX);

    return( rcode );
}
和前面那个程序相比,这个特别之处在于返回值多了 Report_ID ,对于我们处理数据来说,只是有效数据从 Buf[1] 开始,其他地方并无特别。
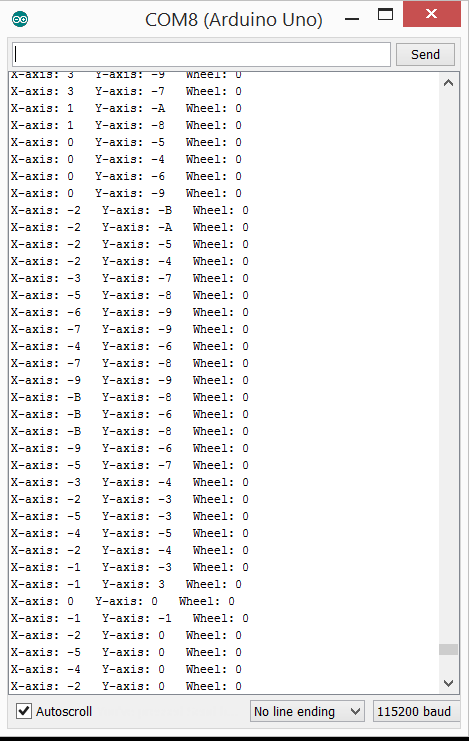
运行结果
完整代码下载
基本上,鼠标的玩法就是这些。可以用鼠标做很多好玩的东西。


