最近研究了一下旋转编码器的使用。入手的是 ALPS EC11系列的:
为了让它工作,自己做了电路板电阻配合【参考1】。电路图和 PCB 设计如下:

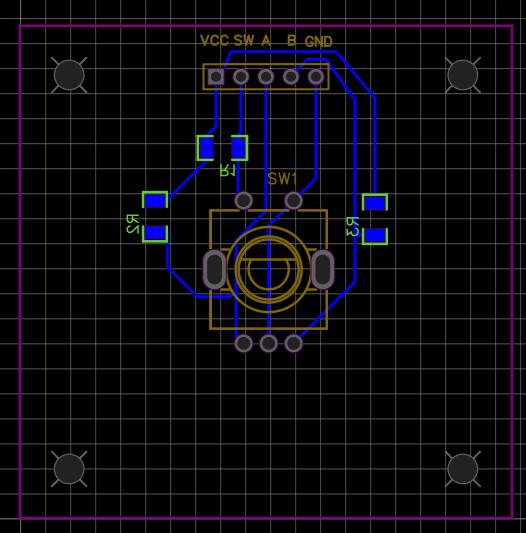
工程可以在这里下载:
软件方面使用了ai-esp32-rotary-encoder 库,下面是一个同时使用2个旋转编码器的例子(特特别注意:不是任何的GPIO 都能选择成为和旋转编码器连接的引脚,某些连接之后会导致无法启动,有可能是因为部分ESP32在启动时会选做接口VSPI,如果你了解原因不妨在评论中指出。谢谢! ):
#include "AiEsp32RotaryEncoder.h"
#include "Arduino.h"

/*
connecting Rotary encoder
CLK (A pin) - to any microcontroler intput pin with interrupt -> in this example pin 32
DT (B pin) - to any microcontroler intput pin with interrupt -> in this example pin 21
SW (button pin) - to any microcontroler intput pin -> in this example pin 25
VCC - to microcontroler VCC (then set ROTARY_ENCODER_VCC_PIN -1) or in this example pin 25
GND - to microcontroler GND
*/

#define ROTARY_ENCODER1_A_PIN 4
#define ROTARY_ENCODER1_B_PIN 16
#define ROTARY_ENCODER1_BUTTON_PIN 2

AiEsp32RotaryEncoder rotaryEncoder1 = AiEsp32RotaryEncoder(ROTARY_ENCODER1_A_PIN, ROTARY_ENCODER1_B_PIN, ROTARY_ENCODER1_BUTTON_PIN, -1);

void rotary1_onButtonClick() {
  Serial.println("Button1 Pressed!");
}

void rotary1_loop() {
	//first lets handle rotary encoder button click
	if (rotaryEncoder1.currentButtonState() == BUT_RELEASED) {
		//we can process it here or call separate function like:
	 	rotary1_onButtonClick();
	}

	//lets see if anything changed
	int16_t encoderDelta = rotaryEncoder1.encoderChanged();

	//for some cases we only want to know if value is increased or decreased (typically for menu items)
	if (encoderDelta>0) Serial.print("+");
	if (encoderDelta<0) Serial.print("-");

	//for other cases we want to know what is current value. Additionally often we only want if something changed
	//example: when using rotary encoder to set termostat temperature, or sound volume etc

	//if value is changed compared to our last read
	if (encoderDelta!=0) {
		//now we need current value
		int16_t encoderValue = rotaryEncoder1.readEncoder();
		//process new value. Here is simple output.
		Serial.print("Rot 1 value: ");
		Serial.println(encoderValue);
	}

}

#define ROTARY_ENCODER2_A_PIN 26
#define ROTARY_ENCODER2_B_PIN 27
#define ROTARY_ENCODER2_BUTTON_PIN 14

AiEsp32RotaryEncoder rotaryEncoder2 = AiEsp32RotaryEncoder(ROTARY_ENCODER2_A_PIN, ROTARY_ENCODER2_B_PIN, ROTARY_ENCODER2_BUTTON_PIN, -1);

void rotary2_onButtonClick() {
  Serial.println("Button2 Pressed!");
}

void rotary2_loop() {
  //first lets handle rotary encoder button click
  if (rotaryEncoder2.currentButtonState() == BUT_RELEASED) {
    //we can process it here or call separate function like:
    rotary2_onButtonClick();
  }

  //lets see if anything changed
  int16_t encoderDelta = rotaryEncoder2.encoderChanged();

  //for some cases we only want to know if value is increased or decreased (typically for menu items)
  if (encoderDelta>0) Serial.print("+");
  if (encoderDelta<0) Serial.print("-");

  //for other cases we want to know what is current value. Additionally often we only want if something changed
  //example: when using rotary encoder to set termostat temperature, or sound volume etc

  //if value is changed compared to our last read
  if (encoderDelta!=0) {
    //now we need current value
    int16_t encoderValue = rotaryEncoder2.readEncoder();
    //process new value. Here is simple output.
    Serial.print("Rot 2 value: ");
    Serial.println(encoderValue);
  }

}

void setup() {

	Serial.begin(115200);
  Serial.println("Starttesting");

	//we must initialize rorary encoder
	rotaryEncoder1.begin();
	rotaryEncoder1.setup([]{rotaryEncoder1.readEncoder_ISR();});
	//optionally we can set boundaries and if values should cycle or not
	rotaryEncoder1.setBoundaries(0, 10, true); //minValue, maxValue, cycle values (when max go to min and vice versa)

  //we must initialize rorary encoder
  rotaryEncoder2.begin();
  rotaryEncoder2.setup([]{rotaryEncoder2.readEncoder_ISR();});
  //optionally we can set boundaries and if values should cycle or not
  rotaryEncoder2.setBoundaries(0, 10, true); //minValue, maxValue, cycle values (when max go to min and vice versa)

}

void loop() {
	//in loop call your custom function which will process rotary encoder values
	rotary1_loop();
  rotary2_loop();

   delay(50);
}
上述测试代码:
库可以在这里下载:
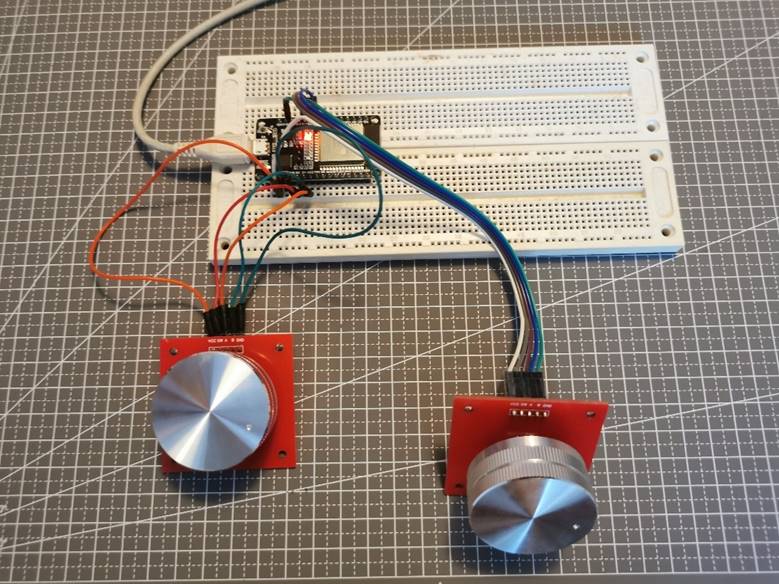
测试的照片:
参考:
1.