UEFI本身不支持多线程,据说主要原因是:UEFI设计本身是为了启动硬件,做一些比较简单的事情,如果支持多线程会使得设计复杂度直线上升,出现问题也不容易调试。
不过UEFI本身是有对应的Protocol 的,称作 EFI_MP_SERVICES_PROTOCOL 。 具体的这个 Protocol 可以在 PI spec 中找到(UEFI Spec中没有)。下面来自【参考1】
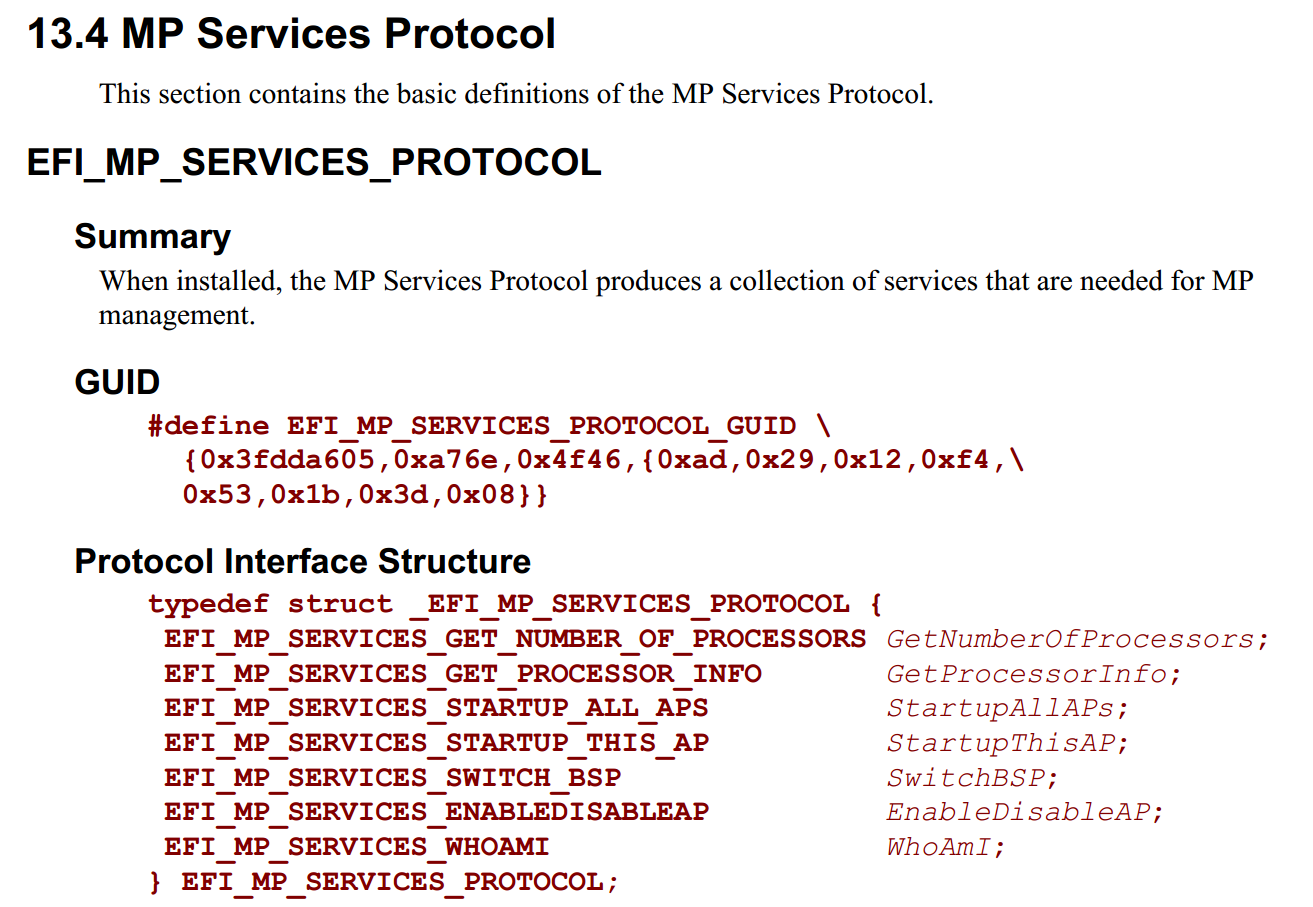
同样可以作为参考的还有EFI_Toolkit_2.0.0.1 中的process.c 程序。
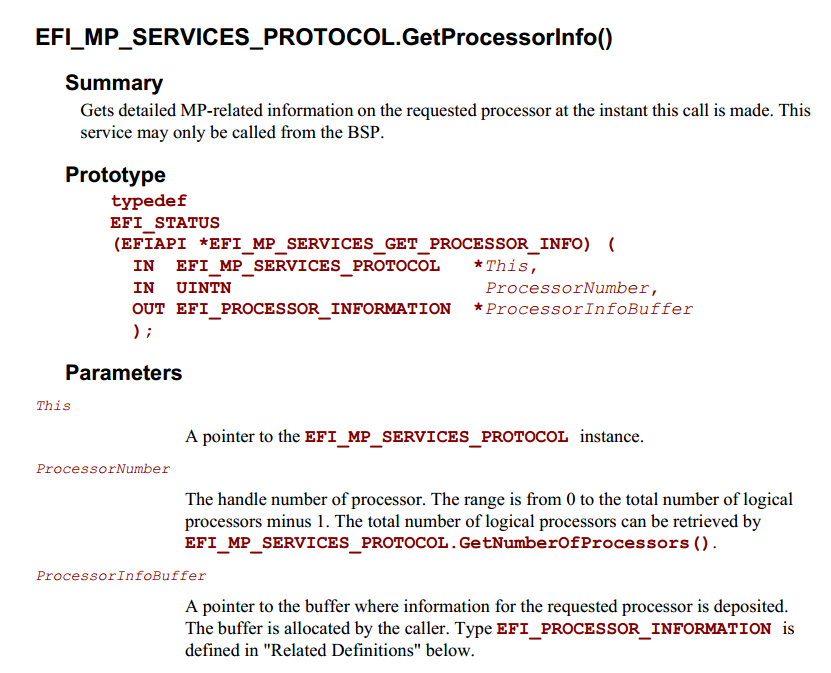
程序很简单,首先 LocateProtocol 到EFI_MP_SERVICES_PROTOCOL。然后,用 Protocol 提供的EFI_MP_SERVICES_GET_NUMBER_OF_PROCESSORS 和EFI_MP_SERVICES_GET_PROCESSOR_INFO 来获得关于处理器的一些信息。需要注意的是EFI_MP_SERVICES_GET_PROCESSOR_INFO,输入的参数ProcessorNumber 意思是:当前要获得的 Processor 号,输入0 表示你要去的编号为 0 的Processor 的信息,输入3 表示你要去的编号为 3 的Processor 的信息,取值范围从0到NumberOfProcessors -1。
最终的代码:
#include  <Uefi.h>
#include  <Library/UefiLib.h>
#include  <Library/ShellCEntryLib.h>
#include  <Pi/PiDxeCis.h>
#include  <Protocol/MpService.h>

EFI_GUID  gEfiMpServiceProtocolGuid = { 0x3fdda605, 0xa76e, 0x4f46,
						{ 0xad, 0x29, 0x12, 0xf4, 0x53, 0x1b, 0x3d, 0x08 }};

extern EFI_BOOT_SERVICES         *gBS;

int
EFIAPI
main (
  IN int Argc,
  IN CHAR16 **Argv
  )
{
	EFI_STATUS	Status;
	EFI_MP_SERVICES_PROTOCOL	*MP=NULL;
	UINTN   i;
	UINTN	NumProcessors;
	UINTN	NumberOfEnabledProcessors;

	EFI_PROCESSOR_INFORMATION	ProcessorInfo;

	//Get MP_Service Protocol
	Status = gBS->LocateProtocol (&gEfiMpServiceProtocolGuid, NULL, (VOID**)&MP);
	if (EFI_ERROR (Status)) {
		Print(L"Unable to initialize MP protocol interface!");
		return EFI_UNSUPPORTED;
	}

	// Determine number of processors
	Status = MP->GetNumberOfProcessors( MP, &NumProcessors , &NumberOfEnabledProcessors );

	if (EFI_ERROR (Status))
	{
		Print( L"MP->GetNumEnabledProcessors:Unable to determine number of processors\n") ;
		return EFI_UNSUPPORTED;
	}
	Print(L"Number of Processors %d\n",NumProcessors);
	Print(L"Number of Enabled Processors %d\n",NumberOfEnabledProcessors);

	//Get more information by GetProcessorInfo
	for (i=0;i<NumProcessors;i++)
	{
		Status = MP->GetProcessorInfo(MP, i , &ProcessorInfo);

		Print( L"Prcoessor #%d ACPI Processor ID = %lX, Flags = %x, Package = %x, Core = %x, Thread = %x \n",
					i,
					ProcessorInfo.ProcessorId,
					ProcessorInfo.StatusFlag,
					ProcessorInfo.Location.Package,
					ProcessorInfo.Location.Core,
					ProcessorInfo.Location.Thread);
	}

	return EFI_SUCCESS;
}
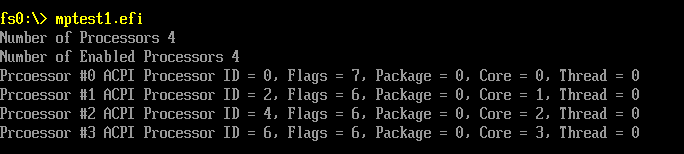
运行结果:
完整的代码下载:
关于这部分程序,在《UEFI 原理与编程》第13章 深入了解多任务 有更详细的论述,如果你有这方面的需求,推荐直接阅读。
另外,如果你想获得更多CPU方面的信息,比如 Cache大小, 还可以通过 CPUID,但是非常不建议通过 SMBIOS 来获得,因为他并不可靠……
最后特别提醒:
开始编写程序时,我遇到了下面的错误,错误代码对于解决问题毫无帮助,最后经过分析发现是因为没有添加PiDxe.h头文件(感谢Marco指出)导致的。
c:\edk\MdePkg\Include\Protocol/MpService.h(361) : error C2146: syntax error : missing ‘)’ before identifier ‘Procedure’
c:\edk\MdePkg\Include\Protocol/MpService.h(361) : error C2081: ‘EFI_AP_PROCEDURE’ : name in formal parameter list illegal
c:\edk\MdePkg\Include\Protocol/MpService.h(361) : error C2061: syntax error : identifier ‘Procedure’
c:\edk\MdePkg\Include\Protocol/MpService.h(361) : error C2059: syntax error : ‘;’
c:\edk\MdePkg\Include\Protocol/MpService.h(361) : error C2059: syntax error : ‘,’
c:\edk\MdePkg\Include\Protocol/MpService.h(367) : error C2059: syntax error : ‘)’
c:\edk\MdePkg\Include\Protocol/MpService.h(459) : error C2146: syntax error : missing ‘)’ before identifier ‘Procedure’
c:\edk\MdePkg\Include\Protocol/MpService.h(459) : error C2081: ‘EFI_AP_PROCEDURE’ : name in formal parameter list illegal
c:\edk\MdePkg\Include\Protocol/MpService.h(459) : error C2061: syntax error : identifier ‘Procedure’
c:\edk\MdePkg\Include\Protocol/MpService.h(459) : error C2059: syntax error : ‘;’
c:\edk\MdePkg\Include\Protocol/MpService.h(459) : error C2059: syntax error : ‘,’
c:\edk\MdePkg\Include\Protocol/MpService.h(465) : error C2059: syntax error : ‘)’
c:\edk\MdePkg\Include\Protocol/MpService.h(623) : error C2061: syntax error : identifier ‘EFI_MP_SERVICES_STARTUP_ALL_APS’
c:\edk\MdePkg\Include\Protocol/MpService.h(624) : error C2061: syntax error : identifier ‘StartupThisAP’
c:\edk\MdePkg\Include\Protocol/MpService.h(624) : error C2059: syntax error : ‘;’
c:\edk\MdePkg\Include\Protocol/MpService.h(628) : error C2059: syntax error : ‘}’
NMAKE : fatal error U1077: ‘”C:\Program Files\Microsoft Visual Studio 9.0\Vc\bin\cl.exe”‘ : return code ‘0x2’
Stop.
参考:
1. Vol2_DXE CIS_1_3.pdf P174