前一段时间参加创客嘉年华,惊奇的发现他们在这个活动上有一个摊位,更惊奇的是他们的摊位主打竟然是玩具。然后和他们聊了两句发现他们这些年转型向玩具市场进军。
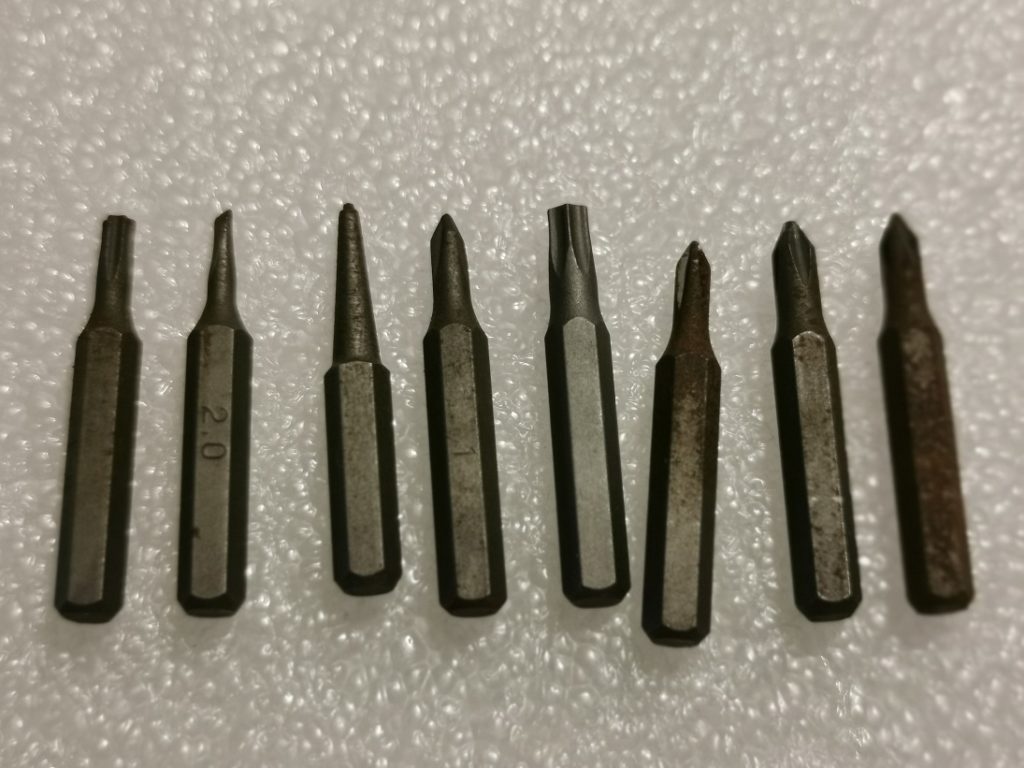
转过天,我修理东西,拿出了他们家生产的螺丝刀,发现竟然生锈了。
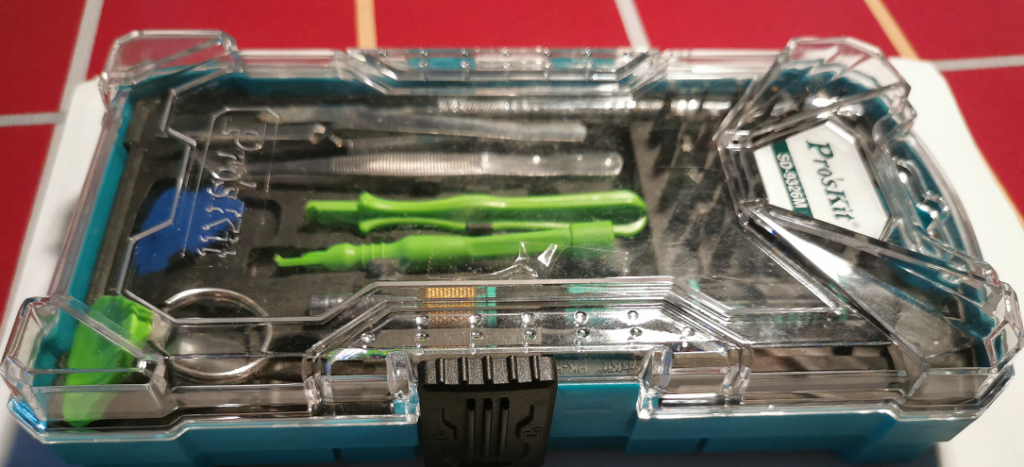
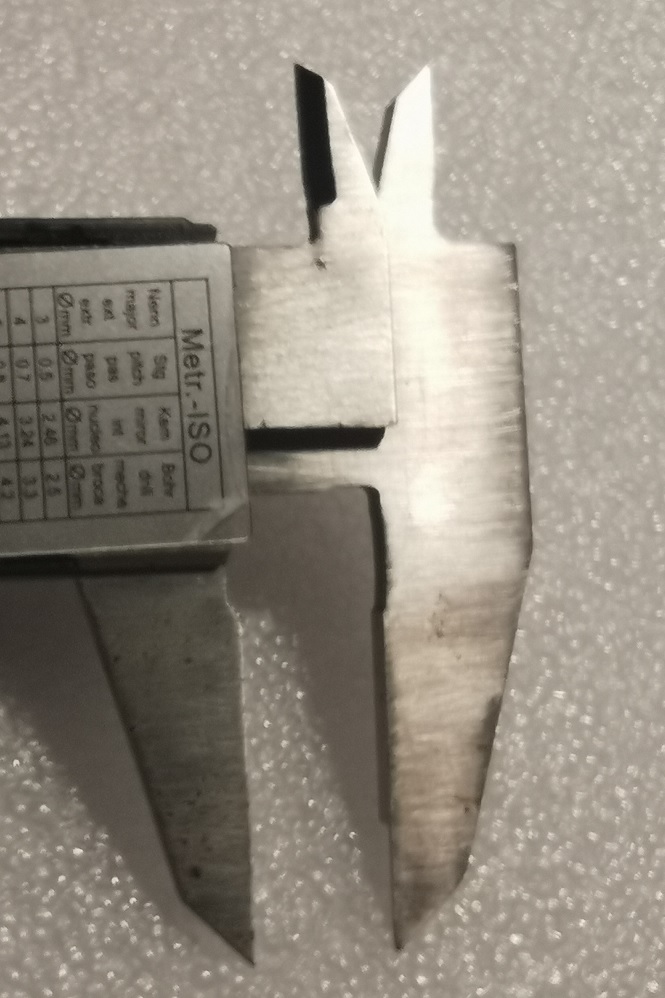
除了这一套螺丝刀,我还有一个游标卡尺也是他们家的

工具一直存放在家里,看起他们他们用的材质是很有问题的。如果非要加一个条件的话那就是:宝工产品不适合南方地区使用(作为东北人,过了山海关都算是南方)。
前一段时间参加创客嘉年华,惊奇的发现他们在这个活动上有一个摊位,更惊奇的是他们的摊位主打竟然是玩具。然后和他们聊了两句发现他们这些年转型向玩具市场进军。
转过天,我修理东西,拿出了他们家生产的螺丝刀,发现竟然生锈了。
除了这一套螺丝刀,我还有一个游标卡尺也是他们家的
工具一直存放在家里,看起他们他们用的材质是很有问题的。如果非要加一个条件的话那就是:宝工产品不适合南方地区使用(作为东北人,过了山海关都算是南方)。
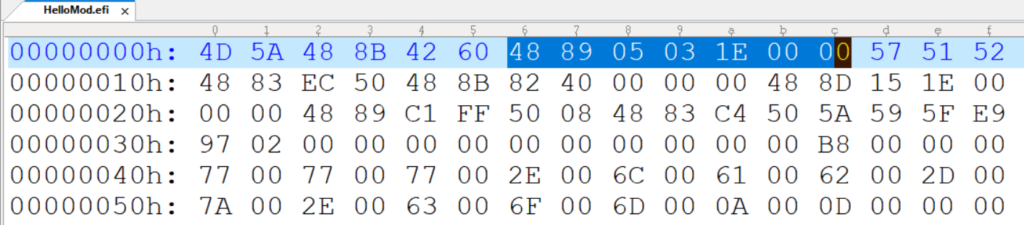
前面介绍了如何使用汇编语言直接编写UEFI Application,这里我偶然发现一个问题:用汇编生成的EFI 文件中,DOS 头部看起来多了一些东西。比如十六进制查看之前的 NasmUEFI.EFI 文件:

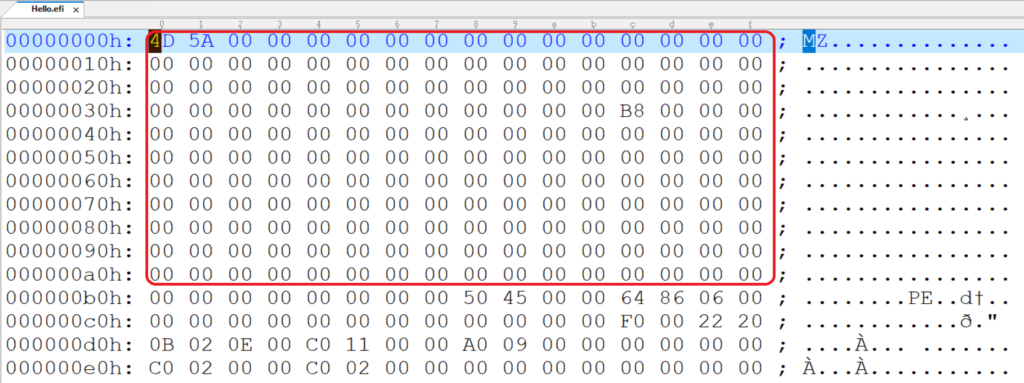
对比 Hello.EFI:
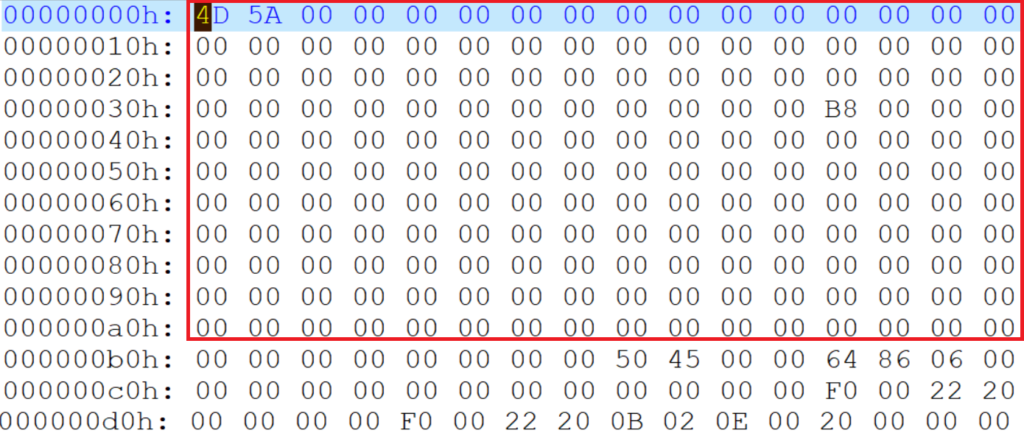
可以看到有些内容被清空为0x00. 首先怀疑的是编译过程中有工具来完成这个动作。于是,重新编译 Hello.EFI 观察到在末期有下面的操作:
Generating code
Finished generating code
        "GenFw" -e UEFI_APPLICATION -o c:\buildbs\201903\Build\AppPkg\DEBUG_VS2015x86\X64\AppPkg\Applications\Hello\Hello\DEBUG\Hello.efi c:\buildbs\201903\Build\AppPkg\DEBUG_VS2015x86\X64\AppPkg\Applications\Hello\Hello\DEBUG\Hello.dll
这个操作输入的是hello.dll 输出为 hello.efi,观察发现DLL 中还存在一些字符串,到了EFI 中会消失。接下来在窗口中直接运行 GenFw 来从 DLL生成EFI文件,最终确认是这个工具来完成移除多余的字符工作的,准确的说只是用0xFF覆盖,并没有引起文件长度的变化。
接下来查看 GenFW 的代码, \BaseTools\Source\C\GenFw\GenFw.c 其中下面就是我们需要找到的位置:
//
  // Zero all unused fields of the DOS header
  //
  if (DosHdr != NULL) {
    memcpy (&BackupDosHdr, DosHdr, sizeof (EFI_IMAGE_DOS_HEADER));
    memset (DosHdr, 0, sizeof (EFI_IMAGE_DOS_HEADER));
    DosHdr->e_magic  = BackupDosHdr.e_magic;
    DosHdr->e_lfanew = BackupDosHdr.e_lfanew;
    for (Index = sizeof (EFI_IMAGE_DOS_HEADER); Index < (UINT32 ) DosHdr->e_lfanew; Index++) {
      FileBuffer[Index] = (UINT8) DosHdr->e_cp;
    }
  }
特别提醒:目前提供的编译辅助工具都是 X86 版本的,因此需要在 x86 Native Tools Command Prompt 窗口下编译,如果使用X64会出现编译报错。
本文只是为了简单试验,并没有考虑一些特殊情况。针对上面的代码进行修改,插入一句话即可:
strcpy(&FileBuffer[sizeof (EFI_IMAGE_DOS_HEADER)],"www.lab-z.com");
这样,再次使用 GenFw 来进行DLL到EFI的转换,可以看到 EFI 文件中DOS Header后面被插入了我们期望的字符串。

通过上述的方法可以在 EFI 文件中自动加入自定义的字符串,通过这样的方法可以制作一些特殊的 EFI 文件,比如只能在特别BIOS上运行的 EFI文件。
使用汇编语言来编写UEFI Application 完全没有问题,理论上编写 DXE Driver 也没有问题。最近抽空研究了一下这个问题。
从网上的资料来说,可以使用 FASM来完成这个工作,在http://x86asm.net/articles/uefi-programming-first-steps/ 可以看到一篇名为 “UEFI Programming – First Steps”的文章。但是经过我的实验使用 FASM 最出来的EFI 在文件头部上(PE Header)就存在很大的问题,比如: Image Size 给出来的不正确,还有 BaseImage 给出的不正确。有可能是我没有使用正确的参数导致的,但是看起来研究会很麻烦,并且最终能否成功严重存疑于是放弃了。
接下来研究如何使用 Nasm 来实现编写一个 UEFI Application。在 https://hackerpulp.com/os/os-development-windows-1-building-uefi-applications-nasm/ 和 https://github.com/BrianOtto/nasm-uefi 找到了一个例子,经过修改可以正常工作。
1.原文是编写一个 BootLoader,所以最后完成显示之后Hang 住即可,这里我们需要正常返回,最终ASM 代码如下:
; Copyright 2018-2019 Brian Otto @ https://hackerpulp.com
;
; Permission to use, copy, modify, and/or distribute this software for any
; purpose with or without fee is hereby granted, provided that the above
; copyright notice and this permission notice appear in all copies.
;
; THE SOFTWARE IS PROVIDED "AS IS" AND THE AUTHOR DISCLAIMS ALL WARRANTIES WITH
; REGARD TO THIS SOFTWARE INCLUDING ALL IMPLIED WARRANTIES OF MERCHANTABILITY
; AND FITNESS. IN NO EVENT SHALL THE AUTHOR BE LIABLE FOR ANY SPECIAL, DIRECT,
; INDIRECT, OR CONSEQUENTIAL DAMAGES OR ANY DAMAGES WHATSOEVER RESULTING FROM
; LOSS OF USE, DATA OR PROFITS, WHETHER IN AN ACTION OF CONTRACT, NEGLIGENCE
; OR OTHER TORTIOUS ACTION, ARISING OUT OF OR IN CONNECTION WITH THE USE OR
; PERFORMANCE OF THIS SOFTWARE.

; generate 64-bit code
bits 64

; contains the code that will run
section .text

; allows the linker to see this symbol
global _start

; see http://www.uefi.org/sites/default/files/resources/UEFI Spec 2_7_A Sept 6.pdf#G8.1001729
struc EFI_TABLE_HEADER
    .Signature    RESQ 1
    .Revision     RESD 1
    .HeaderSize   RESD 1
    .CRC32        RESD 1
    .Reserved     RESD 1
endstruc

; see http://www.uefi.org/sites/default/files/resources/UEFI Spec 2_7_A Sept 6.pdf#G8.1001773
struc EFI_SYSTEM_TABLE
    .Hdr                  RESB EFI_TABLE_HEADER_size
    .FirmwareVendor       RESQ 1
    .FirmwareRevision     RESD 1
    .ConsoleInHandle      RESQ 1
    .ConIn                RESQ 1
    .ConsoleOutHandle     RESQ 1
    .ConOut               RESQ 1
    .StandardErrorHandle  RESQ 1
    .StdErr               RESQ 1
    .RuntimeServices      RESQ 1
    .BootServices         RESQ 1
    .NumberOfTableEntries RESQ 1
    .ConfigurationTable   RESQ 1
endstruc

; see http://www.uefi.org/sites/default/files/resources/UEFI Spec 2_7_A Sept 6.pdf#G16.1016807
struc EFI_SIMPLE_TEXT_OUTPUT_PROTOCOL
    .Reset             RESQ 1
    .OutputString      RESQ 1
    .TestString	       RESQ 1
    .QueryMode	       RESQ 1
    .SetMode	       RESQ 1
    .SetAttribute      RESQ 1
    .ClearScreen       RESQ 1
    .SetCursorPosition RESQ 1
    .EnableCursor      RESQ 1
    .Mode              RESQ 1
endstruc

_start:

    push rax    ;ConOut requires a push here. I don't know why

    ; reserve space for 4 arguments
    sub rsp, 4 * 8

    ; rdx points to the EFI_SYSTEM_TABLE structure
    ; which is the 2nd argument passed to us by the UEFI firmware
    ; adding 64 causes rcx to point to EFI_SYSTEM_TABLE.ConOut
    mov rcx, [rdx + 64]

    ; load the address of our string into rdx
    lea rdx, [rel strHello]

    ; EFI_SYSTEM_TABLE.ConOut points to EFI_SIMPLE_TEXT_OUTPUT_PROTOCOL
    ; call OutputString on the value in rdx
    call [rcx + EFI_SIMPLE_TEXT_OUTPUT_PROTOCOL.OutputString]

    add rsp, 4 * 8
    pop rax
    ret

codesize equ $ - $$

; contains nothing - but it is required by UEFI
section .reloc

; contains the data that will be displayed
section .data
    ; this must be a Unicode string
    strHello db __utf16__ `Hello World !\n\r\0`

datasize equ $ - $$
上面代码很简单,就是根据传入的参数调用 EFI_SYSTEM_TABLE.ConOut 来完成字符串显示。特别的,根据之前的经验要在调用ConOut的时候多向堆栈压入一个8字节内容,否则模拟器会崩溃。
2.使用 Nasm(推荐使用 NASM 2.14 win64 或者更高版本)编译生成 OBJ 文件:
nasm -f win64 nasmuefi.asm
3.使用 Link 来生成 EFI 文件。原文使用的参数不全,导致编译出来的EFI 文件无法运行。经过研究可以使用下面的参数:
link /NODEFAULTLIB /IGNORE:4001 /OPT:REF /OPT:ICF=10 /MAP /ALIGN:32 /SECTION:.xdata,D /SECTION:.pdata,D /Machine:X64 /DLL /ENTRY:_start /SUBSYSTEM:EFI_APPLICATION /SAFESEH:NO /BASE:0 /DRIVER NasmUEFI.obj
(可以加入/DEBUG 生成带有 PDB文件名信息的EFI 文件)
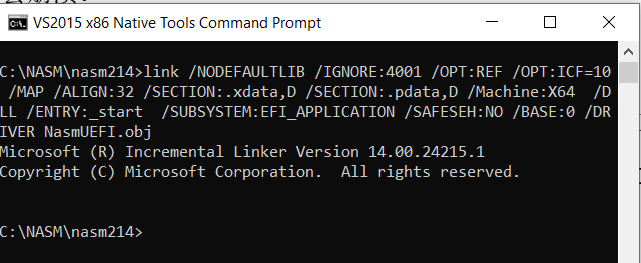
这样我们得到了 NasmUEFI.EFI 文件,大小是 768 bytes.
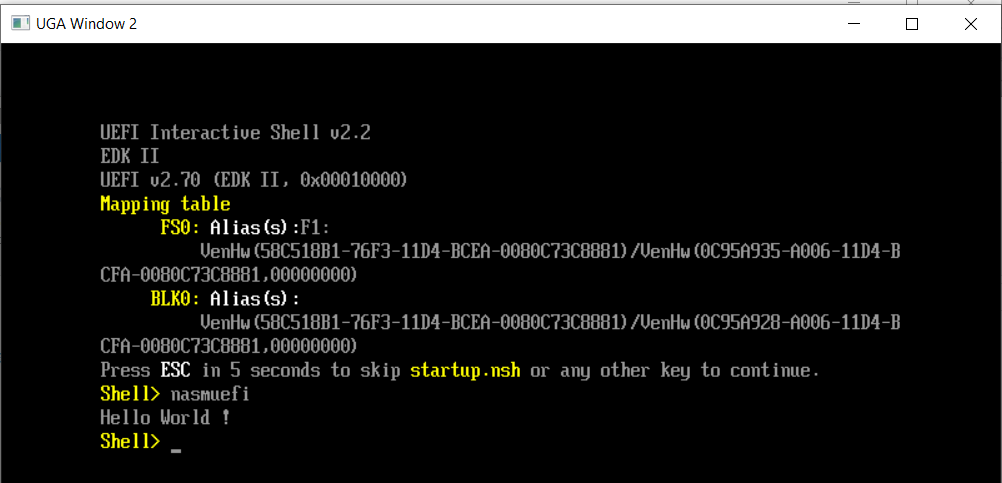
可以在NT32 模拟器上运行,同样的我在实体机上验证过也可以正常运行。
可以看到,汇编语言可以用来编写UEFI Application,相比C语言来说复杂的多。
完整的代码下载:
目标:对于一个已经存在,但是没有 Source Code 的 EFI Application ,通过一种方法来插入代码实现在运行时显示自定义字符串。
前面关于 EFI 文件的研究提到对于一个 EFI Application 来说,运行后会把全部内容加载到内存中。如果我们能在EFI中找到足够大的 “缝隙” ,可以将代码插其中然后通过修改EntryPoint 处加入跳转到缝隙处我们的代码执行之后再跳转会继续执行。
经过观察,我发现“MZ”标志后有一段可以使用的“缝隙”,这次试验就在这里加入代码完成。
首先遇到的问题是:我们需要插入什么样的代码来完成显示。众所周知,UEFI 下需要使用ConOut的OutputString来实现显示。当然无法手工直接编写汇编语句,于是在 \MdePkg\Library\UefiApplicationEntryPoint\ApplicationEntryPoint.c文件中,直接插入要显示的代码:
EFI_STATUS
EFIAPI
_ModuleEntryPoint (
  IN EFI_HANDLE        ImageHandle,
  IN EFI_SYSTEM_TABLE  *SystemTable
  )
{
   SystemTable->ConOut->OutputString(SystemTable->ConOut,L"www.lab-z.com\n\r");

  EFI_STATUS                 Status;


  if (_gUefiDriverRevision != 0) {
    //
    // Make sure that the EFI/UEFI spec revision of the platform is >= EFI/UEFI spec revision of the application.
    //
    if (SystemTable->Hdr.Revision < _gUefiDriverRevision) {
      return EFI_INCOMPATIBLE_VERSION;
    }
  }
…….省略……
我们通过在编译过程中插入 /FAsc /Od 指令的方法强制生成汇编代码。查看上面代码生成的内容如下:
$LN25:
  00000	48 89 5c 24 08	 mov	 QWORD PTR [rsp+8], rbx
  00005	57		 push	 rdi
  00006	48 83 ec 20	 sub	 rsp, 32			; 00000020H
; 46   :
; 47   :     SystemTable->ConOut->OutputString(SystemTable->ConOut,L"www.lab-z.com\n\r");

  0000a	48 8b 42 40	 mov	 rax, QWORD PTR [rdx+64]
  0000e	48 8b da	 mov	 rbx, rdx
  00011	48 8b f9	 mov	 rdi, rcx
  00014	48 8d 15 00 00
	00 00		 lea	 rdx, OFFSET FLAT:??_C@_1CA@KGEHCEOJ@?$AAw?$AAw?$AAw?$AA?4?$AAl?$AAa?$AAb?$AA?9?$AAz?$AA?4?$AAc?$AAo?$AAm?$AA?6?$AA?$AN?$AA?$AA@
  0001b	48 8b c8	 mov	 rcx, rax
  0001e	ff 50 08	 call	 QWORD PTR [rax+8]
; File c:\buildbs\201903\mdepkg\library\uefibootservicestablelib\uefibootservicestablelib.c
最开始处标记的代码编译器生成的,不对应任何C语句。其中的 lea rdx,Offset 部分没有在编译阶段生成,所以为 00。从上面可以看出来,UEFI 调用Application 之后,ImageHandle 作为第一个参数放在RCX中,RDX中存放的第二个参数是指向SystemTable的指针。
接下来,我们修改Application 的 EntryPoint 为跳转,即从 0x2C0跳转到0x002。为了简单起见,使用NASM设计代码如下:
[BITS 64]
org 2C0h
jmp 0x2
Nasm 编译后再反编译,获得机器码如下:
C:\NASM>ndisasm -b 64 inst
00000000  E93DFDFFFF        jmp qword 0xfffffffffffffd42
接下来我们需要恢复现场,去掉前面ApplicationEntryPoint.c 插入的代码后再重新编译检查EFI中需要替换的代码。同样查看生成的ApplicationEntryPoint.cod文件:
_ModuleEntryPoint PROC					; COMDAT
; File c:\buildbs\201903\mdepkg\library\uefibootservicestablelib\uefibootservicestablelib.c

; 62   :   gBS = SystemTable->BootServices;

  00000	48 8b 42 60	 mov	 rax, QWORD PTR [rdx+96]
  00004	48 89 05 00 00
	00 00		 mov	 QWORD PTR gBS, rax
; File c:\buildbs\201903\mdepkg\library\uefiruntimeservicestablelib\uefiruntimeservicestablelib.c

; 46   :   gRT = SystemTable->RuntimeServices;

  0000b	48 8b 42 58	 mov	 rax, QWORD PTR [rdx+88]
  0000f	48 89 05 00 00
	00 00		 mov	 QWORD PTR gRT, rax
; File c:\buildbs\201903\mdepkg\library\uefibootservicestablelib\uefibootservicestablelib.c

; 50   :   gImageHandle = ImageHandle;

  00016	48 89 0d 00 00
	00 00		 mov	 QWORD PTR gImageHandle, rcx

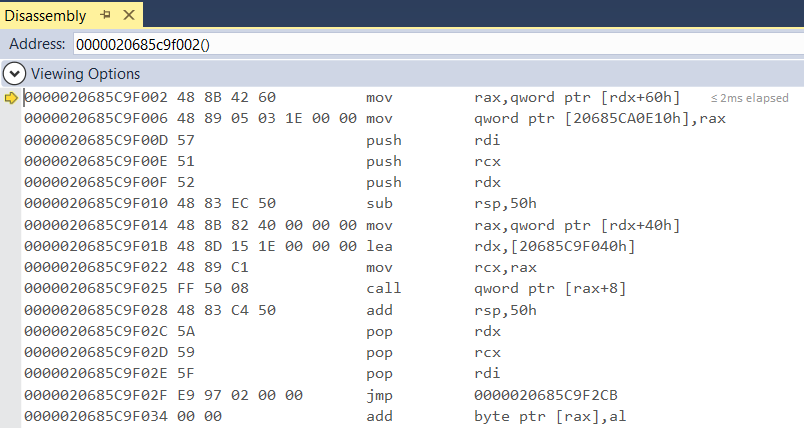
就是说,我们需要将原来在 0x2C0处的值替换成跳转的代码 E9 7D FD FF FF 。原来处于0x2C0处的机器可以从COD文件中看到(特别注意,我们打开 EFI看到0x2C0处的机器是 48 8B 42 60 48 89 05 45 1B 00 00,这是OBJ文件在Link 之后的结果,和CL.EXE 直接生成的有所差别)。
之后,我们需要跳转到它的下一条语句(mov QWORD PTR gBS, rax这个的下一条)在 0x2C0+ 0xB。
有了上面的经验接下来设计位于 0x02 处的代码:
BITS 64
DEFAULT REL
nop
nop     ;还可以使用ORG 2 设定编译的起始偏移,这里使用NOP 是为了便于反编译观察
;EFI文件之前EnteryPoint处的动作我们需要重新做一次
DB 0x48,0x8b,0x42,0x60        ; mov rax, QWORD PTR [rdx+96]
DB 0x48,0x89,0x05,0x03,0x1E,0x00,0x00   ;mov QWORD PTR gBS, rax

push rdi ;为了保证OutputString()正常工作,需要多Push 8Bytes
push rcx
push rdx
sub rsp,80 ;从实践上来看,下面的函数会损坏堆栈
mov rax,[dword rdx+64] ;SystemTable->ConOut
lea rdx,[MyString]
mov rcx,rax
call [rax+8]   ;Call SystemTable->ConOut->OutputString()
add rsp,80
pop  rdx
pop  rcx
pop  rdi

jmp 0x2CB

MyString:
    db "www.lab-z.com",0
直接使用 Nasm inst.asm 即可编译,编译后再使用 ndisasm -b 64 inst反编译查看:
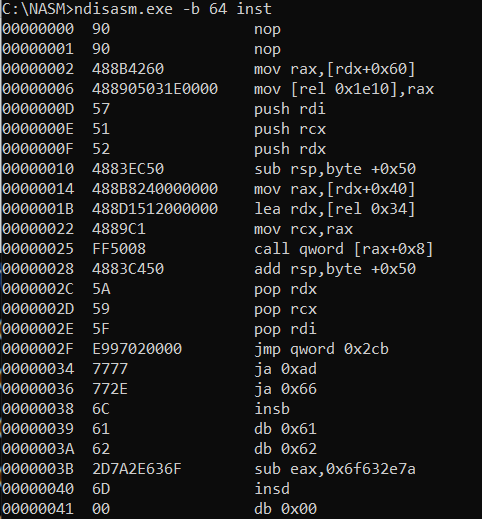
可以看到反编译后,前面的指令都是能够和汇编代码对应上的。接下来就是直接将上面的代码写入从 0x02开始的EFI文件中。
之后可以在 NT32模拟器上运行,同样也可以在实体机上运行:
接下来介绍解决这个问题的时候遇到的各种坑:
1.0x3C 处的0xB8,这是属于Dos Header 上的 E_lfanew ,给出了 PE Header 的起始位置,这里是不可以覆盖的,否则会产生 Load Error。如果你的代码很大,有可能会不小心覆盖掉,这样会导致EFI Image 加载错误。这也是为什么这次试验字符串放置在0x40的原因;
2.代码起始处的 push rdi , 不一定是RDI,任何8Bytes的寄存器都可以,但是如果没有这语句在调用ConOut的时候这个函数内部会发生错误;
3.实践发现在调用 SystemTable->ConOut 的时候会损坏堆栈,比如下面的调用方式(按道理2个参数的情况下是通过寄存器来进行参数传递的):
push rdx
 Call ConOut
pop rdx
执行后会导致 rdx 内容的损坏。因此,这里采用先做PUSH,之后 sub rsp,80 把堆栈指针移开这样的操作来避免堆栈内容的损坏。
4.修改之前的 EFI文件EntryPoint 处的 48 89 05 45 1B 00 00 (mov QWORD PTR gBS, rax),这是一个相对的操作,搬移到其他地址之后需要重新修正。比如,之前这个指令位于 0x2C4:

实际访问到的位置在 0x2C4 + 7 (这个指令的长度) + 0x1B45=0x1E10;当这个指令被移动到0x006 处执行时,需要重新计算其中的偏移: 0x1E10-7-0x006=0x1E03,所以对应机器码如下:
上述使用【参考1】提供的反编译工具。此外,还有 ConOut 中字符串偏移的计算方法与此类似,有兴趣的朋友可以手工试验。
上面的问题都可以使用之前提到的动态调试方法进行查看验证,特别是一些偏移计算上,如果不是很确定可以通过 UltraEdit 进行编辑不断试验和调整。
本文提到的Hello.EFI 原始文件和修改后的文件下载:
参考:
手上有一块 DFRobot 出品的 FireBeelte,它的主控芯片是 ESP32 自带 WIFI 和 蓝牙,因此可以直接模拟成蓝牙键盘。
首先需要安装ESP32 BLE for Arduino这个库,在https://github.com/nkolban/ESP32_BLE_Arduino
然后安装Bluetooth LE Keyboard 这个库,在 https://github.com/T-vK/ESP32-BLE-Keyboard
之后,还需要修改\ESP32-BLE-Keyboard-master\BleKeyboard.cpp 文件,在前面插入 HIDINPUT 和HIDOUTPUT 的定义,否则编译会报错:
#if defined(CONFIG_ARDUHAL_ESP_LOG)
  #include "esp32-hal-log.h"
  #define LOG_TAG ""
#else
  #include "esp_log.h"
  static const char* LOG_TAG = "BLEDevice";
#endif

//LABZ_Debug_Start
#define HIDINPUT(size)             (0x80 | size)
#define HIDOUTPUT(size)            (0x90 | size)
//LABZ_Debug_End

// Report IDs:
#define KEYBOARD_ID 0x01
#define MEDIA_KEYS_ID 0x02
之后打开ESP32-BLE-Keyboard-master\examples\SendKeyStrokes 中的示例文件编译上传即可。
前面提到了使用 Image Size 作为CPU Debug Break的触发条件,相比使用Image 的Size作为触发条件,使用 Image Name 作为触发条件要方便很多,每次只需要重新编译Application 然后运行之即可,因此这里研究如何实现。
首先要解决的是哪里取得Image Name。通过观察可以得知当我们运行 NT32 模拟器时,每次调用 EFI Application时候会在 Debug 窗口显示加载的Image 名称:
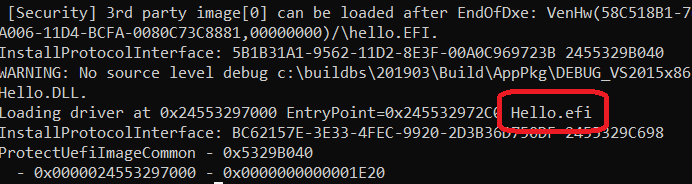
这个显示的功能位于 \MdeModulePkg\Core\Dxe\Image\Image.c如下函数中:
EFI_STATUS
CoreLoadPeImage (
  IN BOOLEAN                     BootPolicy,
  IN VOID                        *Pe32Handle,
  IN LOADED_IMAGE_PRIVATE_DATA   *Image,
  IN EFI_PHYSICAL_ADDRESS        DstBuffer    OPTIONAL,
  OUT EFI_PHYSICAL_ADDRESS       *EntryPoint  OPTIONAL,
  IN  UINT32                     Attribute
  )
具体代码如下:
    DEBUG ((DEBUG_INFO | DEBUG_LOAD,
           "Loading driver at 0x%11p EntryPoint=0x%11p ",
           (VOID *)(UINTN) Image->ImageContext.ImageAddress,
           FUNCTION_ENTRY_POINT (Image->ImageContext.EntryPoint)));

    //
    // Print Module Name by Pdb file path.
    // Windows and Unix style file path are all trimmed correctly.
    //
    if (Image->ImageContext.PdbPointer != NULL) {
      StartIndex = 0;
      for (Index = 0; Image->ImageContext.PdbPointer[Index] != 0; Index++) {
        if ((Image->ImageContext.PdbPointer[Index] == '\\') || (Image->ImageContext.PdbPointer[Index] == '/')) {
          StartIndex = Index + 1;
        }
      }
      //
      // Copy the PDB file name to our temporary string, and replace .pdb with .efi
      // The PDB file name is limited in the range of 0~255.
      // If the length is bigger than 255, trim the redudant characters to avoid overflow in array boundary.
      //
      for (Index = 0; Index < sizeof (EfiFileName) - 4; Index++) {
        EfiFileName[Index] = Image->ImageContext.PdbPointer[Index + StartIndex];
        if (EfiFileName[Index] == 0) {
          EfiFileName[Index] = '.';
        }
        if (EfiFileName[Index] == '.') {
          EfiFileName[Index + 1] = 'e';
          EfiFileName[Index + 2] = 'f';
          EfiFileName[Index + 3] = 'i';
          EfiFileName[Index + 4] = 0;
          break;
        }
      }

      if (Index == sizeof (EfiFileName) - 4) {
        EfiFileName[Index] = 0;
      }
      DEBUG ((DEBUG_INFO | DEBUG_LOAD, "%a", EfiFileName)); // &Image->ImageContext.PdbPointer[StartIndex]));
    }
    DEBUG ((DEBUG_INFO | DEBUG_LOAD, "\n"));

  DEBUG_CODE_END ();
简单的说,有些 Application包含了 PDB 信息的EFI 文件可以从Image中获得文件名称。
第一个关键位置在于 Image->ImageContext.PdbPointer,其中的ImageContext 定义如下:
   /// PeCoffLoader ImageContext
  PE_COFF_LOADER_IMAGE_CONTEXT  ImageContext;
  PE_COFF_LOADER_IMAGE_CONTEXT  结构体定义在 \MdePkg\Include\Library\PeCoffLib.h 文件中:
///
/// The context structure used while PE/COFF image is being loaded and relocated.
///
typedef struct {
…..省略…..
  ///
  /// Set by PeCoffLoaderLoadImage() to point to the PDB entry contained in the CodeView area.
  /// The PdbPointer points to the filename of the PDB file used for source-level debug of
  /// the image by a debugger.
  ///
  CHAR8                             *PdbPointer;
…..省略…..
} PE_COFF_LOADER_IMAGE_CONTEXT;
在\MdePkg\Library\BasePeCoffGetEntryPointLib\PeCoffGetEntryPoint.c 有定义如下函数用来取得这个指针:
/**
  Returns a pointer to the PDB file name for a PE/COFF image that has been
  loaded into system memory with the PE/COFF Loader Library functions.

  Returns the PDB file name for the PE/COFF image specified by Pe32Data.  If
  the PE/COFF image specified by Pe32Data is not a valid, then NULL is
  returned.  If the PE/COFF image specified by Pe32Data does not contain a
  debug directory entry, then NULL is returned.  If the debug directory entry
  in the PE/COFF image specified by Pe32Data does not contain a PDB file name,
  then NULL is returned.
  If Pe32Data is NULL, then ASSERT().

  @param  Pe32Data   The pointer to the PE/COFF image that is loaded in system
                     memory.

  @return The PDB file name for the PE/COFF image specified by Pe32Data or NULL
          if it cannot be retrieved.

**/
VOID *
EFIAPI
PeCoffLoaderGetPdbPointer (
  IN VOID  *Pe32Data
  )

    if (Magic == EFI_IMAGE_NT_OPTIONAL_HDR32_MAGIC) {
      //
      // Use PE32 offset get Debug Directory Entry
      //
      NumberOfRvaAndSizes = Hdr.Pe32->OptionalHeader.NumberOfRvaAndSizes;
      DirectoryEntry = (EFI_IMAGE_DATA_DIRECTORY *)&(Hdr.Pe32->OptionalHeader.DataDirectory[EFI_IMAGE_DIRECTORY_ENTRY_DEBUG]);
      DebugEntry     = (EFI_IMAGE_DEBUG_DIRECTORY_ENTRY *) ((UINTN) Pe32Data + DirectoryEntry->VirtualAddress);
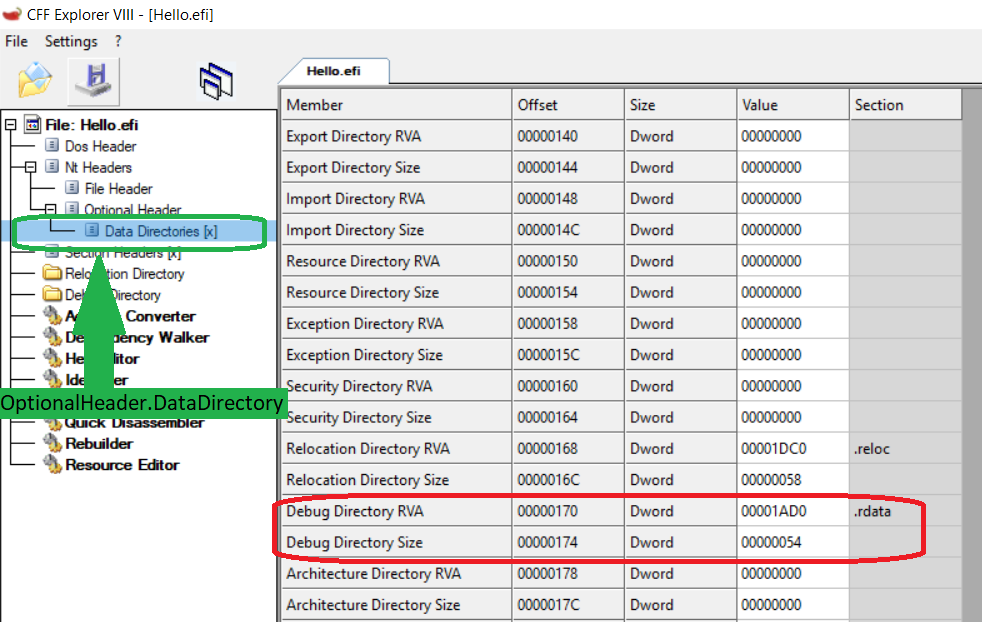
使用 SFF 分析,上面的位置是下面绿色框中 Data Directories[x] 中的EFI_IMAGE_DIRECTORY_ENTRY_DEBUG (该值为6),即右侧红色框中的值。可以看到在文件中的0x1AD0位置,大小为0x54。
继续使用 SFF 可以直接查看 Debug Directory 的内容:
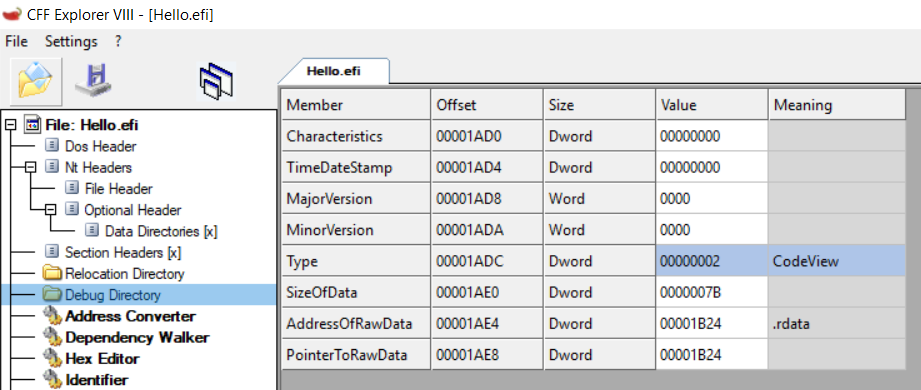
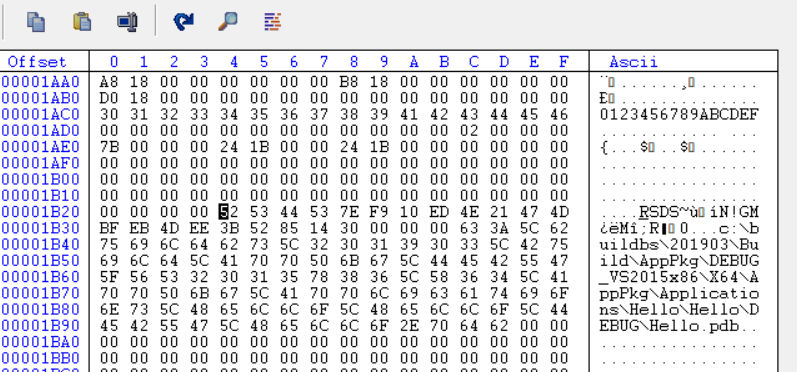
直接查看 0x1B24 位置就可以看到信息:
PeCoffLoaderGetPdbPointer函数对应的代码上有一个扫描的动作,最终确定 PDB File Name:
  //
  // Scan the directory to find the debug entry.
  //
  for (DirCount = 0; DirCount < DirectoryEntry->Size; DirCount += sizeof (EFI_IMAGE_DEBUG_DIRECTORY_ENTRY), DebugEntry++) {
    if (DebugEntry->Type == EFI_IMAGE_DEBUG_TYPE_CODEVIEW) {
      if (DebugEntry->SizeOfData > 0) {
        CodeViewEntryPointer = (VOID *) ((UINTN) DebugEntry->RVA + ((UINTN)Pe32Data) + (UINTN)TEImageAdjust);
        switch (* (UINT32 *) CodeViewEntryPointer) {
        case CODEVIEW_SIGNATURE_NB10:
          return (VOID *) ((CHAR8 *)CodeViewEntryPointer + sizeof (EFI_IMAGE_DEBUG_CODEVIEW_NB10_ENTRY));
        case CODEVIEW_SIGNATURE_RSDS:
          return (VOID *) ((CHAR8 *)CodeViewEntryPointer + sizeof (EFI_IMAGE_DEBUG_CODEVIEW_RSDS_ENTRY));
        case CODEVIEW_SIGNATURE_MTOC:
          return (VOID *) ((CHAR8 *)CodeViewEntryPointer + sizeof (EFI_IMAGE_DEBUG_CODEVIEW_MTOC_ENTRY));
        default:
          break;
        }
      }
    }
  }
根据上面的代码,最终代码如下,就是根据上面的代码取出PDB文件名,然后通过比较确定加载的Image是否触发BreakPoint。
EFI_STATUS
EFIAPI
CoreStartImage (
  IN EFI_HANDLE  ImageHandle,
  OUT UINTN      *ExitDataSize,
  OUT CHAR16     **ExitData  OPTIONAL
  )
……省略……
  SetJumpFlag = SetJump (Image->JumpContext);
  //
  // The initial call to SetJump() must always return 0.
  // Subsequent calls to LongJump() cause a non-zero value to be returned by SetJump().
  //
  if (SetJumpFlag == 0) {
    RegisterMemoryProfileImage (Image, (Image->ImageContext.ImageType == EFI_IMAGE_SUBSYSTEM_EFI_APPLICATION ? EFI_FV_FILETYPE_APPLICATION : EFI_FV_FILETYPE_DRIVER));
    //LABZDEBUG_Start
                UINTN Index;
                UINTN StartIndex;
                CHAR8 EfiFileName[256];
            //
            // Print Module Name by Pdb file path.
            // Windows and Unix style file path are all trimmed correctly.
            //
            if (Image->ImageContext.PdbPointer != NULL) {
              StartIndex = 0;
              for (Index = 0; Image->ImageContext.PdbPointer[Index] != 0; Index++) {
                if ((Image->ImageContext.PdbPointer[Index] == '\\') || (Image->ImageContext.PdbPointer[Index] == '/')) {
                  StartIndex = Index + 1;
                }
              }
              //
              // Copy the PDB file name to our temporary string, and replace .pdb with .efi
              // The PDB file name is limited in the range of 0~255.
              // If the length is bigger than 255, trim the redudant characters to avoid overflow in array boundary.
              //
              for (Index = 0; Index < sizeof (EfiFileName) - 4; Index++) {
                EfiFileName[Index] = Image->ImageContext.PdbPointer[Index + StartIndex];
                if (EfiFileName[Index] == 0) {
                  EfiFileName[Index] = '.';
                }
                if (EfiFileName[Index] == '.') {
                  EfiFileName[Index + 1] = 'e';
                  EfiFileName[Index + 2] = 'f';
                  EfiFileName[Index + 3] = 'i';
                  EfiFileName[Index + 4] = 0;
                  break;
                }
              }

              if (Index == sizeof (EfiFileName) - 4) {
                EfiFileName[Index] = 0;
              }
              DEBUG ((DEBUG_INFO , "%a\n", EfiFileName));
              if (AsciiStrCmp(EfiFileName,"Hello.efi")==0) {
                   CpuBreakpoint();
              }
            }
    //LABZDEBUG_End
    //
    // Call the image's entry point
    //
    Image->Started = TRUE;
Image->Status = Image->EntryPoint (ImageHandle, Image->Info.SystemTable);
……省略……
同样的方法可以用于判定当前的Image是什么文件上,简单的说就是向上,找到“MZ”头文件,然后再去查找 PDB 的信息从中确认文件名称。这样的方法对于使用 WinDBG/DCI 调试Windows 驱动同样有效。
最近在研究 UEFI Application结构相关的内容。除了静态的分析,还需要找到一种观察和调试加载到内存后EFI文件的方法。经过比较和研究, NT32 模拟器是很好的选择。通过它能够方便的进行观察和反编译。
需要解决的第一个问题是:找到跳转到Application Entry Point 处的代码。经过研究入口位于 \MdeModulePkg\Core\Dxe\Image\Image.c 文件中下面这个函数:
EFI_STATUS
EFIAPI
CoreStartImage (
  IN EFI_HANDLE  ImageHandle,
  OUT UINTN      *ExitDataSize,
  OUT CHAR16     **ExitData  OPTIONAL
  )
前面准备妥当后,在下面的语句中跳转到Application Entry来开始执行:
    //
    // Call the image's entry point
    //
    Image->Started = TRUE;
    Image->Status = Image->EntryPoint (ImageHandle, Image->Info.SystemTable);
接下来研究如何实现如何触发,这里采用根据文件大小的方式进行触发。同样的上面这个函数中,申明了下面这个变量:
LOADED_IMAGE_PRIVATE_DATA *Image;
这个结构体定义在 \MdePkg\Include\Protocol\LoadedImage.h
typedef struct {
  UINTN                       Signature;
  /// Image handle
  EFI_HANDLE                  Handle;
  /// Image type
  UINTN                       Type;
  /// If entrypoint has been called
  BOOLEAN                     Started;
  /// The image's entry point
  EFI_IMAGE_ENTRY_POINT       EntryPoint;
  /// loaded image protocol
  EFI_LOADED_IMAGE_PROTOCOL   Info;
  /// Location in memory
  EFI_PHYSICAL_ADDRESS        ImageBasePage;
  /// Number of pages
  UINTN                       NumberOfPages;
  /// Original fixup data
  CHAR8                       *FixupData;
  /// Tpl of started image
  EFI_TPL                     Tpl;
  /// Status returned by started image
  EFI_STATUS                  Status;
  /// Size of ExitData from started image
  UINTN                       ExitDataSize;
  /// Pointer to exit data from started image
  VOID                        *ExitData;
  /// Pointer to pool allocation for context save/restore
  VOID                        *JumpBuffer;
  /// Pointer to buffer for context save/restore
  BASE_LIBRARY_JUMP_BUFFER    *JumpContext;
  /// Machine type from PE image
  UINT16                      Machine;
  /// EBC Protocol pointer
  EFI_EBC_PROTOCOL            *Ebc;
  /// Runtime image list
  EFI_RUNTIME_IMAGE_ENTRY     *RuntimeData;
  /// Pointer to Loaded Image Device Path Protocol
  EFI_DEVICE_PATH_PROTOCOL    *LoadedImageDevicePath;
  /// PeCoffLoader ImageContext
  PE_COFF_LOADER_IMAGE_CONTEXT  ImageContext;
  /// Status returned by LoadImage() service.
  EFI_STATUS                  LoadImageStatus;
} LOADED_IMAGE_PRIVATE_DATA;
其中的 EFI_LOADED_IMAGE_PROTOCOL 包含了当前的 Image Size 信息:
///
/// Revision defined in EFI1.1.
///
#define EFI_LOADED_IMAGE_INFORMATION_REVISION    EFI_LOADED_IMAGE_PROTOCOL_REVISION
///
/// Can be used on any image handle to obtain information about the loaded image.
///
typedef struct {
  UINT32            Revision;       ///< Defines the revision of the EFI_LOADED_IMAGE_PROTOCOL structure.
                                    ///< All future revisions will be backward compatible to the current revision.
  EFI_HANDLE        ParentHandle;   ///< Parent image's image handle. NULL if the image is loaded directly from
                                    ///< the firmware's boot manager.
  EFI_SYSTEM_TABLE  *SystemTable;   ///< the image's EFI system table pointer.

  //
  // Source location of image
  //
  EFI_HANDLE        DeviceHandle;   ///< The device handle that the EFI Image was loaded from.
  EFI_DEVICE_PATH_PROTOCOL  *FilePath;  ///< A pointer to the file path portion specific to DeviceHandle
                                        ///< that the EFI Image was loaded from.
  VOID              *Reserved;      ///< Reserved. DO NOT USE.

  //
  // Images load options
  //
  UINT32            LoadOptionsSize;///< The size in bytes of LoadOptions.
  VOID              *LoadOptions;   ///< A pointer to the image's binary load options.

  //
  // Location of where image was loaded
  //
  VOID              *ImageBase;     ///< The base address at which the image was loaded.
  UINT64            ImageSize;      ///< The size in bytes of the loaded image.
  EFI_MEMORY_TYPE   ImageCodeType;  ///< The memory type that the code sections were loaded as.
  EFI_MEMORY_TYPE   ImageDataType;  ///< The memory type that the data sections were loaded as.
  EFI_IMAGE_UNLOAD  Unload;
} EFI_LOADED_IMAGE_PROTOCOL;
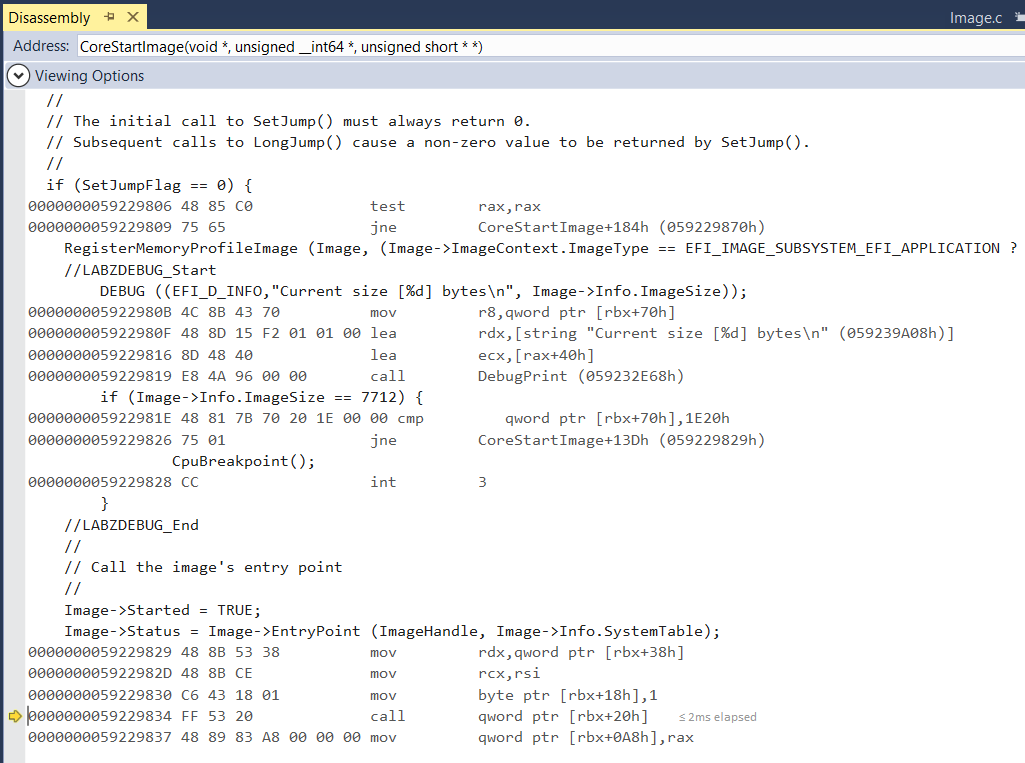
我们使用代码中的 Hello.EFI 作为例子,它的大小是7712bytes。最终,代码如下:
  SetJumpFlag = SetJump (Image->JumpContext);
  //
  // The initial call to SetJump() must always return 0.
  // Subsequent calls to LongJump() cause a non-zero value to be returned by SetJump().
  //
  if (SetJumpFlag == 0) {
    RegisterMemoryProfileImage (Image, (Image->ImageContext.ImageType == EFI_IMAGE_SUBSYSTEM_EFI_APPLICATION ? EFI_FV_FILETYPE_APPLICATION : EFI_FV_FILETYPE_DRIVER));
    //LABZDEBUG_Start
        DEBUG ((EFI_D_INFO,"Current size [%d] bytes\n", Image->Info.ImageSize));
        if (Image->Info.ImageSize == 7712) {
                CpuBreakpoint();
        }
    //LABZDEBUG_End
    //
    // Call the image's entry point
    //
    Image->Started = TRUE;
Image->Status = Image->EntryPoint (ImageHandle, Image->Info.SystemTable);
就是说当发现加载的Image 大小是 7712 bytes 的时候自动触发一个 Breakpoint 打开 VS 进行调试:
接下来我们可以跳入Image 的领空进行查看和调试了。但是显而易见,这样的方法并不完美,如果Image 大小有变化,我们就需要重新编译运行 NT32 模拟器。后面会介绍如何使用文件名称来作为触发的判定条件,有兴趣的朋友可以尝试自己先进性研究。
最近需要进行memory stress 测试,于是到 MemTest86 网站上进行查看:
https://www.memtest86.com/index.html
目前他们提供了几个版本供下载,具体区别如下:
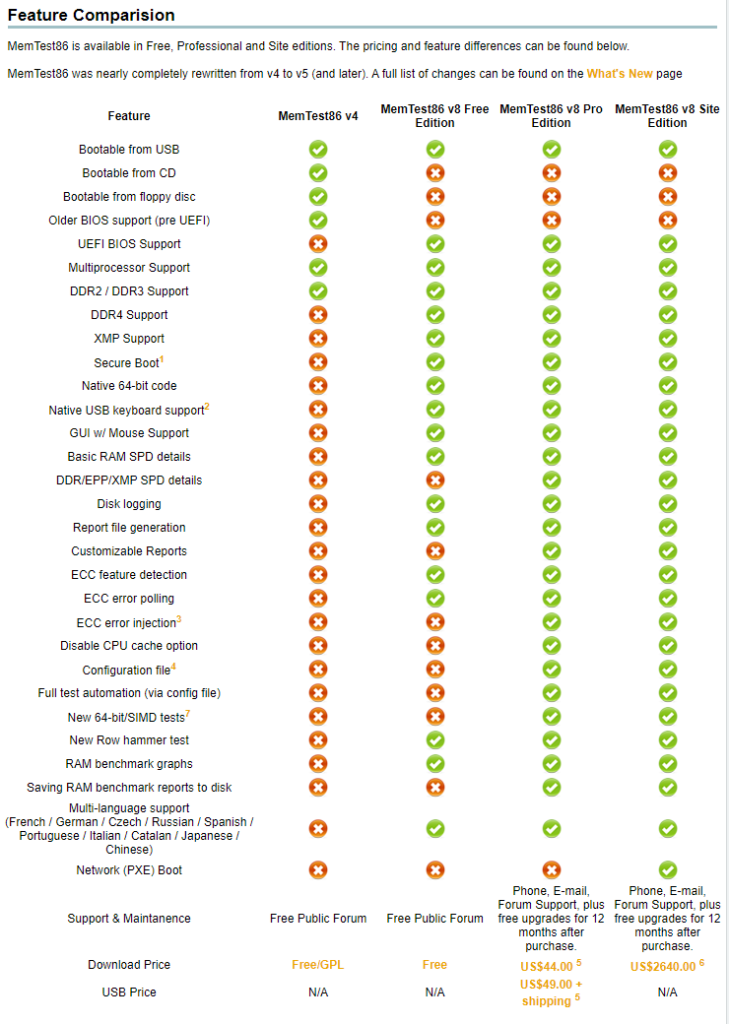
可以看出对于普通测试,免费版已经足够。当然,如果有条件还是建议购买 Pro 版本。
运行测试的方法是:
1.从 https://www.memtest86.com/download.htm 下载免费版
2.解压之后的 Boot 目录内容就是可以在 UEFI Shell 下运行的Application
3.根据需求,从 Shell 启动后进入 Boot 目录选择 32位或者 64位的版本执行即可。
特别注意,这个软件开始运行之后比较慢,请耐心等待。
这里提供一个打包的版本,是 MemTest86 v8.2 Free Edition
继续研究基础的X86 寄存器。这次研究一下 CR0。在【参考1】可以看到 CR0 的简单介绍如下:
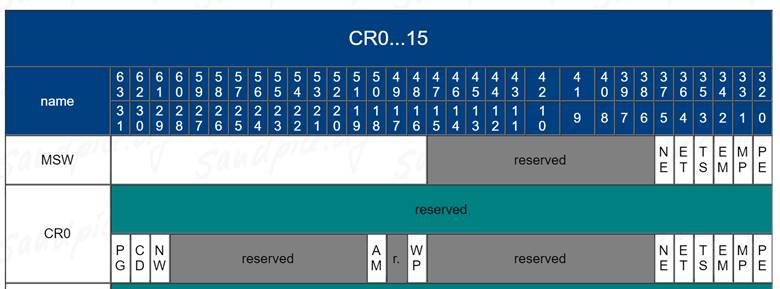
这里我第一次听说 MSW 寄存器,特地去搜索了一下“ Intel在80286 CPU中引入了一个16位的机器状态字寄存器MSW。在80386及其后续的CPU中已经把MSW扩展为4个32位控制寄存器CR0、CR1、CR2和CR3,原来的MSW功能由CR0的低16位来实现。”【参考2】简单的说就是一个历史遗留下来的寄存器,功能已经被 CR0 取代了。
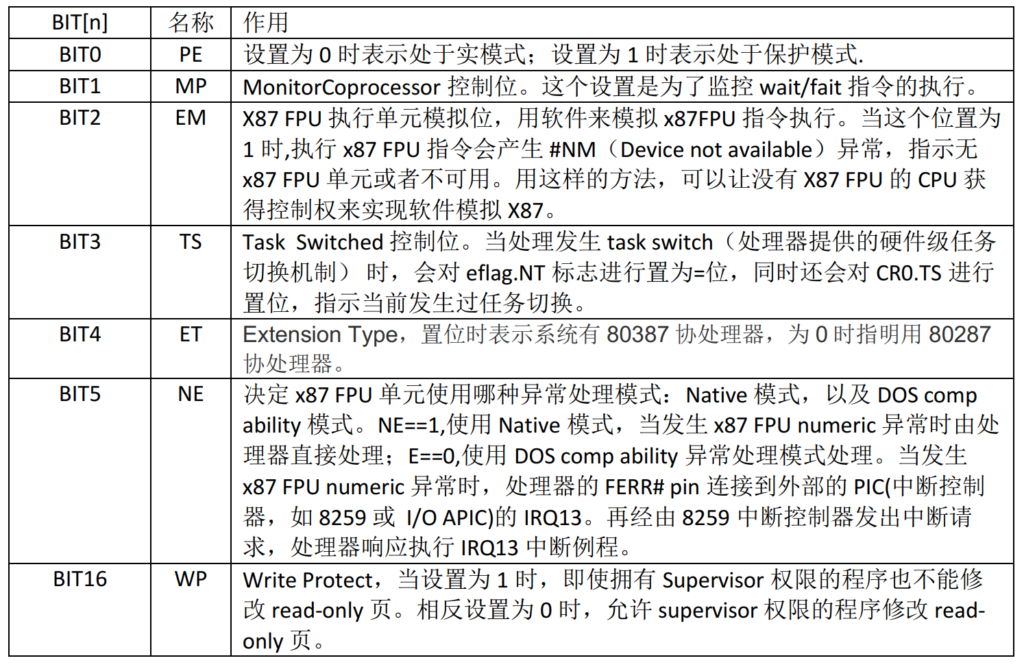
接下来介绍每一个Bit(这部分根据《x86/x64 体系探索及编程》第六章 处理器的控制寄存器,编写),只是大概的介绍,如果想进一步了解推荐购买这本书。
参考:
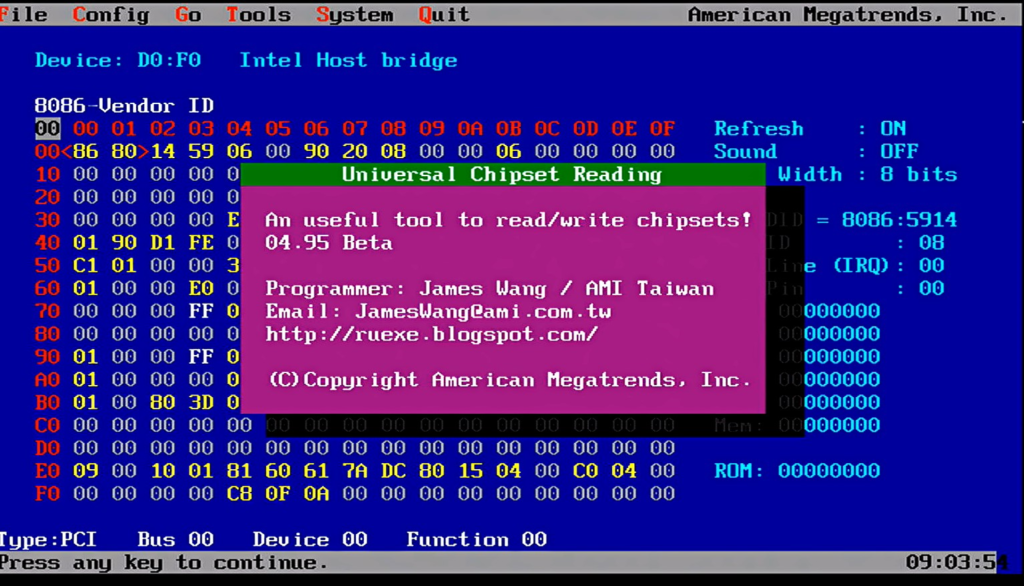
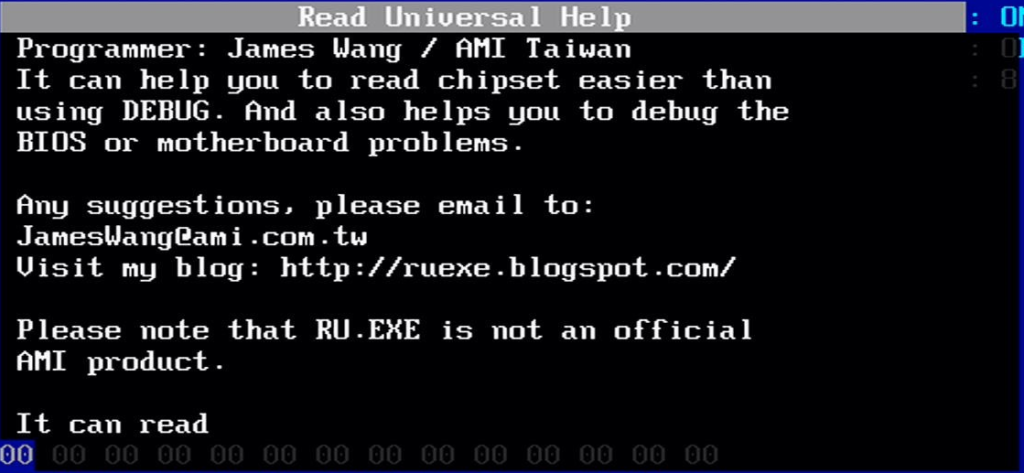
Ru 是AMI 的 James Wang(个人主页http://ruexe.blogspot.tw/)推出的系列工具,其中包括IA32 X64版本的Ru.EFI和一个 Windows 版本的 RU.EXE。最新版本可以在https://github.com/JamesAmiTw/ru-uefi 下载到。
本文简单介绍它的功能和使用。
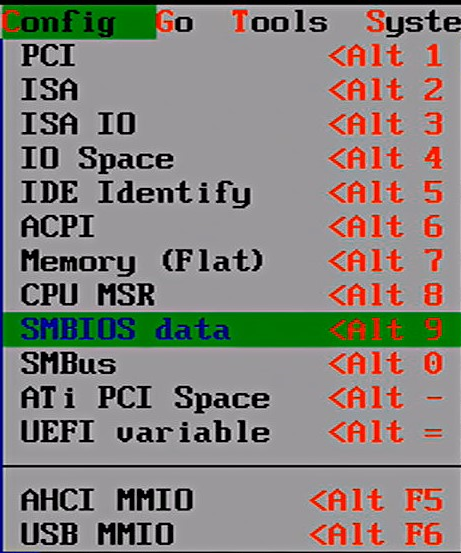
UEFI X64 版本初始界面如下:
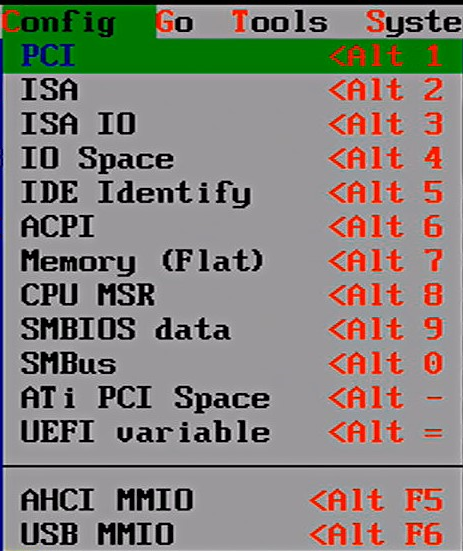
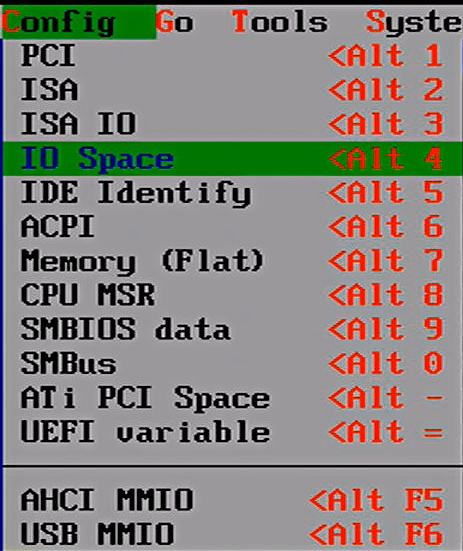
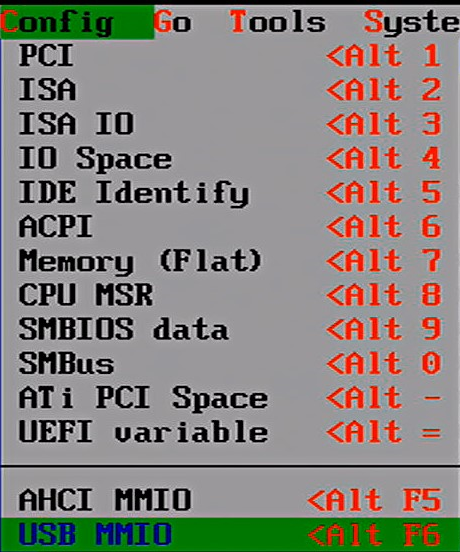
2.Config 菜单用来进行寄存器的访问。
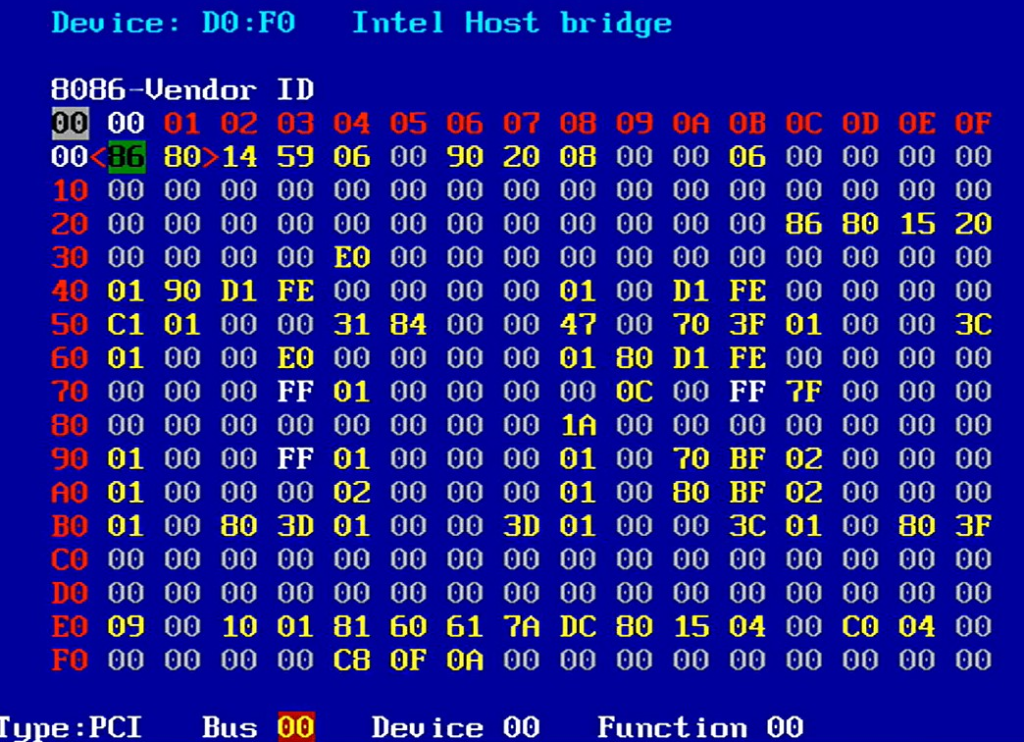
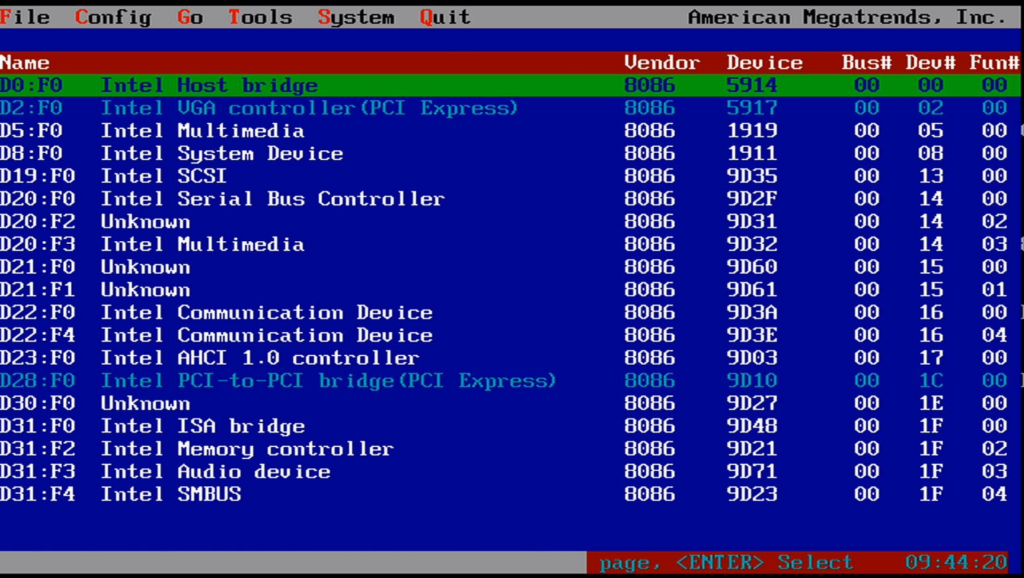
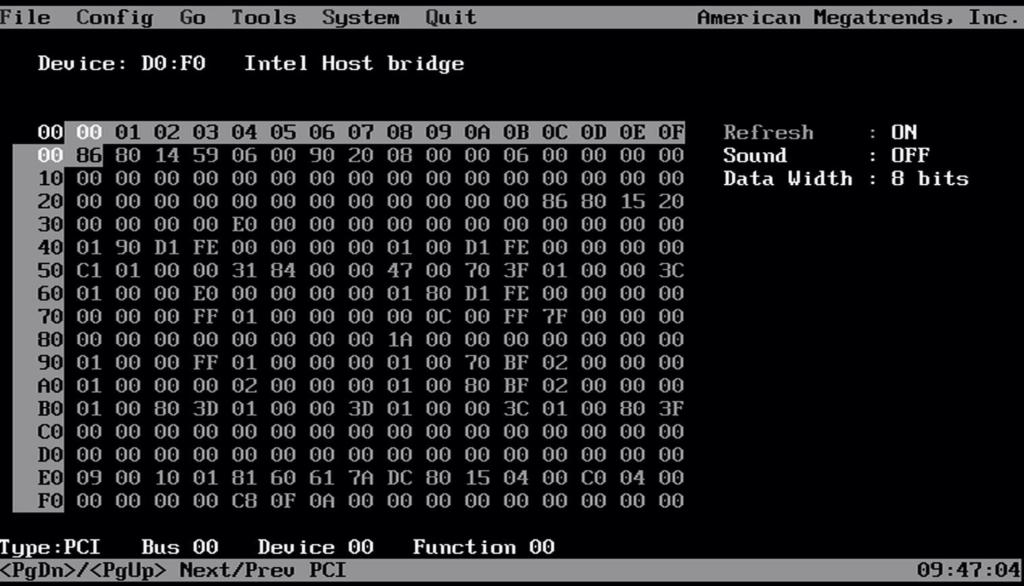
2.1 PCI 可以访问 PCI 设备
选中后输入要查看设备的 Bus Dev Func:
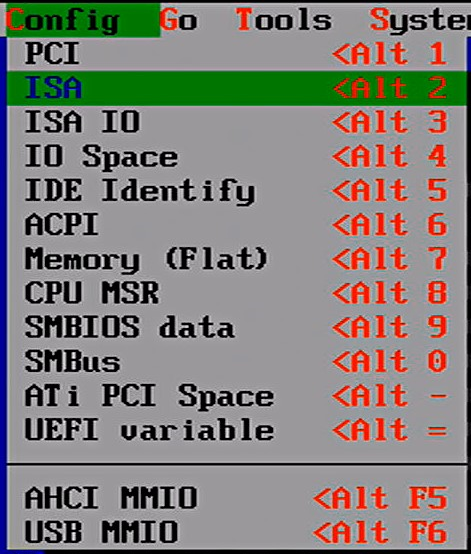
2.2 ISA
ISA IO是 Index/Data 这种形式的访问IO Port:

2.3 ISA IO
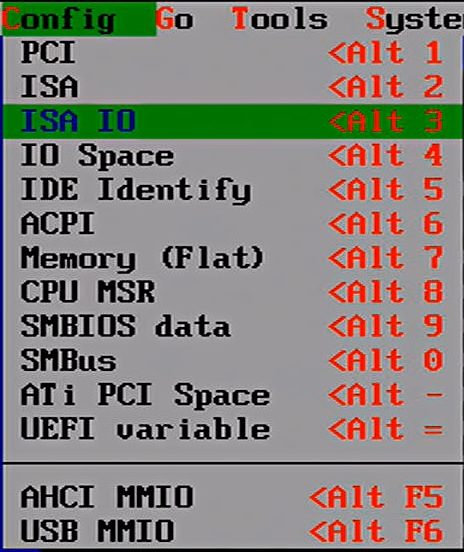
选择之后会出现2个选项让你选择:
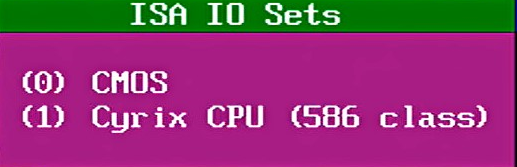
例如,下面是查看 CMOS 的结果。个人感觉这个和上面的 ISA 选项通过手动输入端口号没有差别。
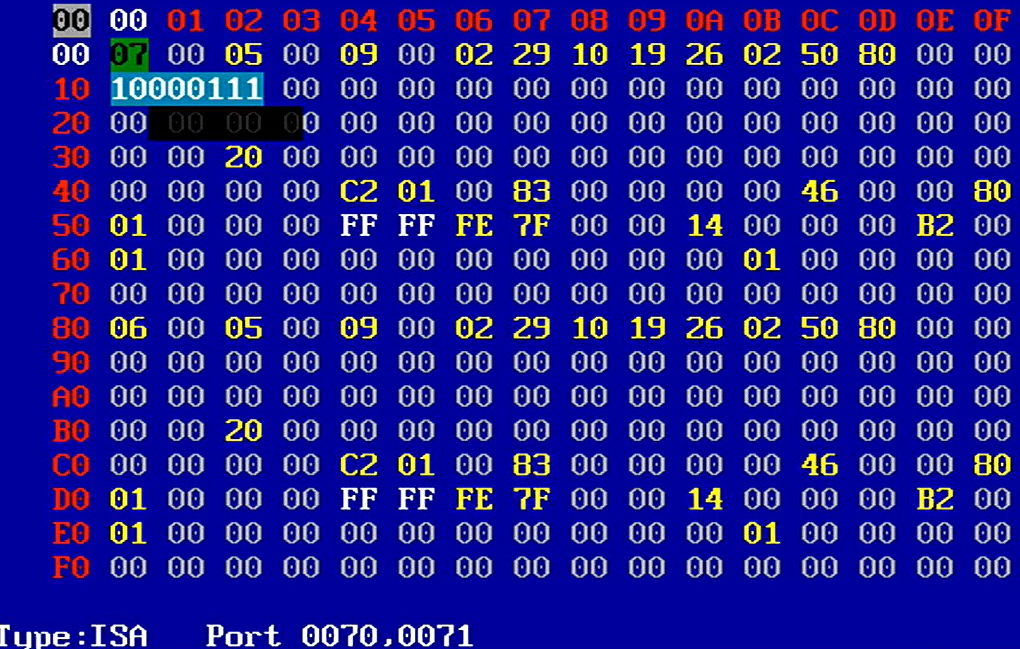
2.4 IO Space
选择后出现额外菜单如下:
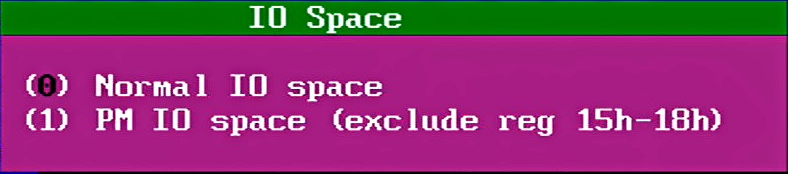
选择 Normal IO Space 后会要求输入要查看的端口。

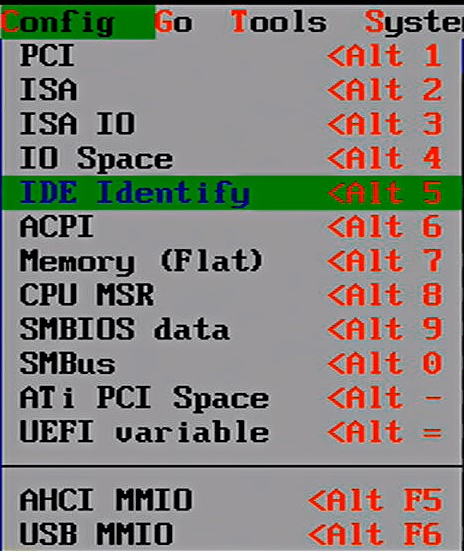
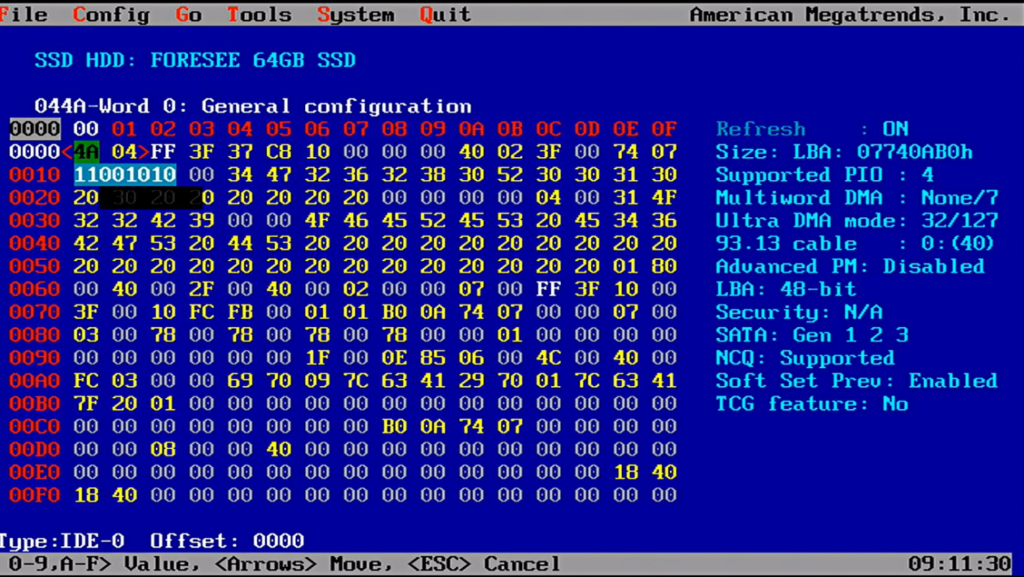
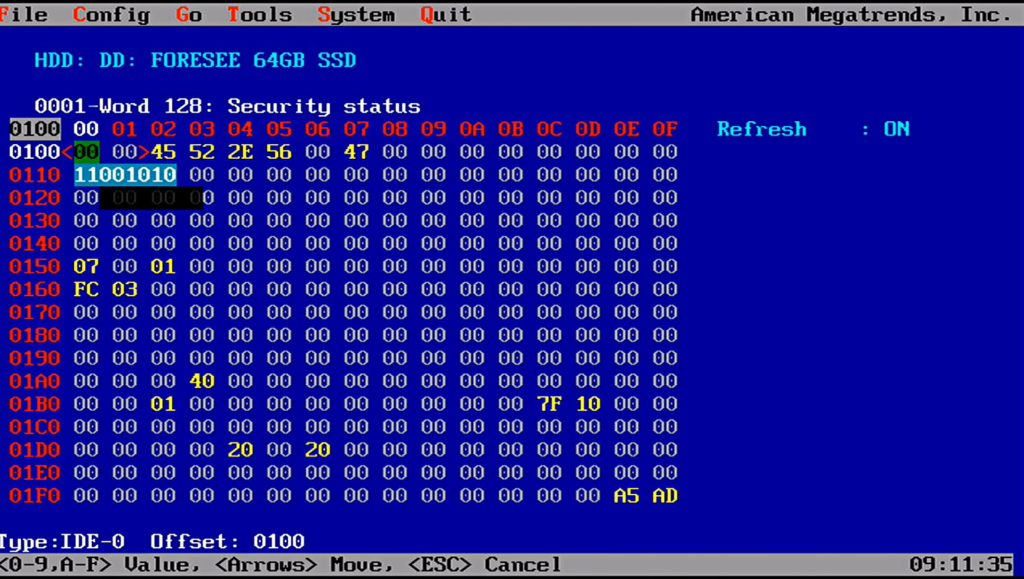
2.5 IDE Identify。这个功能能够查看当前系统中的SATA接口的硬盘信息(PCIE接口的SSD不行)。
选中后会出现提示继续选择要查看的硬盘。

之后可以查看硬盘信息。
额外说一句:不知道什么原因,这个功能和截图软件(CrScreenshotDxe)有冲突,运行这个功能后,会导致死机。本篇的截图都是使用 HDMI 转 USB 设备完成的。
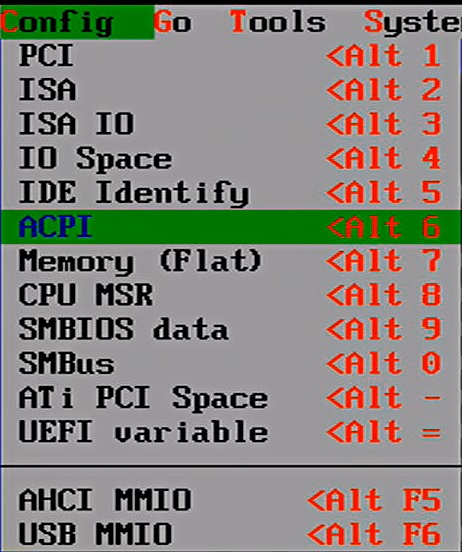
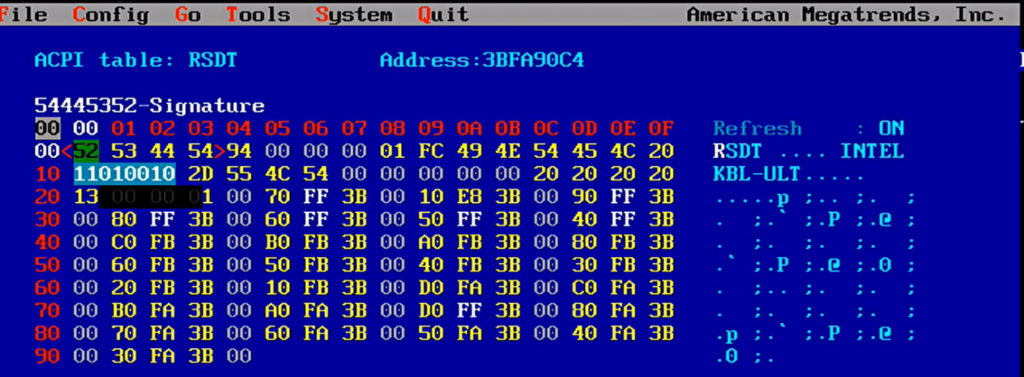
2.6 ACPI
选中后可以看到系统中的 ACPI Table
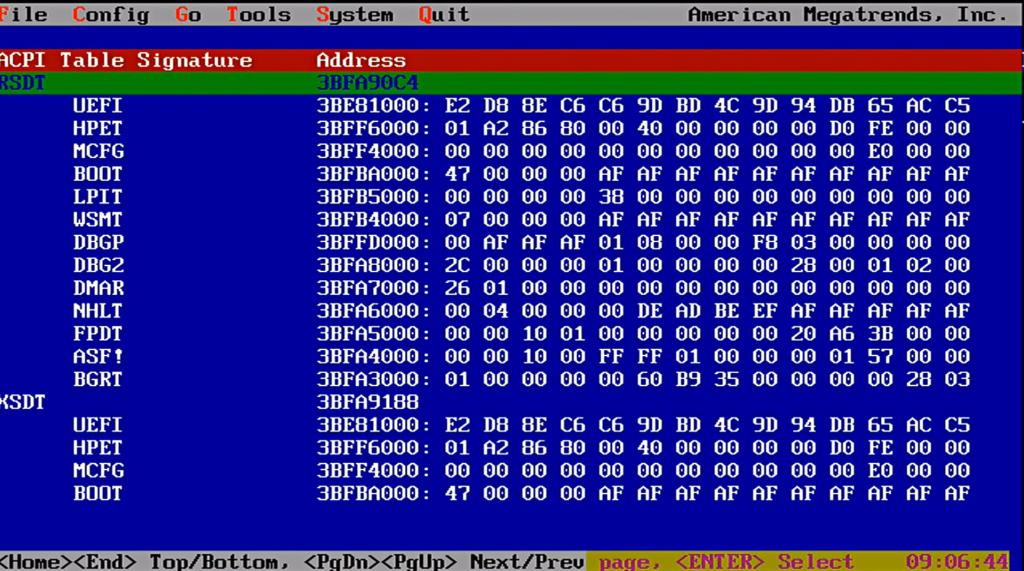
能够查看每一项Table
2.7 Memory (Flat)
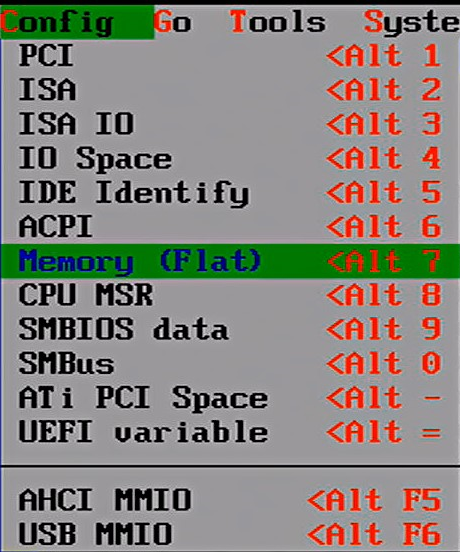
选择这个项目后输入要查看的内存位置即可:
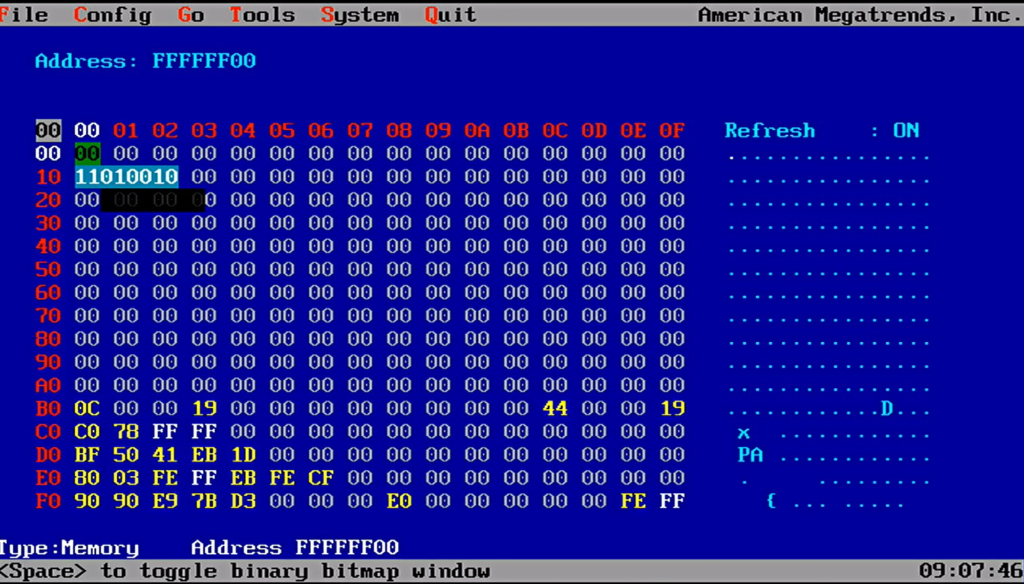
特别注意,目前只支持查看最高 4G的内存。
2.8 CPU MSR
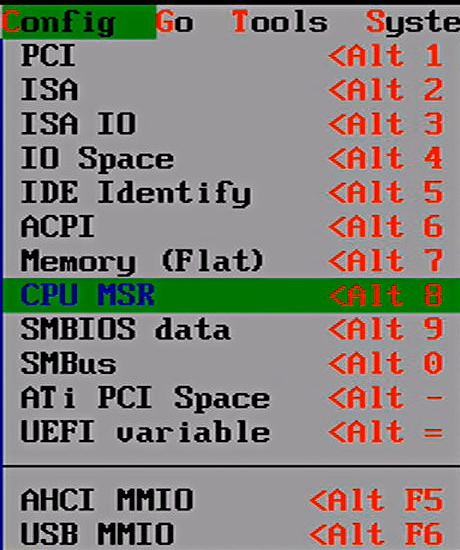
这个功能只能查看固定几个 MSR 的值。并且在我试验的机台上有问题无法正常看到。如果确实有这方面的需求,建议使用 Rw Everything 这样工具。
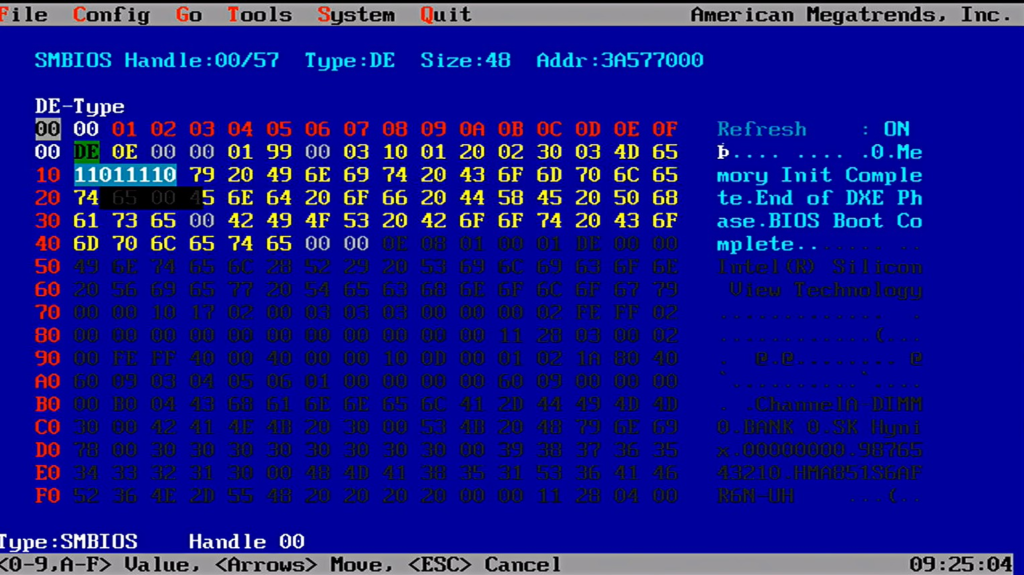
2.9 SMBIOS
查看本机的SMBIOS:
2.10 SMBus
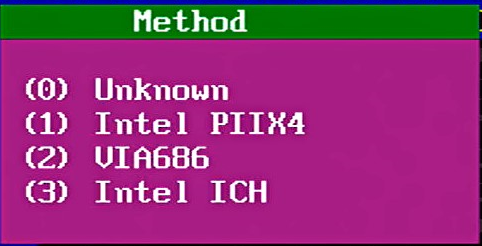
选择这个功能后,会要求选择你的PCH。
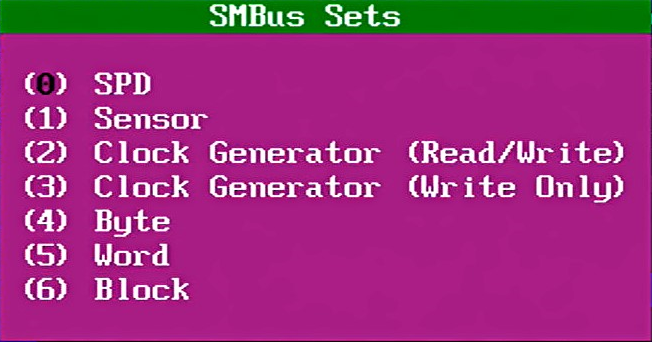
接下来要选择你要查看的设备。
我的测试机台没有SPD,因此没有进一步试验。
2.11 ATi PCI Space
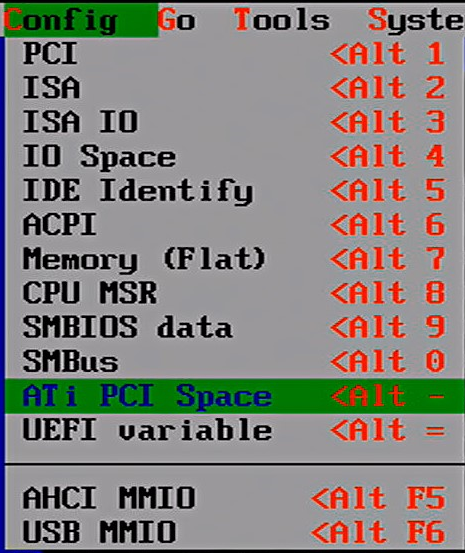
因为目前没有 ATI 主板所以没有进行试验。
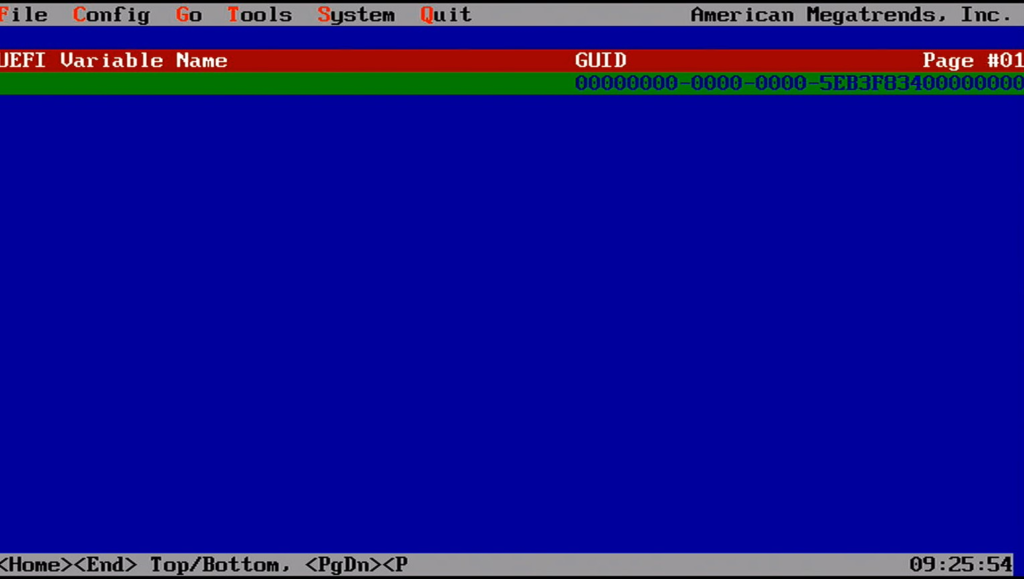
2.12 UEFI variable
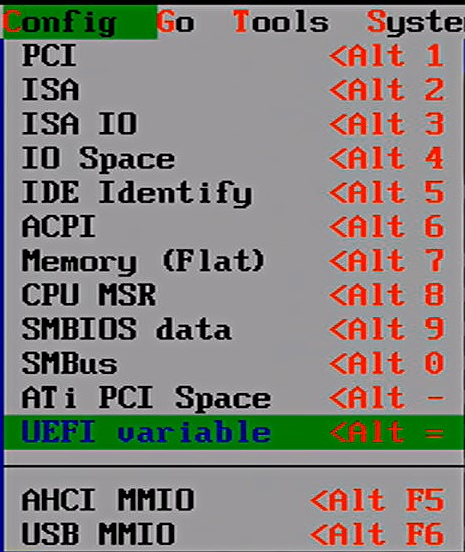
这个功能可以用来查看 UEFI 的变量,感觉上似乎不太准,推荐用 Shell 下的命令直接进行查看。
2.13 AHCI MMIO
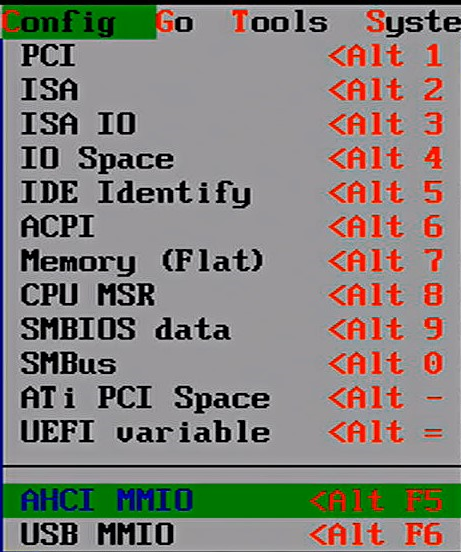
这个功能在我的Kabylake-U 上无法工作,死机。
2.14 USB MMIO
这个功能这个功能在我的Kabylake-U 上无法工作,调不出来。
3.Go 菜单。
3.1 Next 切换
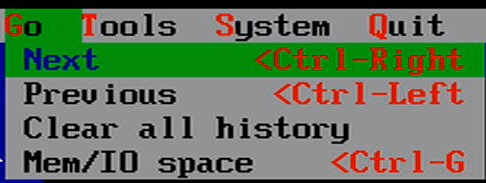
查看下一个项目,比如:当前显示的是 PCI Bus0 Dev0 FunC 0,那么下一个设备是 Bus:0 Dev 0 Func 2。
3.2 Previous 切换
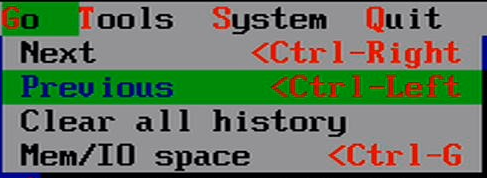
查看上一个项目。
3.3 Clear all history
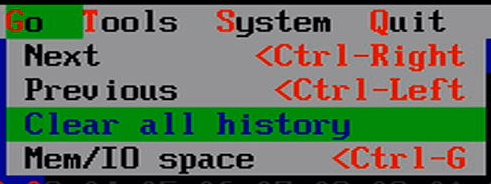
不知道什么意思
3.4 Mem/IO space
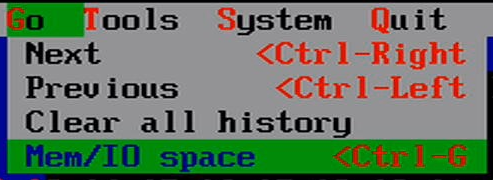
不知道什么意思。
4. Tools 菜单
4.1 List PCI devices
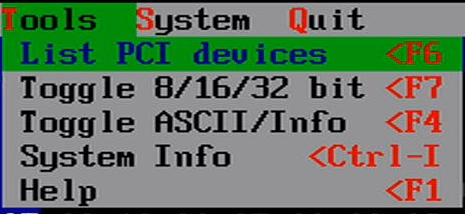
这个选项能够列出当前系统中的全部 PCI 设备,快捷键是 F6。
4.2 Toggle 8/16/32 bit
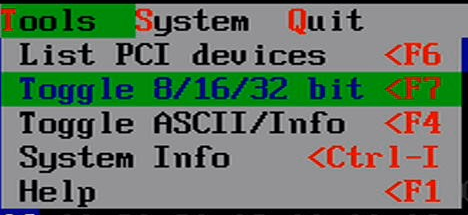
使得当前界面在 1Byte 2Bytes 4bytes 显示之间切换,快捷键是 F7 。在查看寄存器时是很有用的功能。
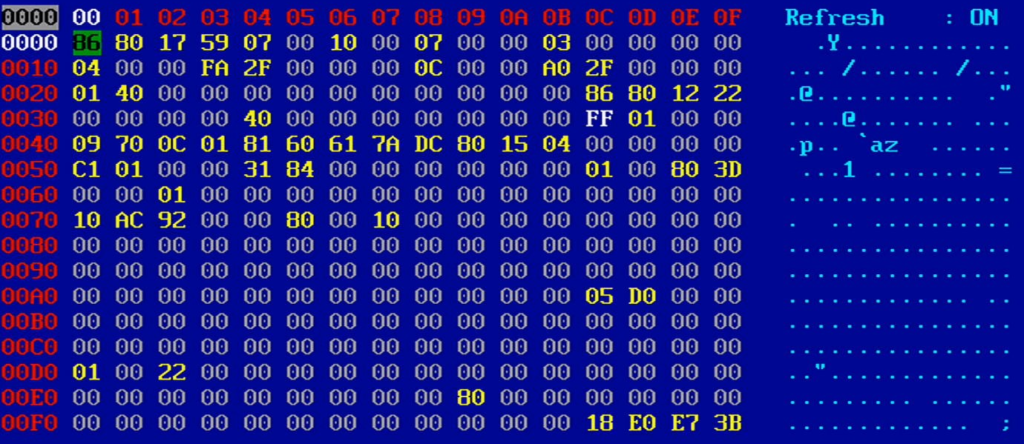
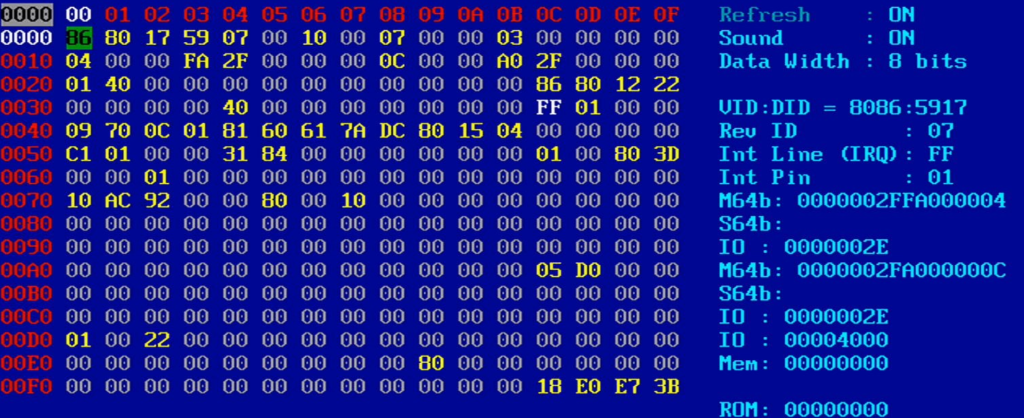
4.2 Toggle ASCII/Info
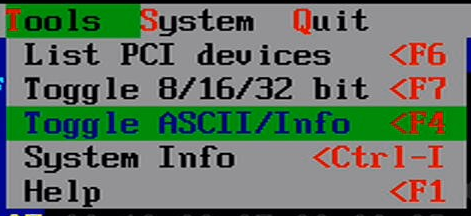
切换界面在 ASCII显示和信息显示模式切换,快捷键为 F4。例如:当前是ASCII显示模式
切换为信息显示模式:
4.3 System Info
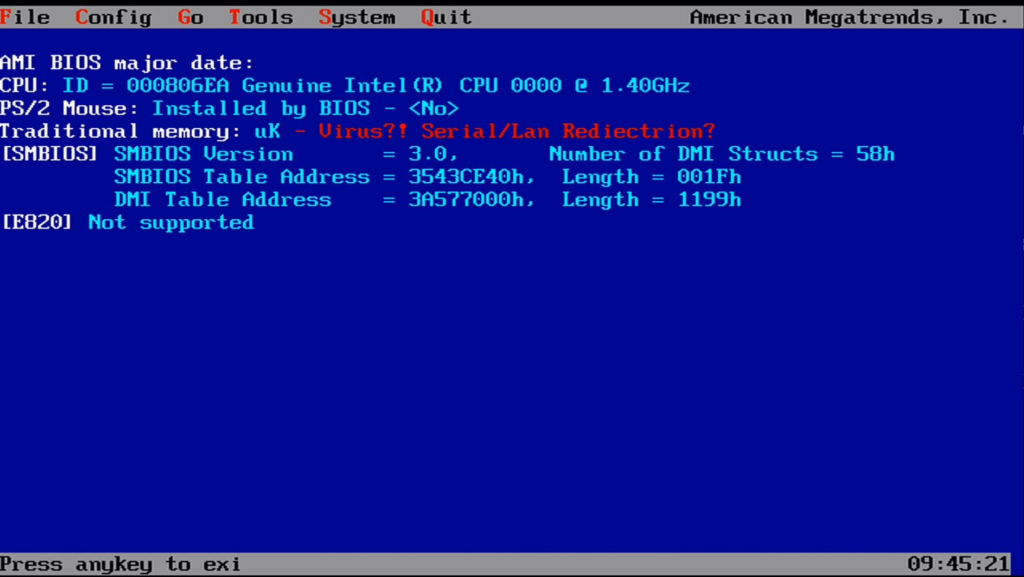
显示当前系统基本信息
4.4 Help
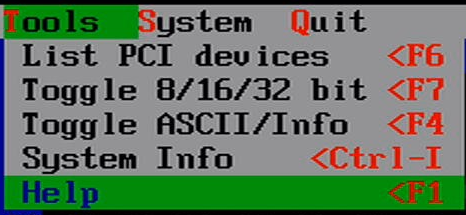
显示帮助信息
5.System Group
5.1 Change Color
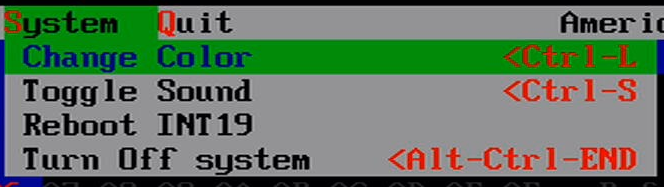
切换界面配色
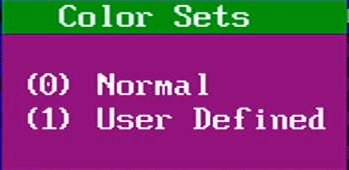
通常看到的是 Normal 模式,User Defined 是黑白的
5.2 Toggle Sound
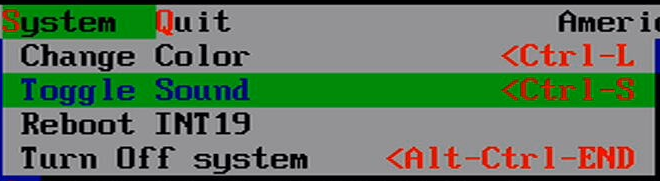
我的主板上没有 Beeper 所以不得而知是否有效果
5.3Reboot INT19
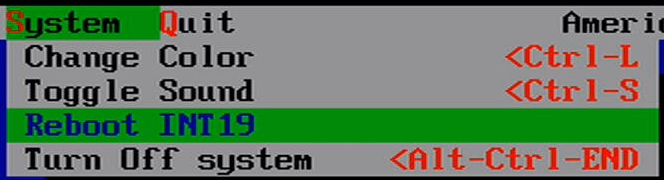
通过 INT19 启动下一个设备,对于 UEFI 是无效的
5.4 Turn Off system
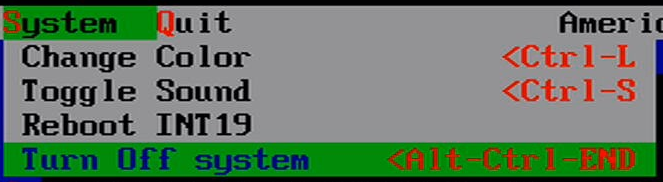
关机,在 UEFI 下是无效的
6.Quit 退出 RU
从上面也可以看到,对于 X86 来说,访问硬件信息需要的基本操作有:
1. PCI 信息的访问
2. 访问IO Port 直接访问
3. IO Port Index/Data 方式的访问
4. Memory 的访问
5. Memory Index/Data 方式的访问
6. MSR 的访问
掌握了上述的访问方法就可以触碰到 X86 上的全部空间和寄存器了。
=============================================================
2025年2月27日