当我还是一个孩子的时候,荧幕上充斥的还是史泰龙施瓦辛格这样的硬汉,他们用肌肉而不是今天这样的小鲜肉那样用兰花指打败敌人,看起来非常过瘾。一次偶然的机会,在父亲的朋友家看了电视台播出的《铁血战士》。这部影片给我留下很深的印象,神秘的丛林,还有影片中拥有着高科技武器的外星人。譬如说,大反派的铁血战士有一个很酷的带在手腕上能显示当前心率的个人电脑。还有就是他可以切换到红外线模式,看到人类无法看到的红外线。这样的功能在夜战中尽占便宜。最后施瓦辛格州长大人凭借主角光环发现了对手这一特性,用泥巴将自己包裹起来阻挡身体上的红外线躲过搜查实现反杀。
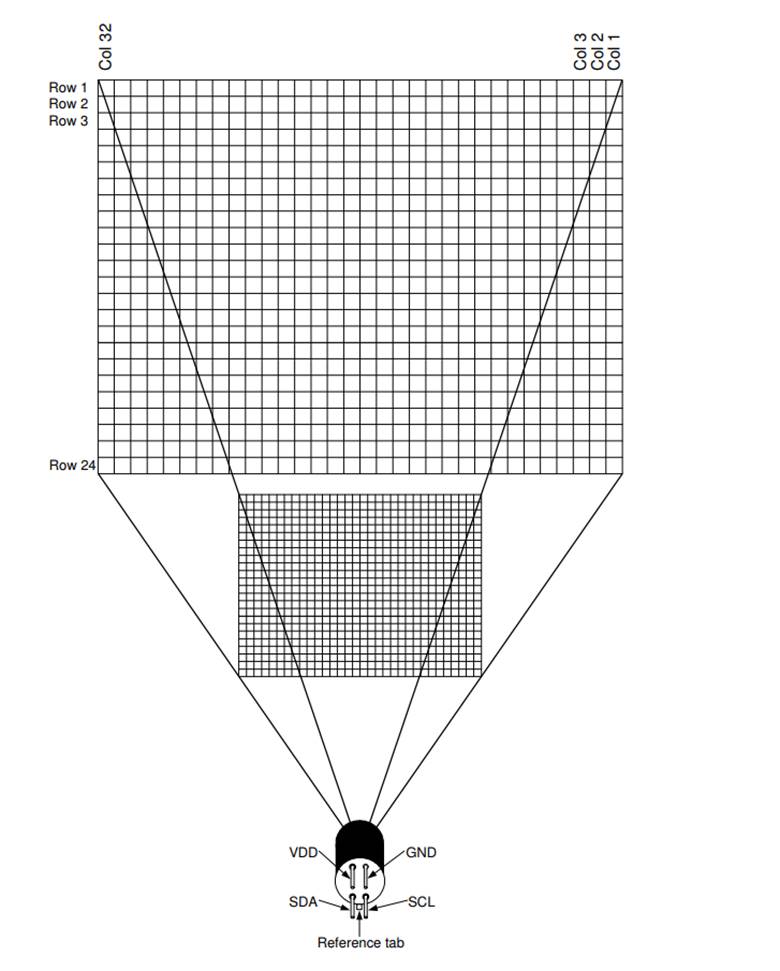
最近发现市面上有一种红外阵列传感器:MLX90640 ,分辨率可以达到 32*24。忽发奇想尝试用它DIY一个简易的热成像仪。MLX90640对内存要求比较高,普通的 Arduino 无法胜任。最终选用 Teensy 3.2 作为主控,主要原因是它性能远超 Arduino ,主频可以达到 120Mhz (Overclock状态)。为了实现在液晶屏上面的显示,需要主控能够快速的将数据发送到屏幕上,否则刷新速度慢非常影响效果。此外,Teensy 3.2内存有 64KB,取得数据和处理数据需要在足够的内存中进行,因此大内存必不可少。之后,从淘宝入手了 320*240 分辨率的SPI 接口的液晶屏作为显示界面。硬件方案确定之后即可着手进行代码编写。
从整体上来说,代码操作需要三部分:第一步,获得传感器数据;第二步,处理数据(因为屏幕明显比传感器大,因此,需要将少量数据变换成大量数据,这里使用的是双线性插值算法);第三步,将数据显示在屏幕上。下面就是详细步骤:
第一步:传感器数据的获得。MLX90640 有对应的 Arduino 库,这使得用户能够方便的获得红外数据。特别需要注意的取得的数据是从右上到左下排列的。
这部分代码很简单,配合调用库函数即可:
  for (byte x = 0 ; x < 2 ; x++){
    uint16_t mlx90640Frame[834];
    int status = MLX90640_GetFrameData(MLX90640_address, mlx90640Frame);

    float vdd = MLX90640_GetVdd(mlx90640Frame, &mlx90640);
    float Ta = MLX90640_GetTa(mlx90640Frame, &mlx90640);

    float tr = Ta - TA_SHIFT; //Reflected temperature based on the sensor ambient temperature
    float emissivity = 0.95;

    MLX90640_CalculateTo(mlx90640Frame, &mlx90640, emissivity, tr, mlx90640To);
  }
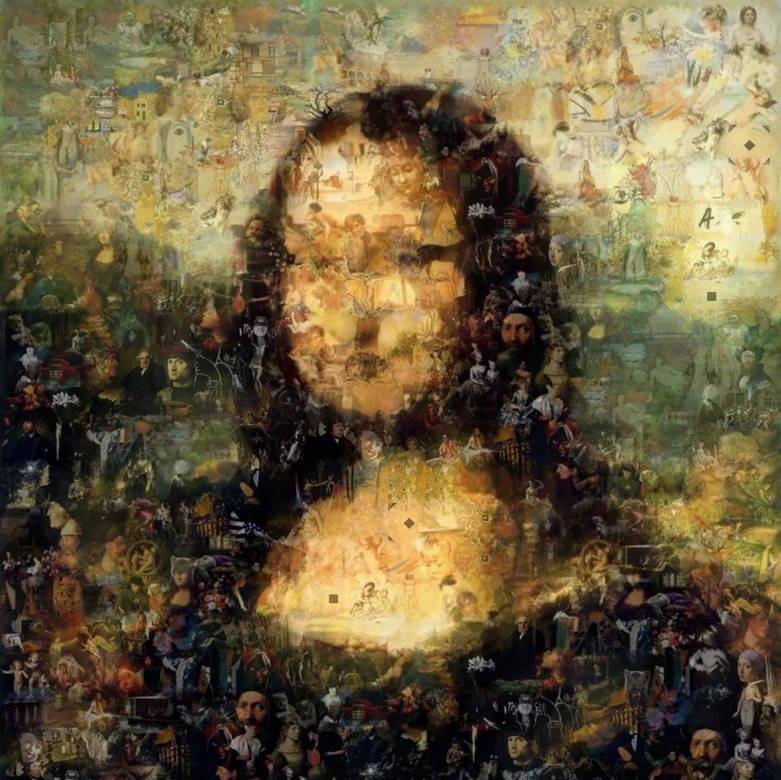
第二步,处理数据。传感器获得的实际数据是32X24,最终需要呈现在 320X240的LCD上。可以看到两者之间分辨率差别很大。这里就需要通过一些算法推理补充出更多的数据以便更好的观感。通俗的解释这个过程和“脑补”类似。例如,即便下面的图片上非常模糊,但是观看者还是会认出来这是著名的《蒙娜丽莎》。当人们看到画面之后,大脑会进行处理,处理的结果就是识别出来这幅名画。
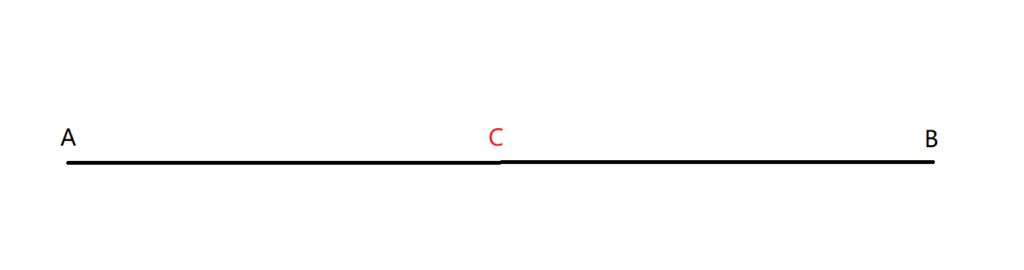
这里选择双线性插值算法来完成这个目的。这种算法是假设中间的点收到周围的点均匀的影响。用一维的例子来说明这个算法,比如,已知下面 A 点的值为 100,B点的值为200,那么如果中间有一个C点,算法推理出来 C 点的值应该是 150。
有了上面的经验,推广到二维世界,下面图片中,已知Q(X,Y) 四个点的取值,想推算出 P 的取值。可以先推算出R1 R2的取值
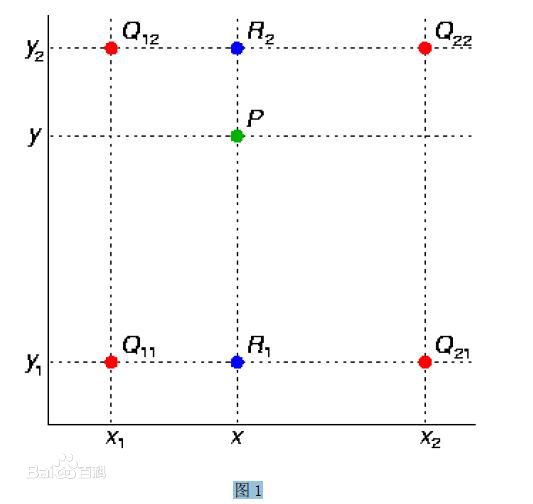
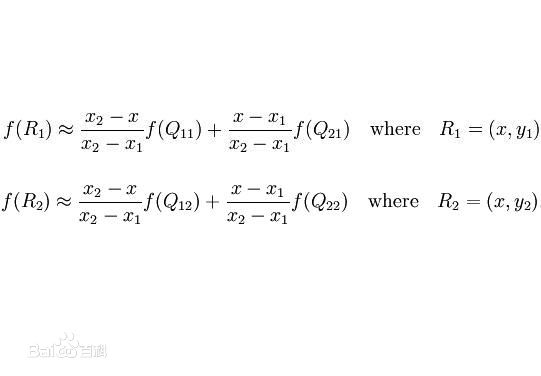
最终再计算出 P 的取值【参考】

代码中使用同样的方法,将4个点插值为100个点,这样整体从 32×24=768个点变换为76800个点。这样的计算量对于 Teensy 来说并不是问题,可以在1ms 内处理完毕。
第三步,数据的现实。代码使用Arduino 的 UcgLib来驱动屏幕。UcgLib 没有提供按照帧发送数据的函数(当然如果有的话,因为数据量太大,也不可能在内存中存放一帧然后完整发送之)。所以使用 DrawPixel 这样的函数一个点一个点的在屏幕上绘制。这样就会牵扯到效率的问题需要进行优化。对此,使用了两个方法:
1.绝对的提升 SPI 传输速度。Teensy 默认频率为 72Mh,超频到 120Mhz 之后,SPI 可以提升到 30Mhz,代码中通过下面这个语句来实现:
SPI.beginTransaction(SPISettings(30000000, MSBFIRST, SPI_MODE0));
2.相对的减少绘制数据量。通过查看UcgLib 的代码可以看到,绘制每一个点时,都会发送位置信息这对于用户来说是不必要的开销。所谓显示,就是将必要的数据送到LCD显示内存中。因此,代码设计了混合的方式。先用 DrawPixel 绘制Y坐标上的第一个点,之后直接发送这一行上其余各点的颜色信息。从实验数据来看,这样可以节省3/5的时间。此外,默认情况下库使用 18Bits 显示模式,每个点由三个Bytes来给出。此外还可以将屏幕设置为 16Bits显示模式,这样每个点可以由2个Bytes给出。但是相应的屏幕颜色数量会大大减少,经过试验显示效果不佳就放弃了。如果用户对速度有更高的要求,可以考虑使用这种模式。
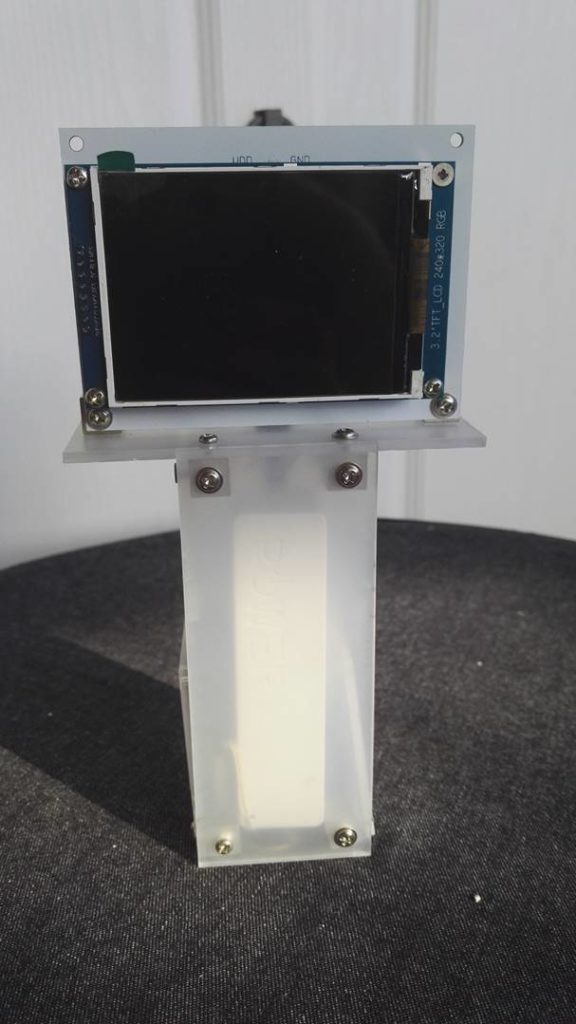
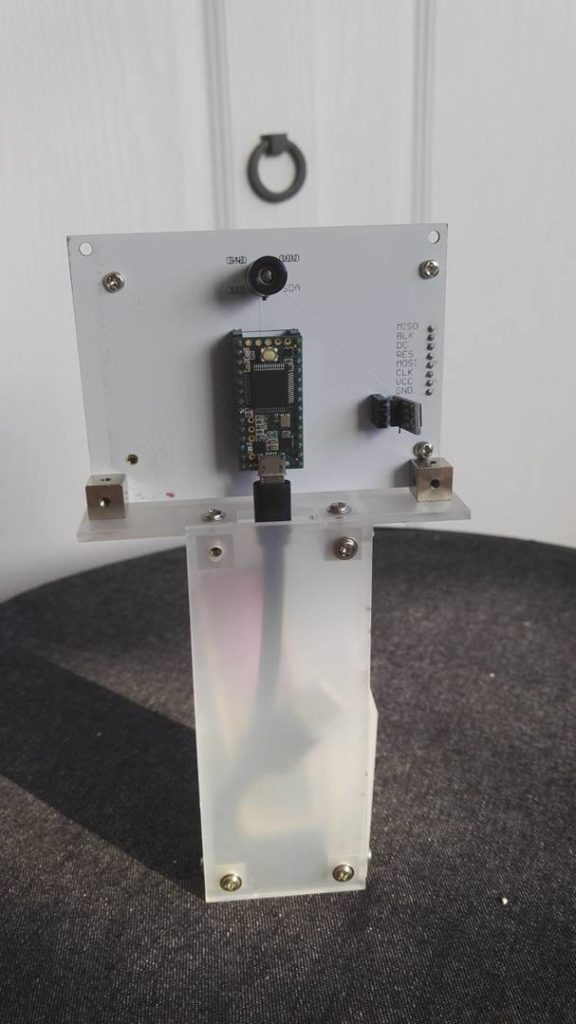
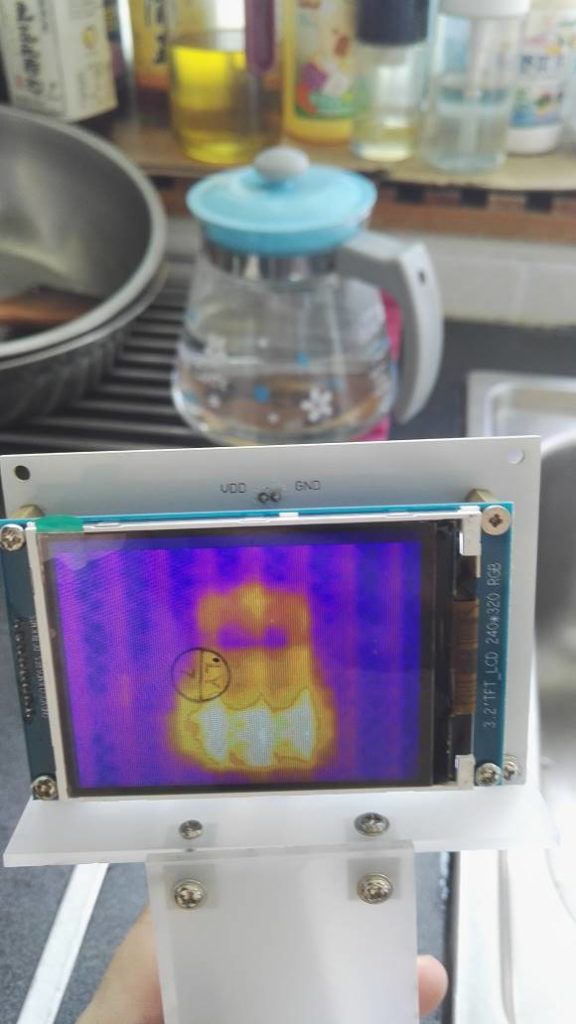
最终成品如下,用亚克力制作了一个简单的外壳,下面是一个把柄,同时可以放置一个充电宝来为整体进行供电。顺便说一句,我原本的设计是要完全包裹起来的,后来计算失误导致尺寸上的差异才变成现象这个样子的…….
工作的视频可以在知乎专栏看到
https://zhuanlan.zhihu.com/p/76527719
最后,关于视力,讲个有意思的事情“当年,在日本海军部队,有这么一个特殊的群体:每天吃鳗鱼喝鱼肝油,服用特制的维生素A,目的是为了保持一双眼睛炯炯有神。他们是军舰上的瞭望员,夜战之前,他们像猴子一样爬得高高的,用一双肉眼在茫茫大海上搜索敌方舰只的踪影。
据笔者考证,这个兵种仅仅存在于当年的日本海军。美国海军名将尼米茨特地为他的奇葩对手冠名为“猫眼”(CAT EYES LOOKOUT),因为猫的夜视能力极强嘛,可以异乎寻常地采集摄取到有效的光线,研究发现,猫的瞳孔在昏暗中可扩大至眼球表面的90%,一点微弱的光亮就足够它们觅取猎物。日本海军的瞭望员也练就了“猫眼神功”,在一片漆黑中,有效搜索远方的猎物。
二战期间,日本政府征召一批作家从军组成“笔部队”,撰写战地报告文学或战地通信稿。“珍珠港事件”后,小说家丹羽文雄随日本海军参加了太平洋战争,他撰写过一篇在当时非常著名的报告文学《海战》,其中就描写了“猫眼神功”:“周围伸手不见五指,就只有手持望远镜的瞭望员的呼喊”左41度,发现一艘舰影”,”左30度,敌舰,敌舰向我而来”……”
在丹羽文雄的笔下,充满了对这些征战太平洋的“勇士”们的崇敬,更是对猫眼瞭望员钦佩有加。“猫眼神功”有多厉害?据当时记载,他们在黑夜里能够看清万米前后的军舰,然后日军在8千米内以探照灯和水上飞机扔照明弹实施攻击。
不得不承认,日本民族的一大特点是能把事情做到极限,在舰队夜战这一块,日本人曾吹嘘“大日本帝国海军夜战技术誉满全球”,他们倒也有一些吹牛的本钱,日本海军以训练刻苦甚至残酷著称,兵员素质确实相当不错,且不论海军的炮术和操船技术,还是以“猫眼神功”为例,日本人练就了“斜眼”——人类的眼球上,夜间感光细胞的分布在眼球侧面的比眼球正面的多,所以,斜眼能在晚上看得更加清楚。”
起初,猫眼比雷达更厉害:
“美日瓜岛战役历时半年,共爆发数十次海战,争夺瓜岛的第一次海战爆发于1942年8月9日凌晨,夜战,一时许,日舰驶抵战场时,日军猫眼瞭望员确实厉害,先发现了两艘巡逻的美军驱逐舰,而装备新型雷达的美军驱逐舰却未能发现日舰。一直到日舰下达总攻击令十分钟后,美军才反应过来。当时日军实施了轻车熟路的夜战模式:日军的水上飞机投下了照明弹,将美舰照得清清楚楚,日军的炮弹和鱼雷接踵而来。
在瓜岛,这样的海战持续发生,总体而言,猫眼表现得不比雷达差。在1942年11月14日深夜发生的第二次瓜达尔卡纳尔海战中,美军于22点55分以雷达发现了日军舰队,5分钟后,猫眼瞭望员也发现美军舰队,又是一场在漆黑大海上的恶战。此战中,威利斯·李指挥的美军主力战斗舰南达科他号还发生了电力故障,无法使用雷达与火炮控制,自动装弹装置也失效,结果成了活靶子。
后人分析说,瓜岛战役日军猫眼没怎么输给雷达,原因还是地理环境,当时美军所装备的雷达,虽然在洋面上搜索距离可以达到20海里,但是在瓜岛附近由于受陆地上山包的干扰,搜索距离一下子就降到了6000米。还有一个不可忽略的因素,是当时雷达的技术与雷达操纵者的水平——后者当然无法跟苦练猫眼技术的日本海军瞭望员相比。
但是,“猫眼神功”再厉害,对于日本海军来说,也是个“然并卵”的结果。在日美双方历时半年多对瓜岛的残酷争夺中,均损失惨重,最终日本因无力进行消耗作战,而选择撤军。美军完全占据瓜岛,而后是整个南太平洋的制海权,因此开始战略反攻。在二战中,瓜岛之战是中途岛之后日本的再次失败,也是日本从战略优势走向劣势的转折点。
此后日本海军仍然依靠“猫眼神功”与雷达对抗,但是已江河日下,屡战屡败。说来也是,人总有用眼过度的时候,训练有素的猫眼瞭望员也是死一个少一个,但雷达技术却在不断进步之中。”【参考】
所以,从我个人角度来说,更相信武器和物资是决定战争成败的主要因素…….
参考:
1. https://baike.baidu.com/item/%E5%8F%8C%E7%BA%BF%E6%80%A7%E6%8F%92%E5%80%BC 双线性插值
1. http://roll.sohu.com/20150918/n421429328.shtml 日本二战“猫眼神功”PK雷达之鉴(图)