前面分析过GetVariable,这里继续证明“Windows 下GetFirmwareEnvironmentVariable 具体的实现代码是gRT->GetVariable ”。
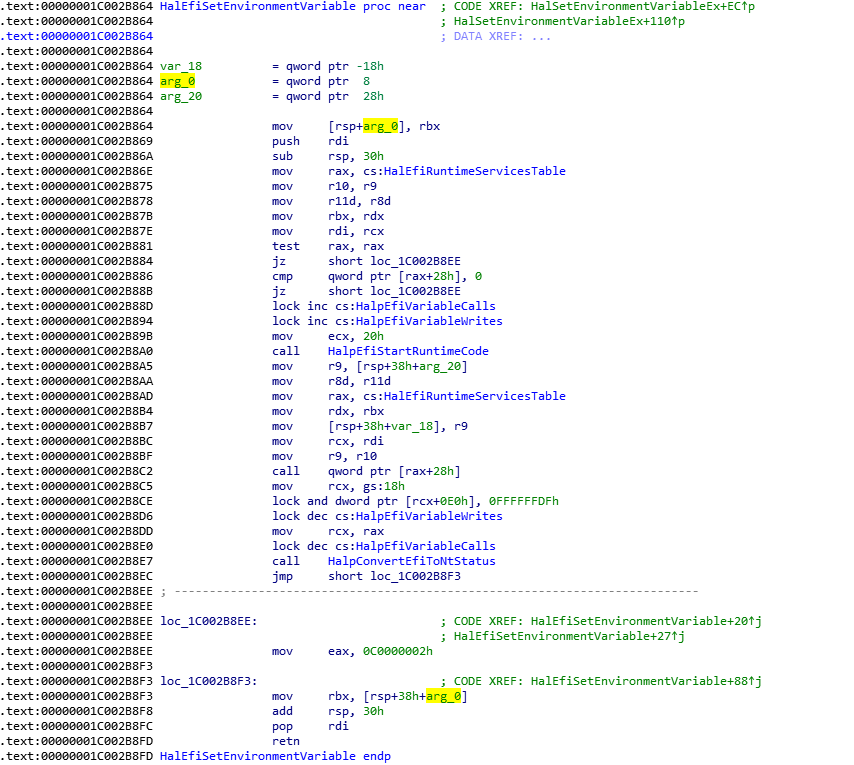
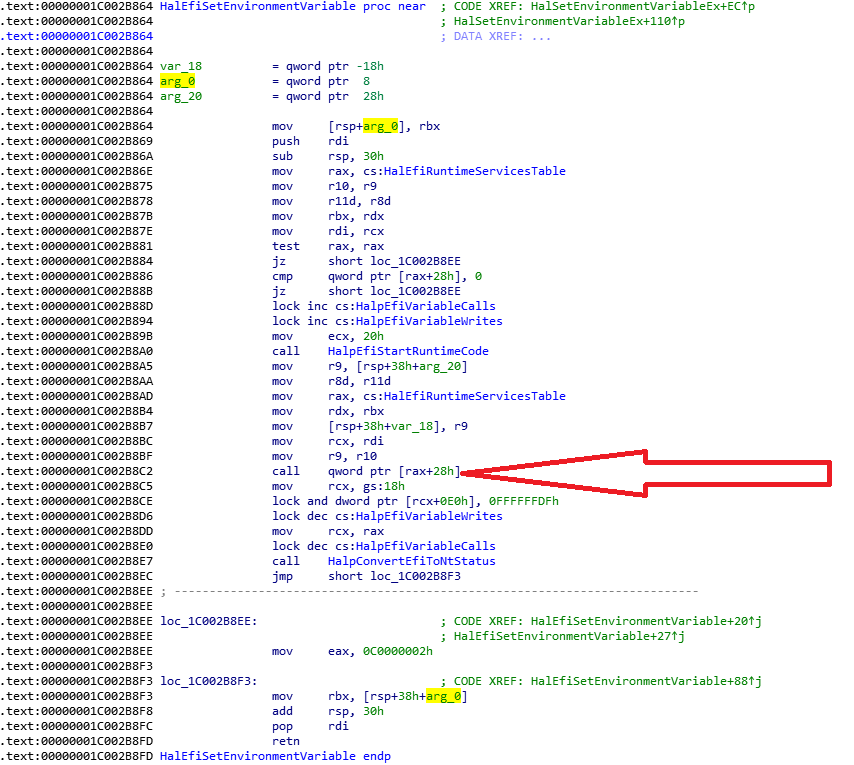
方法一,利用 WinDBG动态分析。首先使用 bp hal!HalEfiSetEnvironmentVariable 下断点。根据我们之前的分析结果,关注红色箭头指向的位置
在 WinDBG 中操作,触发函数断点:
2: kd> g
Breakpoint 1 hit
hal!HalEfiGetEnvironmentVariable:
fffff800`7b02d50c 48895c2408 mov qword ptr [rsp+8],rbx
0: kd> u
hal!HalEfiGetEnvironmentVariable:
fffff800`7b02d50c 48895c2408 mov qword ptr [rsp+8],rbx
fffff800`7b02d511 57 push rdi
fffff800`7b02d512 4883ec30 sub rsp,30h
fffff800`7b02d516 488b05e35a0300 mov rax,qword ptr [hal!HalEfiRuntimeServicesTable (fffff800`7b063000)]
fffff800`7b02d51d 4d8bd1 mov r10,r9
fffff800`7b02d520 4d8bd8 mov r11,r8
fffff800`7b02d523 488bda mov rbx,rdx
fffff800`7b02d526 488bf9 mov rdi,rcx
0: kd> u
hal!HalEfiGetEnvironmentVariable+0x1d:
fffff800`7b02d529 4885c0 test rax,rax
fffff800`7b02d52c 745a je hal!HalEfiGetEnvironmentVariable+0x7c (fffff800`7b02d588)
fffff800`7b02d52e 4883781800 cmp qword ptr [rax+18h],0
fffff800`7b02d533 7453 je hal!HalEfiGetEnvironmentVariable+0x7c (fffff800`7b02d588)
fffff800`7b02d535 f0ff05249d0200 lock inc dword ptr [hal!HalpEfiVariableCalls (fffff800`7b057260)]
fffff800`7b02d53c b908000000 mov ecx,8
fffff800`7b02d541 e876060000 call hal!HalpEfiStartRuntimeCode (fffff800`7b02dbbc)
fffff800`7b02d546 4c8b4c2460 mov r9,qword ptr [rsp+60h]
0: kd> u
hal!HalEfiGetEnvironmentVariable+0x3f:
fffff800`7b02d54b 4d8bc3 mov r8,r11
fffff800`7b02d54e 488b05ab5a0300 mov rax,qword ptr [hal!HalEfiRuntimeServicesTable (fffff800`7b063000)]
fffff800`7b02d555 488bd3 mov rdx,rbx
fffff800`7b02d558 4c894c2420 mov qword ptr [rsp+20h],r9
fffff800`7b02d55d 488bcf mov rcx,rdi
fffff800`7b02d560 4d8bca mov r9,r10
fffff800`7b02d563 ff5018 call qword ptr [rax+18h]
fffff800`7b02d566 65488b0c2518000000 mov rcx,qword ptr gs:[18h]
0: kd> u
hal!HalEfiGetEnvironmentVariable+0x63:
fffff800`7b02d56f f083a1e0000000f7 lock and dword ptr [rcx+0E0h],0FFFFFFF7h
fffff800`7b02d577 f0ff0de29c0200 lock dec dword ptr [hal!HalpEfiVariableCalls (fffff800`7b057260)]
fffff800`7b02d57e 488bc8 mov rcx,rax
fffff800`7b02d581 e802060000 call hal!HalpConvertEfiToNtStatus (fffff800`7b02db88)
fffff800`7b02d586 eb05 jmp hal!HalEfiGetEnvironmentVariable+0x81 (fffff800`7b02d58d)
fffff800`7b02d588 b8020000c0 mov eax,0C0000002h
fffff800`7b02d58d 488b5c2440 mov rbx,qword ptr [rsp+40h]
fffff800`7b02d592 4883c430 add rsp,30h
0: kd> u
hal!HalEfiGetEnvironmentVariable+0x8a:
fffff800`7b02d596 5f pop rdi
其中call qword ptr [rax+18h] 就是跳转到UEFI 的 GetVariable。在此下断点,动态运行可以看到函数执行的代码。这里还没有进入SMM Mode所以 WinDBG 是能够正常工作的。
Breakpoint 2 hit
hal!HalEfiGetEnvironmentVariable+0x57:
fffff800`7b02d563 ff5018 call qword ptr [rax+18h]
0: kd> t
fffff800`7e17ea2c 4c894c2420 mov qword ptr [rsp+20h],r9
0: kd> t
fffff800`7e17ea31 4c89442418 mov qword ptr [rsp+18h],r8
0: kd> t
fffff800`7e17ea36 4889542410 mov qword ptr [rsp+10h],rdx
0: kd> t
fffff800`7e17ea3b 48894c2408 mov qword ptr [rsp+8],rcx
0: kd> t
fffff800`7e17ea40 4881ece8080000 sub rsp,8E8h
0: kd> t
fffff800`7e17ea47 488d15b2160000 lea rdx,[fffff800`7e180100]
0: kd> t
fffff800`7e17ea4e 488b8c24f8080000 mov rcx,qword ptr [rsp+8F8h]
0: kd> t
fffff800`7e17ea56 e8290c0000 call fffff800`7e17f684
接下来在BIOS 的Source Code \MdeModulePkg\Universal\Variable\RuntimeDxe\VariableSmmRuntimeDxe.inf 添加如下编译指令:
[BuildOptions]
  MSFT:*_*_X64_CC_FLAGS = /Oi- /FAcs /Od
这样,在编译过程中会生成对应的 COD 文件。
\Build\KabylakePlatSamplePkg\RELEASE_VS2013x86\X64\MdeModulePkg\Universal\Variable\RuntimeDxe\VariableSmmRuntimeDxe\VariableSmmRuntimeDxe.cod
打开这个文件,可以看到源代码和上面 WinDBG 反编译后的结果相同(机器码相同同),因此,确定 Windows call 到了RuntimeServiceGetVariable 函数中
RuntimeServiceGetVariable PROC				; COMDAT
; 677  : {
$LN18:
  00000	4c 89 4c 24 20	 mov	 QWORD PTR [rsp+32], r9
  00005	4c 89 44 24 18	 mov	 QWORD PTR [rsp+24], r8
  0000a	48 89 54 24 10	 mov	 QWORD PTR [rsp+16], rdx
  0000f	48 89 4c 24 08	 mov	 QWORD PTR [rsp+8], rcx
  00014	48 81 ec e8 08
	00 00		 sub	 rsp, 2280		; 000008e8H

; 678  :   EFI_STATUS                                Status;
; 679  :   UINTN                                     PayloadSize;
; 680  :   SMM_VARIABLE_COMMUNICATE_ACCESS_VARIABLE  *SmmVariableHeader;
; 681  :   UINTN                                     TempDataSize;
; 682  :   UINTN                                     VariableNameSize;
因此,结论得证。
第二种方法,同样的生成对应的 COD文件。
在 Shell 下面运行之前Application显示当前系统中的gRT->GetVariable 的地址,结果为 3C9B9A2C;接下来启动到 Windows中使用 WinDBG 查看这个地址上的数值
kd> dd 3C9B9A2C
00000000`3c9b9a2c 244c894c 44894c20 89481824 48102454
00000000`3c9b9a3c 08244c89 e8ec8148 48000008 16b2158d
00000000`3c9b9a4c 8b480000 08f8248c 29e80000 0f00000c
00000000`3c9b9a5c c085c0b6 0083840f c7480000 66582444
00000000`3c9b9a6c 48000008 7024448d 24448948 4c8d4c20
00000000`3c9b9a7c 8d4c5824 48502444 1686158d 8d480000
00000000`3c9b9a8c 0016e70d ff96e800 8948ffff 48382444
00000000`3c9b9a9c 38247c83 480a7d00 3824448b 000265e9
这个值是可以和UEFI 代码中的RuntimeServiceGetVariable 函数对应起来的,因此可以确定gRT->GetVariable指向的就是这个函数。
结合之前的文章,我们可以明确“Windows API GetFirmwareEnvironmentVariable” 最终会使用 UEFI 的 gRT->GetVariable 来完成实际操作。