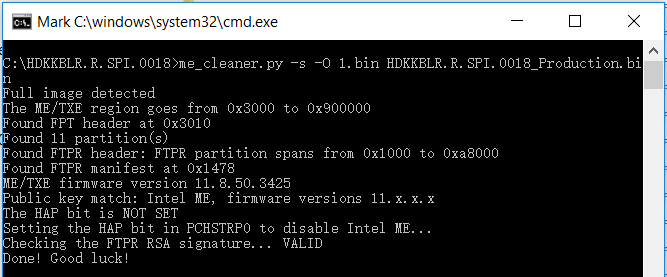
Arduino Firmware简述

一个标准的 Arduino Uno上面有两个可以编程的IC,一个是负责USB 转串口的ATmega16U2,一个主控芯片ATmega328P,下图红色标记的就是16u2,绿色标记的是 328P.
image001
然后对应的有三种Firmware: 16U2 中有一个, 328P 中有两个。16u2的负责USB转串口;328P的一个Firmware是BootLoader,从功能上说主要是负责把 16u2收到串口数据刷新到328P 上;328P中的另外一个 Firmware 就是我们平常写的程序,编译之后生成的,用来完成我们期望的功能。

一般情况下,如果想更新16u2,需要额外的设备,比如 USB IPS ; 我们IDE只能更新328P 中的程序部分.328P 的BootLoader也是需要额外的设备来进行更新的。更新 16u2使用下图左上角框住部分的排针,更新 328P 使用下图中间橘色框图中指出的引脚。
image002
16u2的Firmware 可以在类似 \arduino-1.6.3\hardware\arduino\avr\firmwares\atmegaxxu2\arduino-usbserial 的路径中找到
328P Bootloader 的Firmware 可以在\arduino-1.6.3\hardware\arduino\avr\bootloaders\atmega 的路径中找到。

Arduino 的 Base64库

Base64编码出现的背景【参考1】:电子邮件的传输需要把原始内容编码为可见的ASCII来进行传输,很早之前出现的电子邮件编码规则兼容性不太好,比如没有考虑邮件的多种内容的问题,还有对文件音频视频附件之类兼容不好。因此,提出来新的编码,这种新的编码格式编解码很简单,同时编码后的内容只比编码之前大33%,这就是Base64。

这里是来自网上【参考2】的一份 Arduino base64库,下面简单介绍一下用法:
int base64_encode(char *output, char *input, int inputLen); 对字符串进行base64编码
int base64_decode(char *output, char *input, int inputLen); 对Base64字符串进行b解码
int base64_enc_len(int inputLen); “预测”Base64编码后的字符串长度
int base64_dec_len(char *input, int inputLen); “预测”Base64编码字符串解码后的字符串长度

下面是一个完整的例子【参考2】:

#include <Base64.h>

/*
 Base64 Encode/Decode example
 
 Encodes the text "Hello world" to "SGVsbG8gd29ybGQA" and decodes "Zm9vYmFy" to "foobar"

 Created 29 April 2015
 by Nathan Friedly - http://nfriedly.com/
 
 This example code is in the public domain.

 */


void setup()
{
  // start serial port at 9600 bps:
  Serial.begin(9600);
  while (!Serial) {
    ; // wait for serial port to connect. Needed for Leonardo only
  }
  
  Serial.println("Base64 example");


  // encoding
  char input[] = "Hello world";
  int inputLen = sizeof(input);
  
  int encodedLen = base64_enc_len(inputLen);
  char encoded[encodedLen];
  
  Serial.print(input); Serial.print(" = ");
  
  // note input is consumed in this step: it will be empty afterwards
  base64_encode(encoded, input, inputLen); 
  
  Serial.println(encoded);


  // decoding
  char input2[] = "Zm9vYmFy";
  int input2Len = sizeof(input2);
  
  int decodedLen = base64_dec_len(input2, input2Len);
  char decoded[decodedLen];
  
  base64_decode(decoded, input2, input2Len);
  
  Serial.print(input2); Serial.print(" = "); Serial.println(decoded);
}


void loop()
{
  
}


运行结果:

base64

这里【参考4】,提供了一个在线版的Base64编解码工具,可以用来检查结果是否正确。

完整的代码下载:
sketch_apr20a

最后,之前我还介绍过MD5的 Arduino 库【参考3】,有兴趣的朋友也可以研究一下。
参考:
1. http://www.faqs.org/rfcs/rfc2045.html
2. https://github.com/adamvr/arduino-base64 库下载
arduino-base64-master
3. http://www.lab-z.com/arduinomd5/ Arduino 的MD5库
4. http://www1.tc711.com/tool/BASE64.htm 在线编码解码

Step to UEFI (85) StartImage CLib

之前文章中提到过,用LoadImage和StartImage无法加载CLIB build出来的 Application。这次认真研究一下这个问题。

首先,准备实验的材料: 两个简单的小程序 Hello1 和 Hello2 。前者是 CLIB 编出来的,后者是普通的EFI 程序。此外还有一个加载器程序 exec4.efi 。

1. 单独执行编译出来的 Hello1.efi 和Hello2.efi都没问题。实验 exec4 ,加载 hello1.efi 会出错,虚拟机会重启到 Setup中,加载 hello2.efi 正常;
2. 对 Hello1 进行分析,分析的方法是加入【参考1】提到的那种按键Pause。
2.1 在Build\NT32IA32\DEBUG_MYTOOLS\IA32\AppPkg\Applications\Hello1\Hello1\Makefile文件中可以看到,入口定义:

         IMAGE_ENTRY_POINT = _ModuleEntryPoint


2.2 我们再根据编译过程生成的MAP文件,确定 _ModuleEntryPoint 是在 ApplicationEntryPoint.c 中。同样【参考2】可以给我们提供很多经验,相比普通的EFI程序,增加的CLib只是在整个架构中插入了多函数,并不会改变整体的架构。

/**
  Entry point to UEFI Application.

  This function is the entry point for a UEFI Application. This function must call
  ProcessLibraryConstructorList(), ProcessModuleEntryPointList(), and ProcessLibraryDestructorList().
  The return value from ProcessModuleEntryPointList() is returned.
  If _gUefiDriverRevision is not zero and SystemTable->Hdr.Revision is less than _gUefiDriverRevison,
  then return EFI_INCOMPATIBLE_VERSION.

  @param  ImageHandle                The image handle of the UEFI Application.
  @param  SystemTable                A pointer to the EFI System Table.

  @retval  EFI_SUCCESS               The UEFI Application exited normally.
  @retval  EFI_INCOMPATIBLE_VERSION  _gUefiDriverRevision is greater than SystemTable->Hdr.Revision.
  @retval  Other                     Return value from ProcessModuleEntryPointList().

**/
EFI_STATUS
EFIAPI
_ModuleEntryPoint (
  IN EFI_HANDLE        ImageHandle,
  IN EFI_SYSTEM_TABLE  *SystemTable
  )
{
  EFI_STATUS                 Status;

  if (_gUefiDriverRevision != 0) {
    //
    // Make sure that the EFI/UEFI spec revision of the platform is >= EFI/UEFI spec revision of the application.
    //
    if (SystemTable->Hdr.Revision < _gUefiDriverRevision) {
      return EFI_INCOMPATIBLE_VERSION;
    }
  }

  //
  // Call constructor for all libraries.
  //
  ProcessLibraryConstructorList (ImageHandle, SystemTable);

  //
  // Call the module's entry point
  //
  Status = ProcessModuleEntryPointList (ImageHandle, SystemTable);

  //
  // Process destructor for all libraries.
  //
  ProcessLibraryDestructorList (ImageHandle, SystemTable);

  //
  // Return the return status code from the driver entry point
  //
  return Status;
}


首先追到的是 ProcessLibraryConstructorList 我们在其中插入Debug信息。特别注意,插入的位置在 \Build\NT32IA32\DEBUG_MYTOOLS\IA32\AppPkg\Applications\Hello1\Hello1\DEBUG\AutoGen.c
因为这个文件是编译过程中生成的,所以我们不可以重新 Build AppPkg,而要在目录中(\Build\NT32IA32\DEBUG_MYTOOLS\IA32\AppPkg\Applications\Hello1\Hello1\) 直接运行 NMake来编译;
2.3 插入Debug信息后,NMAKE 编译通过,直接运行 Hello1.efi 一次,确保没问题,再用 exec4 加载 hello1.efi 。同样有错误,这说明问题不是发生在ProcessLibraryConstructorList 中;下面是插入后的代码式样:

VOID
EFIAPI
ProcessLibraryConstructorList (
  IN EFI_HANDLE        ImageHandle,
  IN EFI_SYSTEM_TABLE  *SystemTable
  )
{
  EFI_STATUS  Status;
  EFI_INPUT_KEY	Key;
  
  SystemTable->ConOut->OutputString(SystemTable->ConOut,L"UefiRuntimeServicesTableLibConstructor\n\r");
  Key.ScanCode=SCAN_NULL;
  while (SCAN_UP!=Key.ScanCode)
  {Status= SystemTable -> ConIn -> ReadKeyStroke(SystemTable->ConIn,&Key);}
  SystemTable->ConOut->OutputString(SystemTable->ConOut,L"Waiting for DOWN_KEY\n\r");	
  Key.ScanCode=SCAN_NULL;
  while (SCAN_DOWN!=Key.ScanCode)
  {Status= SystemTable -> ConIn -> ReadKeyStroke(SystemTable->ConIn,&Key);}
	
  Status = UefiRuntimeServicesTableLibConstructor (ImageHandle, SystemTable);
  ASSERT_EFI_ERROR (Status);

   
  SystemTable->ConOut->OutputString(SystemTable->ConOut,L"UefiBootServicesTableLibConstructor\n\r");
  Key.ScanCode=SCAN_NULL;
  while (SCAN_UP!=Key.ScanCode)
  {Status= SystemTable -> ConIn -> ReadKeyStroke(SystemTable->ConIn,&Key);}
  SystemTable->ConOut->OutputString(SystemTable->ConOut,L"Waiting for DOWN_KEY\n\r");	
  Key.ScanCode=SCAN_NULL;
  while (SCAN_DOWN!=Key.ScanCode)
  {Status= SystemTable -> ConIn -> ReadKeyStroke(SystemTable->ConIn,&Key);}

  Status = UefiBootServicesTableLibConstructor (ImageHandle, SystemTable);
  ASSERT_EFI_ERROR (Status);


  SystemTable->ConOut->OutputString(SystemTable->ConOut,L"UefiLibConstructor\n\r");
  Key.ScanCode=SCAN_NULL;
  while (SCAN_UP!=Key.ScanCode)
  {Status= SystemTable -> ConIn -> ReadKeyStroke(SystemTable->ConIn,&Key);}
  SystemTable->ConOut->OutputString(SystemTable->ConOut,L"Waiting for DOWN_KEY\n\r");	
  Key.ScanCode=SCAN_NULL;
  while (SCAN_DOWN!=Key.ScanCode)
  {Status= SystemTable -> ConIn -> ReadKeyStroke(SystemTable->ConIn,&Key);}
  
  Status = UefiLibConstructor (ImageHandle, SystemTable);
  ASSERT_EFI_ERROR (Status);
  

  SystemTable->ConOut->OutputString(SystemTable->ConOut,L"__wchar_construct\n\r");
  Key.ScanCode=SCAN_NULL;
  while (SCAN_UP!=Key.ScanCode)
  {Status= SystemTable -> ConIn -> ReadKeyStroke(SystemTable->ConIn,&Key);}
  SystemTable->ConOut->OutputString(SystemTable->ConOut,L"Waiting for DOWN_KEY\n\r");	
  Key.ScanCode=SCAN_NULL;
  while (SCAN_DOWN!=Key.ScanCode)
  {Status= SystemTable -> ConIn -> ReadKeyStroke(SystemTable->ConIn,&Key);}
  
  Status = __wchar_construct (ImageHandle, SystemTable);
  ASSERT_EFI_ERROR (Status);


  SystemTable->ConOut->OutputString(SystemTable->ConOut,L"ShellLibConstructor \n\r");
  Key.ScanCode=SCAN_NULL;
  while (SCAN_UP!=Key.ScanCode)
  {Status= SystemTable -> ConIn -> ReadKeyStroke(SystemTable->ConIn,&Key);}
  SystemTable->ConOut->OutputString(SystemTable->ConOut,L"Waiting for DOWN_KEY\n\r");	
  Key.ScanCode=SCAN_NULL;
  while (SCAN_DOWN!=Key.ScanCode)
  {Status= SystemTable -> ConIn -> ReadKeyStroke(SystemTable->ConIn,&Key);}

  Status = ShellLibConstructor (ImageHandle, SystemTable);
  ASSERT_EFI_ERROR (Status);


  SystemTable->ConOut->OutputString(SystemTable->ConOut,L"UefiHiiServicesLibConstructor  \n\r");
  Key.ScanCode=SCAN_NULL;
  while (SCAN_UP!=Key.ScanCode)
  {Status= SystemTable -> ConIn -> ReadKeyStroke(SystemTable->ConIn,&Key);}
  SystemTable->ConOut->OutputString(SystemTable->ConOut,L"Waiting for DOWN_KEY\n\r");	
  Key.ScanCode=SCAN_NULL;
  while (SCAN_DOWN!=Key.ScanCode)
  {Status= SystemTable -> ConIn -> ReadKeyStroke(SystemTable->ConIn,&Key);}
  Status = UefiHiiServicesLibConstructor (ImageHandle, SystemTable);
  ASSERT_EFI_ERROR (Status);

}


直接运行程序会不断暂停等待按键才继续:

image001

2.4 接下来在ProcessModuleEntryPointList中像上面一样插入Debug,

  //
  // Call the module's entry point
  //
  Status = ProcessModuleEntryPointList (ImageHandle, SystemTable);


EFI_STATUS
EFIAPI
ProcessModuleEntryPointList (
  IN EFI_HANDLE        ImageHandle,
  IN EFI_SYSTEM_TABLE  *SystemTable
  )

{
  EFI_STATUS  Status;
  EFI_INPUT_KEY	Key;

  SystemTable->ConOut->OutputString(SystemTable->ConOut,L"ShellCEntryLib  \n\r");
  Key.ScanCode=SCAN_NULL;
  while (SCAN_UP!=Key.ScanCode)
  {Status= SystemTable -> ConIn -> ReadKeyStroke(SystemTable->ConIn,&Key);}
  SystemTable->ConOut->OutputString(SystemTable->ConOut,L"Waiting for DOWN_KEY\n\r");	
  Key.ScanCode=SCAN_NULL;
  while (SCAN_DOWN!=Key.ScanCode)
  {Status= SystemTable -> ConIn -> ReadKeyStroke(SystemTable->ConIn,&Key);}
  Status=ShellCEntryLib (ImageHandle, SystemTable);
  
  SystemTable->ConOut->OutputString(SystemTable->ConOut,L"ShellCEntryLib Exit \n\r");
  Key.ScanCode=SCAN_NULL;
  while (SCAN_UP!=Key.ScanCode)
  {Status= SystemTable -> ConIn -> ReadKeyStroke(SystemTable->ConIn,&Key);}
  SystemTable->ConOut->OutputString(SystemTable->ConOut,L"Waiting for DOWN_KEY\n\r");	
  Key.ScanCode=SCAN_NULL;
  while (SCAN_DOWN!=Key.ScanCode)
  {Status= SystemTable -> ConIn -> ReadKeyStroke(SystemTable->ConIn,&Key);}  
  return EFI_SUCCESS;
}


再次实验 Exec4 加载发现,现象消失了。仔细琢磨一下,应该是我最后 return EFI_SUCCESS 导致的。所以问题就应该发生在进入 ShellCEntryLib 那里。

2.5 继续调试直接在 ShellCEntryLib 加入 Debug 信息

/**
  UEFI entry point for an application that will in turn call the
  ShellAppMain function which has parameters similar to a standard C
  main function.

  An application that uses UefiShellCEntryLib must have a ShellAppMain
  function as prototyped in Include/Library/ShellCEntryLib.h.

  Note that the Shell uses POSITIVE integers for error values, while UEFI
  uses NEGATIVE values.  If the application is to be used within a script,
  it needs to return one of the SHELL_STATUS values defined in ShellBase.h.

  @param  ImageHandle  The image handle of the UEFI Application.
  @param  SystemTable  A pointer to the EFI System Table.

  @retval  EFI_SUCCESS               The application exited normally.
  @retval  Other                     An error occurred.

**/
EFI_STATUS
EFIAPI
ShellCEntryLib (
  IN EFI_HANDLE        ImageHandle,
  IN EFI_SYSTEM_TABLE  *SystemTable
  )
{
  INTN                           ReturnFromMain;
  EFI_SHELL_PARAMETERS_PROTOCOL *EfiShellParametersProtocol;
  EFI_SHELL_INTERFACE           *EfiShellInterface;
  EFI_STATUS                    Status;

  ReturnFromMain = -1;
  EfiShellParametersProtocol = NULL;
  EfiShellInterface = NULL;

  Status = SystemTable->BootServices->OpenProtocol(ImageHandle,
                             &gEfiShellParametersProtocolGuid,
                             (VOID **)&EfiShellParametersProtocol,
                             ImageHandle,
                             NULL,
                             EFI_OPEN_PROTOCOL_GET_PROTOCOL
                            );
  if (!EFI_ERROR(Status)) {
SystemTable->ConOut->OutputString(SystemTable->ConOut,L"Shell2\n\r");	 
    //
    // use shell 2.0 interface
    //
    ReturnFromMain = ShellAppMain (
                       EfiShellParametersProtocol->Argc,
                       EfiShellParametersProtocol->Argv
                      );
  } else {
  SystemTable->ConOut->OutputString(SystemTable->ConOut,L"Shell1\n\r");	  
    //
    // try to get shell 1.0 interface instead.
    //
    Status = SystemTable->BootServices->OpenProtocol(ImageHandle,
                               &gEfiShellInterfaceGuid,
                               (VOID **)&EfiShellInterface,
                               ImageHandle,
                               NULL,
                               EFI_OPEN_PROTOCOL_GET_PROTOCOL
                              );
    if (!EFI_ERROR(Status)) {
SystemTable->ConOut->OutputString(SystemTable->ConOut,L"Shell1.1\n\r");	 	
      //
      // use shell 1.0 interface
      //
      ReturnFromMain = ShellAppMain (
                         EfiShellInterface->Argc,
                         EfiShellInterface->Argv
                        );
    } else {
SystemTable->ConOut->OutputString(SystemTable->ConOut,L"Shell fail\n\r");	 	
      ASSERT(FALSE);
    }
  }
  return ReturnFromMain;
}


直接运行,输出如下:
image002

用exec4加载之后输出如下:

image003

可以看到,两种方式下,运行路径是不同的。

最后的结论:产生问题的原因是,当我们用 StartImage 运行一个 CLib程序的时候,Clib带入的函数找不到 Efi Shell Interface (要用这个Interface 的原因是希望取命令行参数传给被调用者)。找不到的时候就报错,报告一个加载不成功。

本文提到的 hello1 hello2 exec4 的源代码下载:
exec4
Hello2
Hello1

参考:

1.http://www.lab-z.com/utpk/ UEFI Tips 用按键做Pause
2.http://www.lab-z.com/22applicationentry/ Application的入口分析

虚拟机和主机的串口通讯 (VirtualBox)

我一直在使用 VirtualBox 虚拟机,忽然想起可以通过设置串口的方式来进行Windbg对虚拟机中的OS进行调试,这就意味着同样也可以使用串口来进行虚拟机和主机的通讯。
具体的操作是根据【参考1】进行的。
在虚拟机中调整Settings->Serial Ports的设置,可以看到VirtualBox支持2个串口。在Enable串口之前,进入虚拟机只有一个 LPT1 (我不知道是怎么来的) 。

image001

Disconnected 未连接,虚拟机中会出现串口,但是不和任何实际设备对应
Host Pipe 主机管道,选择之后会要求你输入一个管道的名称。虚拟机中对于串口的访问都会发生在这个管道上。管道名称是 \\.\pipe\
Host Device主机设备,可以选择主机上的一个设备比如 com1。虚拟机上对于串口的访问重新发送/接收到这个设备上。
Raw File 裸文件,可以设置主机的一个文件。看起来这个功能更多只是用来看一下串口的Log,应该不能用作交互控制。
例子:我设置一个名称为 labz1 的pipe。
image003
正常启动进入虚拟机(XP系统)
可以看到,有一个com1
image005

打开超级终端,使用com1通讯
image008

此外其他配置使用默认即可

image009

设置 Putty(这个软件运行在虚拟机之外) 如下
image011

这时,在Putty中输入字符可以在虚拟机中受到,反之亦可。
image013

参考:
1. http://www.crifan.com/summary_how_to_configure_virtualbox_serial_port/ 【详解】如何配置VirtualBox中的虚拟机的串口

UEFI Tips 用按键做Pause

很多年前,我去AMI学习,偶然间看到他们在代码中加入通过 60/61 Port来读取键盘按键信息实现一个按需Delay ,深以为意。今天偶然间想起来,在调试Application 的时候,配合屏幕输出也可以用这样的方式来进行Debug。

下面是一个例子:

#include  <Uefi.h>
#include  <Library/UefiLib.h>
#include  <Library/ShellCEntryLib.h>


extern EFI_BOOT_SERVICES         *gBS;
extern EFI_SYSTEM_TABLE		 *gST;
extern EFI_RUNTIME_SERVICES 	 *gRT;

#define SCAN_NULL       0x0000
#define SCAN_UP         0x0001
#define SCAN_DOWN       0x0002
#define SCAN_ESC        0x0017

int
EFIAPI
main (
  IN int Argc,
  IN CHAR16 **Argv
  )
{
  EFI_INPUT_KEY	Key;
  EFI_STATUS		Status;  
  gST->ConOut->OutputString(gST->ConOut,L"Test Starting.....\n\r");
  gST->ConOut->OutputString(gST->ConOut,L"Waiting for UP_KEY\n\r");
  
  Key.ScanCode=SCAN_NULL;
  while (SCAN_UP!=Key.ScanCode)
    {
		Status= gST -> ConIn -> ReadKeyStroke(gST->ConIn,&Key);	
	}
  
  gST->ConOut->OutputString(gST->ConOut,L"Waiting for DOWN_KEY\n\r");	
  Key.ScanCode=SCAN_NULL;
  while (SCAN_DOWN!=Key.ScanCode)
    {
		Status= gST -> ConIn -> ReadKeyStroke(gST->ConIn,&Key);	
	}
  return EFI_SUCCESS;
}


通过按光标向上和向下继续运行,运行结果:

keypasue

完整文件下载

KeyPause

Step to UEFI (84) ShellExecute 的使用

之前提到过,使用 LoadImage 和 StartImage 无法加载 CLib Build出来的 EFI Application。一种变通的方法是通过 ShellLib 下面的 ShellExcute 来调用其他的 EFI Application。

具体定义在 \ShellPkg\Library\UefiShellLib\UefiShellLib.c

**
  Cause the shell to parse and execute a command line.

  This function creates a nested instance of the shell and executes the specified
  command (CommandLine) with the specified environment (Environment). Upon return,
  the status code returned by the specified command is placed in StatusCode.
  If Environment is NULL, then the current environment is used and all changes made
  by the commands executed will be reflected in the current environment. If the
  Environment is non-NULL, then the changes made will be discarded.
  The CommandLine is executed from the current working directory on the current
  device.

  The EnvironmentVariables pararemeter is ignored in a pre-UEFI Shell 2.0
  environment.  The values pointed to by the parameters will be unchanged by the
  ShellExecute() function.  The Output parameter has no effect in a
  UEFI Shell 2.0 environment.

  @param[in] ParentHandle         The parent image starting the operation.
  @param[in] CommandLine          The pointer to a NULL terminated command line.
  @param[in] Output               True to display debug output.  False to hide it.
  @param[in] EnvironmentVariables Optional pointer to array of environment variables
                                  in the form "x=y".  If NULL, the current set is used.
  @param[out] Status              The status of the run command line.

  @retval EFI_SUCCESS             The operation completed sucessfully.  Status
                                  contains the status code returned.
  @retval EFI_INVALID_PARAMETER   A parameter contains an invalid value.
  @retval EFI_OUT_OF_RESOURCES    Out of resources.
  @retval EFI_UNSUPPORTED         The operation is not allowed.
**/
EFI_STATUS
EFIAPI
ShellExecute (
  IN EFI_HANDLE                 *ParentHandle,
  IN CHAR16                     *CommandLine OPTIONAL,
  IN BOOLEAN                    Output OPTIONAL,
  IN CHAR16                     **EnvironmentVariables OPTIONAL,
  OUT EFI_STATUS                *Status OPTIONAL
  )
{
  EFI_STATUS                CmdStatus;
  //
  // Check for UEFI Shell 2.0 protocols
  //
  if (gEfiShellProtocol != NULL) {
    //
    // Call UEFI Shell 2.0 version (not using Output parameter)
    //
    return (gEfiShellProtocol->Execute(ParentHandle,
                                      CommandLine,
                                      EnvironmentVariables,
                                      Status));
  }

  //
  // Check for EFI shell
  //
  if (mEfiShellEnvironment2 != NULL) {
    //
    // Call EFI Shell version.
    // Due to oddity in the EFI shell we want to dereference the ParentHandle here
    //
    CmdStatus = (mEfiShellEnvironment2->Execute(*ParentHandle,
                                          CommandLine,
                                          Output));
    //
    // No Status output parameter so just use the returned status
    //
    if (Status != NULL) {
      *Status = CmdStatus;
    }
    //
    // If there was an error, we can't tell if it was from the command or from
    // the Execute() function, so we'll just assume the shell ran successfully
    // and the error came from the command.
    //
    return EFI_SUCCESS;
  }

  return (EFI_UNSUPPORTED);
}


调用参数如下:
ParentHandle 执行操作的父进程的Handle
CommandLine 要执行的命令行
Output 是否输出 Debug 信息(这里我没有搞明白,如果有清楚的朋友望不吝赐教)
EnvironmentVariables 环境变量

因为已经在头文件中定义过,所以我们可以直接调用。

比如用下面的方式可以执行 ls 命令:

Shell command
  CHAR16	  *S=L"ls";
  OpStat = ShellExecute( &MyHandle, S, FALSE, NULL, &CmdStat);


我们再编写一个简单的程序输出当前收到的命令行参数

#include  <Uefi.h>
#include  <Library/UefiLib.h>
#include  <Library/ShellCEntryLib.h>

int
EFIAPI
main (                                         
  IN int Argc,
  IN char **Argv
  )
{
	int	i;
	
	for (i=0;i<Argc; i++)	{
		Print(L"%S\n",Argv[i]);
	}
		
  return EFI_SUCCESS;
}


[Defines]
  INF_VERSION                    = 0x00010006
  BASE_NAME                      = Hello1
  FILE_GUID                      = 4ea97c46-7491-4dfd-0048-747010f3ce51
  MODULE_TYPE                    = UEFI_APPLICATION
  VERSION_STRING                 = 0.1
  ENTRY_POINT                    = ShellCEntryLib

#   
#  VALID_ARCHITECTURES           = IA32 X64 IPF
#

[Sources]
  Hello1.c

[Packages]
  StdLib/StdLib.dec   
  MdePkg/MdePkg.dec
  ShellPkg/ShellPkg.dec 


[LibraryClasses]
  LibC
  LibStdio
  ShellCEntryLib   
  ShellLib
  BaseLib
  BaseMemoryLib
  UefiLib

  
[Protocols]

  
[BuildOptions]


运行结果

se1

我们使用 ShellExecute 的代码

#include  <Uefi.h>
#include  <Library/UefiLib.h>
#include  <Library/ShellCEntryLib.h>

#include <Library/ShellLib.h>

extern EFI_BOOT_SERVICES           	 *gBS;
extern EFI_SYSTEM_TABLE				 *gST;
extern EFI_RUNTIME_SERVICES 		 *gRT;

extern EFI_SHELL_PROTOCOL            *gEfiShellProtocol;
extern EFI_SHELL_ENVIRONMENT2 		 *mEfiShellEnvironment2;
extern EFI_HANDLE 					 gImageHandle;

int
EFIAPI
main (
  IN int Argc,
  IN char **Argv
  )
{
  EFI_STATUS  CmdStat;
  EFI_STATUS  OpStat;
  EFI_HANDLE  MyHandle = gImageHandle;
  CHAR16	  *S=L"hello1.efi a1 b2 c3";
  
  OpStat = ShellExecute( &MyHandle, S, FALSE, NULL, &CmdStat);
  
  return EFI_SUCCESS;
}


最后运行结果
se2

可以看到,能够调用hello1.efi 并且正确的传递了参数。

本文提到的完整代码下载:

shellexecdemo

和技嘉的板子搏斗了一天

前年配了一个台式机,16G 内存 ,Intel I7 4790S的 CPU。当时装的是 GigaByte 的 G1 Sniper b5的板子。我的要求就是:稳定。 CPU 和 内存都是降频运行的。最近感觉硬盘不太稳定,又买了一个新的硬盘,不料安装系统给我折腾的够呛。

装系统需要重启,大约是因为我做的启动盘格式有问题,一直没有办法进去安装盘,我只得Reset重启。没想到这样几次之后,主板就开始抽风:启动,能看到光标,然后关机一直反复这个动作。折腾了很久都没有搞定。最后网上搜索到这块主板是双BIOS(Dual BIOS/Dual SPI),关机状态下长按Power Button开机,开机之后继续按住可以进入Recovery Mode…….此外还可以短接主板上一个 SPI NOR 的 Pin 1 和 Pin 8 强制进入,但是动硬件的话难免风险,按 Button 更简单稳妥一些。

经过无数次折腾,终于进入了这个 Mode,主板从另外一个 SPI NOR 读取出来数据覆盖到主 SPI 上才恢复。

看起来 GigaByte 主板在设计或者说测试阶段应该没有发现:当无法启动Leagcy OS后,主动关机会导致 BIOS 进入某种特殊状态的 Bug。万幸 Dual BIOS 功能做的还不错。

最后经过无数次的努力终于把系统装上,告一段落。

Step to UEFI (83) BlockIo Protocol

“因为硬盘是一种块设备,所以每个硬盘设备(硬盘设备包括分区设备)控制器都安装有一个 BlockIo 实例,一个 BlockIo2实例。BlockIo 提供了访问设备的阻塞函数,BlockIo2提供了访问设备的异步函数”【参考1】

blk2

blk1

这里提供一个枚举BlockIo,然后显示每一个 Media 属性的例子:

#include  <Uefi.h>
#include  <Library/UefiLib.h>
#include  <Library/ShellCEntryLib.h>
#include <Protocol/BlockIo.h>

extern EFI_BOOT_SERVICES         *gBS;
extern EFI_SYSTEM_TABLE			 *gST;
extern EFI_RUNTIME_SERVICES 	 *gRT;

int
EFIAPI
main (
  IN int Argc,
  IN CHAR16 **Argv
  )
{
    EFI_STATUS				Status;
    UINTN					HandleCount,HandleIndex;
    EFI_HANDLE              *BlockControllerHandles = NULL;	
	EFI_BLOCK_IO_PROTOCOL   *BlockIo;
	
	//找到全部有 BlockIo Protocol 的Device
    Status = gBS->LocateHandleBuffer(
            ByProtocol,
            &gEfiBlockIoProtocolGuid,
            NULL,
            &HandleCount,
            &BlockControllerHandles);  

   if (!EFI_ERROR(Status)) {
        //逐个打开 
        for (HandleIndex = 0; HandleIndex < HandleCount; HandleIndex++) {
            /*打开EFI_BLOCK_IO_PROTOCOL  */ 
            Status = gBS->HandleProtocol(
                    BlockControllerHandles[HandleIndex],
                    &gEfiBlockIoProtocolGuid,
                    (VOID**)&BlockIo);
			//显示信息		
			Print(L"-->[Device]<--:%d\n",HandleIndex);
			Print(L"MediaId       :%0x\n",BlockIo->Media->MediaId);
    		Print(L"RemovableMedia:%0x\n",BlockIo->Media->RemovableMedia);
    		Print(L"MediaPresent  :%0x\n",BlockIo->Media->MediaPresent);
    		Print(L"ReadOnly      :%0x\n",BlockIo->Media->ReadOnly); 
    		Print(L"WriteCaching  :%0x\n",BlockIo->Media->WriteCaching);
    		Print(L"BlockSize     :%0x\n",BlockIo->Media->BlockSize);
    		Print(L"IoAlign       :%0x\n",BlockIo->Media->IoAlign);
    		Print(L"LastBlock     :%0x\n",BlockIo->Media->LastBlock);
    		Print(L"LogicalPartition :%0x\n",BlockIo->Media->LogicalPartition);
    		Print(L"LowestAlignedLba :%0x\n",BlockIo->Media->LowestAlignedLba);
    		Print(L"LogicalBlocksPerPhysicalBlock   : %0x\n",
			BlockIo->Media->LogicalBlocksPerPhysicalBlock);
    		Print(L"OptimalTransferLengthGranularity: %0x\n",
			BlockIo->Media->OptimalTransferLengthGranularity);
        }	//for (HandleIndex = 0;
		
        gBS->FreePool(BlockControllerHandles);
    }			
  return EFI_SUCCESS;
}


在 Nt32 虚拟机中运行的结果

blockioa

完整的代码和程序下载:

BIOTest

参考
1. UEFI 原理与编程 P139

一个计算时间的批处理

有时候,我们需要简单的测量一下某个程序经过的时间,经过搜索在网上【参考1】,找到下面的批处理可以完成这个要求。

@echo off
set ns=0
rem Show start time
set time1=%time%
echo Start time is %time1%
call :time2sec %time1%
set t1=%ns%


rem Do what you want


rem Show end time
set time2=%time%
echo End time is ?%time2%
call :time2sec %time2%
set t2=%ns%
rem Calculate
set /a tdiff=%t2% - %t1%
echo diff %time1% from %time2% = %tdiff% seconds.
goto :eof

:time2sec
rem CDonvert time to seconds. Save to ns
set tt=%1
set hh=%tt:~0,2%
set mm=%tt:~3,2%
set ss=%tt:~6,2%
set /a ns=(%hh%*60+%mm%)*60+%ss%


goto :eof


比如,我用这个工具来测试Build BIOS 的时间:

CLean 之后,build 要花费5分钟
clean

再次编译,build只需要不到一分钟
noclean

参考:
1.http://zhidao.baidu.com/link?url=dL8oq_ik4tX5St4YkwQk4vz8HjYGIeFa6ybUs21BI9h6VdSdx7B7BpqdaiVIsNr8rKNlYoRJZ4rIGpxwRfCB3a

Step to UEFI (82) NT32Pkg的Debug Message

最近在查看EDKII代码的时候忽然有一个奇怪的想法:在运行模拟器的时候(Build Run),我们可以在编译窗口看到很多输出的Debug 信息,那么我们是否可以在自己编写的Application中输出这样的信息?

最直接的想法是在 Application中调用 gWinNt ,但是如果要用这个东西,需要定义很多文件头,最麻烦的是这些头文件最后都要使用 Windows.h ,编译的时候总是无法通过。另外的方法是,在 Application 中调用诸如 WinNtThunkDxe 或者 WinNtSerialIoDxe 这样的Protocol,但是在编译使同样会遇到有上面的问题。我尝试了很多次都没有成功,最后只好放弃。

换一种思路,我们可以在NT32Pkg中留下可供调用的函数,然后在 Application 中Call这个函数。

最简单的功能就是用于系统重启的 gST->Reset 。经过查找,模拟器中实现这个功能的代码在 \Nt32Pkg\ResetRuntimeDxe\reset.c 。头定义如下

VOID
EFIAPI
WinNtResetSystem (
  IN EFI_RESET_TYPE   ResetType,
  IN EFI_STATUS       ResetStatus,
  IN UINTN            DataSize,
  IN VOID             *ResetData OPTIONAL
  )
/*++

Routine Description:

  TODO: Add function description

Arguments:

  ResetType   - TODO: add argument description
  ResetStatus - TODO: add argument description
  DataSize    - TODO: add argument description
  ResetData   - TODO: add argument description

Returns:

  EFI_SUCCESS - TODO: Add description for return value

--*/


实现功能的代码只有一行 gWinNt->ExitProcess (0)。只要把这些语句注释掉,替换为我们的输出代码即可。参考 \Nt32Pkg\Library\PeiNt32OemHookStatusCodeLib\Nt32OemHookStatusCodeLib.c
,对编译窗口输出的语句如下:

 //
  // Callout to standard output.
  //
  mWinNt->WriteFile (
            mStdOut,
            Buffer,
            (DWORD)CharCount,
            (LPDWORD)&CharCount,
            NULL
            );


搬过来,写成下面的形式:

VOID
EFIAPI
WinNtResetSystem (
  IN EFI_RESET_TYPE   ResetType,
  IN EFI_STATUS       ResetStatus,
  IN UINTN            DataSize,
  IN VOID             *ResetData OPTIONAL
  )
/*++

Routine Description:

  TODO: Add function description

Arguments:

  ResetType   - TODO: add argument description
  ResetStatus - TODO: add argument description
  DataSize    - TODO: add argument description
  ResetData   - TODO: add argument description

Returns:

  EFI_SUCCESS - TODO: Add description for return value

--*/
{
  CHAR8			 *R="www.lab-z.com \n\r";	
  UINTN           CharCount=AsciiStrLen(R);
  
  //
  // Cache of standard output handle .
  //
	HANDLE                      mStdOut;
  
  //
  // Cache standard output handle.
  //
  mStdOut = gWinNt->GetStdHandle (STD_OUTPUT_HANDLE);  
  
  //
  // Callout to standard output.
  //
  gWinNt->WriteFile (
            mStdOut,
            R,
            (DWORD)CharCount,
            (LPDWORD)&CharCount,
            NULL
            );
			
  //
  // BUGBUG Need to kill all console windows later
  //
  //
  // Discard ResetType, always return 0 as exit code
  //
  //gWinNt->ExitProcess (0);

  //
  // Should never go here
  //
  //ASSERT (FALSE);
}


特别注意:字符串是 Ascii 定义的,末尾必须是 \r\n ,否则不会立即显示。

最后运行结果,只要在模拟器中输入 reset 即可看到字符串,正常的动作应该是退出模拟器。

nt32a

nt32b

因为我修改掉了退出的方法,每次需要在编译窗口用 ctrl+c来结束模拟器了。

这里只是一个Demo,最好还是重新在EDKII代码中定义一个用来直接输出的接口。