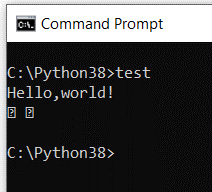
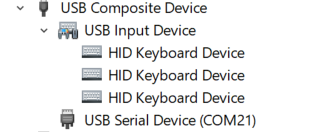
ESP32 SPI 速度测试

使用DFRobot 的 FireBeetle 测试 SPI速度,代码在\DFRobot_FireBeetle-ESP32\0.0.9\libraries\SPI\examples  下面:

/* The ESP32 has four SPi buses, however as of right now only two of
 * them are available to use, HSPI and VSPI. Simply using the SPI API 
 * as illustrated in Arduino examples will use HSPI, leaving VSPI unused.
 * 
 * However if we simply intialise two instance of the SPI class for both
 * of these buses both can be used. However when just using these the Arduino
 * way only will actually be outputting at a time.
 * 
 * Logic analyser capture is in the same folder as this example as
 * "multiple_bus_output.png"
 * 
 * created 30/04/2018 by Alistair Symonds
 */
#include <SPI.h>

static const int spiClk = 1000000; // 1 MHz

//uninitalised pointers to SPI objects
SPIClass * vspi = NULL;
SPIClass * hspi = NULL;

void setup() {
  //initialise two instances of the SPIClass attached to VSPI and HSPI respectively
  vspi = new SPIClass(VSPI);
  hspi = new SPIClass(HSPI);
  
  //clock miso mosi ss

  //initialise vspi with default pins
  //SCLK = 18, MISO = 19, MOSI = 23, SS = 5
  vspi->begin();
  //alternatively route through GPIO pins of your choice
  //hspi->begin(0, 2, 4, 33); //SCLK, MISO, MOSI, SS
  
  //initialise hspi with default pins
  //SCLK = 14, MISO = 12, MOSI = 13, SS = 15
  hspi->begin(); 
  //alternatively route through GPIO pins
  //hspi->begin(25, 26, 27, 32); //SCLK, MISO, MOSI, SS

  //set up slave select pins as outputs as the Arduino API
  //doesn't handle automatically pulling SS low
  pinMode(5, OUTPUT); //VSPI SS
  pinMode(15, OUTPUT); //HSPI SS

}

// the loop function runs over and over again until power down or reset
void loop() {
  //use the SPI buses
  vspiCommand();
  hspiCommand();
  delay(100);
}

void vspiCommand() {
  byte data = 0b01010101; // junk data to illustrate usage

  //use it as you would the regular arduino SPI API
  vspi->beginTransaction(SPISettings(spiClk, MSBFIRST, SPI_MODE0));
  digitalWrite(5, LOW); //pull SS slow to prep other end for transfer
  vspi->transfer(data);  
  digitalWrite(5, HIGH); //pull ss high to signify end of data transfer
  vspi->endTransaction();
}

void hspiCommand() {
  byte stuff = 0b11001100;
  
  hspi->beginTransaction(SPISettings(spiClk, MSBFIRST, SPI_MODE0));
  digitalWrite(15, LOW);
  hspi->transfer(stuff);
  digitalWrite(15, HIGH);
  hspi->endTransaction();
}

其中的 spiClk 指定的是SPI 通讯速度,最高可以设置为 80000000(80M),示波器测量如下:

40M 波形测试如下

https://docs.espressif.com/projects/esp-idf/en/latest/esp32/api-reference/peripherals/spi_master.html

Secure Boot 导致的蓝屏问题

最近在 Debug 一个问题,在刷坏了一个主板之后我更换了同型号的另外的主板。开机之后出现了无法进入系统的问题。

BSOD Message

试验无法进入安全模式。接下使用之前的 WinPe 盘【参考1】启动,查看上图提到的 SrtTrail.txt 内容如下:

Startup Repair diagnosis and repair log
---------------------------
Last successful boot time: ‎5/‎19/‎2020 11:39:04 PM (GMT)
Number of repair attempts: 1

Session details
---------------------------
System Disk = \Device\Harddisk0
Windows directory = C:\Windows
AutoChk Run = 0
Number of root causes = 1

Test Performed: 
---------------------------
Name: Check for updates
Result: Completed successfully. Error code =  0x0
Time taken = 0 ms

Test Performed: 
---------------------------
Name: System disk test
Result: Completed successfully. Error code =  0x0
Time taken = 0 ms

Test Performed: 
---------------------------
Name: Disk failure diagnosis
Result: Completed successfully. Error code =  0x0
Time taken = 0 ms

Test Performed: 
---------------------------
Name: Disk metadata test
Result: Completed successfully. Error code =  0x0
Time taken = 141 ms

Test Performed: 
---------------------------
Name: Disk metadata test
Result: Completed successfully. Error code =  0x0
Time taken = 0 ms

Test Performed: 
---------------------------
Name: Target OS test
Result: Completed successfully. Error code =  0x0
Time taken = 16 ms

Test Performed: 
---------------------------
Name: Volume content check
Result: Completed successfully. Error code =  0x0
Time taken = 31 ms

Test Performed: 
---------------------------
Name: Boot manager diagnosis
Result: Completed successfully. Error code =  0x0
Time taken = 0 ms

Test Performed: 
---------------------------
Name: System boot log diagnosis
Result: Completed successfully. Error code =  0x0
Time taken = 0 ms

Test Performed: 
---------------------------
Name: Event log diagnosis
Result: Completed successfully. Error code =  0x0
Time taken = 0 ms

Test Performed: 
---------------------------
Name: Internal state check
Result: Completed successfully. Error code =  0x0
Time taken = 0 ms

Test Performed: 
---------------------------
Name: Check for installed LCU
Result: Completed successfully. Error code =  0x0
Time taken = 4515 ms

Test Performed: 
---------------------------
Name: Check for installed driver updates
Result: Completed successfully. Error code =  0x0
Time taken = 750 ms

Test Performed: 
---------------------------
Name: Check for pending package install
Result: Completed successfully. Error code =  0x0
Time taken = 1625 ms

Test Performed: 
---------------------------
Name: Boot status test
Result: Completed successfully. Error code =  0x0
Time taken = 0 ms

Test Performed: 
---------------------------
Name: Setup state check
Result: Completed successfully. Error code =  0x0
Time taken = 94 ms

Test Performed: 
---------------------------
Name: Registry hives test
Result: Completed successfully. Error code =  0x0
Time taken = 469 ms

Test Performed: 
---------------------------
Name: Windows boot log diagnosis
Result: Completed successfully. Error code =  0x0
Time taken = 0 ms

Root cause found: 
---------------------------
Boot critical file c:\windows\system32\drivers\msdmfilt.sys is corrupt.

Repair action: File repair
Result: Failed. Error code =  0x57
Time taken = 1063 ms

---------------------------
---------------------------

从上面可以看到是因为 msdmfilt.sys 导致的,搜索了一下这个文件是 WTDF 的文件。没有办法进入安全模式也就没有办法卸载。忽然想起来可能是因为BIOS版本不同导致的。尝试启动到 Shell 来刷BIOS。但是又遇到数字签名不对的问题。这时候我意识到安装 WDTF 的时候 Secure Boot 是Disabled的,更换主板后默认是 Enabled。于是,进入 Setup 设置为 Dsiabled,问题就解决了。

参考:

1. http://www.lab-z.com/newghost/ Ghost 替代者,新的全盘备份工具

2.https://softwaretested.com/windows/how-to-fix-srttrail-txt-bsod-error-on-windows-10/ How to Fix SrtTrail.txt BSOD Error on Windows 10

TinkerNode 恢复方法

因为 TinkerNode 内置U盘功能,所以在某些状况下U盘出现问题会导致系统被拖慢,开发板无法上传等等情况。遇到这样的问题可以通过下面的几个方法尝试修复:

1.Arduino IDE 上传 Blinker 或者一个空的文件;

2.使用 sptool.exe –chip esp32 –port 端口号 –baud 512000 erase_flash尝试烧写

例如:sptool.exe –chip esp32 –port COM43 –baud 512000 erase_flash

3.使用 Arduino IDE 下载 ESP32 支持包选择低波特率烧写。

Step to UEFI (214)Ps2键盘的LED 分析

之前研究过Shell下如何控制USB 键盘上的 LED【参考1】,这次研究如何实现 PS2 键盘的 LED 控制。

和 USB 键盘一样,PS2 键盘同样需要实现Shell 下键盘 LED 的同步。意思是如果系统中有一个 USB 键盘和一个PS2键盘,当USB键盘 Num 键按下后,键盘LED状态也要同步到PS2 键盘上。

PS2键盘

对应的代码可以在\MdeModulePkg\Bus\Isa\Ps2KeyboardDxe\Ps2KbdCtrller.c 的 UpdateStatusLights 函数中看到。根据代码基本想法如下在这个头文件中有如下定义\MdeModulePkg\Bus\Isa\Ps2KeyboardDxe\Ps2Keyboard.h:

typedef struct {
  UINTN                               Signature;

  EFI_HANDLE                          Handle;
  EFI_SIMPLE_TEXT_INPUT_PROTOCOL      ConIn;
  EFI_SIMPLE_TEXT_INPUT_EX_PROTOCOL   ConInEx;

  EFI_EVENT                           TimerEvent;

  UINT32                              DataRegisterAddress;
  UINT32                              StatusRegisterAddress;
  UINT32                              CommandRegisterAddress;

  BOOLEAN                             LeftCtrl;
  BOOLEAN                             RightCtrl;
  BOOLEAN                             LeftAlt;
  BOOLEAN                             RightAlt;
  BOOLEAN                             LeftShift;
  BOOLEAN                             RightShift;
  BOOLEAN                             LeftLogo;
  BOOLEAN                             RightLogo;
  BOOLEAN                             Menu;
  BOOLEAN                             SysReq;

  BOOLEAN                             CapsLock;
  BOOLEAN                             NumLock;
  BOOLEAN                             ScrollLock;

  BOOLEAN                             IsSupportPartialKey;
  //
  // Queue storing key scancodes
  //
  SCAN_CODE_QUEUE                     ScancodeQueue;
  EFI_KEY_QUEUE                       EfiKeyQueue;
  EFI_KEY_QUEUE                       EfiKeyQueueForNotify;

  //
  // Error state
  //
  BOOLEAN                             KeyboardErr;

  EFI_UNICODE_STRING_TABLE            *ControllerNameTable;

  EFI_DEVICE_PATH_PROTOCOL            *DevicePath;
  //
  // Notification Function List
  //
  LIST_ENTRY                          NotifyList;
  EFI_EVENT                           KeyNotifyProcessEvent;
} KEYBOARD_CONSOLE_IN_DEV;

先找到系统中的全部  EFI_SIMPLE_TEXT_INPUT_EX_PROTOCOL ,检查 Signature 确定后再使用下面的宏即可获得KEYBOARD_CONSOLE_IN_DEV结构体

#define KEYBOARD_CONSOLE_IN_DEV_FROM_THIS(a)  CR (a, KEYBOARD_CONSOLE_IN_DEV, ConIn, KEYBOARD_CONSOLE_IN_DEV_SIGNATURE)
#define TEXT_INPUT_EX_KEYBOARD_CONSOLE_IN_DEV_FROM_THIS(a) \
  CR (a, \
      KEYBOARD_CONSOLE_IN_DEV, \
      ConInEx, \
      KEYBOARD_CONSOLE_IN_DEV_SIGNATURE \
      )

之后即可用UpdateStatusLights() 函数实现更改LED 状态。

最终完整代码如下:

#include  <Uefi.h>
#include  <Library/UefiLib.h>
#include  <Library/ShellCEntryLib.h>
#include  <Library/IoLib.h>

#include  "Ps2Keyboard.h"

extern EFI_BOOT_SERVICES        *gBS;
extern EFI_SYSTEM_TABLE         *gST;
extern EFI_RUNTIME_SERVICES     *gRT;

EFI_GUID gEfiSimpleTextInputExProtocolGuid = 
  {0xdd9e7534, 0x7762, 0x4698, 
      { 0x8c, 0x14, 0xf5, 0x85, 0x17, 0xa6, 0x25, 0xaa } };
                       
UINTN
EFIAPI
MicroSecondDelay (
  IN      UINTN                     MicroSeconds
  )
{
  gBS->Stall(MicroSeconds);
  return MicroSeconds;
}

/**
  Write data register.

  @param ConsoleIn Pointer to instance of KEYBOARD_CONSOLE_IN_DEV
  @param Data      value wanted to be written

**/
VOID
KeyWriteDataRegister (
  IN KEYBOARD_CONSOLE_IN_DEV *ConsoleIn,
  IN UINT8                   Data
  )
{
  IoWrite8 (ConsoleIn->DataRegisterAddress, Data);
}

/**
  Read data register .

  @param ConsoleIn Pointer to instance of KEYBOARD_CONSOLE_IN_DEV

  @return return the value

**/
UINT8
KeyReadDataRegister (
  IN KEYBOARD_CONSOLE_IN_DEV *ConsoleIn
  )

{
  return IoRead8 (ConsoleIn->DataRegisterAddress);
}

/**
  Read status register.

  @param ConsoleIn  Pointer to instance of KEYBOARD_CONSOLE_IN_DEV

  @return value in status register

**/
UINT8
KeyReadStatusRegister (
  IN KEYBOARD_CONSOLE_IN_DEV *ConsoleIn
  )
{
  return IoRead8 (ConsoleIn->StatusRegisterAddress);
}

/**
  wait for a specific value to be presented on
  8042 Data register by keyboard and then read it,
  used in keyboard commands ack

  @param ConsoleIn Pointer to instance of KEYBOARD_CONSOLE_IN_DEV
  @param Value     the value wanted to be waited.

  @retval EFI_TIMEOUT Fail to get specific value in given time
  @retval EFI_SUCCESS Success to get specific value in given time.

**/
EFI_STATUS
KeyboardWaitForValue (
  IN KEYBOARD_CONSOLE_IN_DEV *ConsoleIn,
  IN UINT8                   Value
  )
{
  UINT8   Data;
  UINT32  TimeOut;
  UINT32  SumTimeOut;
  UINT32  GotIt;

  GotIt       = 0;
  TimeOut     = 0;
  SumTimeOut  = 0;

  //
  // Make sure the initial value of 'Data' is different from 'Value'
  //
  Data = 0;
  if (Data == Value) {
    Data = 1;
  }
  //
  // Read from 8042 (multiple times if needed)
  // until the expected value appears
  // use SumTimeOut to control the iteration
  //
  while (1) {
    //
    // Perform a read
    //
    for (TimeOut = 0; TimeOut < KEYBOARD_TIMEOUT; TimeOut += 30) {
      if (KeyReadStatusRegister (ConsoleIn) & 0x01) {
        Data = KeyReadDataRegister (ConsoleIn);
        break;
      }

      MicroSecondDelay (30);
    }

    SumTimeOut += TimeOut;

    if (Data == Value) {
      GotIt = 1;
      break;
    }

    if (SumTimeOut >= KEYBOARD_WAITFORVALUE_TIMEOUT) {
      break;
    }
  }
  //
  // Check results
  //
  if (GotIt == 1) {
    return EFI_SUCCESS;
  } else {
    return EFI_TIMEOUT;
  }

}

//
//\MdeModulePkg\Bus\Isa\Ps2KeyboardDxe\Ps2KbdCtrller.c
//
/**
  write key to keyboard

  @param ConsoleIn Pointer to instance of KEYBOARD_CONSOLE_IN_DEV
  @param Data      value wanted to be written

  @retval EFI_TIMEOUT   The input buffer register is full for putting new value util timeout
  @retval EFI_SUCCESS   The new value is sucess put into input buffer register.

**/
EFI_STATUS
KeyboardWrite (
  IN KEYBOARD_CONSOLE_IN_DEV *ConsoleIn,
  IN UINT8                   Data
  )
{
  UINT32  TimeOut;
  UINT32  RegEmptied;

  TimeOut     = 0;
  RegEmptied  = 0;

  //
  // wait for input buffer empty
  //
  for (TimeOut = 0; TimeOut < KEYBOARD_TIMEOUT; TimeOut += 30) {
    if ((KeyReadStatusRegister (ConsoleIn) & 0x02) == 0) {
      RegEmptied = 1;
      break;
    }

    MicroSecondDelay (30);
  }

  if (RegEmptied == 0) {
    return EFI_TIMEOUT;
  }
  //
  // Write it
  //
  KeyWriteDataRegister (ConsoleIn, Data);

  return EFI_SUCCESS;
}

//
//\MdeModulePkg\Bus\Isa\Ps2KeyboardDxe\Ps2KbdCtrller.c
//
/**
  Show keyboard status lights according to
  indicators in ConsoleIn.

  @param ConsoleIn Pointer to instance of KEYBOARD_CONSOLE_IN_DEV

  @return status of updating keyboard register

**/
EFI_STATUS
UpdateStatusLights (
  IN KEYBOARD_CONSOLE_IN_DEV *ConsoleIn
  )
{
  EFI_STATUS  Status;
  UINT8       Command;

  //
  // Send keyboard command
  //
  Status = KeyboardWrite (ConsoleIn, 0xed);
  if (EFI_ERROR (Status)) {
    return Status;
  }

  KeyboardWaitForValue (ConsoleIn, 0xfa);

  //
  // Light configuration
  //
  Command = 0;
  if (ConsoleIn->CapsLock) {
    Command |= 4;
  }

  if (ConsoleIn->NumLock) {
    Command |= 2;
  }

  if (ConsoleIn->ScrollLock) {
    Command |= 1;
  }

  Status = KeyboardWrite (ConsoleIn, Command);

  if (EFI_ERROR (Status)) {
    return Status;
  }

  KeyboardWaitForValue (ConsoleIn, 0xfa);
  return Status;
}


int
EFIAPI
main (
  IN int Argc,
  IN CHAR16 **Argv
  )
{
  EFI_STATUS    Status;
  EFI_SIMPLE_TEXT_INPUT_EX_PROTOCOL       *ConIn;
  KEYBOARD_CONSOLE_IN_DEV              *ConsoleIn;
  UINTN         HandleIndex, HandleCount;
  EFI_HANDLE    *DevicePathHandleBuffer = NULL;
  UINTN         i;
  //
  //Get all the Handles that have SimpleTextInputEx Protocol
  //
  Status = gBS->LocateHandleBuffer(
                  ByProtocol,
                  &gEfiSimpleTextInputExProtocolGuid,
                  NULL,
                  &HandleCount,
                  &DevicePathHandleBuffer);
  //
  //Open SimpleTextInputEx Protocol on each device
  //
  for (HandleIndex = 0; HandleIndex < HandleCount; HandleIndex++) 
  { 
    Status = gBS->HandleProtocol(
                      DevicePathHandleBuffer[HandleIndex],
                      &gEfiSimpleTextInputExProtocolGuid,
                      (VOID**)&ConIn);
    if (EFI_ERROR(Status))
      {
        Print(L"ERROR : Open ConIn fail.\n");
        gBS->FreePool(DevicePathHandleBuffer);  
        return 0;
      }
    
    //Get KEYBOARD_CONSOLE_IN_DEV by SimpleTextInputEx Protocol    
    ConsoleIn = TEXT_INPUT_EX_KEYBOARD_CONSOLE_IN_DEV_FROM_THIS (ConIn);
    
    //Check the signature if it's what we want    
    if (ConsoleIn->Signature==KEYBOARD_CONSOLE_IN_DEV_SIGNATURE) {
            // Turn Off all LEDs
            ConsoleIn->CapsLock=0;
            ConsoleIn->NumLock=0;
            ConsoleIn->ScrollLock=0;
            UpdateStatusLights(ConsoleIn);
                    
            for (i=0;i<20;i++) {
                    ConsoleIn->NumLock=1;
                    UpdateStatusLights(ConsoleIn);
                    MicroSecondDelay(300000UL);
                    ConsoleIn->NumLock=0;
                    UpdateStatusLights(ConsoleIn);
                    MicroSecondDelay(300000UL);
                    
                    ConsoleIn->CapsLock=1;
                    UpdateStatusLights(ConsoleIn);
                    MicroSecondDelay(300000UL);
                    ConsoleIn->CapsLock=0;
                    UpdateStatusLights(ConsoleIn);
                    MicroSecondDelay(300000UL);
                    
                    ConsoleIn->ScrollLock=1;
                    UpdateStatusLights(ConsoleIn);
                    MicroSecondDelay(300000UL);
                    ConsoleIn->ScrollLock=0;
                    UpdateStatusLights(ConsoleIn);
                    MicroSecondDelay(300000UL);
                }
   } //if (ConsoleIn->Signature
  } //for (HandleIndex = 0;

  gBS->FreePool(DevicePathHandleBuffer);  
  return Status;
}

完整代码和X64 EFI 下载(因为含有 IO 代码,所以必须在实体机上运行)

工作的视频:

参考:

  1. https://www.lab-z.com/stu120uk/  UEFI 下控制USB键盘 LED
  2. http://www-ug.eecg.toronto.edu/msl/nios_devices/datasheets/PS2%20Keyboard%20Protocol.htm The PS/2 Keyboard Interface
  3. https://wiki.osdev.org/PS/2_Keyboard PS/2 Keyboard

Arduino 上通过串口控制CH376

CH37X 系列是南京沁恒出品的一系列USB控制类的芯片,主要用途是用作 USB Host 实现 USB 设备的控制。具体列表如下【参考1】:

上面不同型号主要差别在于提供的接口,目前支持三种对单片机的接口,分别是并口 SPI和串口。此外就是是否硬件集成文件系统。如果集成了,那么可以通过简单的命令来实现文件系统级别的操作,否则需要主控芯片自己来实现,这对于主控的内存要求比较高,整体程序也会复杂得多。

从上面可以看到,CH378 是当前最强的,但是因为封装更加负责以及比较新的原因(缺少资料),所以市面上最常见的还是 CH376,淘宝上的价格在20以内,应该也是比较容易接受的。这次试验就是基于 CH376 模块,特别注意是下面这种带有一个 2X3跳线的:

这款电路图如下:

这个模块默认情况下使用串口通讯,跳线顺序如下:

P_S: GND TXD(CH376) TXD

    S:  RXD  GND  TXD

这个跳线决定初始时串口通讯速度,意思是如果能够通讯,那么可以通过修改寄存器的方式修改波特率从而实现更高的速度。

  跳线指南【参考2】

这次试验就是如何进行串口通讯 ,P_S 位置跳线是 TXD(CH376)和 TXD 短路。试验使用的是Arduino Leonardo,因为他带有一个额外的硬件串口(软件串口通常在 115200波特率下接收会有问题)。接线如下:

Arduino LeonardoCH376模块
5VVCC
GNDGND
Pin0 RXTXD
Pin1 TXRXD

测试代码是库中自带的 basicUsageHwSerial测试程序:

/*------------------------------------------------------------------------------------------------------------------
 *    Author: György Kovács                                                                                         |
 *    Created: 28 Mar 2019                                                                                          |
 *    Description: Basic usage of CH376 with hardware serial                                                        |
 *    Thanks for the idea to Scott C , https://arduinobasics.blogspot.com/2015/05/ch376s-usb-readwrite-module.html  |
 *------------------------------------------------------------------------------------------------------------------
 */


#include <Ch376msc.h>

//..............................................................................................................................
// Leave the default jumper settings for the baud rate (9600) on the CH376, the library will set it up the chosen speed(HW serial only)
Ch376msc flashDrive(Serial1, 115200); // Ch376 object with hardware Serial1 on arduino mega baudrate: 9600, 19200, 57600, 115200
//..............................................................................................................................
 // buffer for reading
char adatBuffer[255];// max length 255 = 254 char + 1 NULL character
//..............................................................................................................................
// strings for writing to file
char adat[]="Vivamus nec nisl molestie, blandit diam vel, varius mi. Fusce luctus cursus sapien in vulputate.\n";
char adat2[] = "Lorem ipsum dolor sit amet, consectetur adipiscing elit. Duis efficitur ac est eu pharetra. \n";
//..............................................................................................................................
unsigned long totSect = 0;
unsigned long freeSect = 0;
byte percentg = 0;
byte tmpCommand; //used to store data coming from serial port
boolean readMore;
static char helpString[]= {"h:Print this help\n\n1:Create\n2:Append\n3:Read\n4:Read date/time\n"
            "5:Modify date/time\n6:Delete\n7:List dir\n8:Print free space"
            "\n9:Open/Create folder(s)/subfolder(s)"};

void setup() {
  Serial.begin(115200);
  flashDrive.init();
  printInfo(helpString);
}

void loop() {
	if(flashDrive.checkIntMessage()){
		if(flashDrive.getDeviceStatus()){
			Serial.println(F("Flash drive attached!"));
		} else {
			Serial.println(F("Flash drive detached!"));
		}
	}
  if(Serial.available()){
    tmpCommand = Serial.read();                      //read incoming bytes from the serial monitor
    if(((tmpCommand > 48)&&(tmpCommand < 58)) && !flashDrive.driveReady()){ // if the data is ASCII 1 - 9 and no flash drive are attached
       printInfo("Attach flash drive first!");
      tmpCommand = 10; // change the command byte
    }
     switch (tmpCommand) {

      case 49: //1
        printInfo("COMMAND1: Create and write data to file : TEST1.TXT");    // Create a file called TEST1.TXT
          flashDrive.setFileName("TEST1.TXT");  //set the file name
          flashDrive.openFile();                //open the file

          for(int a = 0; a < 20; a++){          //write text from string(adat) to flash drive 20 times
            flashDrive.writeFile(adat, strlen(adat)); //string, string length
          }
          flashDrive.closeFile();               //at the end, close the file
        printInfo("Done!");
        break;
//*****************************************************************************************************************************************************
      case 50: //2
        printInfo("COMMAND2: Append data to file: TEST1.TXT");               // Append data to the end of the file.
        flashDrive.setFileName("TEST1.TXT");  //set the file name
        if(flashDrive.openFile() == ANSW_USB_INT_SUCCESS){               //open the file
        	flashDrive.moveCursor(CURSOREND);     //if the file exist, move the "virtual" cursor at end of the file, with CURSORBEGIN we actually rewrite our old file
        	//flashDrive.moveCursor(flashDrive.getFileSize()); // is almost the same as CURSOREND, because we put our cursor at end of the file
        }
        for(int a = 0; a < 20; a++){          //write text from string(adat) to flash drive 20 times
        	if(flashDrive.getFreeSectors()){ //check the free space on the drive
        		flashDrive.writeFile(adat2, strlen(adat2)); //string, string length
        	} else {
        		printInfo("Disk full");
        	}
        }
        flashDrive.closeFile();               //at the end, close the file
        printInfo("Done!");
        break;
//*****************************************************************************************************************************************************
      case 51: //3
        printInfo("COMMAND3: Read File: TEST1.TXT");                         // Read the contents of this file on the USB disk, and display contents in the Serial Monitor
        flashDrive.setFileName("TEST1.TXT");  //set the file name
        flashDrive.openFile();                //open the file
        readMore = true;
                //read data from flash drive until we reach EOF
        while(readMore){ // our temporary buffer where we read data from flash drive and the size of that buffer
        	readMore = flashDrive.readFile(adatBuffer, sizeof(adatBuffer));
        	Serial.print(adatBuffer);          //print the contents of the temporary buffer
        }
        flashDrive.closeFile();               //at the end, close the file
        printInfo("Done!");
        break;
//*****************************************************************************************************************************************************
      case 52: //4
        printInfo("COMMAND4: Read File date/time: TEST1.TXT");      // Read the date and time of file, default 2004.01.01 - 00:00:00
        flashDrive.setFileName("TEST1.TXT");            //set the file name
        flashDrive.openFile();                          //open the file
                //print informations about the file
          Serial.println(flashDrive.getFileName());
          Serial.print(flashDrive.getYear());
          Serial.print("y\t");
          Serial.print(flashDrive.getMonth());
          Serial.print("m\t");
          Serial.print(flashDrive.getDay());
          Serial.print("d\t");
          Serial.print(flashDrive.getHour());
          Serial.print("h\t");
          Serial.print(flashDrive.getMinute());
          Serial.print("m\t");
          Serial.print(flashDrive.getSecond());
          Serial.println('s');
        flashDrive.closeFile();                         //at the end, close the file
        printInfo("Done!");
        break;
//*****************************************************************************************************************************************************
      case 53: //5
        printInfo("COMMAND5: Modify File date/time: TEST1.TXT");    // Modify the file date/time and save
        flashDrive.setFileName("TEST1.TXT");  //set the file name
        flashDrive.openFile();                //open the file

          flashDrive.setYear(2019);
          flashDrive.setMonth(12);
          flashDrive.setDay(19);
          flashDrive.setHour(03);
          flashDrive.setMinute(38);
          flashDrive.setSecond(42);

          flashDrive.saveFileAttrb();           //save the changed data
        flashDrive.closeFile();               //and yes again, close the file after when you don`t use it
        printInfo("Done!");
        break;
//*****************************************************************************************************************************************************
      case 54: //6
        printInfo("COMMAND6: Delete File: TEST1.TXT");                       // Delete the file named TEST1.TXT
        flashDrive.setFileName("TEST1.TXT");  //set the file name
        flashDrive.deleteFile();              //delete file
        printInfo("Done!");
        break;
//*****************************************************************************************************************************************************
      case 55: //7
        printInfo("COMMAND7: List directory");                          //Print all file names in the current directory
          while(flashDrive.listDir()){ // reading next file
            if(flashDrive.getFileAttrb() == ATTR_DIRECTORY){//directory
              Serial.print('/');
              Serial.println(flashDrive.getFileName()); // get the actual file name
            } else {
              Serial.print(flashDrive.getFileName()); // get the actual file name
              Serial.print(" : ");
              Serial.print(flashDrive.getFileSize()); // get the actual file size in bytes
              Serial.print(" >>>\t");
              Serial.println(flashDrive.getFileSizeStr()); // get the actual file size in formatted string
            }
          }
          printInfo("Done!");
        break;
//*****************************************************************************************************************************************************
      case 56: //8
    	  totSect = flashDrive.getTotalSectors(); // get the total sector number
    	  freeSect = flashDrive.getFreeSectors(); // get the available sector number
    	  percentg = map(freeSect,totSect,0,0,100); 		// convert it to percentage (0-100)
    	  Serial.print("Disk size in bytes: ");
    	  /*if the sector number is more than 8388607 (8388607 * 512 = 4294966784 byte = 4Gb (fits in a 32bit variable) )
    	    							 e.g. 8388608 * 512 = 4294967296 byte (32bit variable overflows) */
    	  if(totSect > 8388607){
    		  Serial.print(">4Gb");
    	  } else {
        	  Serial.print(totSect * SECTORSIZE);
    	  }
    	  Serial.print("\tFree space in bytes: ");
    	  if(freeSect > 8388607){
    		  Serial.print(">4Gb");
    	  } else {
        	  Serial.print(freeSect * SECTORSIZE);
    	  }
    	  Serial.print(F("\tDisk usage :"));
    	  Serial.print(percentg);
    	  Serial.print(F("%"));
    	  switch (flashDrive.getFileSystem()) { //1-FAT12, 2-FAT16, 3-FAT32
			case 1:
				Serial.println(F("\tFAT12 partition"));
				break;
			case 2:
				Serial.println(F("\tFAT16 partition"));
				break;
			case 3:
				Serial.println(F("\tFAT32 partition"));
				break;
			default:
				Serial.println(F("\tNo valid partition"));
				break;
		}
    	 break;
//*****************************************************************************************************************************************************
      case 57: //9
        switch(flashDrive.cd("/DIR1/DIR2/DIR3",1)){
          case ERR_LONGFILENAME: //0x01
            Serial.println(F("Directory name is too long"));
          break;

          case ANSW_USB_INT_SUCCESS: //0x14
          Serial.println(F("Directory created successfully"));
          break;

          case ANSW_ERR_OPEN_DIR: //0x41
          Serial.println(F("Directory opened successfully"));
          break;

          case ANSW_ERR_MISS_FILE: //0x42
          Serial.println(F("Directory doesn't exist"));
          break;

          case ANSW_ERR_FOUND_NAME: //0x43
          Serial.println(F("File exist with the given name"));
          break;

          default:

          break;
        }
      break;
//*****************************************************************************************************************************************************
      case 104: //h
    	  printInfo(helpString);
        break;
      default:
        break;
    }//end switch

  }//endif serial available

}//end loop

//Print information
void printInfo(char info[]){
  char * infoPtr = info;
  int infoLength = 0;
    while(*infoPtr){
      infoPtr++;
      infoLength++;
      if(infoLength > 40) break;
    }
    Serial.print(F("\n\n"));
    for(int a = 0; a < infoLength; a++){
      Serial.print('*');
    }
   Serial.println();
   Serial.println(info);
   for(int a = 0; a < infoLength; a++){
      Serial.print('*');
    }
   Serial.print(F("\n\n"));
}

运行结果:插拔U盘有提示,输入 h 显示菜单,可以进行U盘读写等等文件操作

最后吐槽一下:CH37X  系列推出十多年了,很多年前我也入手过,但是不得不说这货太难用了,官网提供的资料看起来很全,但上手之后会发现缺少核心部分。现在能用是因为南京沁恒后来公布了一些具体 COMMAND (之前应该只有大客户才能拿到),这样玩家才有机会应用在 Arduino 上。相比之下,国外的芯片资料一直都很全。这也是为什么很多产品在第一版设计时不会考虑国产方案的原因。希望未来国产芯片在这方面能有所改观。

参考:

  1. http://www.wch.cn/products/category/1.html
  2. https://github.com/djuseeq/Ch376msc

查看 PMC Firmware版本的工具

很多时候,我们需要得知当前系统中的 PMC Firmware版本。最简单的方法是进入 Setup 查看。但是不幸的是很多时候BIOS会主动隐藏这个选项。因此,编写一个 Shell 下的工具。用户可以直接获得当前系统 PMC版本号:

显示PMC版本的 Shell 工具

当然,除此之外还可以使用 MEInfo.efi (在 CSME Release Package 中)看到 PMC 的版本信息:

MEINFO 显示PMC版本信息

Arduino USB Host Shield PL2302 Debug Message

问题:当我运行USB Host Shield Library 中关于 Pl2303 的例子(比如 pl2303_gprs_terminal)的时候,在串口会有下面的 Debug 信息:

Start
0000: 09 02 27 00 01 01 00 80 32 09 04 00 00 03 FF 00 
0010: 00 00 07 05 81 03 0A 00 01 07 05 02 02 40 00 00 
0020: 07 05 83 02 40 00 00

经过研究,产生的位置在  Usb.cpp 下面函数中

uint8_t USB::ctrlReq(uint8_t addr, uint8_t ep, uint8_t bmReqType, uint8_t bRequest, uint8_t wValLo, uint8_t wValHi, uint16_t wInd, uint16_t total, uint16_t nbytes, uint8_t* dataptr, USBReadParser *p) {

下面这个代码处:

// Invoke callback function if inTransfer completed successfully and callback function pointer is specified
   if(!rcode && p)
     ((USBReadParser*)p)->Parse(read, dataptr, total - left);

但是很明显,这里是调用设定的 callback 函数。

经过查找,最终确定实际生效的代码是hexdump.h 文件中下面的代码:

template <class BASE_CLASS, class LEN_TYPE, class OFFSET_TYPE>
void HexDumper<BASE_CLASS, LEN_TYPE, OFFSET_TYPE>::Parse(const LEN_TYPE len, const uint8_t *pbuf, const OFFSET_TYPE &offset __attribute__((unused))) {
        if(UsbDEBUGlvl >= 0x80) { // Fully bypass this block of code if we do not debug.
                for(LEN_TYPE j = 0; j < len; j++, byteCount++, byteTotal++) {
                        if(!byteCount) {
                                PrintHex<OFFSET_TYPE > (byteTotal, 0x80);
                                E_Notify(PSTR(": "), 0x80);
                        }
                        PrintHex<uint8_t > (pbuf[j], 0x80);
                        E_Notify(PSTR(" "), 0x80);

                        if(byteCount == 15) {
                                E_Notify(PSTR("\r\n"), 0x80);
                                byteCount = 0xFF;
                        }
                }
        }
}

因为其他地方对 UsbDEBUGlvl 赋值为 0x80,所以会输出一下信息用于Debug。

最近阅读 USB Host Shield 感觉风格不是很统一,比如,用于 Debug 的定义开关有很多处,估计是因为后来的代码是很多人合作的结果。

参考:

1.http://www.lab-z.com/atu9/

Windows10 Lite 版本

最近下载了一个 Win 10 lite 版本,专门用在虚拟机中配合 PHM 查看 Log (我不建议在工作机上安装 PHM ,因为在安装过程中会安装后一些服务会拖慢系统,导致系统降低,因此建议大家用额外的机器安装PHM 查看Log)。镜像来自下面的链接:

https://www.majorgeeks.com/files/details/windows_10_lite.html

这个版本具体的参数如下:

Technical Setup Details

Full NameWindows 10 Lite
Full Setup Size2.4 GB (For 32 Bit), 2.6 GB (For 64 Bit)
CompatibilityCompatible with 32 Bit (x86) / 64 Bit (x64)
Setup TypeOffline Installer / Full Standalone Setup
DevelopersMicrosoft

Minimum System Requirements

Memory (RAM)Minimum 1 GB
HDD (Hard Disk Drive)Minimum 16 GB Free Space Required
ProcessorIntel Pentium 4 Or Advance

在虚拟机中安装之后,还需要安装微软的 Edge 浏览器,之后就可以正常使用PHM。

虚拟机中的 Win10 Lite

链接: https://pan.baidu.com/s/1vlYXOvFDoDgfEBvbQKJ0-w 提取码: h6hn

参考:

1.https://www.lab-z.com/phm/ PowerHouse Mountain 的安装