最近抽空研究了一下 OVMF 的代码。它是为 QEMU虚拟机设计的UEFI BIOS内置在 EDK2 的代码,对于研究 UEFI EDK2架构非常有意义。分析代码是非常枯燥的事情,相信读者也会有这样的感觉。但是“所有的答案都在代码中”,通过这样的过程能够让我们对EDK2有着更深入的理解。
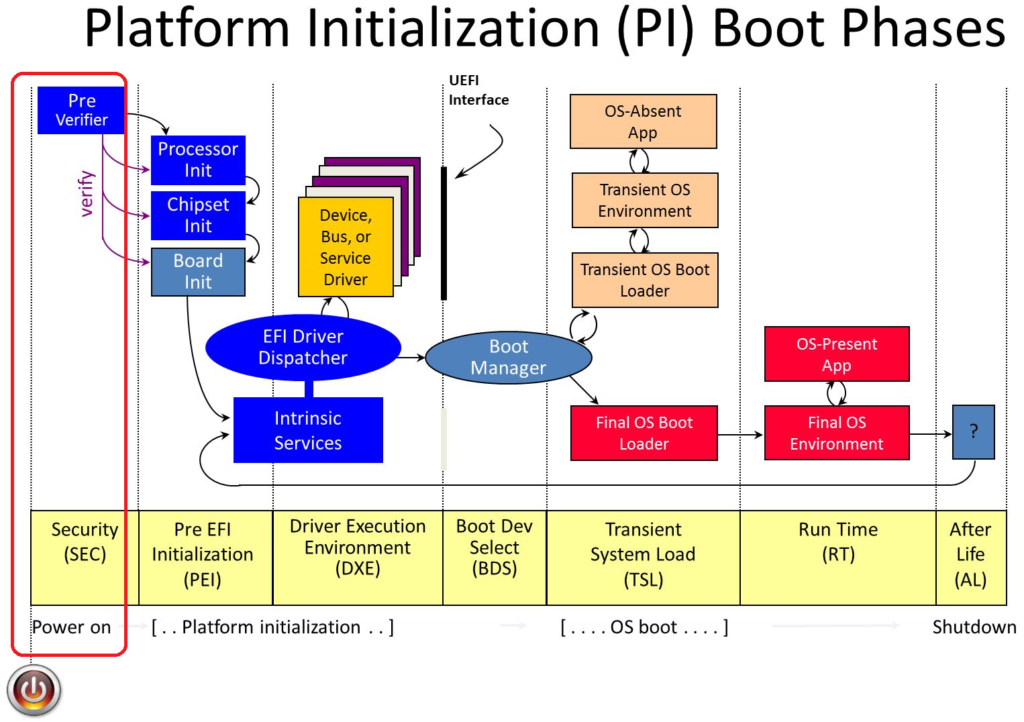
这次从“上电”开始,就是下图的最左侧 “SEC”阶段,研究一下 OVMF 是如何运行的。

使用的代码是edk202108,可以在【参考2】看到介绍。
首先使用 build -a X64 -p OvmfPkg\OvmfPkgX64.dsc 编译生成 ovmf.fd ,之后使用下面的命令启动 QEMU:
qemu-system-x86_64 -bios "ovmf.fd" -debugcon file:debug.log -global isa-debugcon.iobase=0x402
运行之后,即可在QEMU的目录下看到 debug.log,其中的前几条记录如下:
SecCoreStartupWithStack(0xFFFCC000, 0x820000)
Register PPI Notify: DCD0BE23-9586-40F4-B643-06522CED4EDE
Install PPI: 8C8CE578-8A3D-4F1C-9935-896185C32DD3
Install PPI: 5473C07A-3DCB-4DCA-BD6F-1E9689E7349A
The 0th FV start address is 0x00000820000, size is 0x000E0000, handle is 0x820000
Register PPI Notify: 49EDB1C1-BF21-4761-BB12-EB0031AABB39
Register PPI Notify: EA7CA24B-DED5-4DAD-A389-BF827E8F9B38
Install PPI: B9E0ABFE-5979-4914-977F-6DEE78C278A6
很容易可以在 \OvmfPkg\Sec\SecMain.c 的SecCoreStartupWithStack()函数中找到下面的语句:
  DEBUG ((DEBUG_INFO,
    "SecCoreStartupWithStack(0x%x, 0x%x)\n",
    (UINT32)(UINTN)BootFv,
    (UINT32)(UINTN)TopOfCurrentStack
));
这就是我们 Log 中看到的第一条。但是很明显,这里并不是上电的第一条语句,这里作为本次研究的终点。
使用 HxD 打开 OVMF.FD, 在最后可以看到如下字样,这里是CPU 上电之后运行的第一条指令:

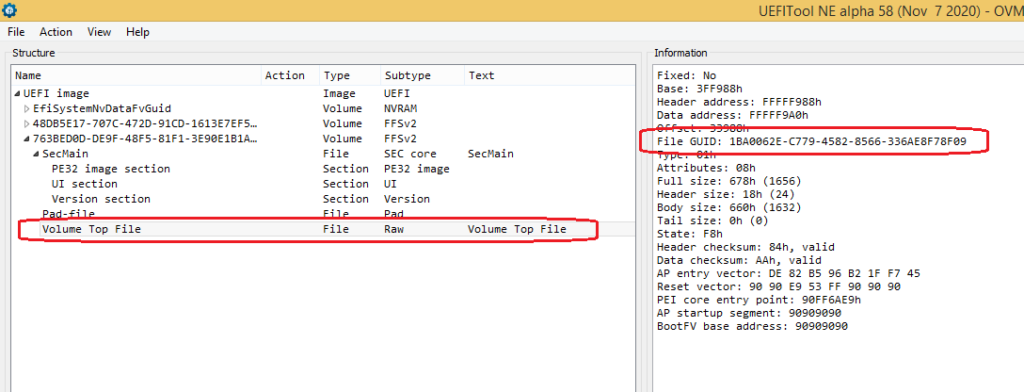
使用UEFITool NE 打开 OVMF.FD查看,这个位置处于 Volume Top File 中。

在\Build\OvmfX64\DEBUG_VS2015x86\FV\SECFV.inf 中可以看到定义了下面2个 FFS, 换句话说 SecMain + Pad-File + Volume Top File = 第一个FV (上图中 GUID 是 753BE…. 的这个)
EFI_READ_LOCK_CAP = TRUE
EFI_READ_LOCK_STATUS = TRUE
EFI_FVB2_ALIGNMENT_16 = TRUE
EFI_FV_EXT_HEADER_FILE_NAME = d:\stable202108\Build\OvmfX64\DEBUG_VS2015x86\FV\SECFV.ext
[files]
EFI_FILE_NAME = d:\stable202108\Build\OvmfX64\DEBUG_VS2015x86\FV\Ffs\df1ccef6-f301-4a63-9661-fc6030dcc880SecMain\df1ccef6-f301-4a63-9661-fc6030dcc880.ffs
EFI_FILE_NAME = d:\stable202108\Build\OvmfX64\DEBUG_VS2015x86\FV\Ffs\1BA0062E-C779-4582-8566-336AE8F78F09ResetVector\1BA0062E-C779-4582-8566-336AE8F78F09.ffs
对于这部分生成方法感兴趣的朋友可以在【参考3】中看到介绍。
接下来我们查看1BA0062E-C779-4582-8566-336AE8F78F09.ffs的代码,在\OvmfPkg\ResetVector\Ia16\ResetVectorVtf0.asm 中:
;
; The VTF signature
;
; VTF-0 means that the VTF (Volume Top File) code does not require
; any fixups.
;
vtfSignature:
    DB      'V', 'T', 'F', 0

ALIGN   16

resetVector:
;
; Reset Vector
;
; This is where the processor will begin execution
;
    nop
    nop
    jmp     EarlyBspInitReal16
ALIGN   16
fourGigabytes:
为了证明代码确实来自这里,在 jmp EarlyBspInitReal16 语句后面添加2条作为标记
	db 0x12
	db 0x34
重新编译之后,可以在 OVMF.FD中看到多出了 12 34 (如果你在IBV 的代码中使用这个方法验证第一条语句的话可能无法成功,原因是IBV 的工具在写入跳转地址的时候会完全覆盖这一行的其他内容,所以你代码中修改之后,生成打包过程中你的标记会被覆盖)。

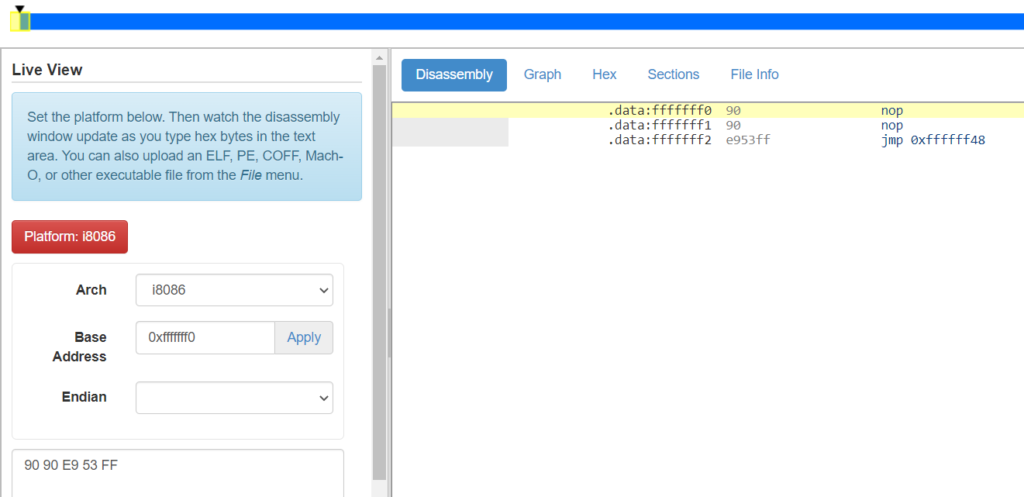
其中 90 90 E9 53 FF 是跳转指令,会跳转到 0xFFFF FF48

代码在\UefiCpuPkg\ResetVector\Vtf0\Ia16\Init16.asm 中(这里同样可以用上面加标志的方法进行验证,有兴趣的朋友可以自行尝试):
;
; @param[out] DI    'BP' to indicate boot-strap processor
;
EarlyBspInitReal16:
    mov     di, 'BP'
    jmp     short Main16

;
; @param[out] DI    'AP' to indicate application processor
;
EarlyApInitReal16:
    mov     di, 'AP'
jmp     short Main16
接下来跳转到 \stable202108\UefiCpuPkg\ResetVector\Vtf0\Main.asm的Main16 处继续执行。
;
; Modified:  EBX, ECX, EDX, EBP
;
; @param[in,out]  RAX/EAX  Initial value of the EAX register
;                          (BIST: Built-in Self Test)
; @param[in,out]  DI       'BP': boot-strap processor, or
;                          'AP': application processor
; @param[out]     RBP/EBP  Address of Boot Firmware Volume (BFV)
; @param[out]     DS       Selector allowing flat access to all addresses
; @param[out]     ES       Selector allowing flat access to all addresses
; @param[out]     FS       Selector allowing flat access to all addresses
; @param[out]     GS       Selector allowing flat access to all addresses
; @param[out]     SS       Selector allowing flat access to all addresses
;
; @return         None  This routine jumps to SEC and does not return
;
Main16:
OneTimeCall EarlyInit16
其中 EarlyInit16在Init16.asm 中:
;
; Modified:  EAX
;
; @param[in]  EAX   Initial value of the EAX register (BIST: Built-in Self Test)
; @param[out] ESP   Initial value of the EAX register (BIST: Built-in Self Test)
;
EarlyInit16:
    ;
    ; ESP -  Initial value of the EAX register (BIST: Built-in Self Test)
    ;
    mov     esp, eax

    debugInitialize   //这是空的宏

OneTimeCallRet EarlyInit16
返回 EarlyInit16 后继续:
    ;
    ; Transition the processor from 16-bit real mode to 32-bit flat mode
    ;
OneTimeCall TransitionFromReal16To32BitFlat
    ;
    ; Search for the Boot Firmware Volume (BFV)
    ;
OneTimeCall Flat32SearchForBfvBase
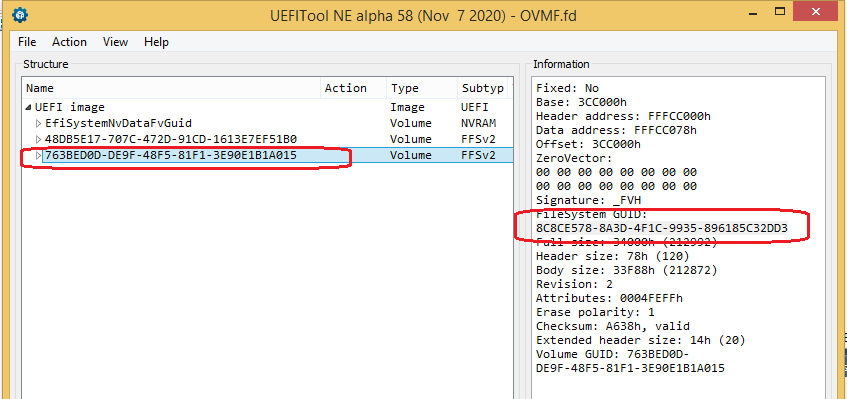
这个函数是在查找EFI_FIRMWARE_FILE_SYSTEM2_GUID的FV:
;#define EFI_FIRMWARE_FILE_SYSTEM2_GUID \
;  { 0x8c8ce578, 0x8a3d, 0x4f1c, { 0x99, 0x35, 0x89, 0x61, 0x85, 0xc3, 0x2d, 0xd3 } }
%define FFS_GUID_DWORD0 0x8c8ce578
%define FFS_GUID_DWORD1 0x4f1c8a3d
%define FFS_GUID_DWORD2 0x61893599
%define FFS_GUID_DWORD3 0xd32dc385

找到之后继续查找 SEC 的入口:
    ;
    ; EBP - Start of BFV
    ;

    ;
    ; Search for the SEC entry point
    ;
OneTimeCall Flat32SearchForSecEntryPoint
最后,跳转到前面找到的 SEC Entry Point(放在 RSI寄存器中)
    ;
    ; Jump to the 64-bit SEC entry point
    ;
jmp     rsi
接下来代码就跳转到 SecEntry.nasm 的代码中,主要动作是用于指定 Stack的内存:
    ;
    ; Load temporary RAM stack based on PCDs
    ;
    %define SEC_TOP_OF_STACK (FixedPcdGet32 (PcdOvmfSecPeiTempRamBase) + \
                          FixedPcdGet32 (PcdOvmfSecPeiTempRamSize))
    mov     rsp, SEC_TOP_OF_STACK
    nop

    ;
    ; Setup parameters and call SecCoreStartupWithStack
    ;   rcx: BootFirmwareVolumePtr
    ;   rdx: TopOfCurrentStack
    ;
    mov     rcx, rbp
    mov     rdx, rsp
    sub     rsp, 0x20
call    ASM_PFX(SecCoreStartupWithStack)
接下来就是C语言的代码了,位于 \OvmfPkg\Sec\SecMain.c 的 SecCoreStartupWithStack() 函数中。
参考:
《Step to UEFI (238)OVMF 从第一条指令到 SecMain》有一个想法