前面介绍过,VS2015并不支持直接内嵌汇编语言。C语言要求有堆栈的环境才能工作,前面的限制对于大多数程序毫无影响。这次尝试在编译过程通过替换数值的方式来实现内嵌汇编。
简单介绍一下思路:
- 在要内嵌的C语言源代码中使用预先定义的指令进行填充,比如:_outpd() 这样的指令,它会生成固定长度固定数值的机器码;
- 修改 build.py, 当处理包含前面C语言代码的 INF 文件时,修改对应的 Makefile,其中加入生成 OBJ 之后搜索替换的动作
这次以 SecMain.c 为例,进行操作。
Step1. 使用 _outpd() 填充,代码如下
  //
  // Find PEI Core entry point. It will report SEC and Pei Core debug information if remote debug
  // is enabled.
  //
  BootFv = (EFI_FIRMWARE_VOLUME_HEADER *)SecCoreData->BootFirmwareVolumeBase;
  FindAndReportEntryPoints (&BootFv, &PeiCoreEntryPoint);
  SecCoreData->BootFirmwareVolumeBase = BootFv;
  SecCoreData->BootFirmwareVolumeSize = (UINTN) BootFv->FvLength;

  //LABZ_Debug_Start
  _outpd(0x80,0xAB);
  _outpd(0x80,0xAB);
  _outpd(0x80,0xAB);
  _outpd(0x80,0xAB);
  _outpd(0x80,0xAB);
  _outpd(0x80,0xAB);
  //LABZ_Debug_End

  DEBUG ((DEBUG_INFO,
    "Check [BootFirmwareVolumeBase]-0x%X [PeiCoreEntryPoint]=0x%X BootFirmwareVolumeBase=0x%X \n",
	(UINT64)BootFv,
    (UINT64)(PeiCoreEntryPoint),
	(UINT64)(*PeiCoreEntryPoint)
));
编译之后们可以看到对应的机器码如下:
; 1022 :   _outpd(0x80,0xAB);

  00050	66 ba 80 00	 mov	 dx, 128			; 00000080H
  00054	b8 ab 00 00 00	 mov	 eax, 171		; 000000abH
  00059	ef		 out	 dx, eax

; 1023 :   _outpd(0x80,0xAB);

  0005a	66 ba 80 00	 mov	 dx, 128			; 00000080H
  0005e	b8 ab 00 00 00	 mov	 eax, 171		; 000000abH
  00063	ef		 out	 dx, eax

; 1024 :   _outpd(0x80,0xAB);

  00064	66 ba 80 00	 mov	 dx, 128			; 00000080H
  00068	b8 ab 00 00 00	 mov	 eax, 171		; 000000abH
  0006d	ef		 out	 dx, eax

; 1025 :   _outpd(0x80,0xAB);

  0006e	66 ba 80 00	 mov	 dx, 128			; 00000080H
  00072	b8 ab 00 00 00	 mov	 eax, 171		; 000000abH
  00077	ef		 out	 dx, eax

; 1026 :   _outpd(0x80,0xAB);

  00078	66 ba 80 00	 mov	 dx, 128			; 00000080H
  0007c	b8 ab 00 00 00	 mov	 eax, 171		; 000000abH
  00081	ef		 out	 dx, eax

; 1027 :   _outpd(0x80,0xAB);

  00082	66 ba 80 00	 mov	 dx, 128			; 00000080H
  00086	b8 ab 00 00 00	 mov	 eax, 171		; 000000abH
  0008b	ef		 out	 dx, eax
就是说,我们在 Secmain.obj 中找到 “66 ba 80 00 b8 ab 00 00 00 ef 66 ba 80 00 b8 ab 00 00 00 ef 66 ba 80 00 b8 ab 00 00 00 ef66 ba 80 00 b8 ab 00 00 00 ef 66 ba 80 00 b8 ab 00 00 00 ef 66 ba 80 00 b8 ab 00 00 00 ef” 这一串,替换成需要的代码即可。
Step2. 使用 C# 编写一个程序,接收3个参数:原文件,要搜索的十六进制数值和要替换为的十六进制数值, 写好后的程序名称为 SAR.exe (Search and Replace)
Step3. 要替换为的内容如下:
00000000 488D05F9FFFFFF lea		rax,[$]
00000007 66BA0204       mov     dx,0x402

                        ; 7-0 Bits
0000000B EE             out     dx,al

                           ; 15-8 Bits
0000000C 48C1E808       shr     rax,8
00000010 EE             out     dx,al

                        ; 23-16 Bits
00000011 48C1E808       shr     rax,8
00000015 EE             out     dx,al

                        ; 31-24 Bits
00000016 48C1E808       shr     rax,8
0000001A EE             out     dx,al

                        ; 39-32 Bits
0000001B 48C1E808       shr     rax,8
0000001F EE             out     dx,al

                        ; 47-40 Bits
00000020 48C1E808       shr     rax,8
00000024 EE             out     dx,al

                        ; 55-48 Bits
00000025 48C1E808       shr     rax,8
00000029 EE             out     dx,al

                        ; 63-56 Bits
0000002A 48C1E808       shr     rax,8
0000002E EE             out     dx,al

0000002F C3             ret
就是说,我要在生成的 SecMain.obj 中搜索如下十六进制值:
66ba8000b8ab000000ef66ba8000b8ab000000ef66ba8000b8ab000000ef66ba8000b8ab000000ef66ba8000b8ab000000ef66ba8000b8ab000000ef
替换为以下十六进制值(实际上后端还要使用 90 NOP 填充为和上面相同长度的数值):
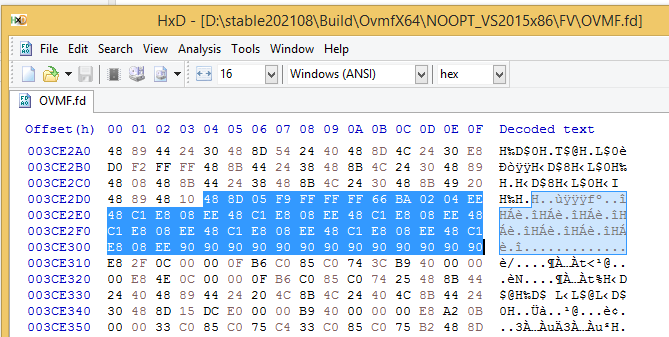
488D05F9FFFFFF66BA0204EE48C1E808EE48C1E808EE48C1E808EE48C1E808EE48C1E808EE48C1E808EE48C1E808EE
Step4. 在 SecMain对应的makefile 中加入如下代码:
    # indicate there's a thread is available for another build task
        BuildTask._RunningQueueLock.acquire()
        BuildTask._RunningQueue.pop(self.BuildItem)
        BuildTask._RunningQueueLock.release()
        BuildTask._Thread.release()

    ## Start build task thread
    #
    def Start(self):
        EdkLogger.quiet("Building ... <%s>" % repr(self.BuildItem))
        EdkLogger.quiet(type(self.BuildItem))
        #ZivDebug_Start
        if str(self.BuildItem).find('SecMain.inf')!=-1:
            EdkLogger.quiet("Here patch Secmain %s" % repr(self.BuildItem))
            os.system('copy /y D:/stable202108/IAT/makefile D:/stable202108/Build/OvmfX64/NOOPT_VS2015x86/X64/OvmfPkg/Sec/SecMain')
        #ZivDebug_End
        Command = self.BuildItem.BuildCommand + [self.BuildItem.Target]
        self.BuildTread = Thread(target=self._CommandThread, args=(Command, self.BuildItem.WorkingDir))
        self.BuildTread.name = "build thread"
        self.BuildTread.daemon = False
        self.BuildTread.start()

## The class contains the information related to EFI image
#
class PeImageInfo():
Step5. 研究 Build.py, 最终找到如下位置,判断当前处理的是否为 Secmain.inf, 如果是,那么替换对应的 Makefile, 然后将补丁程序,搜索文件和替换文件放置到对应的位置,最后执行 makefile
    ## Start build task thread
    #
    def Start(self):
        EdkLogger.quiet("Building ... <%s>" % repr(self.BuildItem))
        EdkLogger.quiet(type(self.BuildItem))
        #ZivDebug_Start
        if str(self.BuildItem).find('SecMain.inf')!=-1:
            EdkLogger.quiet("Here patch Secmain %s" % repr(self.BuildItem))
            os.system('copy /y D:/stable202108/IAT/makefile D:/stable202108/Build/OvmfX64/NOOPT_VS2015x86/X64/OvmfPkg/Sec/SecMain')
        #ZivDebug_End
        Command = self.BuildItem.BuildCommand + [self.BuildItem.Target]
        self.BuildTread = Thread(target=self._CommandThread, args=(Command, self.BuildItem.WorkingDir))
        self.BuildTread.name = "build thread"
        self.BuildTread.daemon = False
        self.BuildTread.start()
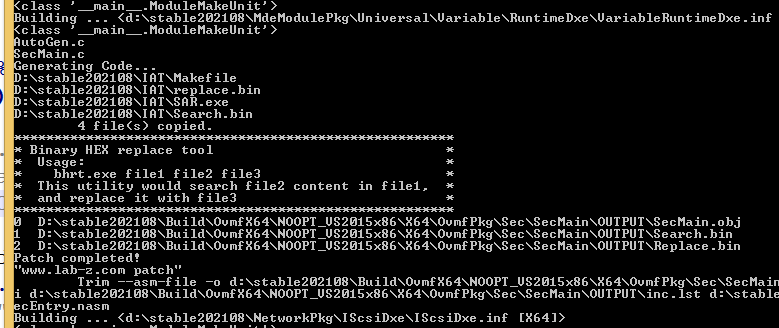
这样,编译过程中可以看到如下信息,表明进行了替换动作:

在最终生成的 OVMF.fd 中可以找到我们替换进去的代码(这一段是没有压缩的,所以可以直接搜索到):

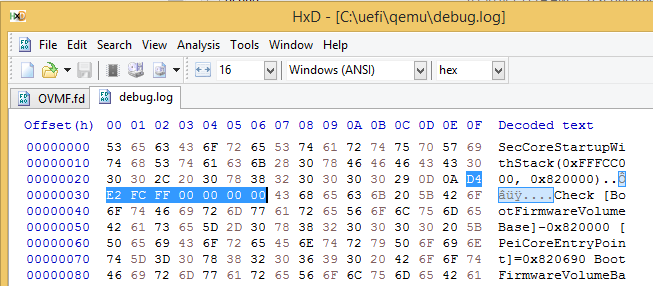
在QEMU上跑起来之后,查看生成的 Debug Log 可以看到有输出 RIP:

最后文章中提到的替换工具和实验用到的Binary 可以在下面下载: