有一句话, 是福尔摩斯的名言“排除一切不可能的,剩下的即使再不可能,那也是真相”。我很多次在《名侦探柯南》上看到这句话,在 Debug方面也快成为我的座右铭了,只是中文读起来逻辑上不是很严谨,原文是: When you have eliminated the impossibles,whatever remains,however improbable,must be the truth.
这次,在调试中又遇到了这样的事情。
我编写一个程序,只是简单的把1K大小的内存值写入到一个文件中,但是我惊奇的发现,对内存写入不同值,打开之后的结果和期望会有不同。
先上源代码
#include  <Uefi.h>
#include  <Library/UefiLib.h>
#include  <Library/ShellCEntryLib.h>

#include <Protocol/SimpleFileSystem.h>
#include <Library/MemoryAllocationLib.h>

extern EFI_BOOT_SERVICES         *gBS;
extern EFI_SYSTEM_TABLE			 *gST;
extern EFI_RUNTIME_SERVICES 	 *gRT;

int
EFIAPI
main (
  IN int Argc,
  IN CHAR16 **Argv
  )
{
	UINTN 							FileSize=1024;
    EFI_STATUS          			Status;
	EFI_FILE_PROTOCOL    			*Root;
	EFI_SIMPLE_FILE_SYSTEM_PROTOCOL *SimpleFileSystem;
	EFI_FILE_PROTOCOL 				*FileHandle=0;
	UINTN							*HandleBuffer;

	Status = gBS->LocateProtocol(
				&gEfiSimpleFileSystemProtocolGuid,
				NULL,
				(VOID **)&SimpleFileSystem);

	if (EFI_ERROR(Status)) {
		Print(L"Cannot find EFI_SIMPLE_FILE_SYSTEM_PROTOCOL \r\n");
		return Status;
	}

	Status = SimpleFileSystem->OpenVolume(SimpleFileSystem,&Root);
    if (EFI_ERROR(Status)) {
		    Print(L"OpenVolume error \r\n");
            return Status;
	}

    Status = Root -> Open(Root,
			&FileHandle,
			(CHAR16 *) L"wre.bin",
			EFI_FILE_MODE_CREATE | EFI_FILE_MODE_READ | EFI_FILE_MODE_WRITE,
			0);

    if (EFI_ERROR(Status) || (FileHandle==0)) {
		    Print(L"Open error \r\n");
            return Status;
	}

	HandleBuffer = AllocateZeroPool(FileSize);
    if (HandleBuffer == NULL) {
		Print(L"Not enough memory!\n");
		return Status;
    }

	*(HandleBuffer)  =1;
	*(HandleBuffer+1)=2;
	*(HandleBuffer+2)=3;
	*(HandleBuffer+3)=4;

	Print(L"%d\n",(FileSize-4)/4);
	Print(L"%d\n",sizeof(UINTN));
	Print(L"%d\n",sizeof(UINT32));
	Print(L"%x\n",HandleBuffer);
	Print(L"%x\n",HandleBuffer+1);

	Status = FileHandle -> Write(FileHandle, &FileSize, HandleBuffer);

	Print(L"Write Done \r\n");
	FreePool(HandleBuffer);
	Status  = FileHandle -> Close (FileHandle);

  return EFI_SUCCESS;
}
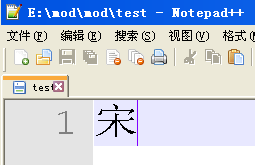
运行结果会生成 wre.bin, 我用 Notepad++ 打开之后看到的结果是下面,看起来是按照 WORD 写入的而不是我期望的UINT32

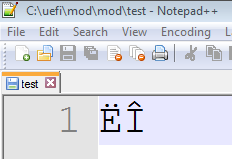
而如果把 *(HandleBuffer) =1; 这行修改为 *(HandleBuffer) =0x1111 1111;
打开同样的文件看到的是下面的结果,很明显这才是我期望的:

<此处空白,有兴趣的朋友可以猜测一下,真相到底是什么>

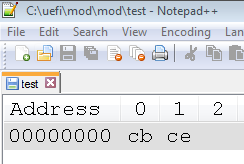
真正的原因是我用的 Notepad++ 有问题,如果我换一款十六进制编辑软件即可看到正确的结果。比如, HHD Hex Editor Noe。
下面是用 Beyond Compare 比较两次生成文件,查看是否有差别

由此完全可以看出,二者没有差别,我遇到的奇怪现象完全是查看工具导致的。
看到这里,你完全可以和我一起默念“排除一切不可能的,剩下的即使再不可能,那也是真相”。