本文会以 BdsDxe.ffs 的生成为例,介绍一下从 EFI 到 FFS的编译过程。
所有的实验都是建立在UDK2015 NT32Pkg的基础上。
首先,要保证NT32能够正常编译运行。之后,在 build目录中取得生成的BIOS文件:nt32.fd。使用 fmmt –v nt32.fd 查看一下这个BIOS的组成。可以看到其中只有一个 FV , 然后有 BdsDxe的ffs。我们可以在\Build\NT32IA32\DEBUG_VS2013\IA32\MdeModulePkg\Universal\BdsDxe\BdsDxe\OUTPUT\ 目录下,找到编译生成的 BdsDxe.efi。 在 \Build\NT32IA32\DEBUG_VS2013\FV\Ffs\6D33944A-EC75-4855-A54D-809C75241F6CBdsDxe可以看到文件名为6D33944A-EC75-4855-A54D-809C75241F6C.ffs 的文件。就是说我们前面看到的BdsDxe .efi,最终得到了一个ffs文件。


下面就针对这个过程逐一进行分析。
1. *.PE32 文件的生成。具体的生成命令可以在在6D33944A-EC75-4855-A54D-809C75241F6CSEC2.1.1.1.pe32.txt中看到:
GenSec -s EFI_SECTION_PE32 -o c:\udk2015\Build\NT32IA32\DEBUG_VS2013\FV\Ffs\6D33944A-EC75-4855-A54D-809C75241F6CBdsDxe\6D33944A-EC75-4855-A54D-809C75241F6CSEC2.1.1.1.pe32 c:\udk2015\Build\NT32IA32\DEBUG_VS2013\IA32\MdeModulePkg\Universal\BdsDxe\BdsDxe\OUTPUT\BdsDxe.efi
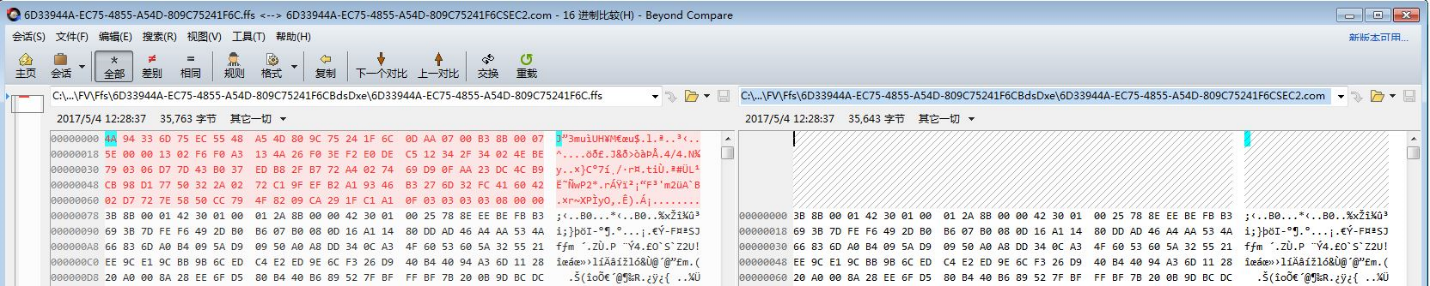
使用工具比较一下生成前后的文件,可以看到只有头部存在一点差异。
再查看 GenSec 的源代码,当指定为 EFI_SECTION_PE32 的时候,头的内容是 EFI_SECTION_PE32(0x10)+Length。所以和之前的EFI 相比,增加的是 0x10 和0x13004 (EFI文件的长度)
2. GUIDED文件的生成,在6D33944A-EC75-4855-A54D-809C75241F6CSEC2.1.guided.txt 可以看到, 使用的是 GenSec 工具,作为输入的是 PE32, UI和 VER文件。
GenSec -s EFI_SECTION_GUID_DEFINED –sectionalign 1 –sectionalign 1 –sectionalign 1 -o c:\udk2015\Build\NT32IA32\DEBUG_VS2013\FV\Ffs\6D33944A-EC75-4855-A54D-809C75241F6CBdsDxe\6D33944A-EC75-4855-A54D-809C75241F6CSEC2.1.guided c:\udk2015\Build\NT32IA32\DEBUG_VS2013\FV\Ffs\6D33944A-EC75-4855-A54D-809C75241F6CBdsDxe\6D33944A-EC75-4855-A54D-809C75241F6CSEC2.1.1.1.pe32 c:\udk2015\Build\NT32IA32\DEBUG_VS2013\FV\Ffs\6D33944A-EC75-4855-A54D-809C75241F6CBdsDxe\6D33944A-EC75-4855-A54D-809C75241F6CSEC2.1.2.ui c:\udk2015\Build\NT32IA32\DEBUG_VS2013\FV\Ffs\6D33944A-EC75-4855-A54D-809C75241F6CBdsDxe\6D33944A-EC75-4855-A54D-809C75241F6CSEC2.1.3.ver
3. 目前我尚不知道 *.UI文件是如何生成的,希望有懂的朋友指导一下,谢谢!
4. 从6D33944A-EC75-4855-A54D-809C75241F6CSEC2.1.3.ver.txt 文件可以得知*.VER 是这样生成的
GenSec -s EFI_SECTION_VERSION -n 1.0 -o c:\udk2015\Build\NT32IA32\DEBUG_VS2013\FV\Ffs\6D33944A-EC75-4855-A54D-809C75241F6CBdsDxe\6D33944A-EC75-4855-A54D-809C75241F6CSEC2.1.3.ver
5. 从6D33944A-EC75-4855-A54D-809C75241F6CSEC2.com.txt 文件可以得知 .COM 的生成方式如下(COM 并非DOS下面的可执行文件,而是 COMPRESS的缩写)。经过了这步,因为压缩的原因,生成的结果比压缩之前小了很多,比较起来也会发现“面目全非”。
GenSec -s EFI_SECTION_COMPRESSION -c PI_STD -o c:\udk2015\Build\NT32IA32\DEBUG_VS2013\FV\Ffs\6D33944A-EC75-4855-A54D-809C75241F6CBdsDxe\6D33944A-EC75-4855-A54D-809C75241F6CSEC2.com c:\udk2015\Build\NT32IA32\DEBUG_VS2013\FV\Ffs\6D33944A-EC75-4855-A54D-809C75241F6CBdsDxe\6D33944A-EC75-4855-A54D-809C75241F6CSEC2.1.guided
6. 从6D33944A-EC75-4855-A54D-809C75241F6C.ffs.txt 可以看到 FFS是如何生成的:
GenFfs -t EFI_FV_FILETYPE_DRIVER -g 6D33944A-EC75-4855-A54D-809C75241F6C -o c:\udk2015\Build\NT32IA32\DEBUG_VS2013\FV\Ffs\6D33944A-EC75-4855-A54D-809C75241F6CBdsDxe\6D33944A-EC75-4855-A54D-809C75241F6C.ffs -i c:\udk2015\Build\NT32IA32\DEBUG_VS2013\FV\Ffs\6D33944A-EC75-4855-A54D-809C75241F6CBdsDxe\6D33944A-EC75-4855-A54D-809C75241F6CSEC1.1.dpx -i c:\udk2015\Build\NT32IA32\DEBUG_VS2013\FV\Ffs\6D33944A-EC75-4855-A54D-809C75241F6CBdsDxe\6D33944A-EC75-4855-A54D-809C75241F6CSEC2.com
7. 从6D33944A-EC75-4855-A54D-809C75241F6CSEC1.1.dpx.txt,可以看到 dpx 文件的生成过程
GenSec -s EFI_SECTION_DXE_DEPEX -o c:\udk2015\Build\NT32IA32\DEBUG_VS2013\FV\Ffs\6D33944A-EC75-4855-A54D-809C75241F6CBdsDxe\6D33944A-EC75-4855-A54D-809C75241F6CSEC1.1.dpx c:\udk2015\Build\NT32IA32\DEBUG_VS2013\IA32\MdeModulePkg\Universal\BdsDxe\BdsDxe\OUTPUT\BdsDxe.depex
8. 接下来是最后一步,使用COM 和 DPX 生成 FFS 文件,从6D33944A-EC75-4855-A54D-809C75241F6C.ffs.txt 文件可以看到操作动作
GenFfs -t EFI_FV_FILETYPE_DRIVER -g 6D33944A-EC75-4855-A54D-809C75241F6C -o c:\udk2015\Build\NT32IA32\DEBUG_VS2013\FV\Ffs\6D33944A-EC75-4855-A54D-809C75241F6CBdsDxe\6D33944A-EC75-4855-A54D-809C75241F6C.ffs -i c:\udk2015\Build\NT32IA32\DEBUG_VS2013\FV\Ffs\6D33944A-EC75-4855-A54D-809C75241F6CBdsDxe\6D33944A-EC75-4855-A54D-809C75241F6CSEC1.1.dpx -i c:\udk2015\Build\NT32IA32\DEBUG_VS2013\FV\Ffs\6D33944A-EC75-4855-A54D-809C75241F6CBdsDxe\6D33944A-EC75-4855-A54D-809C75241F6CSEC2.com
最后生成的 FFS 和 COM 差别很小
了解了整体的BIOS结构,做很多事情,比如:编写无需重新编译代码,直接修改ROM的工具等等。本文只是简单的对于FFS的生成进行了研究,希望这篇文章对于需要了解EDK2 Firmware 结构的朋友有所帮助。