EFI_STATUS
EFIAPI
_ModuleEntryPoint (
  IN EFI_HANDLE        ImageHandle,
  IN EFI_SYSTEM_TABLE  *SystemTable
  )
{
  EFI_STATUS                 Status;

  if (_gUefiDriverRevision != 0) {
    //
    // Make sure that the EFI/UEFI spec revision of the platform is >= EFI/UEFI spec revision of the application.
    //
    if (SystemTable->Hdr.Revision < _gUefiDriverRevision) {
      return EFI_INCOMPATIBLE_VERSION;
    }
  }
CpuBreakpoint(); //LABZ_Debug
  //
  // Call constructor for all libraries.
  //
  ProcessLibraryConstructorList (ImageHandle, SystemTable);
F3 90 PAUSE Gives hint to processor that improves
performance of spin-wait loops.
Description
Improves the performance of spin-wait loops. When executing
a “spin-wait loop,” a Pentium 4 or Intel Xeon processor suffers a
severe performance penalty when exiting the loop because it detects a possible
memory order violation. The PAUSE instruction provides a hint to the processor
that the code sequence is a spin-wait loop. The processor uses this hint to
avoid the memory order violation in most situations, which greatly improves
processor performance. For this reason, it is recommended that a PAUSE
instruction be placed in all spin-wait loops.
An additional function of the PAUSE instruction is to reduce
the power consumed by a Pentium 4 processor while executing a spin loop. The
Pentium 4 processor can execute a spinwait loop extremely quickly, causing the
processor to consume a lot of power while it waits for the resource it is
spinning on to become available. Inserting a pause instruction in a spinwait
loop greatly reduces the processor’s power consumption.
This instruction was introduced in the Pentium 4 processors,
but is backward compatible with all IA-32 processors. In earlier IA-32
processors, the PAUSE instruction operates like a NOP instruction. The Pentium
4 and Intel Xeon processors implement the PAUSE instruction as a pre-defined
delay. The delay is finite and can be zero for some processors. This
instruction does not change the architectural state of the processor (that is,
it performs essentially a delaying noop operation). 【参考1】
从上面的资料来看 Pause 的机器码和 NOP 的非常像。因此,这样可以实现兼容之前的 CPU。
上面一段话翻译如下:
“PAUSE指令提升了自旋等待循环(spin-wait
loop)的性能。当执行一个循环等待时,Intel P4或Intel Xeon处理器会因为检测到一个可能的内存顺序违规(memory order violation)而在退出循环时使性能大幅下降。PAUSE指令给处理器提了个醒:这段代码序列是个循环等待。处理器利用这个提示可以避免在大多数情况下的内存顺序违规,这将大幅提升性能。因为这个原因,所以推荐在循环等待中使用PAUSE指令。
/**
  Entry point to UEFI Application.

  This function is the entry point for a UEFI Application. This function must call
  ProcessLibraryConstructorList(), ProcessModuleEntryPointList(), and ProcessLibraryDestructorList().
  The return value from ProcessModuleEntryPointList() is returned.
  If _gUefiDriverRevision is not zero and SystemTable->Hdr.Revision is less than _gUefiDriverRevison,
  then return EFI_INCOMPATIBLE_VERSION.

  @param  ImageHandle                The image handle of the UEFI Application.
  @param  SystemTable                A pointer to the EFI System Table.

  @retval  EFI_SUCCESS               The UEFI Application exited normally.
  @retval  EFI_INCOMPATIBLE_VERSION  _gUefiDriverRevision is greater than SystemTable->Hdr.Revision.
  @retval  Other                     Return value from ProcessModuleEntryPointList().

**/
EFI_STATUS
EFIAPI
_ModuleEntryPoint (
  IN EFI_HANDLE        ImageHandle,
  IN EFI_SYSTEM_TABLE  *SystemTable
  )
{
  EFI_STATUS                 Status;

  if (_gUefiDriverRevision != 0) {
    //
    // Make sure that the EFI/UEFI spec revision of the platform is >= EFI/UEFI spec revision of the application.
    //
    if (SystemTable->Hdr.Revision < _gUefiDriverRevision) {
      return EFI_INCOMPATIBLE_VERSION;
    }
  }
  //
  // Call constructor for all libraries.
  //
  ProcessLibraryConstructorList (ImageHandle, SystemTable);
  //
  // Call the module's entry point
  //
  Status = ProcessModuleEntryPointList (ImageHandle, SystemTable);

  //
  // Process destructor for all libraries.
  //
  ProcessLibraryDestructorList (ImageHandle, SystemTable);

  //
  // Return the return status code from the driver entry point
  //
  return Status;
}
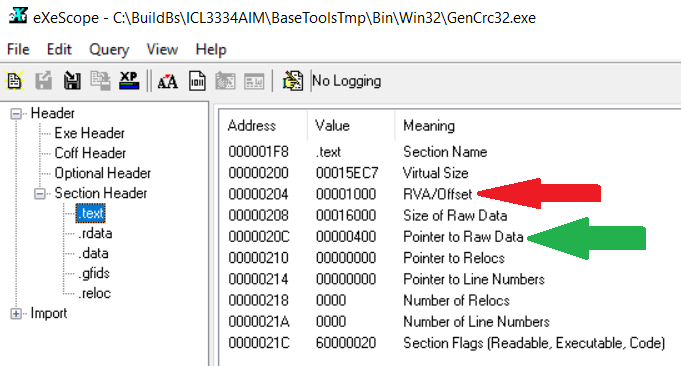
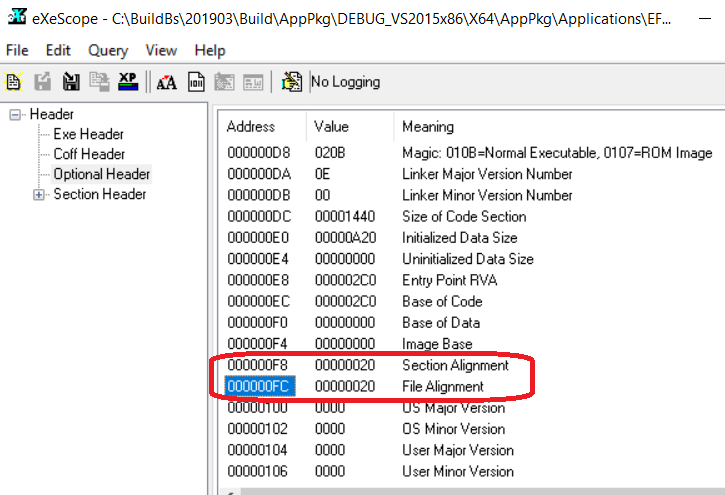
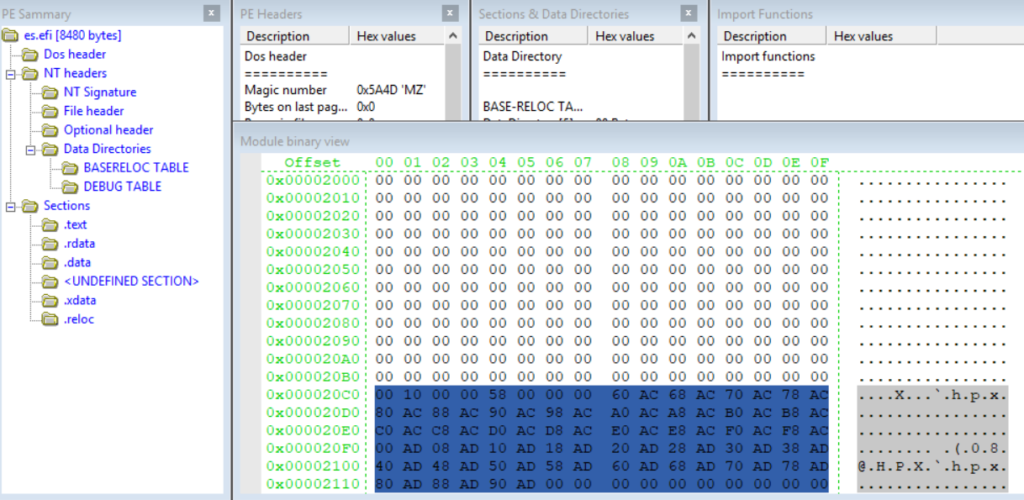
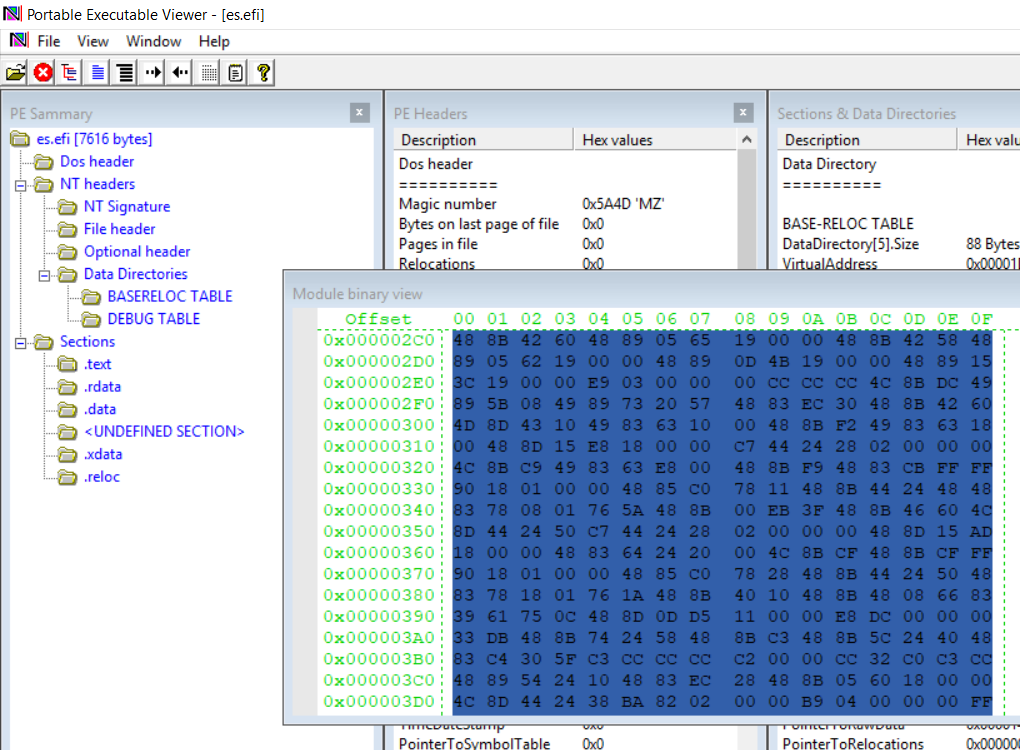
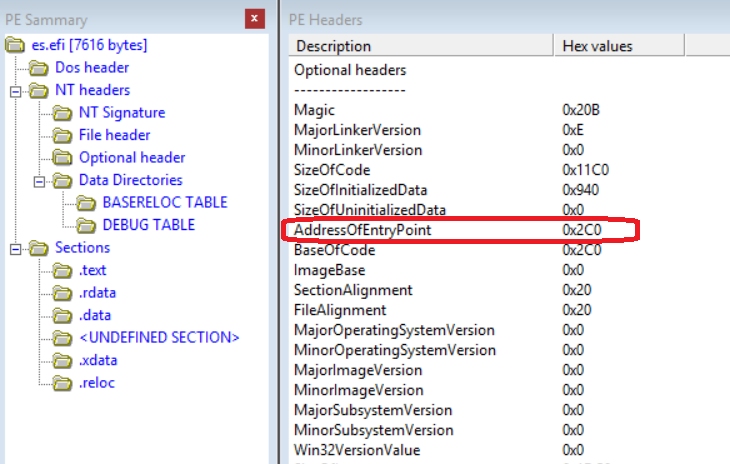
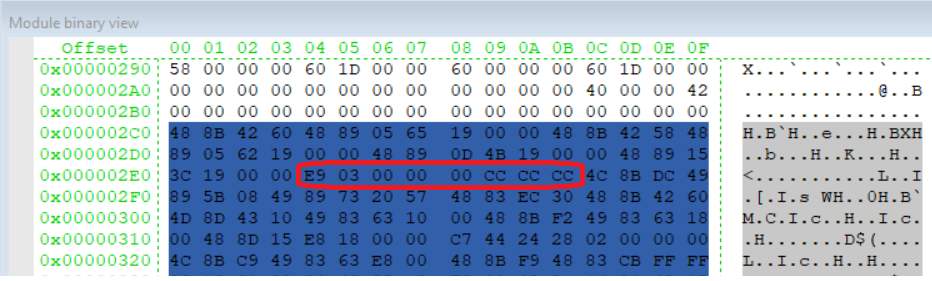
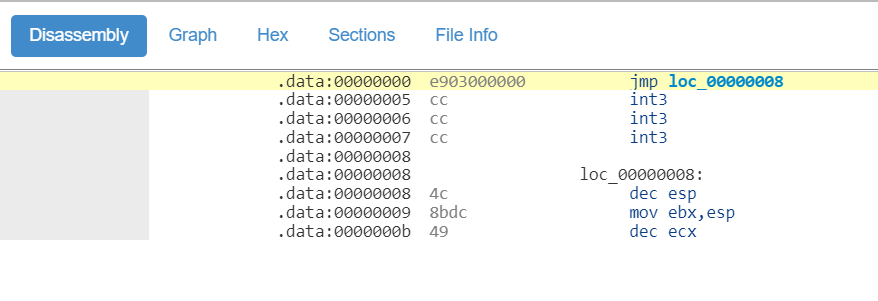
EFI 文件使用的是 PE 格式(PE文件的全称是Portable
Executable,意为可移植的可执行的文件,常见的EXE、DLL、OCX、SYS、COM都是PE文件,PE文件是微软Windows操作系统上的程序文件【参考1】),所以很多关于PE文件的知识在 EFI
文件上仍然是通用的。
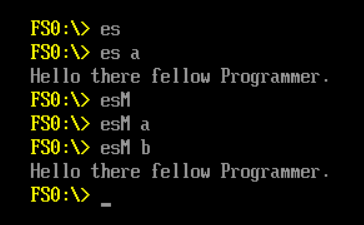
我们编写一个代码来进行研究。功能非常简单,如果运行时加入 a 参数,那么打印一串字符,否则无任何动作。具体代码如下:
#include  <Uefi.h>
#include  <Library/UefiLib.h>
#include  <Library/ShellCEntryLib.h>

/***
  Print a welcoming message.

  Establishes the main structure of the application.

  @retval  0         The application exited normally.
  @retval  Other     An error occurred.
***/
INTN
EFIAPI
ShellAppMain (
  IN UINTN Argc,
  IN CHAR16 **Argv
  )
{
        if ((Argc>1)&&(Argv[1][0]=='a')) {
                Print(L"Hello there fellow Programmer.\n");
        }

  return(0);
}
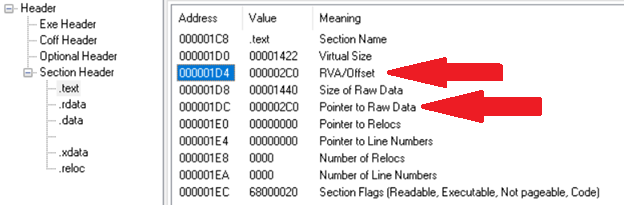
Start         Length     Name                   Class
 0001:00000000 000011aeH .text$mn                CODE
 0002:00000000 00000654H .rdata                  DATA
 0002:00000654 00000114H .rdata$zzzdbg           DATA
 0003:00000000 00000020H .data                   DATA
 0003:00000020 00000020H .bss                    DATA
 0004:00000000 00000084H .pdata                  DATA
 0005:00000000 0000007cH .xdata                  DATA
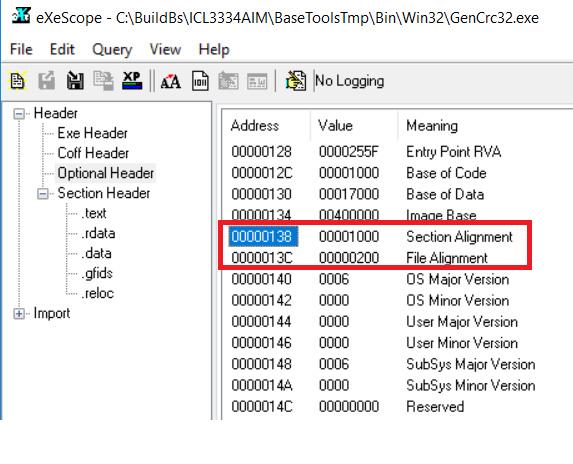
The PE format is documented (in the loosest sense of the word) in
the WINNT.H header file. About midway through WINNT.H is a section titled
“Image Format.” This section starts out with small tidbits from the
old familiar MS-DOS MZ format and NE format headers before moving into the
newer PE information. WINNT.H provides definitions of the raw data structures
used by PE files, but contains only a few useful comments to make sense of what
the structures and flags mean. Whoever wrote the header file for the PE format
(the name Michael J. O’Leary keeps popping up) is certainly a believer in long,
descriptive names, along with deeply nested structures and macros. When coding
with WINNT.H, it’s not uncommon to have expressions like this:
/** @file
Application for Cryptographic Primitives Validation.
Copyright (c) 2009 - 2016, Intel Corporation. All rights reserved.<BR>
This program and the accompanying materials
are licensed and made available under the terms and conditions of the BSD License
which accompanies this distribution. The full text of the license may be found at
http://opensource.org/licenses/bsd-license.php
THE PROGRAM IS DISTRIBUTED UNDER THE BSD LICENSE ON AN "AS IS" BASIS,
WITHOUT WARRANTIES OR REPRESENTATIONS OF ANY KIND, EITHER EXPRESS OR IMPLIED.
**/
#include <Uefi.h>
#include <Library/BaseLib.h>
#include <Library/BaseMemoryLib.h>
#include <Library/MemoryAllocationLib.h>
#include <Library/UefiLib.h>
#include <Library/UefiApplicationEntryPoint.h>
#include <Library/DebugLib.h>
#include <Protocol/PciIo.h>
#include <Library/ShellLib.h>
EFI_STATUS
EFIAPI
GDTMain (
IN EFI_HANDLE ImageHandle,
IN EFI_SYSTEM_TABLE *SystemTable
)
{
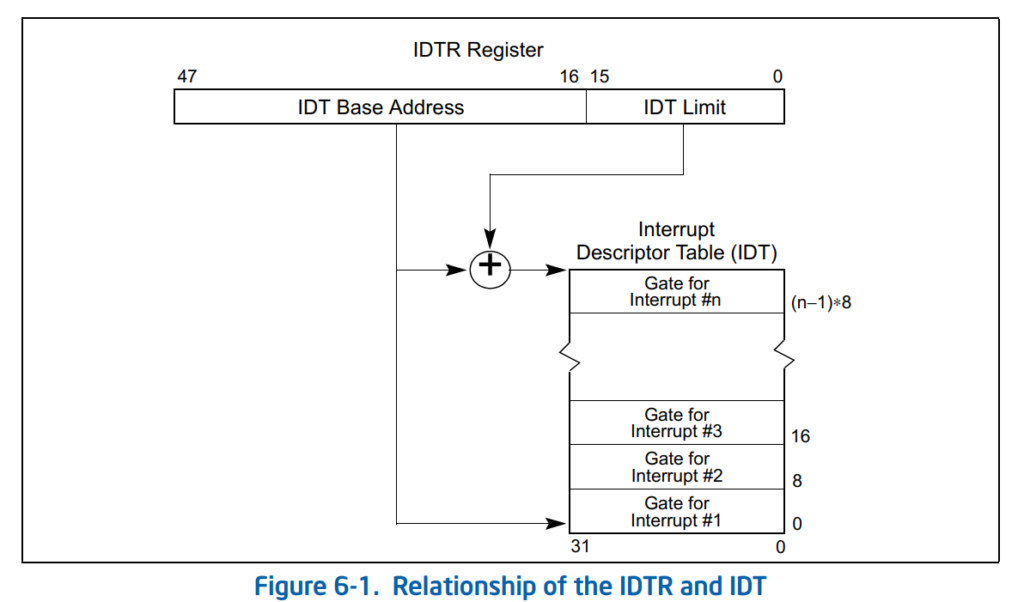
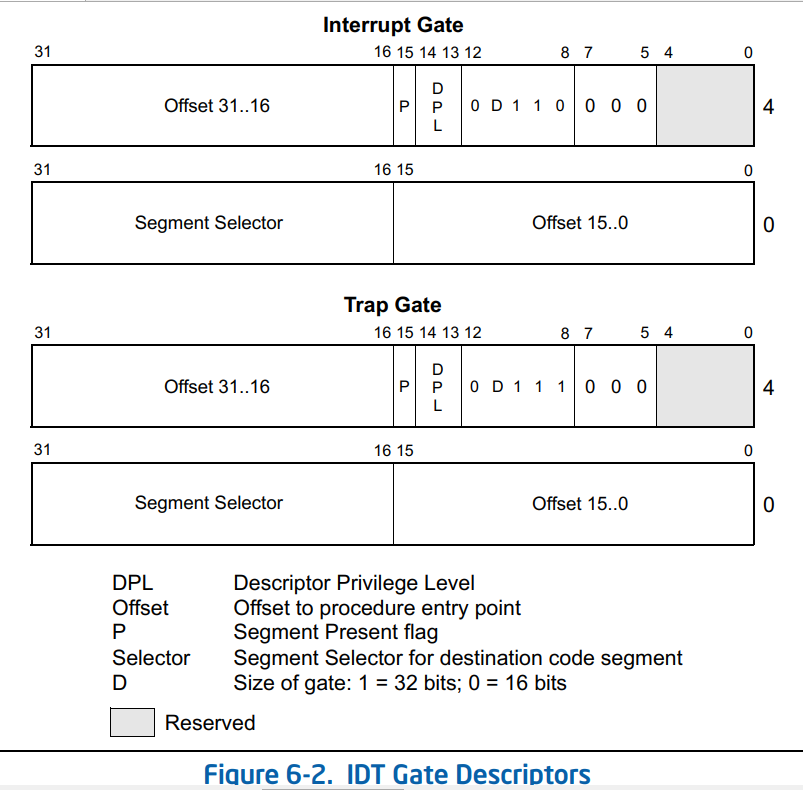
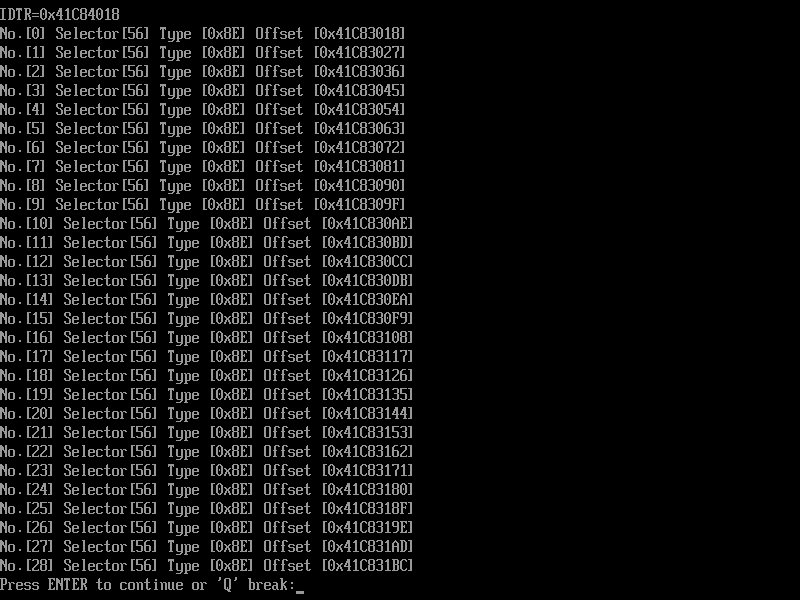
IA32_DESCRIPTOR Idtr;
IA32_IDT_GATE_DESCRIPTOR *IdtTable;
UINT16 Index;
UINT16 IdtEntryCount;
ShellSetPageBreakMode(TRUE);
AsmReadIdtr (&Idtr);
IdtEntryCount = (UINT16) ((Idtr.Limit + 1) / sizeof (IA32_IDT_GATE_DESCRIPTOR));
IdtTable = (IA32_IDT_GATE_DESCRIPTOR *) Idtr.Base;
Print(L"IDTR=0x%lX\n",IdtTable);
for (Index = 0; Index < IdtEntryCount; Index++) {
Print(L"No.[%d] ",Index);
Print(L"Selector[%d] ",IdtTable->Bits.Selector);
Print(L"Type [0x%X] ",IdtTable->Bits.GateType);
Print(L"Offset [0x%lX]\n",
(IdtTable->Bits.OffsetUpper<<32)|
(IdtTable->Bits.OffsetHigh <<16)|
(IdtTable->Bits.OffsetLow)
);
IdtTable++;
}
return EFI_SUCCESS;
}
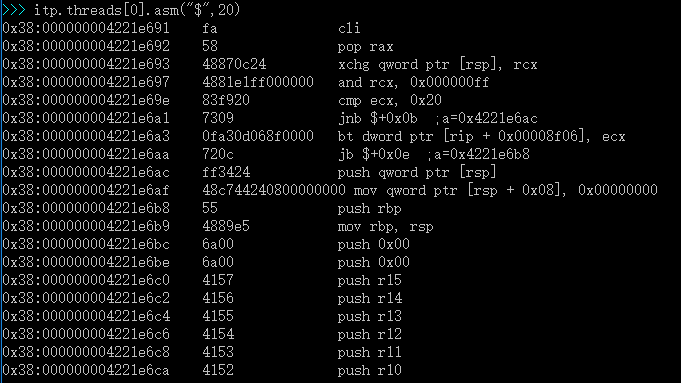
global ASM_PFX(CommonInterruptEntry)
ASM_PFX(CommonInterruptEntry):
    cli
    pop     rax
    ;
    ; All interrupt handlers are invoked through interrupt gates, so
    ; IF flag automatically cleared at the entry point
    ;
    xchg    rcx, [rsp]      ; Save rcx into stack and save vector number into rcx
    and     rcx, 0xFF
    cmp     ecx, 32         ; Intel reserved vector for exceptions?
    jae     NoErrorCode
    bt      [ASM_PFX(mErrorCodeFlag)], ecx
    jc      HasErrorCode