Step to UEFI (99)使用 Protocol的总结

前面很多程序一直在使用各种 Protocol 提供的服务,《UEFI 原理与编程》第五章是关于 UEFI基础服务的,正好借着本章,总结一下如何查找和调用 Protocol。

要使用Protocol,首先要知道使用哪个 Protocol ,它的名字就是 GUID。比如:gEfLoadedImageProtocolGuid ,他是 EFI_GUID类型。

启动服务(Boot Services)提供了下面一些服务用来查找指定的 Protocol。

OpenProtocol 打开指定句柄上面的 Protocol
HandleProtocol 上面的OpenProtocol对于参数要求比较复杂,HandleProtocol可以看做是前者的简化版本。
LocateProtocol 用于找出给定的 Protocol 在系统中的第一个实例。当你确定系统中只有一个 Protocol 的时候可以使用这个函数。比如,查找系统中的 EfiShellProtocol
LocateHandleBuffer 和上面的类似,差别在于这个函数能够给出系统中所有的支持给定 Protocol 设备的 Handle。比如,找到系统中所有支持 BlockIO 的设备

下面分别介绍每个函数:
1. OpenProtocol 原型定义可以在这支文件中看到 \MdePkg\Include\Uefi\UefiSpec.h

/**
  Queries a handle to determine if it supports a specified protocol. If the protocol is supported by the
  handle, it opens the protocol on behalf of the calling agent.

  @param[in]   Handle           The handle for the protocol interface that is being opened.
  @param[in]   Protocol         The published unique identifier of the protocol.
  @param[out]  Interface        Supplies the address where a pointer to the corresponding Protocol
                                Interface is returned.
  @param[in]   AgentHandle      The handle of the agent that is opening the protocol interface
                                Specified by Protocol and Interface.
  @param[in]   ControllerHandle If the agent that is opening a protocol is a driver that follows the
                                UEFI Driver Model, then this parameter is the controller handle
                                that requires the protocol interface. If the agent does not follow
                                the UEFI Driver Model, then this parameter is optional and may
                                be NULL.
  @param[in]   Attributes       The open mode of the protocol interface specified by Handle
                                and Protocol.

  @retval EFI_SUCCESS           An item was added to the open list for the protocol interface, and the
                                protocol interface was returned in Interface.
  @retval EFI_UNSUPPORTED       Handle does not support Protocol.
  @retval EFI_INVALID_PARAMETER One or more parameters are invalid.
  @retval EFI_ACCESS_DENIED     Required attributes can't be supported in current environment.
  @retval EFI_ALREADY_STARTED   Item on the open list already has requierd attributes whose agent
                                handle is the same as AgentHandle.

**/
typedef
EFI_STATUS
(EFIAPI *EFI_OPEN_PROTOCOL)(
  IN  EFI_HANDLE                Handle, //指定在哪个 Handle 上查找 Protocol 
  IN  EFI_GUID                  *Protocol,//查找哪个 Protocol
  OUT VOID                      **Interface, OPTIONAL //返回打开的 Protocol 对象
  IN  EFI_HANDLE                AgentHandle, //打开此 Protocol 的Image(书上说的,我并不理解)
  IN  EFI_HANDLE                ControllerHandle, //使用此 Protocol的控制器
  IN  UINT32                    Attributes     //打开 Protocol 的方式
  );


2. HandleProtocol 和前面的那个函数相比,调用参数上简单多了。 原型定义可以在这支文件中看到 \MdePkg\Include\Uefi\UefiSpec.h

/**
  Queries a handle to determine if it supports a specified protocol.

  @param[in]   Handle           The handle being queried.
  @param[in]   Protocol         The published unique identifier of the protocol.
  @param[out]  Interface        Supplies the address where a pointer to the corresponding Protocol
                                Interface is returned.

  @retval EFI_SUCCESS           The interface information for the specified protocol was returned.
  @retval EFI_UNSUPPORTED       The device does not support the specified protocol.
  @retval EFI_INVALID_PARAMETER Handle is NULL.
  @retval EFI_INVALID_PARAMETER Protocol is NULL.
  @retval EFI_INVALID_PARAMETER Interface is NULL.

**/
typedef
EFI_STATUS
(EFIAPI *EFI_HANDLE_PROTOCOL)(
  IN  EFI_HANDLE               Handle,   //打开 Handle上面的 
  IN  EFI_GUID                 *Protocol, //GUID给定的Protocol
  OUT VOID                     **Interface //打开之后放在这里
  );


3. LocateProtocol 前面两个函数都是用来打开特定 Handle 上的Protocol,如果我们不知道需要的Protocol 在哪个Handle上,就可以用这个函数。调用参数上简单多了. 原型定义可以在这支文件中看到\MdePkg\Include\Uefi\UefiSpec.h

/**
  Returns the first protocol instance that matches the given protocol.

  @param[in]  Protocol          Provides the protocol to search for.
  @param[in]  Registration      Optional registration key returned from
                                RegisterProtocolNotify().
  @param[out]  Interface        On return, a pointer to the first interface that matches Protocol and
                                Registration.

  @retval EFI_SUCCESS           A protocol instance matching Protocol was found and returned in
                                Interface.
  @retval EFI_NOT_FOUND         No protocol instances were found that match Protocol and
                                Registration.
  @retval EFI_INVALID_PARAMETER Interface is NULL.

**/
typedef
EFI_STATUS
(EFIAPI *EFI_LOCATE_PROTOCOL)(
  IN  EFI_GUID  *Protocol,                //要打开的 Protocol
  IN  VOID      *Registration, OPTIONAL  //从 RegisgerProtocolNotify() 获得的Key (不懂)
  OUT VOID      **Interface     //返回找到的对个匹配的 Protocol 实例
  );


4. LocateHandleBuffer 这个函数用来找出支持某个 Protocol的所有设备, 原型定义可以在这支文件中看到 \MdePkg\Include\Uefi\UefiSpec.h

/**
  Returns an array of handles that support a specified protocol.

  @param[in]       SearchType   Specifies which handle(s) are to be returned.
  @param[in]       Protocol     Specifies the protocol to search by.
  @param[in]       SearchKey    Specifies the search key.
  @param[in, out]  BufferSize   On input, the size in bytes of Buffer. On output, the size in bytes of
                                the array returned in Buffer (if the buffer was large enough) or the
                                size, in bytes, of the buffer needed to obtain the array (if the buffer was
                                not large enough).
  @param[out]      Buffer       The buffer in which the array is returned.

  @retval EFI_SUCCESS           The array of handles was returned.
  @retval EFI_NOT_FOUND         No handles match the search.
  @retval EFI_BUFFER_TOO_SMALL  The BufferSize is too small for the result.
  @retval EFI_INVALID_PARAMETER SearchType is not a member of EFI_LOCATE_SEARCH_TYPE.
  @retval EFI_INVALID_PARAMETER SearchType is ByRegisterNotify and SearchKey is NULL.
  @retval EFI_INVALID_PARAMETER SearchType is ByProtocol and Protocol is NULL.
  @retval EFI_INVALID_PARAMETER One or more matches are found and BufferSize is NULL.
  @retval EFI_INVALID_PARAMETER BufferSize is large enough for the result and Buffer is NULL.

**/
typedef
EFI_STATUS
(EFIAPI *EFI_LOCATE_HANDLE)(
  IN     EFI_LOCATE_SEARCH_TYPE   SearchType,   //查找方法
  IN     EFI_GUID                 *Protocol,    OPTIONAL //指定的 Protocol
  IN     VOID                     *SearchKey,   OPTIONAL   //PROTOCOL_NOTIFY 类型
  IN OUT UINTN                    *BufferSize,                  //找到的Handle数量
  OUT    EFI_HANDLE               *Buffer                       //返回的 Handle Buffer 
  );


其中EFI_LOCATE_SEARCH_TYPE 可以定义为下面几种类型

///
/// Enumeration of EFI Locate Search Types
///
typedef enum {
  ///
  /// Retrieve all the handles in the handle database.
  ///
  AllHandles,               //返回当前系统中的全部 Handle
  ///
  /// Retrieve the next handle fron a RegisterProtocolNotify() event.
  ///
  ByRegisterNotify, //搜索从 RegisterProtocolNodify 中找出匹配SearchKey的 Handle
  ///
  /// Retrieve the set of handles from the handle database that support a 
  /// specified protocol.
  ///
  ByProtocol            //返回系统Handle数据可中支持指定Protocol的HANDLE
} EFI_LOCATE_SEARCH_TYPE;


Adarfruit的触摸库

之前我介绍过一个MPR121 触摸传感器模块的库【参考1】,这次再介绍另外一个实现同样功能的库,差别在于这个新的库可以从Arduino IDE中直接下载到:
image001
国内买到的板子都是根据 Adafruit仿造的,下图就是 Adafruit的原图
image002
引出的 12个触摸脚,还有如下控制pin:
1.IRQ 可以做到按下时同时 Arduino
2.SDA/SCL I2C通讯用的
3.ADDR: 作用是选择I2C的地址,模块本身有下拉电阻,这里可以不接。默认地址是0x5B
image003
image004

4.GND 地
5. 3.3V 电源
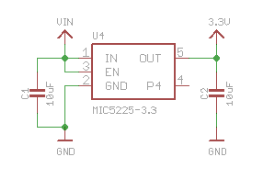
6. VIN 模块本身有一个电压转换芯片,可以接入 5V
image005
运行库自带的例子,接线上只要接3.3V GND SDA SCL 四根线即可,这个库本身是用轮询的方法来处理引脚的触摸信息的。
代码如下:

/*********************************************************
This is a library for the MPR121 12-channel Capacitive touch sensor

Designed specifically to work with the MPR121 Breakout in the Adafruit shop 
  ----> https://www.adafruit.com/products/

These sensors use I2C communicate, at least 2 pins are required 
to interface

Adafruit invests time and resources providing this open source code, 
please support Adafruit and open-source hardware by purchasing 
products from Adafruit!

Written by Limor Fried/Ladyada for Adafruit Industries.  
BSD license, all text above must be included in any redistribution
**********************************************************/

#include <Wire.h>
#include "Adafruit_MPR121.h"

// You can have up to 4 on one i2c bus but one is enough for testing!
Adafruit_MPR121 cap = Adafruit_MPR121();

// Keeps track of the last pins touched
// so we know when buttons are 'released'
uint16_t lasttouched = 0;
uint16_t currtouched = 0;

void setup() {
  while (!Serial);        // needed to keep leonardo/micro from starting too fast!

  Serial.begin(9600);
  Serial.println("Adafruit MPR121 Capacitive Touch sensor test"); 
  
  // Default address is 0x5A, if tied to 3.3V its 0x5B
  // If tied to SDA its 0x5C and if SCL then 0x5D
  if (!cap.begin(0x5A)) {
    Serial.println("MPR121 not found, check wiring?");
    while (1);
  }
  Serial.println("MPR121 found!");
}

void loop() {
  // Get the currently touched pads
  currtouched = cap.touched();
  
  for (uint8_t i=0; i<12; i++) {
    // it if *is* touched and *wasnt* touched before, alert!
    if ((currtouched & _BV(i)) && !(lasttouched & _BV(i)) ) {
      Serial.print(i); Serial.println(" touched");
    }
    // if it *was* touched and now *isnt*, alert!
    if (!(currtouched & _BV(i)) && (lasttouched & _BV(i)) ) {
      Serial.print(i); Serial.println(" released");
    }
  }

  // reset our state
  lasttouched = currtouched;

  // comment out this line for detailed data from the sensor!
  return;
  
  // debugging info, what
  Serial.print("\t\t\t\t\t\t\t\t\t\t\t\t\t 0x"); Serial.println(cap.touched(), HEX);
  Serial.print("Filt: ");
  for (uint8_t i=0; i<12; i++) {
    Serial.print(cap.filteredData(i)); Serial.print("\t");
  }
  Serial.println();
  Serial.print("Base: ");
  for (uint8_t i=0; i<12; i++) {
    Serial.print(cap.baselineData(i)); Serial.print("\t");
  }
  Serial.println();
  
  // put a delay so it isn't overwhelming
  delay(100);
}


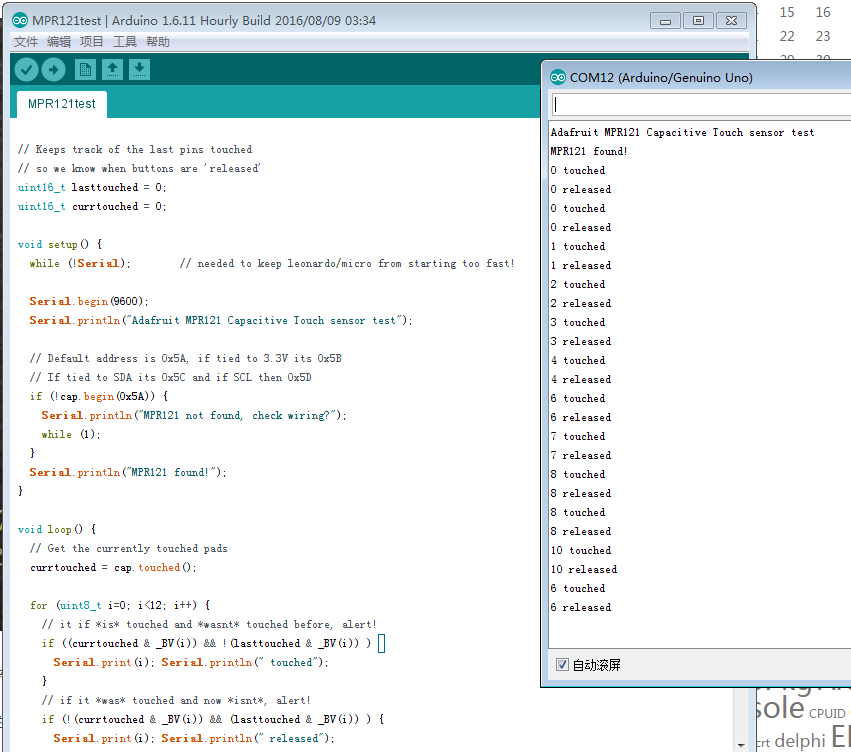
运行结果:
image006
需要注意的是模块的地址问题,根据DataSheet ADDR 如果接到GND,地址应该是0x5B ,但是实际上是 0x5A。
参考:
1. http://www.lab-z.com/mpr121/ MPR121 触摸传感器模块
2. https://www.adafruit.com/products/1982

Step to UEFI (98)Shell加载EFI的分析

继续阅读《UEFI 原理与编程》,其中的第三章介绍了一个 EFI Application如何在 Shell下加载运行的。ShellProtocol.c中的InternalShellExecuteDevicePath 是具体实现这个功能的函数。
函数头:

/**
  internal worker function to load and run an image via device path.

  @param ParentImageHandle      A handle of the image that is executing the specified
                                command line.
  @param DevicePath             device path of the file to execute
  @param CommandLine            Points to the NULL-terminated UCS-2 encoded string
                                containing the command line. If NULL then the command-
                                line will be empty.
  @param Environment            Points to a NULL-terminated array of environment
                                variables with the format 'x=y', where x is the
                                environment variable name and y is the value. If this
                                is NULL, then the current shell environment is used.
                            
  @param[out] StartImageStatus  Returned status from gBS->StartImage.

  @retval EFI_SUCCESS       The command executed successfully. The  status code
                            returned by the command is pointed to by StatusCode.
  @retval EFI_INVALID_PARAMETER The parameters are invalid.
  @retval EFI_OUT_OF_RESOURCES Out of resources.
  @retval EFI_UNSUPPORTED   Nested shell invocations are not allowed.
**/
EFI_STATUS
EFIAPI
InternalShellExecuteDevicePath(
  IN CONST EFI_HANDLE               *ParentImageHandle,
  IN CONST EFI_DEVICE_PATH_PROTOCOL *DevicePath,
  IN CONST CHAR16                   *CommandLine OPTIONAL,
  IN CONST CHAR16                   **Environment OPTIONAL,
  OUT EFI_STATUS                    *StartImageStatus OPTIONAL
  )


第一步,先将 EFI Application加载到内存中,生成Image对象。取得这个对象的句柄为 NewHandle。

  //
  // Load the image with:
  // FALSE - not from boot manager and NULL, 0 being not already in memory
  //
  Status = gBS->LoadImage(
    FALSE,
    *ParentImageHandle,
    (EFI_DEVICE_PATH_PROTOCOL*)DevicePath,
    NULL,
    0,
    &NewHandle);

  if (EFI_ERROR(Status)) {
    if (NewHandle != NULL) {
      gBS->UnloadImage(NewHandle);
    }
    return (Status);
  }

第二步,取得命令行参数,将命令行的参数交给 NewHandle

 Status = gBS->OpenProtocol(
    NewHandle,
    &gEfiLoadedImageProtocolGuid,
    (VOID**)&LoadedImage,
    gImageHandle,
    NULL,
    EFI_OPEN_PROTOCOL_GET_PROTOCOL);

  if (!EFI_ERROR(Status)) {
    ASSERT(LoadedImage->LoadOptionsSize == 0);
    if (NewCmdLine != NULL) {
      LoadedImage->LoadOptionsSize  = (UINT32)StrSize(NewCmdLine);
      LoadedImage->LoadOptions      = (VOID*)NewCmdLine;
    }


看到这里我有一个问题:前面加载之后,为什么第二步就能够在被加载的Image上找到“EFI_Loaded_Image_Protocol”? 带着这样的问题追踪了代码。首先要找到 gBS->LoadImage 的真正实现代码,在\MdeModulePkg\Core\Dxe\DxeMain\DxeMain.c有定义,

//
// DXE Core Module Variables
//
EFI_BOOT_SERVICES mBootServices = {
  {
.................
.................
  (EFI_IMAGE_LOAD)                              CoreLoadImage,                            // LoadImage
.................
.................
}


再追CoreLoadImage代码在 \MdeModulePkg\Core\Dxe\Image\Image.c

/**
  Loads an EFI image into memory and returns a handle to the image.

  @param  BootPolicy              If TRUE, indicates that the request originates
                                  from the boot manager, and that the boot
                                  manager is attempting to load FilePath as a
                                  boot selection.
  @param  ParentImageHandle       The caller's image handle.
  @param  FilePath                The specific file path from which the image is
                                  loaded.
  @param  SourceBuffer            If not NULL, a pointer to the memory location
                                  containing a copy of the image to be loaded.
  @param  SourceSize              The size in bytes of SourceBuffer.
  @param  ImageHandle             Pointer to the returned image handle that is
                                  created when the image is successfully loaded.

  @retval EFI_SUCCESS             The image was loaded into memory.
  @retval EFI_NOT_FOUND           The FilePath was not found.
  @retval EFI_INVALID_PARAMETER   One of the parameters has an invalid value.
  @retval EFI_UNSUPPORTED         The image type is not supported, or the device
                                  path cannot be parsed to locate the proper
                                  protocol for loading the file.
  @retval EFI_OUT_OF_RESOURCES    Image was not loaded due to insufficient
                                  resources.
  @retval EFI_LOAD_ERROR          Image was not loaded because the image format was corrupt or not
                                  understood.
  @retval EFI_DEVICE_ERROR        Image was not loaded because the device returned a read error.
  @retval EFI_ACCESS_DENIED       Image was not loaded because the platform policy prohibits the 
                                  image from being loaded. NULL is returned in *ImageHandle.
  @retval EFI_SECURITY_VIOLATION  Image was loaded and an ImageHandle was created with a 
                                  valid EFI_LOADED_IMAGE_PROTOCOL. However, the current 
                                  platform policy specifies that the image should not be started.

**/
EFI_STATUS
EFIAPI
CoreLoadImage (
  IN BOOLEAN                    BootPolicy,
  IN EFI_HANDLE                 ParentImageHandle,
  IN EFI_DEVICE_PATH_PROTOCOL   *FilePath,
  IN VOID                       *SourceBuffer   OPTIONAL,
  IN UINTN                      SourceSize,
  OUT EFI_HANDLE                *ImageHandle
  )
{
  EFI_STATUS    Status;
  UINT64        Tick;
  EFI_HANDLE    Handle;

  Tick = 0;
  PERF_CODE (
    Tick = GetPerformanceCounter ();
  );

  Status = CoreLoadImageCommon (
             BootPolicy,
             ParentImageHandle,
             FilePath,
             SourceBuffer,
             SourceSize,
             (EFI_PHYSICAL_ADDRESS) (UINTN) NULL,
             NULL,
             ImageHandle,
             NULL,
             EFI_LOAD_PE_IMAGE_ATTRIBUTE_RUNTIME_REGISTRATION | EFI_LOAD_PE_IMAGE_ATTRIBUTE_DEBUG_IMAGE_INFO_TABLE_REGISTRATION
             );

  Handle = NULL; 
  if (!EFI_ERROR (Status)) {
    //
    // ImageHandle will be valid only Status is success. 
    //
    Handle = *ImageHandle;
  }

  PERF_START (Handle, "LoadImage:", NULL, Tick);
  PERF_END (Handle, "LoadImage:", NULL, 0);

  return Status;
}
在CoreLoadImageCommon 中可以找到加载安装EFI_Loaded_Image_Protocol 的代码。
  //
  //Reinstall loaded image protocol to fire any notifications
  //
  Status = CoreReinstallProtocolInterface (
             Image->Handle,
             &gEfiLoadedImageProtocolGuid,
             &Image->Info,
             &Image->Info
             );
  if (EFI_ERROR (Status)) {
    goto Done;
  }


就是说,在加载过程中,还要对Image 安装EFI_Loaded_Image_Protocol。因此,Load 的动作并不是简单的读取到内存中。

继续回到InternalShellExecuteDevicePath 代码中。

    //第三步,将修改好的ShellParamsProtocol 再安装到 Image上。
    //
    // Initialize and install a shell parameters protocol on the image.
    //
    ShellParamsProtocol.StdIn   = ShellInfoObject.NewShellParametersProtocol->StdIn;
    ShellParamsProtocol.StdOut  = ShellInfoObject.NewShellParametersProtocol->StdOut;
    ShellParamsProtocol.StdErr  = ShellInfoObject.NewShellParametersProtocol->StdErr;
    Status = UpdateArgcArgv(&ShellParamsProtocol, NewCmdLine, NULL, NULL);
    ASSERT_EFI_ERROR(Status);
    //
    // Replace Argv[0] with the full path of the binary we're executing:
    // If the command line was "foo", the binary might be called "foo.efi".
    // "The first entry in [Argv] is always the full file path of the
    //  executable" - UEFI Shell Spec section 2.3
    //
    ImagePath = EfiShellGetFilePathFromDevicePath (DevicePath);
    // The image we're executing isn't necessarily in a filesystem - it might
    // be memory mapped. In this case EfiShellGetFilePathFromDevicePath will
    // return NULL, and we'll leave Argv[0] as UpdateArgcArgv set it.
    if (ImagePath != NULL) {
      if (ShellParamsProtocol.Argv == NULL) {
        // Command line was empty or null.
        // (UpdateArgcArgv sets Argv to NULL when CommandLine is "" or NULL)
        ShellParamsProtocol.Argv = AllocatePool (sizeof (CHAR16 *));
        if (ShellParamsProtocol.Argv == NULL) {
          Status = EFI_OUT_OF_RESOURCES;
          goto UnloadImage;
        }
        ShellParamsProtocol.Argc = 1;
      } else {
        // Free the string UpdateArgcArgv put in Argv[0];
        FreePool (ShellParamsProtocol.Argv[0]);
      }
      ShellParamsProtocol.Argv[0] = ImagePath;
    }

    Status = gBS->InstallProtocolInterface(&NewHandle, &gEfiShellParametersProtocolGuid, EFI_NATIVE_INTERFACE, &ShellParamsProtocol);
    ASSERT_EFI_ERROR(Status);
//第四步,用 gBS->StartImage执行Image。
    //
    // now start the image and if the caller wanted the return code pass it to them...
    //
    if (!EFI_ERROR(Status)) {
      StartStatus      = gBS->StartImage(
                          NewHandle,
                          0,
                          NULL
                          );
      if (StartImageStatus != NULL) {
        *StartImageStatus = StartStatus;
      }


Step to UEFI (97)Shell下获得和设置环境变量

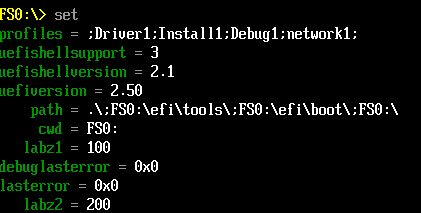
Shell 下可以通过 Set 命令获取和设置当前的环境变量。比如:在模拟环境下运行 Set 可以看到默认的 path 路径:
image001

这里介绍一下如何使用代码来实现这个功能。

首先介绍取得环境变量的函数,在 \ShellPkg\Include\Library\ShellLib.h 中可以看到他的原型。输入函数是要读取的环境变量名称。比如: path

/**
  Return the value of an environment variable.

  This function gets the value of the environment variable set by the
  ShellSetEnvironmentVariable function.

  @param[in] EnvKey             The key name of the environment variable.

  @retval NULL                  The named environment variable does not exist.
  @return != NULL               The pointer to the value of the environment variable.
**/
CONST CHAR16*
EFIAPI
ShellGetEnvironmentVariable (
  IN CONST CHAR16                *EnvKey
  );


其次,介绍一下设置环境变量的函数,同样在在 \ShellPkg\Include\Library\ShellLib.h 中可以看到他的原型。输入的参数是:环境变量名称,要设置的值,还有一个是该变量是否为易失的。如果设置为非易失,那么下次重新其中之后这个值还会存在Shell中。

/**
  Set the value of an environment variable.

  This function changes the current value of the specified environment variable. If the
  environment variable exists and the Value is an empty string, then the environment
  variable is deleted. If the environment variable exists and the Value is not an empty
  string, then the value of the environment variable is changed. If the environment
  variable does not exist and the Value is an empty string, there is no action. If the
  environment variable does not exist and the Value is a non-empty string, then the
  environment variable is created and assigned the specified value.

  This is not supported pre-UEFI Shell 2.0.

  @param[in] EnvKey             The key name of the environment variable.
  @param[in] EnvVal             The Value of the environment variable
  @param[in] Volatile           Indicates whether the variable is non-volatile (FALSE) or volatile (TRUE).

  @retval EFI_SUCCESS           The operation completed sucessfully
  @retval EFI_UNSUPPORTED       This operation is not allowed in pre-UEFI 2.0 Shell environments.
**/
EFI_STATUS
EFIAPI
ShellSetEnvironmentVariable (
  IN CONST CHAR16               *EnvKey,
  IN CONST CHAR16               *EnvVal,
  IN BOOLEAN                    Volatile
  );


编写一个测试的 Application

#include  <Uefi.h>
#include  <Library/UefiLib.h>
#include  <Library/ShellCEntryLib.h>

#include <Library/MemoryAllocationLib.h>
#include <Library/BaseMemoryLib.h>
#include <Protocol/UnicodeCollation.h>

#include  "ShellLib.h"

extern EFI_BOOT_SERVICES         *gBS;
extern EFI_SYSTEM_TABLE		*gST;
extern EFI_RUNTIME_SERVICES 	 *gRT;

int
EFIAPI
main (
  IN int Argc,
  IN CHAR16 **Argv
  )
{
  EFI_STATUS          Status;
  CONST CHAR16		  *Result;
  
  Result=ShellGetEnvironmentVariable(L"path");
  if (Result!=NULL) {
		Print(L"Get path=[%s]\n",Result);
	}
  
  Status=ShellSetEnvironmentVariable(L"labz1",L"100",TRUE);
  if (EFI_ERROR(Status)) {
		Print(L"Set Env. variable error\n",Result);
	}  

  Status=ShellSetEnvironmentVariable(L"labz2",L"200",FALSE);
  if (EFI_ERROR(Status)) {
		Print(L"Set Env. variable error\n",Result);
	}  
	
  Result=ShellGetEnvironmentVariable(L"labz1");
  if (Result!=NULL) {
		Print(L"Get labz1=[%s]\n",Result);
	}	
  
  return EFI_SUCCESS;
}


需要特别注意的地方是:在 NT32 模拟环境下,ShellSetEnvironmentVariable 函数无法使用:

image003
上面的代码首先显示一下当前的 path 变量,之后设置2个变量分别是 lab1=100和lab2=200.
下面的都是在实体机上进行测试的(测试平台:Kabylake HDK Board)

image005

运行之后我们再检查环境变量可以看到 labz1 和 labz2 已经设置进去了。
image006
重启之后,再次检查可以看到变量labz2仍然存在
image007
比如,某天你需要在BIOS中加入一个重启动测试的代码,可以考虑将重启次数放在环境变量中。

完整的代码下载 envtest

Putty 的辅助工具 V3.0

spc3V1.0
因为工作的关系需要取得串口信息来Debug。之前在XP下使用的一款软件(我也不清楚具体应该叫做什么名字,因为我下载时它的名字是“好用的串口工具.exe”),如同他的名字一样,确实很好用。但是令人郁闷的是自从切换到了Windows7 64位系统下,这个工具不再工作正常。于是又开始寻找起来新的工具。

后来用了一段时间的 Putty 发现功能强大。美中不足是每次打开操作复杂,首先双击之后会弹出权限的窗口,其次需要手动输入com号,而因为我使用USB串口,经常因为插拔而导致端口的变化,于是每次还要去设备管理器重查看目前的端口,打开设备管理器还会弹出权限窗口……..真的很麻烦。

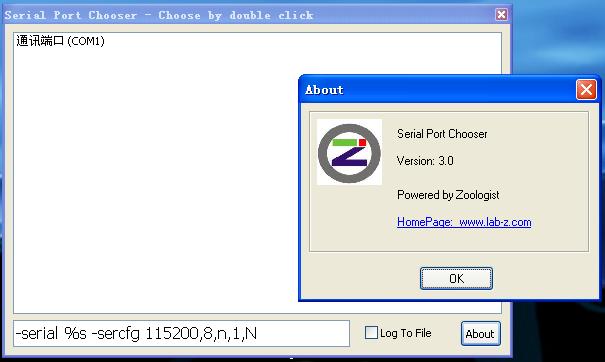
因为Putty是开源软件,就想试图修改去掉限制。再后来发现Putty一起发布的有一个功能比较单一的PuttyTel,并且可以通过命令行方式进行端口的指定和调用,最后就编写这个软件。使用方法非常简单:使用时将这个文件和PuttyTel放在同一个目录下,然后运行之后双击当前端口列表中出现的需要串口即可立即调用起来。

源程序在Source目录下。特别注意这是Delphi XE4 下面Build通过的,并没有使用XE4的新特性,如果你使用其他版本Delphi需要修改对应的头文件。

V2.0 升级了一下,可以自己设置波特率,也可以兼容更多的能接受命令行参数的串口软件。

V2.1 上一个版本会确认一下当前的命令行参数,对于普通用户来说是多余的。删掉这个重新编译。另外,调整代码将 JediAPILib.inc 放在源程序的目录下。还有就是多显示一位版本号,之前只能显示大版本,比如:2 修改之后可以显示 2.1 这样的版本号。

V2.2 根据 krman@biosren的建议,增加如果配置文件中保存了一个端口,并且这个端口现在仍然在列表中,倒计时三秒后启动该端口。

V2.2 根据 krman@biosren的建议,增加如果配置文件中保存了一个端口,并且这个端口现在仍然在列表中,倒计时三秒后启动该端口。

V3.0 根据 heyjude@biosren的建议,增加Log的功能。勾选 ‘Log To File’之后,根据当前时间生成一个Log文件。另外,我更换掉之前的 PuttyTel 工具,因为这个工具不支持命令行指定 log 文件名。替换为 Putty.exe 。

参考:

1.Putty的官方网站(因为安全问题请不要使用国内的Putty软件。)
http://www.chiark.greenend.org.uk/~sgtatham/putty/download.html

2.关于Putty命令行调用方式来自
http://tartarus.org/~simon/putty-snapshots/htmldoc/Chapter3.html
例如:-serial com4 -sercfg 115200,8,n,1,N

-sessionlog 文件名, 指定使用的 Log文件名

下载serialportchooseriii

Step to UEFI (96)Build 参数介绍

最近在认真研读《UEFI 原理与编程》,强烈推荐这本书,希望深入学习UEFI 的朋友都应该购买一本反复阅读。

《UEFI 原理与编程》第二章提到了build 命令的常用参数,我认真考察了一下。在 CMD窗口下运行 build –h 可以获得支持的命令参数列表:

–version 显示build的版本然后退出
-h, –help 显示帮助信息然后退出
-a TARGETARCH, –arch=TARGETARCH 指定编译目标,可选的有IA32, X64, IPF, ARM, AARCH64 或者 EBC。这个参数会覆盖 target.txt中指定的TARGET_ARCH。我们经常使用的 –a IA32 编译出来的 Application,更换为 –a X64即可编译出X64平台下可以用的 Application。
  -p PLATFORMFILE, –platform=PLATFORMFILE


指令要编译的 package。这个参数会覆盖 target.txt中指定的 ACTIVE_PLATFORM。
  -m MODULEFILE, –module=MODULEFILE 编译指定的模块。就是编译指定 INF文件。
  -b BUILDTARGET, –buildtarget=BUILDTARGET 指定编译为 RELASE版本还是 DEBUG版本。这个参数会覆盖 target.txt中指定的TARGET。
  -t TOOLCHAIN, –tagname=TOOLCHAIN


指定使用的工具集。这个参数会覆盖 target.txt中的TOOL_CHAIN_TAG 定义.


-x SKUID, –sku-id=SKUID


使用的给出的SKU ID来进行编译,覆盖DSC文件中的SKUID_IDENTIFIER (没用过。检查UDK2015 Source Code这个参数定义为 DEFAULT)
  -n THREADNUMBER 指定编译中使用的线程数量。理论上说线程越多,编译速度越快。这个参数会覆盖target.txt中的MAX_CONCURRENT_THREAD_NUMBER
  -f FDFFILE, –fdf=FDFFILE


指定 FDF的名称。这个参数会覆盖DSC文件中指定的FDF文件名。
  -r ROMIMAGE, –rom-image=ROMIMAGE 指定生成的 FD文件名称。这个名称必须是FDF文件中[FD] 节中存在的文件名。
  -i FVIMAGE, –fv-image=FVIMAGE

file.

指定生成的FV文件名称。这个名称必须是FDF文件中[FV] 节中存在的名称。
  -C CAPNAME, –capsule-image=CAPNAME


指定生成的Capsule文件名称。这个名称必须是FDF文件中[Capsule] 节中存在的名称。Capsule 是一种专门用来升级的UEFI定义的格式。比如:有对应的BIOS Capsule 文件,在启动过程中你把对应的文件放在U盘上,BIOS会自动识别并且加载然后升级自身,这样的好处是刷新环境稳定,避免操作系统的影响,避免被破解的风险。坏处是实际操中挺麻烦,需要准备FAT32格式的U盘。
  -u, –skip-autogen 跳过 Autogen 的过程进行编译
  -e, –re-parse 只做分析和生成编译需要的准备工作,不做实际编译,相当于只做AutoGen。
  -c, –case-insensitive 不检查 INF文件中的大小写
  -w, –warning-as-error 将 Warning视作 Error
-j LOGFILE, –log=LOGFILE


将编译过程中输出到屏幕上的信息同样输入到文件中。如果信息太多,无法看到期望的出错信息不妨试试这个参数直接查看Log文件。
  -s, –silent 沉默模式执行NMAKE。
  -q, –quiet           Disable all messages except FATAL ERRORS.


关闭除了致命错误之外的全部信息显示。感觉和上面的 –s没有差别。
-v, –verbose


打开 verbose模式(完整信息),包括 library实例,dependency表达式,warning信息等等。
  -d DEBUG, –debug=DEBUG


看起来是控制编译期的Debug信息输出。
  -D MACROS, –define=MACROS


定义宏
-y REPORTFILE, –report-file=REPORTFILE

Create/overwrite the report to the specified filename.


创建/覆盖指定的报告。这个功能非常有用,可以生成一个 report文件,其中包括了项目定义的 PCD变量等等的信息。这对于查看一些编译期的参数非常有用。
  -Y REPORTTYPE, –report-type=REPORTTYPE


创建/覆盖指定内容的报告。内容范围在[PCD, LIBRARY, FLASH, DEPEX, BUILD_FLAGS, FIXED_ADDRESS, EXECUTION_ORDER]。
  -F FLAG, –flag=FLAG  Specify the specific option to parse EDK UNI file.

Must be one of: [-c, -s]. -c is for EDK framework UNI

file, and -s is for EDK UEFI UNI file. This option can

also be specified by setting *_*_*_BUILD_FLAGS in

[BuildOptions] section of platform DSC. If they are

both specified, this value will override the setting

in [BuildOptions] section of platform DSC.


指定处理uni文件的方法,可选项是[-c,-s]。-c是用来处理EDK架构的UNI;-s用来处理EDK架构的 UNI。我不清楚具体有什么差别,如果你了解不妨告诉我
-N, –no-cache 关闭缓存机制。在EDK编译过程中是要生成一个小型的数据库文件的。我之前就遇到过杀毒软件会误杀这个数据库导致无法正常编译的情况。
–conf=CONFDIRECTORY 指定 Conf 的目录。
  –check-usage


检查 INF中提到的Source文件是否存在。只是检查而已,没有其他动作。
  –ignore-sources      Focus to a binary build and ignore all source files 不使用源程序,强制使用编译生成的二进制文件继续编译。


上述是通过简单实验和个人理解进行翻译的,如果有不妥当欢迎直接评论中指出或者给我写邮件。万分感谢!


2019年2月12日 补充。上面提到的 -Y 参数查看 PCD 设定的例子(UDK2018):

build -x X64 -Y PCD -y zz.txt

运行结束后在根目录下可以看到 zz.txt。需要注意的是:

1.建议先编译一次,确定能跑过再继续;

2.zz.txt 是编译结束的时候才生成的。

Arduino 使用固态继电器的例子

平时我们使用的继电器都是下面这种,内部是有机械结构来控制通断的。在工作的时候我们会听到“咔”的声响。
image002
如果你是持续的操作或者是在安静的环境下使用,这种声音就会非常恼人。此时可以考虑使用固态继电器,长相如下:
image004

注意,固态继电器有直流和交流的差别,上面这样一个差不多11元,比继电器模块贵一些(如果你的继电器模块功能比较全,有光耦之类的其实二者价格相差不多)。
上面图片显示的就是我入手的,控制端输入3-32V直流,被控制端可以控制5-60V直流。
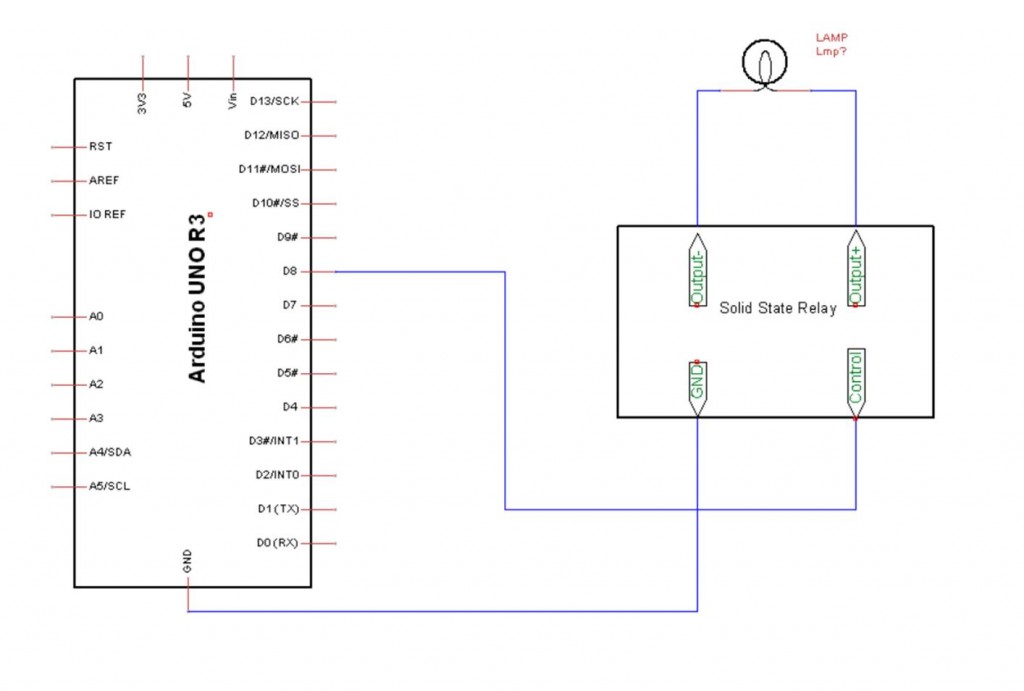
具体线路连接如下:
image006

#define ControlPin 8
void setup()
{
    Serial.begin(9600);
    pinMode(ControlPin,OUTPUT);      //该端口需要选择有#号标识的数字口
    digitalWrite(ControlPin,LOW);
}

void loop()
{
  char  c;

    while (Serial.available() > 0)  
    {
        c=Serial.read();
        if (']'==c) 
          {
            digitalWrite(ControlPin,HIGH);
          }
        if ('['==c) 
          {
            digitalWrite(ControlPin,LOW);
          }

    }
}


最后放一下工作的照片
image007
总结【参考2】固态继电器的优缺点
1、固态继电器的优点
(1)高寿命,高可靠:SSR没有机械零部件,有固体器件完成触点功能,由于没有运动的零部件,因此能在高冲击,振动的环境下工作,由于组成固态继电器的元器件的固有特性,决定了固态继电器的寿命长,可靠性高。
(2)灵敏度高,控制功率小,电磁兼容性好:固态继电器的输入电压范围较宽,驱动功率低,可与大多数逻辑集成电路兼容不需加缓冲器或驱动器。
(3)快速转换:固态继电器因为采用固体其间,所以切换速度可从几毫秒至几微妙。
(4)电磁干扰笑:固态继电器没有输入”线圈”,没有触点燃弧和回跳,因而减少了电磁干扰。大多数交流输出固态继电器是一个零电压开关,在零电压处导通,零电流处关断,减少了电流波形的突然中断,从而减少了开关瞬态效应。
(5)无噪音

2、固态继电器的缺点
(1)导通后的管压降大,可控硅或双相控硅的正向降压可达1~2V,大功率晶体管的饱和压浆液灾1~2V之间,一般功率场效应管的导通电祖也较机械触点的接触电阻大。
(2)半导体器件关断后仍可有数微安至数毫安的漏电流,因此不能实现理想的电隔离。
(3)由于管压降大,导通后的功耗和发热量也大,大功率固态继电器的体积远远大于同容量的电磁继电器,成本也较高。
(4)电子元器件的温度特性和电子线路的抗干扰能力较差,耐辐射能力也较差,如不采取有效措施,则工作可靠性低。
(5)固态继电器对过载有较大的敏感性,必须用快速熔断器或RC阻尼电路对其进行过在保护。固态继电器的负载与环境温度明显有关,温度升高,负载能力将迅速下降。

另外,一般的继电器输出有3个Pin分别是:地,常开和常闭。固态继电器只有2个Pin,购买的时候就需要确定是常开的还是常闭。
参考:
1. http://www.lab-z.com/mos%E6%8E%A7%E5%88%B6%E5%B0%8F%E7%81%AF%E6%B3%A1%E7%9A%84%E5%AE%9E%E9%AA%8C/ MOS控制小灯泡的实验
2. http://www.elecfans.com/yuanqijian/jidianqi/20121030295690.html 固态继电器简介及优缺点

Step to UEFI (95)又一个截图软件

之前我写过一个UEFI 截图软件,功能有限,最近在网上看到了一个开源的截图软件【参考1】,支持热键,抓图结果会被转化为 Png格式,自动存在FSx:下面。于是,下载编译实验之。

代码中lodepng.h 和qsort.c 中对于size_t 的定义有些问题,看起来他是想使用VS默认的定义,但是不知道为什么我在 UDK2015 + Vs2013 下面编译会有问题,重新定义一下,编译就OK了。

编译好的代码无法在NT32模拟环境下运行。下面是在平板电脑的 Shell 中运行的结果,使用 Load 命令加载之后就可以使用 ctrl+alt+F12截屏:

image001

image002

之后在Intel  Kabylake HDK上测试

image003

进入 RU 之后还可以正常工作

image004

除了一般的Shell下截图,还可以先进入 Shell 加载之后再退出到Setup中,同样的热键截图

image005

修改之后的源代码在这里:

CrScreenshotDxe

参考:

1.项目地址在 https://github.com/LongSoft/CrScreenshotDxe

2023年5月6日

编译后的 X64 版本EFI程序可以在这里下载

给麦步手表写一个获取比特币行情的表盘

我对手表有着深厚的感情,每当人生遇到坎坷时,或者愤怒不已的时候,我都会想象和安慰自己“我去年买了块表”。刚有taobao的时候,我买了一块卡西欧的太阳能手表,时至今日我还记得价格是 258元。十多年过去了,这块表的卖家已经消失,我从来没有给他更换过电池,这块手表依然行走完好。
image001

古人云“穷玩车,富玩表”。为了体验一下富人的感觉,最近入手了一块麦步智能手表。对于这块手表,最重要的是可以写程序。于是我就尝试给他编写程序,听上去又在重复“屌丝玩电脑”。

image002

首先通读API,了解这个手表的原理。简单的说,这块手表通过蓝牙连接,从而实现WIFI通讯。
image003

目标是编写一个获取当前比特币行情。huobi 网提供了行情API, http://api.huobi.com/staticmarket/ticker_btc_json.js 可以显示实时行情。例如:一次返回数据如下

{“time”:”1467817886″,”ticker”:{“open”:4479,”vol”:604962.2546,”symbol”:”btccny”,”last”:4522.79,”buy”:4522.79,”sell”:4523.03,”high”:4612,”low”:4467.64} }。 其中的 last 就是当前的价格。

配合麦步手表提供的显示股票行情的代码,编写自己的程序如下:

#include <stdlib.h>

#include <stdio.h>

#include <string.h>


#include "maibu_sdk.h"

#include "maibu_res.h"


/*Web通讯ID*/

static uint32_t g_comm_id_web = 0;


/*Web request地址*/

#define DATA_WEB     "http://api.huobi.com/staticmarket/ticker_btc_json.js"


/* 时间项 */

#define DATE_TEXT_POS_X                      2

#define DATE_TEXT_POS_Y                      6

#define DATE_TEXT_SIZE_W                     70

#define DATE_TEXT_SIZE_H                     14


#define TIME_TEXT_POS_X                      90

#define TIME_TEXT_POS_Y                      6

#define TIME_TEXT_SIZE_W                     36

#define TIME_TEXT_SIZE_H                     14


static const char weekday[7][11] =

{

    {"周日"},

    {"周一"},

    {"周二"},

    {"周三"},

    {"周四"},

    {"周五"},

    {"周六"}

};


/*窗口ID*/

static int32_t g_window_id = -1;


//数据提示

static int32_t g_layer_id_text = -1;

//数据内容

static int32_t g_layer_id_data = -1;


//时间的句柄

static int32_t g_layer_id_time   = -1;

//日期的句柄

static int32_t g_layer_id_date   = -1;


//整个窗体句柄

static P_Window h_window;


void data_request_web()

{

     /*拼接url请求地址, 注意url的缓存大小*/

     char url[200] = "";   

     sprintf(url, "%s", DATA_WEB);              


     /*

               拼接过滤参数,即只接受和过滤参数匹配的返回值

               个人感觉这里的过滤可能是让手机做的,就是这里通知手机:json中的数据除了我制定的其他都过滤掉

     */


     /*发送一次*/

     g_comm_id_web = maibu_comm_request_web(url, "last", 0);

}


void add_text_layer(P_Window p_window, int32_t *p_layer_id, char *p_str, GRect *p_frame, enum GAlign align, int8_t font, enum GColor color)

{

    LayerText text_cfg = {p_str, *p_frame, align, font, 0};

    P_Layer layer = app_layer_create_text(&text_cfg);

    app_layer_set_bg_color(layer, color);


    P_Layer old_layer = app_window_get_layer_by_id(p_window, *p_layer_id);

    if(old_layer)

    {

        *p_layer_id = app_window_replace_layer(p_window, old_layer, layer);

    }

    else

    {

        *p_layer_id = app_window_add_layer(p_window, layer);

    }

}


static void add_time_bar(P_Window p_window)

{

    /* 添加时间图层 */

    uint8_t text_buf[40];

    struct date_time t;

    app_service_get_datetime(&t);


    memset(text_buf, 0, sizeof(text_buf));

    sprintf((char *)text_buf, "%s", (char *)&weekday[t.wday][0]);

    sprintf(&text_buf[6], "%02d-%02d", t.mon, t.mday);


    GRect frame;

    frame.origin.x = DATE_TEXT_POS_X;

    frame.origin.y = DATE_TEXT_POS_Y;

    frame.size.h   = DATE_TEXT_SIZE_H;

    frame.size.w   = DATE_TEXT_SIZE_W;


    add_text_layer(p_window, &g_layer_id_date, (char*)text_buf, &frame, GAlignLeft, U_ASCII_ARIAL_14, GColorWhite);


    frame.origin.x = TIME_TEXT_POS_X;

    frame.origin.y = TIME_TEXT_POS_Y;

    frame.size.h   = TIME_TEXT_SIZE_H;

    frame.size.w   = TIME_TEXT_SIZE_W;


    memset(text_buf, 0, sizeof(text_buf));

    sprintf(text_buf, "%02d:%02d", t.hour, t.min);


    add_text_layer(p_window, &g_layer_id_time, (char*)text_buf, &frame, GAlignLeft, U_ASCII_ARIAL_14, GColorWhite);

}


P_Window init_btc_window()

{

     static P_Window p_window;


     p_window = app_window_create();

     if (NULL == p_window)

     {

               return NULL;

     }


    /* 添加表盘背景 */

    GRect frame = {{0, 0}, {128, 128}};

    GBitmap bitmap;


    res_get_user_bitmap(BMP_STOCK_BG, &bitmap);

    LayerBitmap layer_bitmap = {bitmap, frame, GAlignCenter};

    P_Layer layer = app_layer_create_bitmap(&layer_bitmap);

    app_window_add_layer(p_window, layer);


    /* 添加时间栏 */

    add_time_bar(p_window);


     /*加入你的代码 begin*/     


     /*添加数据提示信息*/

     GRect frame_main = {{0, 30}, {16, 128}};

    add_text_layer(p_window, &g_layer_id_text, "BTC", &frame_main, GAlignCenter, U_ASCII_ARIAL_14, GColorWhite);


     /*添加数据*/

     GRect frame_data = {{0, 60}, {16, 128}};

    add_text_layer(p_window, &g_layer_id_data, "waiting", &frame_data, GAlignCenter, U_ASCII_ARIAL_14, GColorWhite);


     return p_window;


}


void data_comm_result_callback(enum ECommResult result, uint32_t comm_id, void *context)

{


     /*如果上一次请求WEB通讯失败,并且通讯ID相同,则重新发送*/

     if ((result == ECommResultFail) && (comm_id == g_comm_id_web))

     {

               data_request_web();

     }


}


static void web_recv_callback(const uint8_t *buff, uint16_t size)

{

    char stock_gid[10];

     char i;


    maibu_get_json_str(buff, "last", stock_gid, 10);


     for (i=0;i<10;i++)

     {

     if (stock_gid[i]=='}')

               {

                         stock_gid[i]=0;

               }

     }


     /*添加数据*/

     GRect frame_data = {{0, 60}, {16, 128}};

    add_text_layer(h_window, &g_layer_id_data, stock_gid, &frame_data, GAlignCenter, U_ASCII_ARIAL_14, GColorWhite);


     app_window_update(h_window);

}


static void watch_time_change_callback(enum SysEventType type, void *context)

{

    /*时间更改,分变化*/

    if (type == SysEventTypeTimeChange)

    {

        uint8_t text_buf[40];

        struct date_time t;

        app_service_get_datetime(&t);


        memset(text_buf, 0, sizeof(text_buf));

        sprintf((char *)text_buf, "%s", (char *)&weekday[t.wday][0]);

        sprintf(&text_buf[6], "%02d-%02d", t.mon, t.mday);


        GRect frame;

        frame.origin.x = DATE_TEXT_POS_X;

        frame.origin.y = DATE_TEXT_POS_Y;

        frame.size.h   = DATE_TEXT_SIZE_H;

        frame.size.w   = DATE_TEXT_SIZE_W;


        add_text_layer(h_window, &g_layer_id_date, (char*)text_buf, &frame, GAlignLeft, U_ASCII_ARIAL_14, GColorWhite);


        frame.origin.x = TIME_TEXT_POS_X;

        frame.origin.y = TIME_TEXT_POS_Y;

        frame.size.h   = TIME_TEXT_SIZE_H;

        frame.size.w   = TIME_TEXT_SIZE_W;


        memset(text_buf, 0, sizeof(text_buf));

        sprintf(text_buf, "%02d:%02d", t.hour, t.min);


        add_text_layer(h_window, &g_layer_id_time, (char*)text_buf, &frame, GAlignLeft, U_ASCII_ARIAL_14, GColorWhite);


        app_window_update(h_window);

    }

}


static void data_timer_callback(date_time_t tick_time, uint32_t millis, void *context)

{

    data_request_web();

}


int main()

{


     /*创建消息列表窗口*/

     h_window = init_btc_window();


     //订阅时间改变事件

    maibu_service_sys_event_subscribe(watch_time_change_callback);


     /*放入窗口栈显示*/

     g_window_id = app_window_stack_push(h_window);


     data_request_web();


     /*注册通讯结果回调*/

     maibu_comm_register_result_callback(data_comm_result_callback);


     //注册网络请求回调函数

    maibu_comm_register_web_callback(web_recv_callback);


    //聚合数据源每隔10s更新数据

    app_window_timer_subscribe(h_window, 10000, data_timer_callback, (void *)h_window);


     return 0;

}


编译之后上传到手表上就OK了。

看起来工作正常,美中不足就是屏幕有点小,如果能像美国队长那块一样大就完美了。

image004

这块手表的一大重要特性就是采用电纸屏幕,就是那种 Kindle 的屏幕材质,不改变内容无需耗电,这样待机可以很长时间(标称21天)。说道这里,我想起来一个很老的苏联笑话:

有一个人在机场等六点的飞机,可是他忘记了带手表,于是他想找

个人问问。这时,他看见一个人提着两个巨大的手提箱吃力的走过来,手腕上戴

着一块异常漂亮的一看就知道是高科技产品的手表。

  “请问,几点了?”他问道。

  “哪个国家的时间?”那人反问。

  “哦?”他的好奇心来了,“你都知道哪些国家的时间呢?”

  “所有的国家,”那人回答道。

  “哇!那可真是一块好手表呀!”

  “还不止这些呢,这块表还有GPS卫星系统,可以随时收发电子邮件、

传真,这个彩色的屏幕可以收看NTSC制式的电视节目!”那人给他

演示,果真如此!

“哦!太棒了,我真想拥有一块这样的手表,您……您可以把它卖给我吗?”

“说实话,我已经烦透了这块表了,这样吧,900美元,如何?”

  他马上掏出支票簿,写了900美元给那人,“成交!”

 “好的,现在,它是你的了。”那人如释重负,把手表交给他,“这个是你

的手表”,然后指着地上的两个大箱子说,“这两个是电池!”

无数的科学家和工程师在不断的努力改造着我们的生活。