之前文章中提到过,用LoadImage和StartImage无法加载CLIB build出来的 Application。这次认真研究一下这个问题。
首先,准备实验的材料: 两个简单的小程序 Hello1 和 Hello2 。前者是 CLIB 编出来的,后者是普通的EFI 程序。此外还有一个加载器程序 exec4.efi 。
1. 单独执行编译出来的 Hello1.efi 和Hello2.efi都没问题。实验 exec4 ,加载 hello1.efi 会出错,虚拟机会重启到 Setup中,加载 hello2.efi 正常;
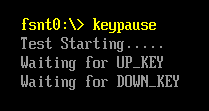
2. 对 Hello1 进行分析,分析的方法是加入【参考1】提到的那种按键Pause。
2.1 在Build\NT32IA32\DEBUG_MYTOOLS\IA32\AppPkg\Applications\Hello1\Hello1\Makefile文件中可以看到,入口定义:
IMAGE_ENTRY_POINT = _ModuleEntryPoint
2.2 我们再根据编译过程生成的MAP文件,确定 _ModuleEntryPoint 是在 ApplicationEntryPoint.c 中。同样【参考2】可以给我们提供很多经验,相比普通的EFI程序,增加的CLib只是在整个架构中插入了多函数,并不会改变整体的架构。
/**
  Entry point to UEFI Application.

  This function is the entry point for a UEFI Application. This function must call
  ProcessLibraryConstructorList(), ProcessModuleEntryPointList(), and ProcessLibraryDestructorList().
  The return value from ProcessModuleEntryPointList() is returned.
  If _gUefiDriverRevision is not zero and SystemTable->Hdr.Revision is less than _gUefiDriverRevison,
  then return EFI_INCOMPATIBLE_VERSION.

  @param  ImageHandle                The image handle of the UEFI Application.
  @param  SystemTable                A pointer to the EFI System Table.

  @retval  EFI_SUCCESS               The UEFI Application exited normally.
  @retval  EFI_INCOMPATIBLE_VERSION  _gUefiDriverRevision is greater than SystemTable->Hdr.Revision.
  @retval  Other                     Return value from ProcessModuleEntryPointList().

**/
EFI_STATUS
EFIAPI
_ModuleEntryPoint (
  IN EFI_HANDLE        ImageHandle,
  IN EFI_SYSTEM_TABLE  *SystemTable
  )
{
  EFI_STATUS                 Status;

  if (_gUefiDriverRevision != 0) {
    //
    // Make sure that the EFI/UEFI spec revision of the platform is >= EFI/UEFI spec revision of the application.
    //
    if (SystemTable->Hdr.Revision < _gUefiDriverRevision) {
      return EFI_INCOMPATIBLE_VERSION;
    }
  }

  //
  // Call constructor for all libraries.
  //
  ProcessLibraryConstructorList (ImageHandle, SystemTable);

  //
  // Call the module's entry point
  //
  Status = ProcessModuleEntryPointList (ImageHandle, SystemTable);

  //
  // Process destructor for all libraries.
  //
  ProcessLibraryDestructorList (ImageHandle, SystemTable);

  //
  // Return the return status code from the driver entry point
  //
  return Status;
}
首先追到的是 ProcessLibraryConstructorList 我们在其中插入Debug信息。特别注意,插入的位置在 \Build\NT32IA32\DEBUG_MYTOOLS\IA32\AppPkg\Applications\Hello1\Hello1\DEBUG\AutoGen.c
因为这个文件是编译过程中生成的,所以我们不可以重新 Build AppPkg,而要在目录中(\Build\NT32IA32\DEBUG_MYTOOLS\IA32\AppPkg\Applications\Hello1\Hello1\) 直接运行 NMake来编译;
2.3 插入Debug信息后,NMAKE 编译通过,直接运行 Hello1.efi 一次,确保没问题,再用 exec4 加载 hello1.efi 。同样有错误,这说明问题不是发生在ProcessLibraryConstructorList 中;下面是插入后的代码式样:
VOID
EFIAPI
ProcessLibraryConstructorList (
  IN EFI_HANDLE        ImageHandle,
  IN EFI_SYSTEM_TABLE  *SystemTable
  )
{
  EFI_STATUS  Status;
  EFI_INPUT_KEY	Key;

  SystemTable->ConOut->OutputString(SystemTable->ConOut,L"UefiRuntimeServicesTableLibConstructor\n\r");
  Key.ScanCode=SCAN_NULL;
  while (SCAN_UP!=Key.ScanCode)
  {Status= SystemTable -> ConIn -> ReadKeyStroke(SystemTable->ConIn,&Key);}
  SystemTable->ConOut->OutputString(SystemTable->ConOut,L"Waiting for DOWN_KEY\n\r");
  Key.ScanCode=SCAN_NULL;
  while (SCAN_DOWN!=Key.ScanCode)
  {Status= SystemTable -> ConIn -> ReadKeyStroke(SystemTable->ConIn,&Key);}

  Status = UefiRuntimeServicesTableLibConstructor (ImageHandle, SystemTable);
  ASSERT_EFI_ERROR (Status);


  SystemTable->ConOut->OutputString(SystemTable->ConOut,L"UefiBootServicesTableLibConstructor\n\r");
  Key.ScanCode=SCAN_NULL;
  while (SCAN_UP!=Key.ScanCode)
  {Status= SystemTable -> ConIn -> ReadKeyStroke(SystemTable->ConIn,&Key);}
  SystemTable->ConOut->OutputString(SystemTable->ConOut,L"Waiting for DOWN_KEY\n\r");
  Key.ScanCode=SCAN_NULL;
  while (SCAN_DOWN!=Key.ScanCode)
  {Status= SystemTable -> ConIn -> ReadKeyStroke(SystemTable->ConIn,&Key);}

  Status = UefiBootServicesTableLibConstructor (ImageHandle, SystemTable);
  ASSERT_EFI_ERROR (Status);


  SystemTable->ConOut->OutputString(SystemTable->ConOut,L"UefiLibConstructor\n\r");
  Key.ScanCode=SCAN_NULL;
  while (SCAN_UP!=Key.ScanCode)
  {Status= SystemTable -> ConIn -> ReadKeyStroke(SystemTable->ConIn,&Key);}
  SystemTable->ConOut->OutputString(SystemTable->ConOut,L"Waiting for DOWN_KEY\n\r");
  Key.ScanCode=SCAN_NULL;
  while (SCAN_DOWN!=Key.ScanCode)
  {Status= SystemTable -> ConIn -> ReadKeyStroke(SystemTable->ConIn,&Key);}

  Status = UefiLibConstructor (ImageHandle, SystemTable);
  ASSERT_EFI_ERROR (Status);


  SystemTable->ConOut->OutputString(SystemTable->ConOut,L"__wchar_construct\n\r");
  Key.ScanCode=SCAN_NULL;
  while (SCAN_UP!=Key.ScanCode)
  {Status= SystemTable -> ConIn -> ReadKeyStroke(SystemTable->ConIn,&Key);}
  SystemTable->ConOut->OutputString(SystemTable->ConOut,L"Waiting for DOWN_KEY\n\r");
  Key.ScanCode=SCAN_NULL;
  while (SCAN_DOWN!=Key.ScanCode)
  {Status= SystemTable -> ConIn -> ReadKeyStroke(SystemTable->ConIn,&Key);}

  Status = __wchar_construct (ImageHandle, SystemTable);
  ASSERT_EFI_ERROR (Status);


  SystemTable->ConOut->OutputString(SystemTable->ConOut,L"ShellLibConstructor \n\r");
  Key.ScanCode=SCAN_NULL;
  while (SCAN_UP!=Key.ScanCode)
  {Status= SystemTable -> ConIn -> ReadKeyStroke(SystemTable->ConIn,&Key);}
  SystemTable->ConOut->OutputString(SystemTable->ConOut,L"Waiting for DOWN_KEY\n\r");
  Key.ScanCode=SCAN_NULL;
  while (SCAN_DOWN!=Key.ScanCode)
  {Status= SystemTable -> ConIn -> ReadKeyStroke(SystemTable->ConIn,&Key);}

  Status = ShellLibConstructor (ImageHandle, SystemTable);
  ASSERT_EFI_ERROR (Status);


  SystemTable->ConOut->OutputString(SystemTable->ConOut,L"UefiHiiServicesLibConstructor  \n\r");
  Key.ScanCode=SCAN_NULL;
  while (SCAN_UP!=Key.ScanCode)
  {Status= SystemTable -> ConIn -> ReadKeyStroke(SystemTable->ConIn,&Key);}
  SystemTable->ConOut->OutputString(SystemTable->ConOut,L"Waiting for DOWN_KEY\n\r");
  Key.ScanCode=SCAN_NULL;
  while (SCAN_DOWN!=Key.ScanCode)
  {Status= SystemTable -> ConIn -> ReadKeyStroke(SystemTable->ConIn,&Key);}
  Status = UefiHiiServicesLibConstructor (ImageHandle, SystemTable);
  ASSERT_EFI_ERROR (Status);

}
直接运行程序会不断暂停等待按键才继续:

2.4 接下来在ProcessModuleEntryPointList中像上面一样插入Debug,
  //
  // Call the module's entry point
  //
  Status = ProcessModuleEntryPointList (ImageHandle, SystemTable);


EFI_STATUS
EFIAPI
ProcessModuleEntryPointList (
  IN EFI_HANDLE        ImageHandle,
  IN EFI_SYSTEM_TABLE  *SystemTable
  )

{
  EFI_STATUS  Status;
  EFI_INPUT_KEY	Key;

  SystemTable->ConOut->OutputString(SystemTable->ConOut,L"ShellCEntryLib  \n\r");
  Key.ScanCode=SCAN_NULL;
  while (SCAN_UP!=Key.ScanCode)
  {Status= SystemTable -> ConIn -> ReadKeyStroke(SystemTable->ConIn,&Key);}
  SystemTable->ConOut->OutputString(SystemTable->ConOut,L"Waiting for DOWN_KEY\n\r");
  Key.ScanCode=SCAN_NULL;
  while (SCAN_DOWN!=Key.ScanCode)
  {Status= SystemTable -> ConIn -> ReadKeyStroke(SystemTable->ConIn,&Key);}
  Status=ShellCEntryLib (ImageHandle, SystemTable);

  SystemTable->ConOut->OutputString(SystemTable->ConOut,L"ShellCEntryLib Exit \n\r");
  Key.ScanCode=SCAN_NULL;
  while (SCAN_UP!=Key.ScanCode)
  {Status= SystemTable -> ConIn -> ReadKeyStroke(SystemTable->ConIn,&Key);}
  SystemTable->ConOut->OutputString(SystemTable->ConOut,L"Waiting for DOWN_KEY\n\r");
  Key.ScanCode=SCAN_NULL;
  while (SCAN_DOWN!=Key.ScanCode)
  {Status= SystemTable -> ConIn -> ReadKeyStroke(SystemTable->ConIn,&Key);}
  return EFI_SUCCESS;
}
再次实验 Exec4 加载发现,现象消失了。仔细琢磨一下,应该是我最后 return EFI_SUCCESS 导致的。所以问题就应该发生在进入 ShellCEntryLib 那里。
2.5 继续调试直接在 ShellCEntryLib 加入 Debug 信息
/**
  UEFI entry point for an application that will in turn call the
  ShellAppMain function which has parameters similar to a standard C
  main function.

  An application that uses UefiShellCEntryLib must have a ShellAppMain
  function as prototyped in Include/Library/ShellCEntryLib.h.

  Note that the Shell uses POSITIVE integers for error values, while UEFI
  uses NEGATIVE values.  If the application is to be used within a script,
  it needs to return one of the SHELL_STATUS values defined in ShellBase.h.

  @param  ImageHandle  The image handle of the UEFI Application.
  @param  SystemTable  A pointer to the EFI System Table.

  @retval  EFI_SUCCESS               The application exited normally.
  @retval  Other                     An error occurred.

**/
EFI_STATUS
EFIAPI
ShellCEntryLib (
  IN EFI_HANDLE        ImageHandle,
  IN EFI_SYSTEM_TABLE  *SystemTable
  )
{
  INTN                           ReturnFromMain;
  EFI_SHELL_PARAMETERS_PROTOCOL *EfiShellParametersProtocol;
  EFI_SHELL_INTERFACE           *EfiShellInterface;
  EFI_STATUS                    Status;

  ReturnFromMain = -1;
  EfiShellParametersProtocol = NULL;
  EfiShellInterface = NULL;

  Status = SystemTable->BootServices->OpenProtocol(ImageHandle,
                             &gEfiShellParametersProtocolGuid,
                             (VOID **)&EfiShellParametersProtocol,
                             ImageHandle,
                             NULL,
                             EFI_OPEN_PROTOCOL_GET_PROTOCOL
                            );
  if (!EFI_ERROR(Status)) {
SystemTable->ConOut->OutputString(SystemTable->ConOut,L"Shell2\n\r");
    //
    // use shell 2.0 interface
    //
    ReturnFromMain = ShellAppMain (
                       EfiShellParametersProtocol->Argc,
                       EfiShellParametersProtocol->Argv
                      );
  } else {
  SystemTable->ConOut->OutputString(SystemTable->ConOut,L"Shell1\n\r");
    //
    // try to get shell 1.0 interface instead.
    //
    Status = SystemTable->BootServices->OpenProtocol(ImageHandle,
                               &gEfiShellInterfaceGuid,
                               (VOID **)&EfiShellInterface,
                               ImageHandle,
                               NULL,
                               EFI_OPEN_PROTOCOL_GET_PROTOCOL
                              );
    if (!EFI_ERROR(Status)) {
SystemTable->ConOut->OutputString(SystemTable->ConOut,L"Shell1.1\n\r");
      //
      // use shell 1.0 interface
      //
      ReturnFromMain = ShellAppMain (
                         EfiShellInterface->Argc,
                         EfiShellInterface->Argv
                        );
    } else {
SystemTable->ConOut->OutputString(SystemTable->ConOut,L"Shell fail\n\r");
      ASSERT(FALSE);
    }
  }
  return ReturnFromMain;
}
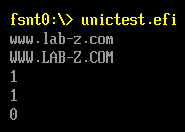
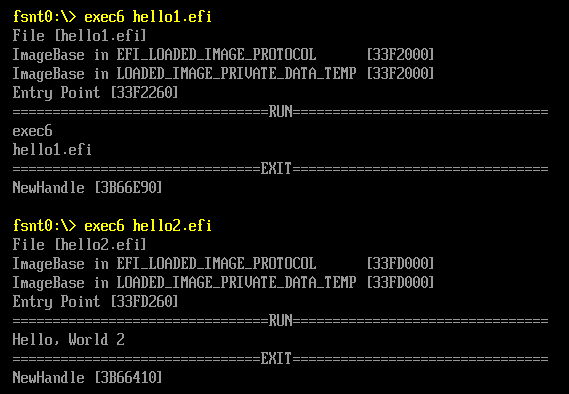
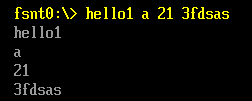
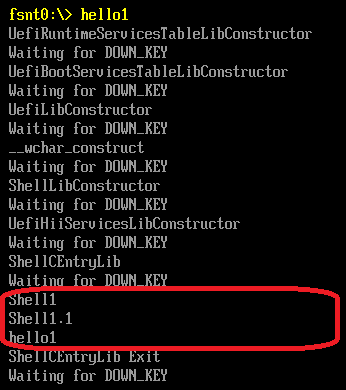
直接运行,输出如下:
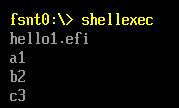
用exec4加载之后输出如下:
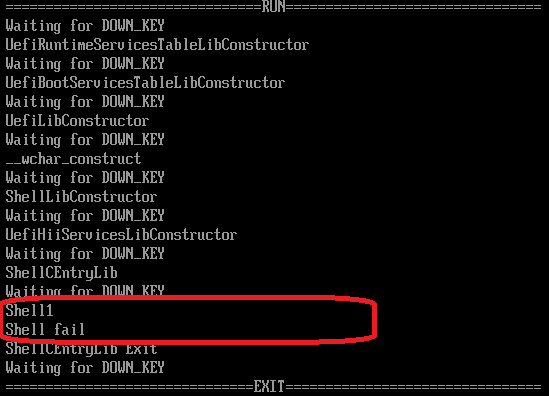
可以看到,两种方式下,运行路径是不同的。
最后的结论:产生问题的原因是,当我们用 StartImage 运行一个 CLib程序的时候,Clib带入的函数找不到 Efi Shell Interface (要用这个Interface 的原因是希望取命令行参数传给被调用者)。找不到的时候就报错,报告一个加载不成功。
本文提到的 hello1 hello2 exec4 的源代码下载:
exec4
Hello2
Hello1
参考:
1.http://www.lab-z.com/utpk/ UEFI Tips 用按键做Pause
2.http://www.lab-z.com/22applicationentry/ Application的入口分析