FireBeetle USB KB/MS Shield

USB 键盘鼠标是最常见的输入设备了,之前如果想在 Arduino 上使用这两种设备,一个可行的方法是使用 USB Host Shield。这种方法的缺点是:成本比较高(MAX3421E芯片贵),操作复杂(SPI接口),资料少。因为这样缺点的存在,USB Host Shield 在使用上存在诸多不便。偶然间看到USB键鼠转串口通讯控制芯片CH9350(南京沁恒,WCH,阅读过我文章的朋友都知道CH340 也是他们家的产品)。这款能够将 USB 键盘鼠标的有效信息转为串口数据。芯片特点如下:

  • 支持12Mbps全速USB传输和1.5Mbps低速USB传输,兼容USB V2.0。
  • 上位机端USB端口符合标准HID类协议,不需要额外安装驱动程序,支持内置HID类设备驱动的Windows、Linux、MAC等操作系统。
  • 同一芯片可配置为上位机模式和下位机模式,分别连接USB-Host主机和USB键盘、鼠标。
  • 支持USB键盘鼠标在BIOS界面使用,支持多媒体功能键,支持不同分辨率USB鼠标。
  • 支持各种品牌的USB键盘鼠标、USB无线键盘鼠标、USB转PS2线等。
  • 上位机端和下位机端支持热插拔。
  • 提供发送状态引脚,支持485通讯。
  • 串口支持115200/57600/38400串口通信波特率。
  • 内置晶振和上电复位电路,外围电路简单。
  • 支持5V、3.3V电源电压。
  • 提供LQFP-48无铅封装,兼容RoHS。

于是尝试给 ESP32 FireBeetle 绘制一个  USB Keyboard/Mouse Shield,让 ESP32 能够轻松的获得 USB 键盘鼠标数据。

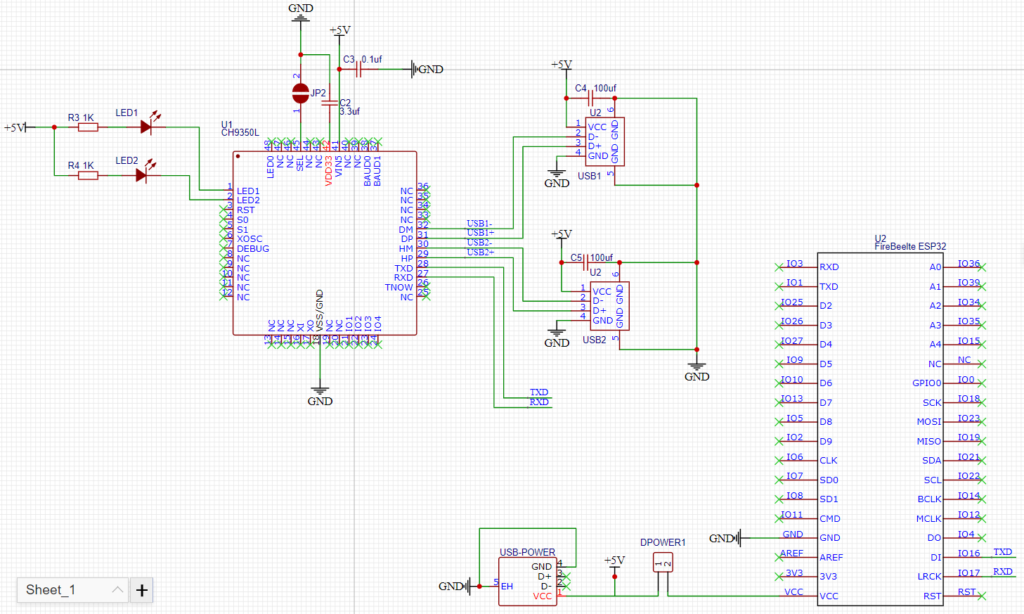
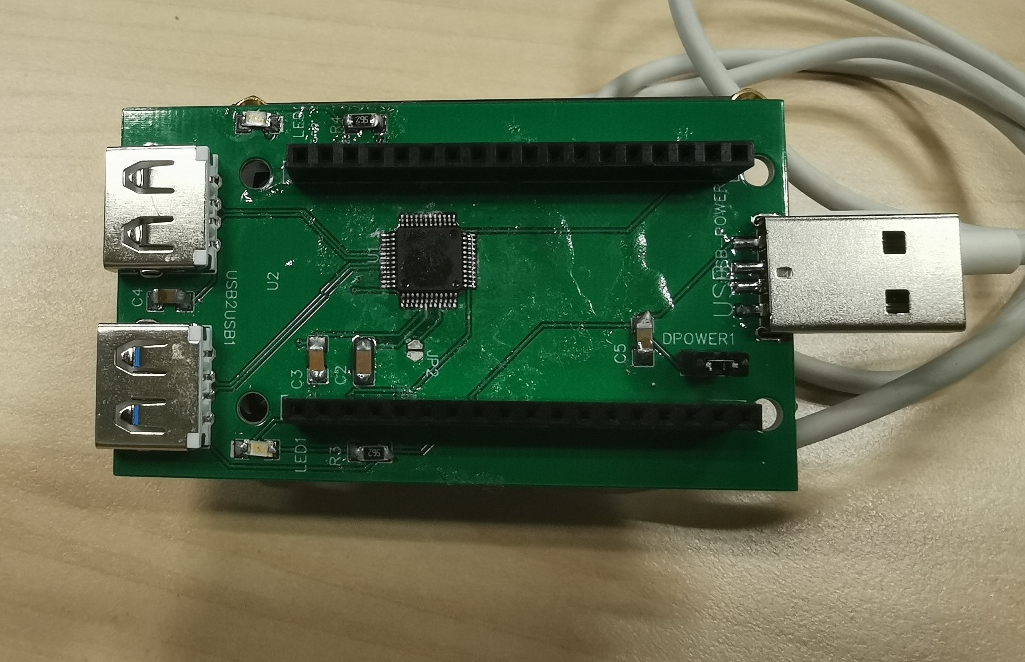
第一步,设计电路。核心是 CH9350芯片,它能够一次性支持2个 USB Host接口,下图中的 USB1 和 USB2。LED1 和 LED2 是通讯指示灯,对应的 USB1 和 USB2 如果有正常的通讯,对应的 LED会熄灭。此外,还有一个USB_Power 是USB公头,用于从外部取电,避免 FireBeetle 供电不足的情况。

CH9350L 最小系统

PCB 设计如下:

CH9350L PCB

3D 预览如下:

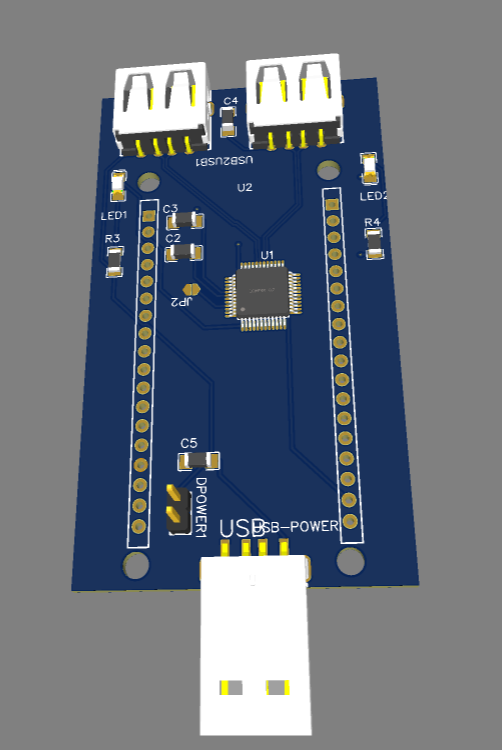
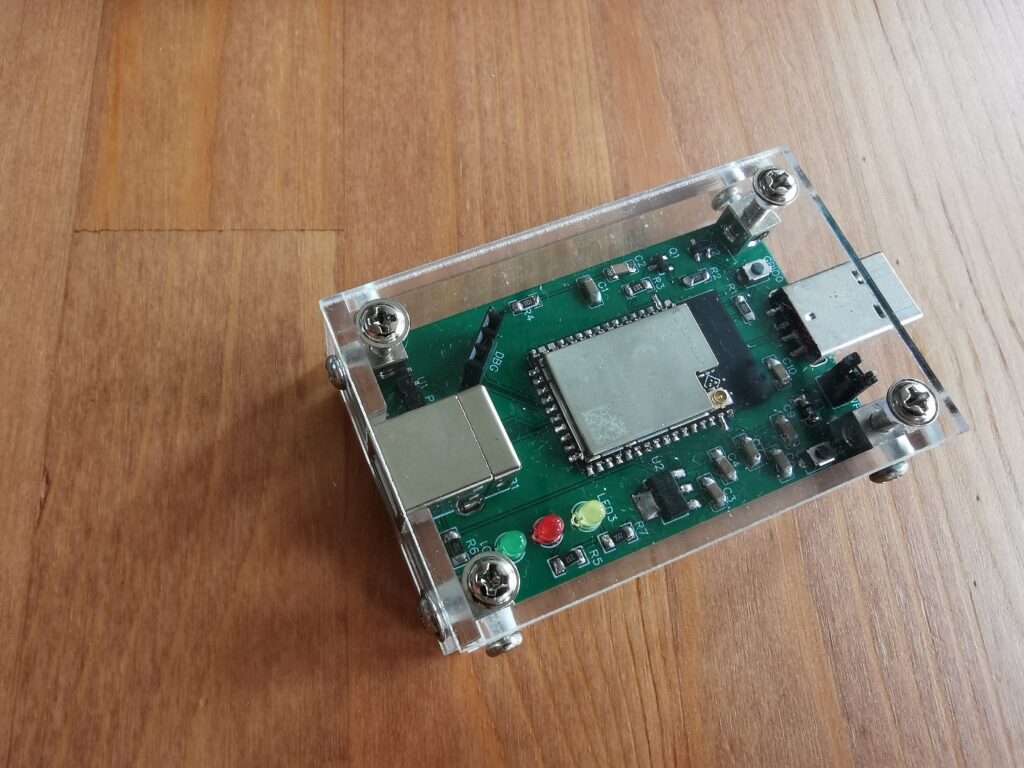
做出来就是这样(美中不足的因为2个USB 母头的存在,这个板子稍微大一些。另外,这个芯片引脚比较密集,焊接费了一些功夫,如果你对自己焊接技术不放心,推荐直接 SMT 避免手工焊接):

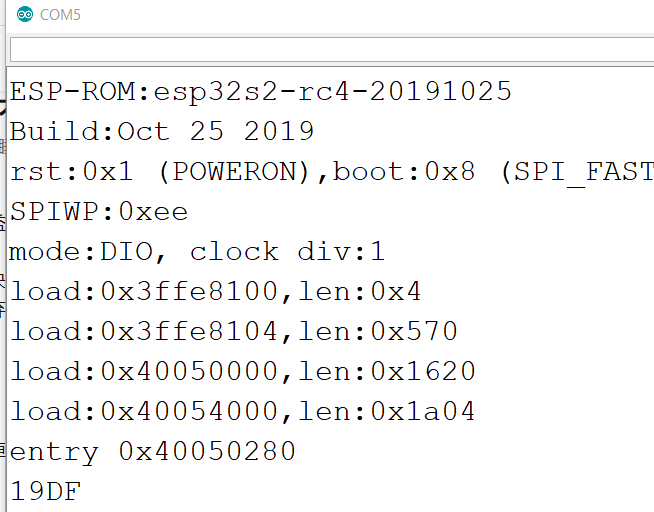
因为芯片使用串口输出,所以很容易就能够获得数据。数据格式在 Data Sheet 上有描述:

CH9350L 输出数据格式

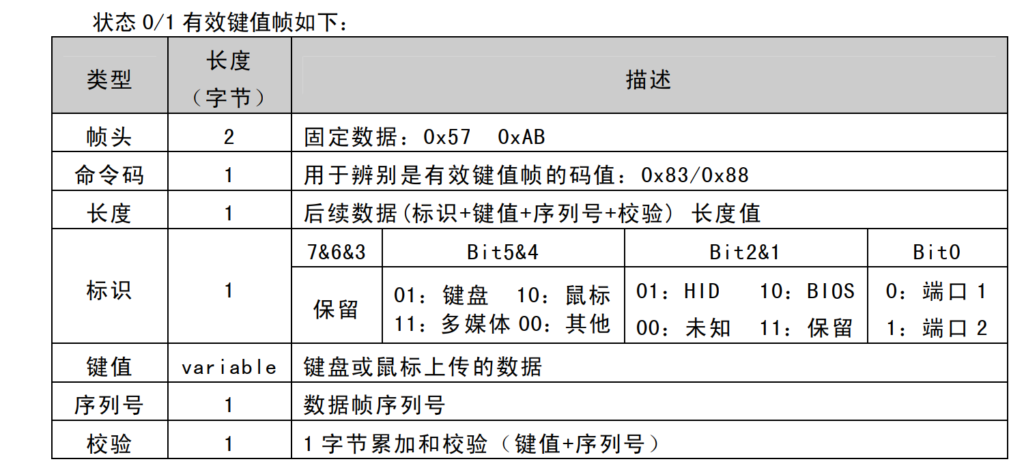
解析数据会出现在 FireBeetle Serial2上。

电路图是立创 EDA设计的,如下:

对应的 CH9350L Datasheet

再读 eSPI

5年前,我给出过如果有可能尽量不要在设计上使用 eSPI 接口,时至今日,至少在平板和笔记本上 eSPI 已经完全取代了 LPC 接口, 我们需要对此有所了解。

首先 eSPI 相比之前的 LPC 总线,有着速度更快的优势。最新的 ADL-P 平台上,eSPI 可达50Mhz (最多支持4个数据线,一次性可以传输 4Bits).

此外,还提供了虚拟信号的功能,比如,可以从eSPI上发送 SMI# 信号,这样无需外部有SMI# 的引线即可让 EC 发送 SMI# 请求。从另外的角度来说,使用 eSPI 之后可以简化布线节省 PCB 空间。

再有就是提供通过 PECI 读取CPU /PCH 温度这样的功能,便于 EC 进行温度方面的控制。这样可以实现更好的散热功能。

传统的设计上, BIOS 和 EC 的 Firemware 是分别存储在两个 SPI NOR 中的:

使用 eSPI 之后可以共享。共享方式有如下两种:

第一种:挂接在 PCH 上,EC 访问需要通过 PCH 的 eSPI Master, 称作 Master Attached Flash Sharing (简称 MAFS,或者 MAF),这种模式下 EC 通过PCH 中的SPI Master 来访问存放在 SPI Nor 中的 EC Firmware。

MAFS

特别注意的是,还有一种 MAFS 的变种 G3 Flash Sharing,特别之处在于 EC 和 PCH 都是直连 SPI Nor。在PCH Reset 之前,EC 作为 SPI master 需要完成读取 Firmware 的动作。PCH Reset 之后,PCH 作为 SPI Master 来和 SPI Nor 进行通讯。G3 Flash Sharing 的设定和CSME以及BIOS 无关,完全是硬件动作,所以你也无法在 FIT 中找到设定的选项(个人非常不建议用这个模式,因为出现问题不容易判断产生错误的原因,可能是硬件也可能是 EC Firmare) 随着时代的进步,G3 Sharing 已经成为主流,现在建议跟随 Intel 参考设计进行:

第二种,SPI 挂在 EC 下面,PCH 访问需要透过EC, 这种称作 Slave Attached Flash Sharing(简称 SAFS,或者 SAF)

SAFS

个人建议:尽量不要使用共享模式,虽然能帮老板省一点钱,但是可能会有未知的问题。或者说参考板用哪种,尽量用哪种。特别是新的 Chipset ,理论上全部都可以支持,但是很可能非参考板的设计目前尚未验证过,如果想让它正常工作还需要特别的PMC 之类的设定。

参考:

1.https://blog.csdn.net/gkcywbcbjpvel404/article/details/107401736

2.Intel: Enhanced SPI (eSPI) Platform Enabling and Debug Guide

ESP32 的 Software Serial 库

ESP32 支持3个串口,ESP32 S2支持2个串口。但是,你终究会遇到需求比硬件支持多一个的情况。这种情况下就需要使用软串口。

这里推荐一个 ESP32 SoftSerial ,经过我的测试可以在ESP32 S2 上正常使用。

示例代码如下,使用 GPIO12 发送,未使用接收功能,比如,我们需要多出来的串口输出调试信息:
#include <SoftwareSerial.h>
                   // RX TX
SoftwareSerial swSer(SW_SERIAL_UNUSED_PIN, 12, false, 256);

void setup() {
  Serial.begin(115200);
  swSer.begin(115200);

  Serial.println("\nSoftware serial test started");

  for (char ch = ' '; ch <= 'z'; ch++) {
    swSer.write(ch);
  }
  swSer.println("");

}

void loop() {
  while (swSer.available() > 0) {
    Serial.write(swSer.read());
  }
  while (Serial.available() > 0) {
    swSer.write(Serial.read());
  }

}

库文件:

来自:https://github.com/akshaybaweja/SoftwareSerial

VC 重复宏定义 Warning

如果我们在代码中重复定义一个宏(macro redefine),例如:

#define SUM(a,b) a+b
#define SUM(a,b) a*b

会遇到下面的错误提示:

MRedef.c(20): error C2220: warning treated as error - no 'object' file generated
MRedef.c(20): warning C4005: 'SUM': macro redefinition
MRedef.c(19): note: see previous definition of 'SUM'

解决方法是在文件头部加入 Disable 这个 Warning 的指令如下:

#pragma warning (disable : 4005)

完整的代码如下:

#include  <Uefi.h>
#include  <Library/UefiLib.h>
#include  <Library/ShellCEntryLib.h>

#pragma warning (disable : 4005)

/*
MRedef.c(20): error C2220: warning treated as error - no 'object' file generated
MRedef.c(20): warning C4005: 'SUM': macro redefinition
MRedef.c(19): note: see previous definition of 'SUM'
*/

#define SUM(a,b) a+b
#define SUM(a,b) a*b


/***
  Print a welcoming message.

  Establishes the main structure of the application.

  @retval  0         The application exited normally.
  @retval  Other     An error occurred.
***/
INTN
EFIAPI
ShellAppMain (
  IN UINTN Argc,
  IN CHAR16 **Argv
  )
{
        int c =3,d=4;

  Print(L"Hello there fellow Programmer.\n");
  Print(L"Welcome to the world of EDK II.\n");

  Print(L"Macro test %d\n",SUM(c,d));
  
  return(0);
}

参考:

1.https://stackoverflow.com/questions/25201724/fix-macro-redefinition-in-c

Step to UEFI (234)不定参数函数的测试

一些情况下,调用函数的参数并不确定,显而易见的一个例子是 printf,在调用的时候后面可能接多个参数,对于这种情况我们可以使用 VA_LIST 来解决。在 Base.h 中有定义:

//
//  Support for variable argument lists in freestanding edk2 modules.
//
//  For modules that use the ISO C library interfaces for variable
//  argument lists, refer to "StdLib/Include/stdarg.h".
//
//  VA_LIST  - typedef for argument list.
//  VA_START (VA_LIST Marker, argument before the ...) - Init Marker for use.
//  VA_END (VA_LIST Marker) - Clear Marker
//  VA_ARG (VA_LIST Marker, var arg type) - Use Marker to get an argument from
//    the ... list. You must know the type and pass it in this macro.  Type
//    must be compatible with the type of the actual next argument (as promoted
//    according to the default argument promotions.)
//  VA_COPY (VA_LIST Dest, VA_LIST Start) - Initialize Dest as a copy of Start.
//
//  Example:
//
//  UINTN
//  EFIAPI
//  ExampleVarArg (
//    IN UINTN  NumberOfArgs,
//    ...
//    )
//  {
//    VA_LIST Marker;
//    UINTN   Index;
//    UINTN   Result;
//
//    //
//    // Initialize the Marker
//    //
//    VA_START (Marker, NumberOfArgs);
//    for (Index = 0, Result = 0; Index < NumberOfArgs; Index++) {
//      //
//      // The ... list is a series of UINTN values, so sum them up.
//      //
//      Result += VA_ARG (Marker, UINTN);
//    }
//
//    VA_END (Marker);
//    return Result;
//  }
//
//  Notes:
//  - Functions that call VA_START() / VA_END() must have a variable
//    argument list and must be declared EFIAPI.
//  - Functions that call VA_COPY() / VA_END() must be declared EFIAPI.
//  - Functions that only use VA_LIST and VA_ARG() need not be EFIAPI.
//

根据上面的代码,编写测试例子如下:

#include  <Uefi.h>
#include  <Library/UefiLib.h>
#include  <Library/ShellCEntryLib.h>

UINTN
EFIAPI
VarSum (
  IN UINTN  NumberOfArgs,
  ...
  )
{
  VA_LIST Marker;
  UINTN   Index;
  UINTN   Result;

  //
  // Initialize the Marker
  //
  VA_START (Marker, NumberOfArgs);
  for (Index = 0, Result = 0; Index < NumberOfArgs; Index++) {
    //
    // The ... list is a series of UINTN values, so sum them up.
    //
    Result += VA_ARG (Marker, UINTN);
  }

  VA_END (Marker);
  return Result;
}

UINTN
EFIAPI
VarString (
  IN UINTN  NumberOfArgs,
  ...
  )
{
  VA_LIST Marker;
  UINTN   Index;
  UINTN   Result;

  //
  // Initialize the Marker
  //
  VA_START (Marker, NumberOfArgs);
  for (Index = 0, Result = 0; Index < NumberOfArgs; Index++) {
    //
    // The ... list is a series of UINTN values, so sum them up.
    //
    //Result += VA_ARG (Marker, UINTN);
    Print(L"String %d: %s\n",Index,VA_ARG (Marker, CHAR16*));
  }

  VA_END (Marker);
  return Result;
}

/***
  Print a welcoming message.

  Establishes the main structure of the application.

  @retval  0         The application exited normally.
  @retval  Other     An error occurred.
***/
INTN
EFIAPI
ShellAppMain (
  IN UINTN Argc,
  IN CHAR16 **Argv
  )
{

  Print(L"VarSum(2,1,2)=%d\n",VarSum(2,1,2));
  Print(L"VarSum(3,1,2,3)=%d\n",VarSum(3,1,2,3));
  Print(L"VarSum(4,1,2,3,4)=%d\n",VarSum(4,1,2,3,4));
  
  Print(L"VarString(4,L\"abcde\",L\"1234\",L\"efgh\",L\"5678\")\n",
                VarString(4,L"abcde",L"1234",L"efgh",L"5678"));
  return(0);
}

运行结果:

不定参数函数运行结果

可以看到VarSum()能够实现将可变个数值相加,VarString()能够实现在屏幕输出可变个字符串变量的功能。

C# 取得设备 Bus reported device description 的方法

using System;
using System.Collections.Generic;
using System.Linq;
using System.Text;
using System.Threading.Tasks;
using System.Management;
using System.Collections;

namespace ConsoleApplication29
{
    class Program
    {
        private static void GatherUsbInformation()
        {
            var mos = new ManagementObjectSearcher("select DeviceID from Win32_PnPEntity");
            var mbos = new ArrayList(mos.Get());
            var data = new Dictionary<string, string[]>();

            for (var i = 0; i < mbos.Count; i++)
            {
                var managementBaseObject = mbos[i] as ManagementBaseObject;

                if (managementBaseObject == null)
                {
                    continue;
                }

                var deviceId = managementBaseObject.Properties["DeviceID"].Value as string;

                if (deviceId == null || !deviceId.StartsWith("USB"))
                {
                    continue;
                }

                if (!data.ContainsKey(deviceId))
                {
                    data.Add(deviceId, new string[8]);
                }
                else if (data.ContainsKey(deviceId))
                {
                    continue;
                }

                var mo = managementBaseObject as ManagementObject;
                var inParams = mo.GetMethodParameters("GetDeviceProperties");

                var result = mo.InvokeMethod(
                    "GetDeviceProperties",
                    inParams,
                    new InvokeMethodOptions()
                );

                if (result?.Properties["deviceProperties"].Value == null)
                {
                    continue;
                }

                foreach (var deviceProperties in result.Properties["deviceProperties"].Value as ManagementBaseObject[])
                {
                    var keyName = deviceProperties.Properties["KeyName"].Value as string;
                    var value = deviceProperties.Properties["Data"].Value as string;

                    if (string.IsNullOrWhiteSpace(value) || string.IsNullOrWhiteSpace(keyName))
                    {
                        //MachineInformationGatherer.Logger.LogTrace(
                        //    $"KeyName {keyName} or Value {value} was null or whitespace for device ID {deviceId}");
                        continue;
                    }
                    Console.WriteLine(keyName);
                    Console.WriteLine(value);
                    switch (keyName)
                    {
                        case "DEVPKEY_Device_BusReportedDeviceDesc":
                            {
                                data[deviceId][0] = value;
                                break;
                            }
                        case "DEVPKEY_Device_DriverDesc":
                            {
                                data[deviceId][1] = value;
                                break;
                            }
                        case "DEVPKEY_Device_DriverVersion":
                            {
                                data[deviceId][2] = value;
                                break;
                            }
                        case "DEVPKEY_Device_DriverDate":
                            {
                                var year = int.Parse(value.Substring(0, 4));
                                var month = int.Parse(value.Substring(4, 2));
                                var day = int.Parse(value.Substring(6, 2));
                                var hour = int.Parse(value.Substring(8, 2));
                                var minute = int.Parse(value.Substring(10, 2));
                                var second = int.Parse(value.Substring(12, 2));

                                data[deviceId][3] =
                                    new DateTime(year, month, day, hour, minute, second).ToString();
                                break;
                            }
                        case "DEVPKEY_Device_Class":
                            {
                                data[deviceId][4] = value;
                                break;
                            }
                        case "DEVPKEY_Device_DriverProvider":
                            {
                                data[deviceId][5] = value;
                                break;
                            }
                        case "DEVPKEY_NAME":
                            {
                                data[deviceId][6] = value;
                                break;
                            }
                        case "DEVPKEY_Device_Manufacturer":
                            {
                                data[deviceId][7] = value;
                                break;
                            }
                        case "DEVPKEY_Device_Children":
                            {
                                var children = deviceProperties.Properties["DEVPKEY_Device_Children"];
                                if (children.Value != null)
                                {
                                    if (children.IsArray)
                                    {
                                        foreach (var child in children.Value as string[])
                                        {
                                            mos.Query = new ObjectQuery(
                                                $"select * from Win32_PnPEntity where DeviceID = {child}");
                                            var childs = mos.Get();

                                            foreach (var child1 in childs)
                                            {
                                                mbos.Add(child1);
                                            }
                                        }
                                    }
                                }

                                break;
                            }
                    }
                }
            }
        }

        static void Main(string[] args)
        {
            GatherUsbInformation();
            Console.ReadKey();
        }
    }
}

运行结果:

运行结果

代码来自 https://github.com/L3tum/HardwareInformation/blob/master/HardwareInformation/Providers/WindowsInformationProvider.cs

Ch340B修改字符串等设备信息的实验

CH340B 是 CH34X USB 转串口芯片的一员,这个家族芯片之间的差别主要在于:

1.是否需要外部晶振(不需要的可以节省PCB空间);

2.封装尺寸差别;

CH340 封装

3.支持速度有差别,比如, CH340R 最高只支持 115200

CH340B 最大的特点在于内置了 EEPROM 可以修改默认的 USB 设备参数。

运行界面如下(我的操作系统是英文,所以一些位置出现乱码)。

CH340B 设定工具

可以看到,能够修改的有3个参数:

  1. PID/VID
  2. Product String
  3. Serial Numbers

接下来逐个介绍上面的参数。首先是 PID/VID。这个参数是主机用来识别 USB的最重要参数。比如,我将VID 修改为 0x8888,那么之前安装好的 CH340 驱动将无法使用(因为驱动的 INF 中找不到 VID=0x8888 PID=0x7523对应的项目):

修改 CH340 的 PID 和 VID

接下来修改 CH340 的驱动文件,手工添加新的项目:

这样修改之后, 驱动中签名会出现问题,如果想安装必须先 Disable Secure Boot 功能,安装时会出现下面的提示信息:

提示当前驱动签名有问题

安装之后再打开 Secure Boot,设备仍然能正常工作。但是如果始终打开 Secure Boot,那就一直无法安装。

之后再 Enable SecureBoot 设备驱动还是能够正常工作的

接下来介绍一下 Product String,这个修改之后,没有安装之前这个字符串会显示在设备上:

未安装驱动

安装之后会显示为驱动定义的名称:

安装驱动之后

同样,这个信息会显示在设备的“Bus reported device description”中:

“Bus reported device description”

最后,说一下Serial Numbers,修改这个项目之后,例如,修改这个项目为 20210705 之后:

修改 Serial Numbers 信息

在 Device instance path 中PID/VID 字符串的后面可以看到:

可以看到我们新加的 Serial Number出现在“Device instance path”属性中

本文提到的 CH340B 修改工具可以在这里下载:

UEFI Shell Helper

在编写调试 UEFI Shell 下的 Application 的时候,经常需要在实体机上进行测试。但是每次需要使用U盘来回拷贝,感觉非常麻烦。为了解决这个问题,最近几个月,制作了一个调试助手: UEFI Shell Helper 缩写 USH。

UEFI Shell Helper 缩写 USH

上面有2个 USB 接口,一个是 CH340 提供的 USB 串口(USB Type-A 公头),另外一个是 ESP32-S2 模拟出来的 U盘(USB Type-B 母头)。这个模拟 U盘中还内置了一个 UEFI Shell ,可以直接启动到 Shell 下。使用时,将母头端接入被测机,然后公头端接入Windows 主机端。之后可以通过主机对设备发送数据,发送完成后运行 Shell 下的应用程序即可取得数据;反之被测试端也可以发送数据给主机端。这样在调试的时候就可以免除插拔拷贝之苦。

工作的视频:

https://www.bilibili.com/video/BV1T64y1e7ay/

这是一个开源设备,具体设计方案可以在下面的链接看到(涉及电路图,PCB 设计, C# 编程和 Arduino 代码开发,前后搞了3个月,感觉挺复杂):

https://diy.szlcsc.com/p/Zoologist/uefi-shell#

有兴趣的朋友可以看看,不过目前还有1个问题尚未解决:

1.串口传输最高只能达到 230400 baud rate (115200*2),选用的 CH340B 应该可以达到 2000000;目前正在找 WCH Debug。

后面会介绍 USH 牵涉到的 UEFI 内容.

ESP32 I2C 设备扫描代码

有时候在调试 I2C 设备的时候,需要确定设备的地址,可以使用下面的代码来完成:

// ESP32 I2C Scanner
// Based on code of Nick Gammon  http://www.gammon.com.au/forum/?id=10896
// ESP32 DevKit - Arduino IDE 1.8.5
// Device tested PCF8574 - Use pullup resistors 3K3 ohms !
// PCF8574 Default Freq 100 KHz 

#include <Wire.h>

void setup()
{
  Serial.begin (115200);  
  Wire.begin (21, 22);   // sda= GPIO_21 /scl= GPIO_22
}

void Scanner ()
{
  Serial.println ();
  Serial.println ("I2C scanner. Scanning ...");
  byte count = 0;

  Wire.begin();
  for (byte i = 8; i < 120; i++)
  {
    Wire.beginTransmission (i);          // Begin I2C transmission Address (i)
    if (Wire.endTransmission () == 0)  // Receive 0 = success (ACK response) 
    {
      Serial.print ("Found address: ");
      Serial.print (i, DEC);
      Serial.print (" (0x");
      Serial.print (i, HEX);     // PCF8574 7 bit address
      Serial.println (")");
      count++;
    }
  }
  Serial.print ("Found ");      
  Serial.print (count, DEC);        // numbers of devices
  Serial.println (" device(s).");
}

void loop()
{
  Scanner ();
  delay (100);
}

代码来自 https://www.esp32.com/viewtopic.php?p=55303

ESP32 和 C# 的 CRC16

CRC-16 有很多种,这里使用的是CRC-16/CCITT-FALSE。可以用这个在线工具进行验证(注意下图是16进制数值):

https://crccalc.com/

1.

static unsigned short crc16(const unsigned char *buf, unsigned long count)
{
  unsigned short crc = 0xFFFF;
  int i;

  while(count--) {
    crc = crc ^ *buf++ << 8;

    for (i=0; i<8; i++) {
      if (crc & 0x8000) crc = crc << 1 ^ 0x1021;
      else crc = crc << 1;
    }
  }
  return crc;
}

void setup() {
        Serial.begin(115200);
}

void loop() {
        byte data[11]={0x11,0x22,0x33,0x44,0x55,0x66,0x77,0x88,0x99,0x00,0x11};
        Serial.println(crc16(data,11),HEX);
        delay(10000);
}

2.C# 代码

using System;
using System.Collections.Generic;
using System.Linq;
using System.Text;
using System.Threading.Tasks;
using System.Runtime.InteropServices;

namespace CRC16Test
{
    class Program
    {


        static void Main(string[] args)
        {
            byte[] data = new byte[] { 0x11, 0x22, 0x33, 0x44, 0x55, 0x66, 0x77, 0x88, 0x99, 0x00,0x11};
            /*           for (int i = 0; i < 10; i++)
                       {
                           data[i] = (byte)(i % 256);
                       }
           */
            string hex = Crc16Ccitt(data).ToString("x2");
            Console.WriteLine(hex);

            Console.Write("Press any key to continue . . . ");
            Console.ReadKey(true);
        }

        //
        // CRC-16/CCITT-FALSE
        // https://crccalc.com/
        //
        public static ushort Crc16Ccitt(byte[] bytes)
        {
            const ushort poly = 0x1021;
            ushort[] table = new ushort[256];
            ushort initialValue = 0xffff;
            ushort temp, a;
            ushort crc = initialValue;
            for (int i = 0; i < table.Length; ++i)
            {
                temp = 0;
                a = (ushort)(i << 8);
                for (int j = 0; j < 8; ++j)
                {
                    if (((temp ^ a) & 0x8000) != 0)
                        temp = (ushort)((temp << 1) ^ poly);
                    else
                        temp <<= 1;
                    a <<= 1;
                }
                table[i] = temp;
            }
            for (int i = 0; i < bytes.Length; ++i)
            {
                crc = (ushort)((crc << 8) ^ table[((crc >> 8) ^ (0xff & bytes[i]))]);
            }
            return crc;
        }

    }
}