从 IvyBridge开始, Intel 新加入了 RDRAND 和 RDSEED 两个用于生成随机数的指令。从【参考1】来看二者的差别在于:
The short answer
The decision process for which instruction to use is mercifully simple, and based on what the output will be used for.
• If you wish to seed another pseudorandom number generator (PRNG), use RDSEED
• For all other purposes, use RDRAND
That’s it. RDSEED is intended for seeding a software PRNG of arbitrary width. RDRAND is intended for applications that merely require high-quality random numbers.
简单的说二者的差别就是 “如果打算用来作为其它伪随机数生成器的种子的时候那么就可以考虑RDSEED,不然就使用RNRAND。”【参考2】
在 UDK2015的代码中,有涉及到 RDRAND这个指令的,下面就进行实验。作为参考的代码在 SecurityPkg\RandomNumberGenerator\RngDxe 下面。比较特别的地方是,代码中用到了汇编语言调用这个指令,例如:
;------------------------------------------------------------------------------
;  Generate a 16 bit random number
;  Return TRUE if Rand generated successfully, or FALSE if not
;
;  BOOLEAN EFIAPI RdRand16Step (UINT16 *Rand);   RCX
;------------------------------------------------------------------------------
RdRand16Step  PROC
    ; rdrand   ax                  ; generate a 16 bit RN into ax, CF=1 if RN generated ok, otherwise CF=0
    db     0fh, 0c7h, 0f0h         ; rdrand r16:  "0f c7 /6  ModRM:r/m(w)"
    jb     rn16_ok                 ; jmp if CF=1
    xor    rax, rax                ; reg=0 if CF=0
    ret                            ; return with failure status
rn16_ok:
    mov    [rcx], ax
    mov    rax, 1
    ret
RdRand16Step ENDP
而对于 X64 来说,无法实现代码中内嵌汇编,因此,源程序上有一份32的ASM 和一份 64 的 ASM。
INF 文件中也要分开声明两次:
[Sources.common]
  RdRand.c
  RdRand.h
[Sources.IA32]
  IA32/RdRandWord.c
  IA32/AsmRdRand.asm
[Sources.X64]
  X64/RdRandWord.c
  X64/AsmRdRand.asm
此外,在使用这个指令之前还需要用CPUID指令来检测当前CPU是否支持,最终代码如下:
/** @file
Support routines for RDRAND instruction access.
Copyright (c) 2013, Intel Corporation. All rights reserved.<BR>
This program and the accompanying materials
are licensed and made available under the terms and conditions of the BSD License
which accompanies this distribution. The full text of the license may be found at
http://opensource.org/licenses/bsd-license.php
THE PROGRAM IS DISTRIBUTED UNDER THE BSD LICENSE ON AN "AS IS" BASIS,
WITHOUT WARRANTIES OR REPRESENTATIONS OF ANY KIND, EITHER EXPRESS OR IMPLIED.
**/
#include <Uefi.h>
#include <Library/BaseLib.h>
#include <Library/UefiLib.h>
#include "RdRand.h"
//#include "AesCore.h"
//
// Bit mask used to determine if RdRand instruction is supported.
//
#define RDRAND_MASK 0x40000000
/**
Determines whether or not RDRAND instruction is supported by the host hardware.
@retval EFI_SUCCESS RDRAND instruction supported.
@retval EFI_UNSUPPORTED RDRAND instruction not supported.
**/
EFI_STATUS
EFIAPI
IsRdRandSupported (
VOID
)
{
EFI_STATUS Status;
UINT32 RegEax;
UINT32 RegEbx;
UINT32 RegEcx;
UINT32 RegEdx;
BOOLEAN IsIntelCpu;
Status = EFI_UNSUPPORTED;
IsIntelCpu = FALSE;
//
// Checks whether the current processor is an Intel product by CPUID.
//
AsmCpuid (0, &RegEax, &RegEbx, &RegEcx, &RegEdx);
if ((CompareMem ((CHAR8 *)(&RegEbx), "Genu", 4) == 0) &&
(CompareMem ((CHAR8 *)(&RegEdx), "ineI", 4) == 0) &&
(CompareMem ((CHAR8 *)(&RegEcx), "ntel", 4) == 0)) {
IsIntelCpu = TRUE;
}
if (IsIntelCpu) {
//
// Determine RDRAND support by examining bit 30 of the ECX register returned by CPUID.
// A value of 1 indicates that processor supports RDRAND instruction.
//
AsmCpuid (1, 0, 0, &RegEcx, 0);
if ((RegEcx & RDRAND_MASK) == RDRAND_MASK) {
Status = EFI_SUCCESS;
}
}
return Status;
}
/**
Calls RDRAND to obtain a 16-bit random number.
@param[out] Rand Buffer pointer to store the random result.
@param[in] NeedRetry Determine whether or not to loop retry.
@retval EFI_SUCCESS RDRAND call was successful.
@retval EFI_NOT_READY Failed attempts to call RDRAND.
**/
EFI_STATUS
EFIAPI
RdRand16 (
OUT UINT16 *Rand,
IN BOOLEAN NeedRetry
)
{
UINT32 Index;
UINT32 RetryCount;
if (NeedRetry) {
RetryCount = RETRY_LIMIT;
} else {
RetryCount = 1;
}
//
// Perform a single call to RDRAND, or enter a loop call until RDRAND succeeds.
//
for (Index = 0; Index < RetryCount; Index++) {
if (RdRand16Step (Rand)) {
return EFI_SUCCESS;
}
}
return EFI_NOT_READY;
}
/**
Calls RDRAND to obtain a 32-bit random number.
@param[out] Rand Buffer pointer to store the random result.
@param[in] NeedRetry Determine whether or not to loop retry.
@retval EFI_SUCCESS RDRAND call was successful.
@retval EFI_NOT_READY Failed attempts to call RDRAND.
**/
EFI_STATUS
EFIAPI
RdRand32 (
OUT UINT32 *Rand,
IN BOOLEAN NeedRetry
)
{
UINT32 Index;
UINT32 RetryCount;
if (NeedRetry) {
RetryCount = RETRY_LIMIT;
} else {
RetryCount = 1;
}
//
// Perform a single call to RDRAND, or enter a loop call until RDRAND succeeds.
//
for (Index = 0; Index < RetryCount; Index++) {
if (RdRand32Step (Rand)) {
return EFI_SUCCESS;
}
}
return EFI_NOT_READY;
}
/**
The user Entry Point for Application. The user code starts with this function
as the real entry point for the application.
@param[in] ImageHandle The firmware allocated handle for the EFI image.
@param[in] SystemTable A pointer to the EFI System Table.
@retval EFI_SUCCESS The entry point is executed successfully.
@retval other Some error occurs when executing this entry point.
**/
EFI_STATUS
EFIAPI
UefiMain (
IN EFI_HANDLE ImageHandle,
IN EFI_SYSTEM_TABLE *SystemTable
)
{
UINT16 RandNumber1;
UINT32 RandNumber2;
if (FALSE==IsRdRandSupported) {
Print (L"Your CPU doesn't support RdRand\n");
return EFI_SUCCESS;
}
RdRand16(&RandNumber1,TRUE);
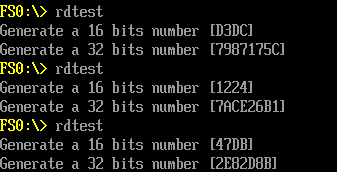
Print (L"Generate a 16 bits number [%X]\n",RandNumber1);
RdRand32(&RandNumber2,TRUE);
Print (L"Generate a 32 bits number [%X]\n",RandNumber2);
return EFI_SUCCESS;
}
特别注意:代码无法在 NT32环境下运行,下面的结果是在 KBL-R HDK 上取得的。
IA32和X64的 Application 下载:
RdRandapp
完整的代码下载
RdRand
参考:
1. https://software.intel.com/en-us/blogs/2012/11/17/the-difference-between-rdrand-and-rdseed The Difference Between RDRAND and RDSEED
2. http://blog.yinfupai.com/2914.html