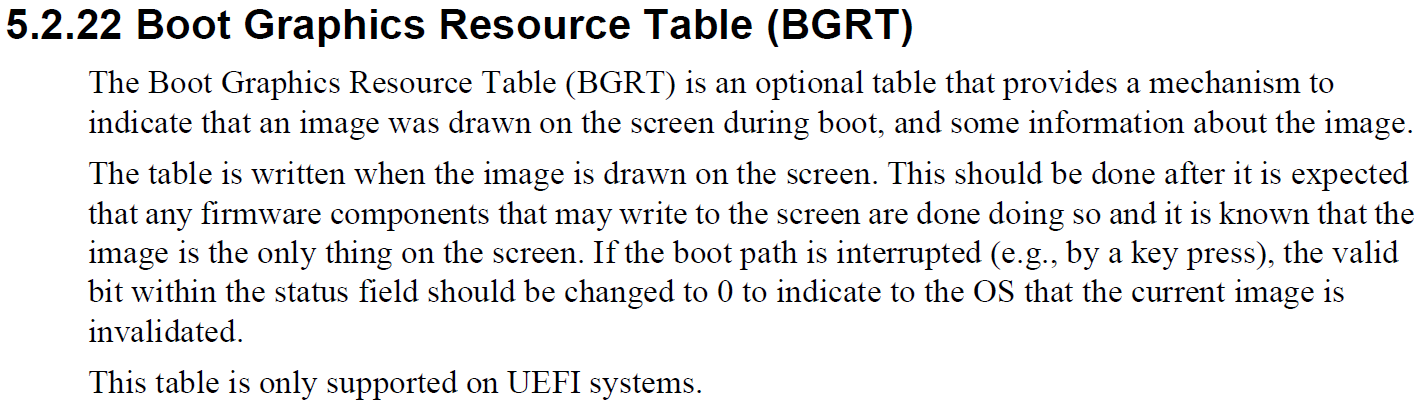
Step to UEFI (74) —– 通过 OpenVolume访问FSx上的文件

题目有点绕口,简单的说目标就是:我打算用 EFI_SIMPLE_FILE_SYSTEM_PROTOCOL 中的 OpenVolume 打开 FsX: 上面的文件怎么办?
实现的思路是:

1. 查找系统中所有支持 FS Protocol的Device
2. 对于每一个有 FS Protocol 的 Device 用 DevicePathFromHandle 取得 DevicePath
3. 再用 GetFsName 功能取得 FS0 ,FS1 这样的名称,然后判断是否为我们希望的名称
4. 如果是的话,再取得这个设备上的 SimpleFileSystem protocol
5. 最后用 OpenVolue 打开文件。

具体代码:

#include  <Uefi.h>
#include  <Library/UefiLib.h>
#include  <Library/ShellCEntryLib.h>

#include  <stdio.h>
#include  <stdlib.h>
#include  <wchar.h>

#include <Protocol/EfiShell.h>
#include <Library/ShellLib.h>

#include <Protocol/SimpleFileSystem.h>
#include <Protocol/BlockIo.h>
#include <Library/DevicePathLib.h>
#include <Library/HandleParsingLib.h>
#include <Library/SortLib.h>
#include <Library/MemoryAllocationLib.h>
#include <Library/BaseMemoryLib.h>

extern EFI_BOOT_SERVICES         *gBS;

extern EFI_SHELL_ENVIRONMENT2    *mEfiShellEnvironment2;
extern EFI_HANDLE				 gImageHandle;

EFI_STATUS
EFIAPI
PerformSingleMappingDisplay(
  IN CONST EFI_HANDLE Handle
  )
{
	EFI_DEVICE_PATH_PROTOCOL  *DevPath;
	CHAR16                    *CurrentName;
	CHAR16					*FSNAME=L"fsnt1";
	EFI_SIMPLE_FILE_SYSTEM_PROTOCOL *SimpleFileSystem;
	EFI_FILE_INFO     		*FileInfo = NULL;
	EFI_STATUS                Status;
	EFI_FILE_PROTOCOL   		*FileProtocol;
	EFI_FILE_HANDLE     		FileHandle;
	UINTN 					FileDataLength;
	CHAR16 					*FileData;

	CurrentName = NULL;
    DevPath = DevicePathFromHandle(Handle);
  
  //4. Covnver DevicePath to FSx (E.x FS2, FSNT1.....)
  mEfiShellEnvironment2->GetFsName(DevPath,FALSE,&CurrentName);

  //5. If the "FSx" string is what we want 
  if (StrCmp(CurrentName,FSNAME)==0) {
		Print (L"%s \r\n", CurrentName);  		
		
		//6. Open the SimpleFileSystem Protocol on it
		Status = gBS->OpenProtocol(
								Handle,
                                &gEfiSimpleFileSystemProtocolGuid,
                                (VOID**)&SimpleFileSystem,
								gImageHandle,
								NULL,
								EFI_OPEN_PROTOCOL_GET_PROTOCOL
                                );
		if (EFI_ERROR(Status)) {
			Print (L"LocateProtocol SimpleFileSystem Error \r\n");  	
			return (EFI_NOT_FOUND);
		}
	   
	    //7. Use OpenVolue to get FileProtocol
		Status = SimpleFileSystem->OpenVolume(SimpleFileSystem, &FileProtocol);
		if (EFI_ERROR(Status)) {
			Print (L"SimpleFileSystem OpenVolume Error \r\n");
			return Status;
		}
    
		//8. At last we can operate file by FileProtocol
		Status = FileProtocol->Open(FileProtocol, 
                              &FileHandle, 
                              L"Hello.txt",
                              EFI_FILE_MODE_READ,
                              0);
		if (EFI_ERROR(Status)) {
			Print (L"FileProtocol Open Error [%r]\r\n",Status);
			return Status;
		}
    
		FileInfo = ShellGetFileInfo( (SHELL_FILE_HANDLE)FileHandle);	
		Print(L"Filesize [%ld] bytes\n",FileInfo-> FileSize);
		FileDataLength=(UINTN) FileInfo->FileSize;
	
		FileData  = AllocatePool((UINTN) FileInfo->FileSize);
		Status = FileHandle->Read(FileHandle, &FileDataLength, FileData );
		if (EFI_ERROR(Status)) {
			Print(L"Loading file error! \n");
		}
		
		FileData[FileDataLength/2 -1]=0x0;
		Print(L"File contants: [%s]",FileData);
		
		FreePool(FileData);
		FileProtocol->Close(FileHandle);
  }
	
  if ((CurrentName) != NULL) { FreePool((CurrentName)); CurrentName = NULL; }

  return EFI_SUCCESS;
}

int
EFIAPI
main (                                         
  IN int Argc,
  IN char **Argv
  )
{
  EFI_STATUS                Status;
  EFI_HANDLE                *HandleBuffer=NULL;
  UINTN                     BufferSize=0;
  UINTN                     LoopVar;
  BOOLEAN                   Found;

  //1. We have to use some function in SE2 
  //
  // UEFI 2.0 shell interfaces (used preferentially)
  //
  Status = gBS->OpenProtocol(
    gImageHandle,
    &gEfiShellProtocolGuid,
    (VOID **)&gEfiShellProtocol,
    gImageHandle,
    NULL,
    EFI_OPEN_PROTOCOL_GET_PROTOCOL
   );
   
  if (EFI_ERROR(Status)) {
    //
    // Search for the shell protocol
    //
    Status = gBS->LocateProtocol(
      &gEfiShellProtocolGuid,
      NULL,
      (VOID **)&gEfiShellProtocol
     );
    if (EFI_ERROR(Status)) {
      gEfiShellProtocol = NULL;
     }
  }

  
  //
  //2. Look up all SimpleFileSystems in the platform
  //
  Status = gBS->LocateHandle(
    ByProtocol,
    &gEfiSimpleFileSystemProtocolGuid,
    NULL,
    &BufferSize,
    HandleBuffer);
	
  if (Status == EFI_BUFFER_TOO_SMALL) {
		HandleBuffer = AllocateZeroPool(BufferSize);
		if (HandleBuffer == NULL) {
			return (SHELL_OUT_OF_RESOURCES);
		}
		Status = gBS->LocateHandle(
			ByProtocol,
			&gEfiSimpleFileSystemProtocolGuid,
			NULL,
			&BufferSize,
			HandleBuffer);
   }

  //
  // Get the map name(s) for each one.
  //
  for ( LoopVar = 0, Found = FALSE
      ; LoopVar < (BufferSize / sizeof(EFI_HANDLE)) && HandleBuffer != NULL
      ; LoopVar ++
     ) {
	//3.Emulate every Handle which has SimpileFileSystem 
    Status = PerformSingleMappingDisplay(HandleBuffer[LoopVar]);
    if (!EFI_ERROR(Status)) {
      Found = TRUE;
    }
  }
  
  FreePool(HandleBuffer);
	
  return EFI_SUCCESS;
}


我是在虚拟机下实验的,运行之后打开并且读取 fsnt2:\hello.txt 的内容(内容是 www.lab-z.com123)。

openfs

特别注意的是:直接读取之后按照 CHAR16 的字符串来处理,但是读取内容没有 0x00 0x00的结尾。直接用Print 输出的时候字符串后面会有意料之外的字符。所以用下面这个语句 FileData[FileDataLength/2 -1]=0x0; 直接添加一个结尾。这也是为什么字符3被截掉的原因。

完整代码下载
OpenFSX

参考:

1. http://www.lab-z.com/esptest/ Step to UEFI (54) —– EFI_SIMPLE_FILE_SYSTEM_PROTOCOL 写文件
2. http://www.lab-z.com/shellfsx/ Step to UEFI (36) —– 枚举Shell下的全部盘符
3. http://www.lab-z.com/stu63/ Step to UEFI (63) —– 常用的字符串函数(下)
4. http://www.lab-z.com/nstring/ Step to UEFI (62) —– 常用的字符串函数(上)

Step to UEFI (73) —– 获得鼠标信息

前面《获得 USB 设备的PID和VID》中提到 USB 鼠标上面有一个 SimplePointer 的 Protocol。 本文介绍一下这个 Protocol 的使用。

在【参考1】上提到EFI_SIMPLE_POINTER_PROTOCOL 的作用是获得鼠标或者轨迹球的输入数据。
“This would include devices such as mice and trackballs.
The EFI_SIMPLE_POINTER_PROTOCOLallows information about a pointer device to be
retrieved. This would include the status of buttons and the motion of the pointer device since the last
time it was accessed. This protocol is attached the device handle of a pointer device, and can be used
for input from the user inthe preboot environment.”

程序原理:首先用 LocateProtocol 取得EFI_SIMPLE_POINTER_PROTOCOL (这里假设系统中只有一个),然后做一次 Reset ,通过这个动作也确定设备是否可以使用。
image001

之后,不断使用 GetState 轮询,如果发现前后两次获得的信息不同那么就输出解析结果,打印当前鼠标的状态。
image002

特别注意,取得的信息如下,是一个 INT32 类型的 RelativeMovement 数值,这个数值必须通过 EFI_SIMPLE_POINTER_MODE 中给出来的 UINT64类型的Resolution 除一次才能得到真正的移动信息。
image003

最终的程序如下:

#include  <Uefi.h>
#include  <Library/UefiLib.h>
#include  <Library/ShellCEntryLib.h>
#include  <Protocol/SimplePointer.h>

extern EFI_BOOT_SERVICES         *gBS;
extern EFI_SYSTEM_TABLE		 *gST;
extern EFI_RUNTIME_SERVICES 	 *gRT;

// Include/Protocol/SimplePointer.h
EFI_GUID gEfiSimplePointerProtocolGuid  = { 0x31878C87, 0x0B75, 0x11D5, 
			{ 0x9A, 0x4F, 0x00, 0x90, 0x27, 0x3F, 0xC1, 0x4D }};
  
int
EFIAPI
main (
  IN int Argc,
  IN CHAR16 **Argv
  )
{
	EFI_STATUS	Status;
	EFI_SIMPLE_POINTER_PROTOCOL	*Mouse;
	EFI_SIMPLE_POINTER_STATE	Last,Current;
	EFI_INPUT_KEY				Key;
	INT32		X,Y,Z;
	
	//Get MP_Service Protocol
	Status = gBS->LocateProtocol (&gEfiSimplePointerProtocolGuid, NULL, (VOID**)&Mouse);
	if (EFI_ERROR (Status)) {
		Print(L"Unable to initialize EFI_SIMPLE_POINTER_PROTOCOL protocol interface!");
		return EFI_UNSUPPORTED;
	}
	
	Status = Mouse->Reset(Mouse,TRUE);
	if (EFI_ERROR (Status)) {
		Print(L"The device is not functioning correctly and could not be reset!");
		return EFI_UNSUPPORTED;
	}
 
	gST-> ConOut -> ClearScreen(gST->ConOut);
    Print(L"Resolution: [%lX] [%lX] [%lX] \n",
			Mouse->Mode->ResolutionX,
			Mouse->Mode->ResolutionY,
			Mouse->Mode->ResolutionZ);

 
	while (1) {
		Status = Mouse->GetState(Mouse,&Current);
		if (memcmp(&Current,&Last,sizeof(EFI_SIMPLE_POINTER_STATE))!=0) {
		
			X=(INT32) ( Current.RelativeMovementX / Mouse->Mode->ResolutionX);
			Y=(INT32) (Current.RelativeMovementY / Mouse->Mode->ResolutionY);
			Z=(INT32) ( Current.RelativeMovementZ / Mouse->Mode->ResolutionZ);
			
			Print(L"X=[%d] Y=[%d] Z=[%d] ",
					X,
					Y,
					Z);
			Current.LeftButton?
					Print(L"[Left Click]"):
					Print(L"[No Left   ]");
			Current.RightButton?
					Print(L"[Right Click]\n"):
					Print(L"[No Right   ]\n");
			memcpy(&Last,&Current,sizeof(EFI_SIMPLE_POINTER_STATE))	;	
		}
		Status = gST -> ConIn -> ReadKeyStroke (gST->ConIn,&Key);
		if (Status== EFI_SUCCESS) {
			break;
		}
	}
	return EFI_SUCCESS;
}


运行结果:

image004
上面可以看到有一些前后没有变化的数据也被打印出来,这个可能是因为取得的原始数据有不同,但是做过除法之后数据是相同的导致的。

关于上面程序需要注意的地方:
1.EDK自带的模拟环境虽然能找到这个 Protocol 但是实际上不会有数据出来的。我试验了很久才发现,同样的程序实体机中跑的很好,但是模拟器不会有结果,所以不能在模拟环境中实验;
2.在处理INT32 INT64输出时要特别注意输出方式,否则会有奇怪的结果。

完整的代码下载:
micetest1

参考:
1. UEFI Spec 2.4 P461

<<与孩子一起学编程>>中的“滑雪的人”游戏

最近在学习 Python,看了一本书<<与孩子一起学编程>>英文名是“Computer Programming for Kids and Other Beginners”,感觉挺有意思的。

Capture

书中推荐用 pygame 来编写游戏,我按照书上的程序打了一个滑雪者的小游戏。输入程序花了半小时,调试这个程序差不多花了2个小时。

最后调试通过的程序如下:

import pygame,sys,random

skier_images = ["skier_down.png","skier_right1.png",
                "skier_right2.png","skier_left2.png",
                "skier_left1.png"]

class SkierClass(pygame.sprite.Sprite):
    def __init__(self):
        pygame.sprite.Sprite.__init__(self)
        self.image = pygame.image.load("skier_down.png")
        self.rect = self.image.get_rect()
        self.rect.center = [320,100]
        self.angle =0

    def turn(self,direction):
        self.angle = self.angle + direction
        if self.angle < -2: self.angle = -2
        if self.angle >  2: self.angle = 2
        center = self.rect.center
        self.image = pygame.image.load(skier_images[self.angle])
        self.rect = self.image.get_rect()
        self.rect.center =center
        speed = [self.angle,6 - abs(self.angle) * 2]
        return speed

    def move(self,speed):
        self.rect.centerx = self.rect.centerx + speed[0]
        if self.rect.centerx < 20: self.rect.centerx = 20
        if self.rect.centerx > 620: self.rect.centerx =620

class ObstacleClass(pygame.sprite.Sprite):
    def __init__(self,image_file,location,type):
        pygame.sprite.Sprite.__init__(self)
        self.image_file = image_file
        self.image = pygame.image.load(image_file)
        self.location = location
        self.rect = self.image.get_rect()
        self.rect.center = location
        self.type =type
        self.passed =False

    def scroll(self, t_ptr):
        self.rect.centery = self.location[1] - t_ptr

def create_map(start, end):
        obstacles = pygame.sprite.Group()
        gates = pygame.sprite.Group()
        locations = []
        for i in range(10):
            row = random.randint(start,end)
            col = random.randint(0,9)
            location = [col * 64+20,row * 64 +20]
            if not (location in locations):
                locations.append(location)
            type = random.choice(["tree","flag"])
            if type == "tree": img = "skier_tree.png"
            elif type == "flag": img ="skier_flag.png"
            obstact = ObstacleClass(img,location,type)
            obstacles.add(obstact)
        return obstacles

def animate():
        screen.fill([255,255,255])
        pygame.display.update(obstacles.draw(screen))
        screen.blit(skier.image, skier.rect)
        screen.blit(score_text,[10,10])
        pygame.display.flip()

def updateObstacleGroup(map0,map1):
        obstacles = pygame.sprite.Group()
        for ob in map0: obstacles.add(ob)
        for ob in map1: obstacles.add(ob)
        return obstacles

pygame.init()
screen = pygame.display.set_mode([640,640])
clock = pygame.time.Clock()
skier = SkierClass()
speed = [0,6]
map_position =0
points=0;
map0 = create_map(20,29)
map1 = create_map(10,19)
activeMap =0;
obstacles = updateObstacleGroup(map0,map1)
font = pygame.font.Font(None,50)
        
while True:
    clock.tick(30)
    for event in pygame.event.get():
        if event.type == pygame.QUIT: sys.exit()
        if event.type == pygame.KEYDOWN:
            if event.key == pygame.K_LEFT:
                    speed = skier.turn(-1)
            elif event.key == pygame.K_RIGHT:
                    speed = skier.turn(1)
    skier.move(speed)
    map_position+=speed[1]

    if map_position >= 640 and activeMap == 0:
            activeMap = 1
            map0 = create_map(20,29)
            obstacles = updateObstacleGroup(map0,map1)
    if map_position>= 1280 and activeMap == 1:
            activeMap = 0
            for ob in map0:
                ob.location[1] = ob.location[1] -1280
            map_position = map_position - 1280
            map1 = create_map(10,19)
            obstacles = updateObstacleGroup(map0,map1)
            
    for obstacle in obstacles:
            obstacle.scroll(map_position)
    hit = pygame.sprite.spritecollide(skier,obstacles,False)
    if hit:
        if hit[0].type == "tree" and not hit[0].passed:
            points = points -100
            skier.image = pygame.image.load("skier_crash.png")
            animate()
            pygame.time.delay(1000)
            skier.image = pygame.image.load("skier_down.png")
            skier.angle = 0
            speed =[0,6]
            hit[0].passed = True
        elif hit[0].type == "flag" and not hit[0].passed:
            points +=10
            obstacles.remove(hit[0])
    score_text = font.render("Score: "+str(points),1,(0,0,0))
    animate()


运行结果:

Untitled

如果你也恰好阅读这本书,遇到同样的问题,建议你参考上面的程序,此外需要特别注意的是 Python 使用缩进之类的来表示上下文之间的隶属关系。如果你的程序遇到莫名其妙的错误,请检查是不是缩进搞错了。比如:

class x:
def func1
def func2

这样,func2 是 x 的一个方法了,如果你在其他地方试图直接调用 func2 就会出现未定 func2 的问题。我因为这样的事情被卡了很久。

最后放上完整的代码(包括官方网站下载到的官方板的源程序),如果你调试不过,最后还可以用beyond compare 这样的对比工具找到原因。

skier

Step to UEFI (72) —– MP_Service_Protocol 获得CPU信息

UEFI本身不支持多线程,据说主要原因是:UEFI设计本身是为了启动硬件,做一些比较简单的事情,如果支持多线程会使得设计复杂度直线上升,出现问题也不容易调试。

不过UEFI本身是有对应的Protocol 的,称作 EFI_MP_SERVICES_PROTOCOL 。 具体的这个 Protocol 可以在 PI spec 中找到(UEFI Spec中没有)。下面来自【参考1】

image001

同样可以作为参考的还有EFI_Toolkit_2.0.0.1 中的process.c 程序。

程序很简单,首先 LocateProtocol 到EFI_MP_SERVICES_PROTOCOL。然后,用 Protocol 提供的EFI_MP_SERVICES_GET_NUMBER_OF_PROCESSORS 和EFI_MP_SERVICES_GET_PROCESSOR_INFO 来获得关于处理器的一些信息。需要注意的是EFI_MP_SERVICES_GET_PROCESSOR_INFO,输入的参数ProcessorNumber 意思是:当前要获得的 Processor 号,输入0 表示你要去的编号为 0 的Processor 的信息,输入3 表示你要去的编号为 3 的Processor 的信息,取值范围从0到NumberOfProcessors -1。

image002

最终的代码:

#include  <Uefi.h>
#include  <Library/UefiLib.h>
#include  <Library/ShellCEntryLib.h>
#include  <Pi/PiDxeCis.h>
#include  <Protocol/MpService.h>

EFI_GUID  gEfiMpServiceProtocolGuid = { 0x3fdda605, 0xa76e, 0x4f46, 
						{ 0xad, 0x29, 0x12, 0xf4, 0x53, 0x1b, 0x3d, 0x08 }};
  
extern EFI_BOOT_SERVICES         *gBS;

int
EFIAPI
main (
  IN int Argc,
  IN CHAR16 **Argv
  )
{
	EFI_STATUS	Status;
	EFI_MP_SERVICES_PROTOCOL	*MP=NULL;
	UINTN   i;	
	UINTN	NumProcessors;
	UINTN	NumberOfEnabledProcessors;

	EFI_PROCESSOR_INFORMATION	ProcessorInfo;
	
	//Get MP_Service Protocol
	Status = gBS->LocateProtocol (&gEfiMpServiceProtocolGuid, NULL, (VOID**)&MP);
	if (EFI_ERROR (Status)) {
		Print(L"Unable to initialize MP protocol interface!");
		return EFI_UNSUPPORTED;
	}
	
	// Determine number of processors
	Status = MP->GetNumberOfProcessors( MP, &NumProcessors , &NumberOfEnabledProcessors );
	
	if (EFI_ERROR (Status))
	{
		Print( L"MP->GetNumEnabledProcessors:Unable to determine number of processors\n") ;
		return EFI_UNSUPPORTED;
	}	
	Print(L"Number of Processors %d\n",NumProcessors);
	Print(L"Number of Enabled Processors %d\n",NumberOfEnabledProcessors);
	
	//Get more information by GetProcessorInfo
	for (i=0;i<NumProcessors;i++)
	{
		Status = MP->GetProcessorInfo(MP, i , &ProcessorInfo);
		
		Print( L"Prcoessor #%d ACPI Processor ID = %lX, Flags = %x, Package = %x, Core = %x, Thread = %x \n", 
					i,
					ProcessorInfo.ProcessorId, 
					ProcessorInfo.StatusFlag,
					ProcessorInfo.Location.Package,
					ProcessorInfo.Location.Core,
					ProcessorInfo.Location.Thread);
	}
	
	return EFI_SUCCESS;
}

运行结果:

image003

完整的代码下载:

MPTest1

关于这部分程序,在《UEFI 原理与编程》第13章 深入了解多任务 有更详细的论述,如果你有这方面的需求,推荐直接阅读。

另外,如果你想获得更多CPU方面的信息,比如 Cache大小, 还可以通过 CPUID,但是非常不建议通过 SMBIOS 来获得,因为他并不可靠……

最后特别提醒:

开始编写程序时,我遇到了下面的错误,错误代码对于解决问题毫无帮助,最后经过分析发现是因为没有添加PiDxe.h头文件(感谢Marco指出)导致的。

c:\edk\MdePkg\Include\Protocol/MpService.h(361) : error C2146: syntax error : missing ‘)’ before identifier ‘Procedure’
c:\edk\MdePkg\Include\Protocol/MpService.h(361) : error C2081: ‘EFI_AP_PROCEDURE’ : name in formal parameter list illegal
c:\edk\MdePkg\Include\Protocol/MpService.h(361) : error C2061: syntax error : identifier ‘Procedure’
c:\edk\MdePkg\Include\Protocol/MpService.h(361) : error C2059: syntax error : ‘;’
c:\edk\MdePkg\Include\Protocol/MpService.h(361) : error C2059: syntax error : ‘,’
c:\edk\MdePkg\Include\Protocol/MpService.h(367) : error C2059: syntax error : ‘)’
c:\edk\MdePkg\Include\Protocol/MpService.h(459) : error C2146: syntax error : missing ‘)’ before identifier ‘Procedure’
c:\edk\MdePkg\Include\Protocol/MpService.h(459) : error C2081: ‘EFI_AP_PROCEDURE’ : name in formal parameter list illegal
c:\edk\MdePkg\Include\Protocol/MpService.h(459) : error C2061: syntax error : identifier ‘Procedure’
c:\edk\MdePkg\Include\Protocol/MpService.h(459) : error C2059: syntax error : ‘;’
c:\edk\MdePkg\Include\Protocol/MpService.h(459) : error C2059: syntax error : ‘,’
c:\edk\MdePkg\Include\Protocol/MpService.h(465) : error C2059: syntax error : ‘)’
c:\edk\MdePkg\Include\Protocol/MpService.h(623) : error C2061: syntax error : identifier ‘EFI_MP_SERVICES_STARTUP_ALL_APS’
c:\edk\MdePkg\Include\Protocol/MpService.h(624) : error C2061: syntax error : identifier ‘StartupThisAP’
c:\edk\MdePkg\Include\Protocol/MpService.h(624) : error C2059: syntax error : ‘;’
c:\edk\MdePkg\Include\Protocol/MpService.h(628) : error C2059: syntax error : ‘}’
NMAKE : fatal error U1077: ‘”C:\Program Files\Microsoft Visual Studio 9.0\Vc\bin\cl.exe”‘ : return code ‘0x2’
Stop.

参考:

1. Vol2_DXE CIS_1_3.pdf P174

Arduino 玩家不要购买CC3000 WiFi Shield

这个模块有供电的问题,用 USB 供电容易出现无法使用的情况。

前几天入手一个 CC3000 WiFi Shield 发现无法使用,经过查找和卖家沟通发现这个是通病,

无论是国外出售的还是国内的都有很大概率出现 USB 供电时无法使用的情况,

因此,有 WIFI 通讯需要的朋友请购买其他型号的。

Arduino 装置验证漩涡方向的问题

之前入手过一个9.9元的小水泵【参考1】,正好这次做实验用上了。他的工作电压最高是12V,我用MOS管 + Arduino的PWM来实现电压的控制。电路图和之前一个控制小灯泡的非常类似【参考2】。

#define PWMPin 10

int n=255;
void setup()
{
Serial.begin(9600);
//该端口需要选择有#号标识的数字口
pinMode(PWMPin,OUTPUT);
}

void loop()
{
char c;

while (Serial.available() > 0)
{
c=Serial.read();
if (‘]’==c)
{
n=n+5;
}
if (‘[‘==c)
{
n=n-5;
}
//这里为了方便,加入一个可以直接开到最大值的字符
if (‘/’==c)
{
n=255;
}
//这里为了方便,加入一个可以直接关闭的字符
if (‘.’==c)
{
n=0;
}
if (n>255) {n=0;}
if (n<0) {n=255;}
analogWrite(PWMPin,n);
Serial.println(n);

}
}

电路图
pump

具体的实验内容是:使用一个底部有孔的小盆,证明放水时产生漩涡的方向和地球自转偏向力无关,而和放水时水流方向有关。

参考:
1. http://www.lab-z.com/waterpump/?nsukey=ZI7FePgtjom%2F3mfgzX9EtL5onGMfsUajYidhT5jUCO2t0hFAbtL%2B1LlY6YXFtxT785b4i%2Fe%2BSSjzo0wnFsIu1w%3D%3D 小水泵套件
2. http://www.lab-z.com/mos%E6%8E%A7%E5%88%B6%E5%B0%8F%E7%81%AF%E6%B3%A1%E7%9A%84%E5%AE%9E%E9%AA%8C/ MOS控制小灯泡的实验

Step to UEFI (71) —– 获得 USB 设备的 PID 和 VID

一个问题:如何获得 Shell 下面所有 USB 设备的 PID 和 VID ?

首先在网上搜索一下,找到【参考1】,上面使用了 USBIO Protocol。

typedef struct _EFI_USB_IO_PROTOCOL {
  EFI_USB_IO_CONTROL_TRANSFER            UsbControlTransfer;
  EFI_USB_IO_BULK_TRANSFER               UsbBulkTransfer;
  EFI_USB_IO_ASYNC_INTERRUPT_TRANSFER    UsbAsyncInterruptTransfer;
  EFI_USB_IO_SYNC_INTERRPUT_TRANSFER     UsbSyncInterruptTransfer;
  EFI_USB_IO_ISOCHRONOUS_TRANSFER        UsbIsochronousTransfer;
  EFI_USB_IO_ASYNC_ISOCHRONOUS_TRANSFER  UsbAsyncIsochronousTransfer;
  EFI_USB_IO_GET_DEVICE_DESCRIPTOR       UsbGetDeviceDescriptor;
  EFI_USB_IO_GET_CONFIG_DESCRIPTOR       UsbGetConfigDescriptor;
  EFI_USB_IO_GET_INTERFACE_DESCRIPTOR    UsbGetInterfaceDescriptor;
  EFI_USB_IO_GET_ENDPOINT_DESCRIPTOR     UsbGetEndpointDescriptor;
  EFI_USB_IO_GET_STRING_DESCRIPTOR       UsbGetStringDescriptor;
  EFI_USB_IO_GET_SUPPORTED_LANGUAGES     UsbGetSupportedLanguages;
  EFI_USB_IO_PORT_RESET                  UsbPortReset;
} EFI_USB_IO_PROTOCOL;

来自【参考2】。

我们在实体机上用 dh –p USBIO 命令看一下(注意:EDK自带的模拟环境没有设备挂USBIO 这个 Protocol,所以只能用实体机查看)。可以看到 USB设备上都有这个 Protocol,于是,一切都简单了。

image001

我们再把实体机启动到 Windows中,也是同样的顺序,分别是 USB Hub (这是我外接的一个 USB HUB),USB鼠标,USB键盘(这个键盘是一个复合设备,所以会显示为2个),最后是我的 U盘。多说两句对照上面的截图,我们可以看到USB鼠标上附加了一个 SimplePointer Protocol,键盘上有 TxtinEx/Txtin/ConIn Protocol ,U盘上附加了 DiskIo/BlkIo Protocol,后面我们会分别研究一下这些 Protocol 的使用。

image002

每一个USB设备上都有这个 Protocol 所以我们要用 LocateHandleBuffer 和HandleProtocol 这样的组合把所有有这个 Protocol 的设备都取下来,然后调用 UsbIO 中的UsbGetDeviceDescriptor 即可。
弄清楚原理整个程序还是比较简单的,如下:

#include  <Uefi.h>
#include  <Library/UefiLib.h>
#include  <Library/ShellCEntryLib.h>

#include  <Protocol/UsbIo.h>

extern EFI_BOOT_SERVICES         *gBS;

EFI_GUID  gEfiUsbIoProtocolGuid   = 
	{ 0x2B2F68D6, 0x0CD2, 0x44CF, 
		{ 0x8E, 0x8B, 0xBB, 0xA2, 0x0B, 0x1B, 0x5B, 0x75 }};

UINTN GetUSB( )
{
  EFI_STATUS  Status;
  UINTN       HandleIndex, HandleCount;
  EFI_HANDLE  *DevicePathHandleBuffer = NULL;
  EFI_USB_IO_PROTOCOL 			*USBIO;
  EFI_USB_DEVICE_DESCRIPTOR     DeviceDescriptor;

  Status = gBS->LocateHandleBuffer(
                  ByProtocol,
                  &gEfiUsbIoProtocolGuid,
                  NULL,
                  &HandleCount,
                  &DevicePathHandleBuffer);

  if (EFI_ERROR(Status)) 
  {
    Print(L"ERROR : Get USBIO count fail.\n");
    return 0;
  }   

  for (HandleIndex = 0; HandleIndex < HandleCount; HandleIndex++) 
  { 
     Status = gBS->HandleProtocol(
                      DevicePathHandleBuffer[HandleIndex],
                      &gEfiUsbIoProtocolGuid,
                      (VOID**)&USBIO);

      if (EFI_ERROR(Status))
      {
        Print(L"ERROR : Open USBIO fail.\n");
        gBS->FreePool(DevicePathHandleBuffer);  
        return 0;
      }

      Status = USBIO->UsbGetDeviceDescriptor(USBIO, &DeviceDescriptor);     
      if (EFI_ERROR(Status))
      {
        Print(L"ERROR : Usb Get Device Descriptor fail.\n");
        gBS->FreePool(DevicePathHandleBuffer);  
        return 0;
      }

      Print(L"VendorID = %04X, ProductID = %04X\n", 
                              DeviceDescriptor.IdVendor, 
                              DeviceDescriptor.IdProduct);      

  }
  gBS->FreePool(DevicePathHandleBuffer);       
  return HandleCount;
}

int
EFIAPI
main (
  IN int Argc,
  IN CHAR16 **Argv
  )
{
  GetUSB( );
  return EFI_SUCCESS;
}

最终运行结果如下:

image003

完整的代码和程序下载:
GetPIDVID

参考:
1. http://biosren.com/viewthread.php?tid=5925&highlight=usbio 請問如何透過DevicePath獲取對應的device全名?
2. http://wiki.phoenix.com/wiki/index.php/EFI_USB_IO_PROTOCOL EFI USB IO PROTOCOL 同样的,在 UEFI spec中也可以找到上面的定义

Arduino 控制USB设备(8) 鼠标的 Boot Protocol

前面介绍了USB 鼠标数据的读取,个人感觉最困难的部分就是解析HID Descriptor,不同的鼠标的Descriptor不同,发出来的格式也不同。相比之下,键盘切换到 Boot Protocol 之后问题就简单多了。本文介绍如何将鼠标切换到这个模式下。
我们在之前中断方式获得鼠标改变代码的基础上,这样会使得整体效率比较高。
当 Mouse 工作在 Boot Protocol下面的时候,默认使用下面的 HID Protocol【参考1】
image001
根据资料,编写程序如下:

/* Mouse communication via interrupt endpoint  */
/* Assumes EP1 as interrupt IN ep              */
#include "max3421e.h"
#include "usb.h"
 
#define DEVADDR 1
#define CONFVALUE 1
#define EP_MAXPKTSIZE 5
EP_RECORD ep_record[ 2 ];  //endpoint record structure for the mouse
 
 
void setup();
void loop();
 
MAX3421E Max;
USB Usb;
 
void setup()
{
    Serial.begin( 115200 );
    Serial.println("Start");
    Max.powerOn();
    delay( 200 );
}
 
void loop()
{
 byte rcode;
    Max.Task();
    Usb.Task();
    if( Usb.getUsbTaskState() == USB_STATE_CONFIGURING ) {
        mouse1_init();
    }//if( Usb.getUsbTaskState() == USB_STATE_CONFIGURING...
    if( Usb.getUsbTaskState() == USB_STATE_RUNNING ) { 
        rcode = mouse1_poll();
        if( rcode ) {
          Serial.print("Mouse Poll Error: ");
          Serial.println( rcode, HEX );
        }//if( rcode...
    }//if( Usb.getUsbTaskState() == USB_STATE_RUNNING...
}
/* Initialize mouse */
void mouse1_init( void )
{
 byte rcode = 0;  //return code
 byte tmpdata;
 byte* byte_ptr = &tmpdata;
  /**/
  ep_record[ 0 ] = *( Usb.getDevTableEntry( 0,0 ));  //copy endpoint 0 parameters
  ep_record[ 1 ].MaxPktSize = EP_MAXPKTSIZE;
  ep_record[ 1 ].sndToggle = bmSNDTOG0;
  ep_record[ 1 ].rcvToggle = bmRCVTOG0;
  Usb.setDevTableEntry( 1, ep_record );             
  /* Configure device */
  rcode = Usb.setConf( DEVADDR, 0, CONFVALUE );
  if( rcode ) {
    Serial.print("Error configuring mouse. Return code : ");
    Serial.println( rcode, HEX );
    while(1);  //stop
  }//if( rcode...
  
  rcode = Usb.setIdle( DEVADDR, 0, 0, 0, tmpdata );
  if( rcode ) {
    Serial.print("Set Idle error. Return code : ");
    Serial.println( rcode, HEX );
    while(1);  //stop
  }
  
  rcode = Usb.getIdle( DEVADDR, 0, 0, 0, (char *)byte_ptr );
  if( rcode ) {
    Serial.print("Get Idle error. Return code : ");
    Serial.println( rcode, HEX );
    while(1);  //stop
  }
  Serial.print("Idle Rate: ");
  Serial.print(( tmpdata * 4 ), DEC );        //rate is returned in multiples of 4ms
  Serial.println(" ms");
  tmpdata = 0;
  rcode = Usb.setIdle( DEVADDR, 0, 0, 0, tmpdata );
  if( rcode ) {
    Serial.print("Set Idle error. Return code : ");
    Serial.println( rcode, HEX );
    while(1);  //stop
  }
  
    /* Set boot protocol */
    rcode = Usb.setProto( DEVADDR, 0, 0, 0 );
    if( rcode ) {
         Serial.print("Error attempting to configure boot protocol. Return code :");
         Serial.println( rcode, HEX );
         while( 1 );  //stop
    }  
    
  Usb.setUsbTaskState( USB_STATE_RUNNING );
  return;
}
/* Poll mouse via interrupt endpoint and print result */
/* assumes EP1 as interrupt endpoint                  */
byte mouse1_poll( void )
{
  byte rcode,i;
  char buf[ 3 ] = { 0 };                          //mouse report buffer

  unsigned long int libuf[ sizeof(buf) ];
  unsigned long int x;
  unsigned long int y;

  
  /* poll mouse */
  rcode = Usb.inTransfer( DEVADDR, 1, sizeof(buf), buf, 1 );  //

    if( rcode ) {  //error
      if( rcode == 0x04 ) {  //NAK
        rcode = 0;
      }
      return( rcode );
    }
    
    for (int i=0;i<sizeof(buf);i++) {
       libuf[i]=(buf[i]) & 0xff;
       Serial.print(libuf[i],HEX); Serial.print("  "); 
    }
    
    Serial.println("");
  
    return( rcode );
}


运行结果:

image003

完整的代码下载

bootmouse

特别注意:经过我的实验,不是所有的鼠标都支持 Boot Protocol ,前面实验中用到的Dell 和HP鼠标都无法正常工作,可能是这两种鼠标不支持Boot Protocol 。换一个角度说,如果客户使用 USB 键盘,那么一定要有进入 BIOS Setup的需求,但是客户通常不会有在Setup中使用鼠标的需求,所以鼠标对于Boot Protocol的支持不好也在情理之中。

我发现好用的反倒是一个杂牌鼠标:

bmouse

参考:

1. HID Firmware Specification 1.11 P71

Step to UEFI (70) —– 获取 EDID 信息

之前介绍过使用 Arduino 用硬件的方法直接读取 EDID 【参考1】,这里介绍一下如何在 Shell下读取 EDID 信息。

我们使用 EFI_EDID_DISCOVERED_PROTOCOL 这个 Protocol 来获得信息。当然,类似的还可以使用 EFI_EDID_ACTIVE_PROTOCOL,都是没有问题的。

在要获取 EDID 信息之前,最好先使用 “DH -p EdidDiscovered” 命令来确定你当前的系统中存在 Edid 信息。例如:

edidpre

实现这个功能的代码如下:

#include  <Uefi.h>
#include  <Library/UefiLib.h>
#include  <Library/ShellCEntryLib.h>

#include  <Protocol/EdidDiscovered.h>


extern EFI_BOOT_SERVICES         *gBS;
extern EFI_SYSTEM_TABLE			 *gST;
extern EFI_RUNTIME_SERVICES 	 *gRT;

extern EFI_HANDLE				 gImageHandle;

EFI_GUID gEfiEdidDiscoveredProtocolGuid = 

{ 0x1C0C34F6, 0xD380, 0x41FA, { 0xA0, 0x49, 0x8A, 0xD0, 0x6C, 0x1A, 0x66, 0xAA }};

EFI_STATUS GetEDIDInfo()
{
    EFI_STATUS  Status;
    EFI_HANDLE *EDIDHandleBuffer;
    UINTN EDIDHandleCount, index, i;
    EFI_EDID_DISCOVERED_PROTOCOL * EDID;
    
    Status = gBS->LocateHandleBuffer (ByProtocol, 
                                      &gEfiEdidDiscoveredProtocolGuid, 
                                      NULL, 
                                      &EDIDHandleCount, 
                                      &EDIDHandleBuffer); 
    if (EFI_ERROR (Status))
    {
      Print(L"ERROR : Can't get EdidDiscoveredProtocol.\n");   
      return FALSE;
    }
    
    Print(L"EDID count = %d\n", EDIDHandleCount);
    for(index = 0 ; index < EDIDHandleCount ; index++)
    {
      Status = gBS->OpenProtocol( EDIDHandleBuffer[index],
                                  &gEfiEdidDiscoveredProtocolGuid,
                                  (VOID**)&EDID,
                                  gImageHandle,
                                  NULL,
                                  EFI_OPEN_PROTOCOL_GET_PROTOCOL
                                  );
      if (EFI_ERROR (Status))
      {
        Print(L"ERROR : Open EDID Protocol failed.\n");   
        return FALSE;
      }          
      
      Print(L"%d\n", EDID->SizeOfEdid);
      for(i = 0 ; i < 128 ; i++)
      {
        Print(L"%02X ", EDID->Edid[i]);
		
		if ((i+1) % 16 ==0) { 
				Print(L"\n"); }
		else	
			    if ((i+1) % 8 ==0) { Print(L"- ");}
      }
      Print(L"\n");
                
      Status = gBS->CloseProtocol(EDIDHandleBuffer[index],
			&gEfiEdidDiscoveredProtocolGuid, gImageHandle, NULL); 
      
      if (EFI_ERROR (Status))
      {
        Print(L"ERROR : Close EDID device handle failed.\n");   
        return FALSE;
      }
    }    
  return EFI_SUCCESS;    
}

int
EFIAPI
main (
  IN int Argc,
  IN CHAR16 **Argv
  )
{
 GetEDIDInfo();
 return EFI_SUCCESS;
}


上述程序运行结果

edidr

完整代码下载

GetEDID

比对之前获得的结果(我用的是同一个显示器,可以在【参考1】中看到),可以发现结果是相同的。

bq1

bq2

如果想程序解析每个值的具体含义,还按照【参考3】给出的例子。

参考:
1.http://www.lab-z.com/arduinoedid/ Arduino 读取显示器 EDID
2.http://biosren.com/thread-5921-1-1.html 求救如何取得EDID?
3.http://blog.fpmurphy.com/2012/09/accessing-edid-information-from-uefi-shell.html Accessing EDID Information From UEFI Shell

如何将你的 Uno 变成一个鼠标设备

之前介绍过如何使用外部加一些元件从而让你的 Uno编程一个USB设备【参考1】,美中不足的地方是:

1.模拟方式实现USB,占用非常多的资源,基本上无法做其他事情;
2.需要外部元件,做起来比较麻烦。

本文根据【参考1】提供的信息,介绍一下如何将Uno通过刷写Firmware的方法编程一个Mouse。

先说一下原理:在标准的Uno上有一个USB转串口的芯片,Atmega 16U2 。通过对其重写Firmware,能够实现其他 USB 功能。重写之后这个芯片对AtMega 328 主芯片的通讯仍然是串口,就是说我们主芯片可以像串口通讯一样,直接发送数据到这个芯片上,这个芯片负责将数据转化为 USB信号发给PC。

在整个开始之前,首先,你必须有一个烧写器。这里推荐UsbTinyIsp,我使用的是 OCROBOT 出品的【参考2】。必须有这个东西,否则你一定会出现搞坏了没办法救回来的情况。

然后就可以使用工具刷新 16U2 的 Firmware。 这里推荐 AvrDude 这个工具,比较好的地方在于,这个工具有自动识别芯片的功能,你可以用它检查接线之类是否正常。选中Arduino-mouse.hex,然后点击Write即可,下方会有信息提示(这种工具本质都是调用AVRDUDE的命令行参数,只是AVRDUDE命令行非常复杂也不直观)。完成之后会出现下面的提示:
avrdude.exe: verifying …
avrdude.exe: 3872 bytes of flash verified
avrdude.exe done. Thank you.

接下来,在Arduino的IDE中打开Mouse_usb_demo.pde。
你需要确定 :
1.Tools->Board->选择的是Arduino Uno
2.Tools->Programmer下面选择的是 UsbTinyISP。
正常编译这个程序,不要选择编译并且上传,单纯选择编译即可。编译后,用File->Upload using Programmer 即完成上传。

再把Uno插在PC上,你会发现设备管理器中多出一个鼠标

uno1

PID VID如下所示:

uno2

实现的功能是你的鼠标每隔一段会自己转一圈。

完整的代码下载
Arduino-mouse

从这篇介绍也可以看出来,初学者尽量买原版的 Arduino Uno ,不要购买什么极客板等等,虽然会便宜一些,但是扩展性可玩性上下降很多。

参考:

1. http://hunt.net.nz/users/darran/weblog/cca39/Arduino_UNO_Mouse_HID.html Arduino UNO Mouse HID

2.这个东西是必须的,推荐这款有数字签名的驱动,支持Win8 64位,这样你就不必每次跑去关闭数字签名了。购买地址:
https://item.taobao.com/item.htm?spm=a1z10.5-c.w4002-684314961.37.VJHdrg&id=19035872312 。
当然淘宝上还有更便宜,我之前买了一个便宜的,说是无需驱动,结果无法用,非常懊恼……