继续前面的话题,现在尝试直接输出AHCI HDD 的信息。资料上标明AHCI和IDE HDD输出的信息格式是相同的,所以这里会一同处理。
原理上:找到 DISK INFO PROTOCOL 后,判断 GUID 是否为 IDE和 AHCI 的,如果是,那么用Identify 来取得型号信息。返回构体EFI_ATAPI_IDENTIFY_DATA,具体定义在下面这个文件中:
\EdkCompatibilityPkg\Foundation\Framework\Protocol\IdeControllerInit\IdeControllerInit.h 中。
typedef struct {
    UINT16  config;             // General Configuration
    UINT16  obsolete_1;
    UINT16  specific_config;
    UINT16  obsolete_3;
    UINT16  retired_4_5[2];
    UINT16  obsolete_6;
    UINT16  cfa_reserved_7_8[2];
    UINT16  retired_9;
    CHAR8   SerialNo[20];       // ASCII
    UINT16  retired_20_21[2];
    UINT16  obsolete_22;
    CHAR8   FirmwareVer[8];     // ASCII
    CHAR8   ModelName[40];      // ASCII
    UINT16  multi_sector_cmd_max_sct_cnt;
    UINT16  reserved_48;
    UINT16  capabilities_49;
    UINT16  capabilities_50;
    UINT16  obsolete_51_52[2];
    UINT16  field_validity;
    UINT16  obsolete_54_58[5];
    UINT16  mutil_sector_setting;
    UINT16  user_addressable_sectors_lo;
    UINT16  user_addressable_sectors_hi;
    UINT16  obsolete_62;
    UINT16  multi_word_dma_mode;
    UINT16  advanced_pio_modes;
    UINT16  min_multi_word_dma_cycle_time;
    UINT16  rec_multi_word_dma_cycle_time;
    UINT16  min_pio_cycle_time_without_flow_control;
    UINT16  min_pio_cycle_time_with_flow_control;
    UINT16  reserved_69_74[6];
    UINT16  queue_depth;
    UINT16  reserved_76_79[4];
    UINT16  major_version_no;
    UINT16  minor_version_no;
    UINT16  cmd_set_support_82;
    UINT16  cmd_set_support_83;
    UINT16  cmd_feature_support;
    UINT16  cmd_feature_enable_85;
    UINT16  cmd_feature_enable_86;
    UINT16  cmd_feature_default;
    UINT16  ultra_dma_select;
    UINT16  time_required_for_sec_erase;
    UINT16  time_required_for_enhanced_sec_erase;
    UINT16  current_advanced_power_mgmt_value;
    UINT16  master_pwd_revison_code;
    UINT16  hardware_reset_result;
    UINT16  current_auto_acoustic_mgmt_value;
    UINT16  reserved_95_99[5];
    UINT16  max_user_lba_for_48bit_addr[4];
    UINT16  reserved_104_126[23];
    UINT16  removable_media_status_notification_support;
    UINT16  security_status;
    UINT16  vendor_data_129_159[31];
    UINT16  cfa_power_mode;
    UINT16  cfa_reserved_161_175[15];
    UINT16  current_media_serial_no[30];
    UINT16  reserved_206_254[49];
    UINT16  integrity_word;
} EFI_ATAPI_IDENTIFY_DATA;
代码如下:
#include  <Uefi.h>
#include  <Library/UefiLib.h>
#include  <Library/ShellCEntryLib.h>
#include  <Library/ShellCEntryLib.h>
#include  <Protocol/DiskInfo.h>
#include  <Library/BaseMemoryLib.h>
#include  <Protocol/IdeControllerInit.h>

extern EFI_BOOT_SERVICES         *gBS;

extern EFI_HANDLE				 gImageHandle;

EFI_GUID gEfiDiskInfoProtocolGuid = { 0xD432A67F, 0x14DC, 0x484B,
					{ 0xB3, 0xBB, 0x3F, 0x02, 0x91, 0x84, 0x93, 0x27 }};
EFI_GUID gEfiDiskInfoAhciInterfaceGuid  = { 0x9e498932, 0x4abc, 0x45af,
					{ 0xa3, 0x4d, 0x02, 0x47, 0x78, 0x7b, 0xe7, 0xc6 }};
EFI_GUID gEfiDiskInfoIdeInterfaceGuid   = { 0x5E948FE3, 0x26D3, 0x42B5,
					{ 0xAF, 0x17, 0x61, 0x02, 0x87, 0x18, 0x8D, 0xEC }};

int
EFIAPI
main (
  IN int Argc,
  IN CHAR16 **Argv
  )
{
    EFI_STATUS Status;
    UINTN HandleIndex, NumHandles;
    EFI_HANDLE *ControllerHandle = NULL;
	EFI_DISK_INFO_PROTOCOL	*DiskInfoProtocol;
	UINT32                       BufferSize;
    EFI_ATAPI_IDENTIFY_DATA      IdentifyData;
	UINT32				i;

    Status = gBS->LocateHandleBuffer(
            ByProtocol,
            &gEfiDiskInfoProtocolGuid,
            NULL,
            &NumHandles,
            &ControllerHandle);

    for (HandleIndex = 0; HandleIndex < NumHandles; HandleIndex++) {
        Status = gBS->OpenProtocol(
                ControllerHandle[HandleIndex],
                &gEfiDiskInfoProtocolGuid,
                (VOID**)&DiskInfoProtocol,
                gImageHandle,
                NULL,
                EFI_OPEN_PROTOCOL_GET_PROTOCOL
                );
        if (EFI_ERROR(Status)) {
            continue;
        }

		//We only deal with AHCI and IDE
		if (!(CompareGuid (
				&DiskInfoProtocol->Interface,
				&gEfiDiskInfoAhciInterfaceGuid)||
			(CompareGuid (
				&DiskInfoProtocol->Interface,
			    &gEfiDiskInfoIdeInterfaceGuid)
			))) {
				continue;
			}

		BufferSize   = sizeof (EFI_ATAPI_IDENTIFY_DATA);
		Status = DiskInfoProtocol->Identify (
                         DiskInfoProtocol,
                         &IdentifyData,
                         &BufferSize
                         );

		Print(L"Model Name :");
		for (i=0;i<40;i=i+2) {
			Print(L"%c%c",
				IdentifyData.ModelName[i+1],
				IdentifyData.ModelName[i]);
		}
		Print(L"\n");
	}

  return EFI_SUCCESS;
}
在 KabyLake HDK 板子上运行上述代码,结果如下:
![]()
细心的朋友可能注意到,输出并不是直接输出序列号,而是有一个顺序上的调整:
Print(L”%c%c”, IdentifyData.ModelName[i+1], IdentifyData.ModelName[i]);
原因是,刚开始我试验的是直接顺序输出,但是发现结果是下面这样的:
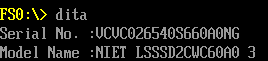
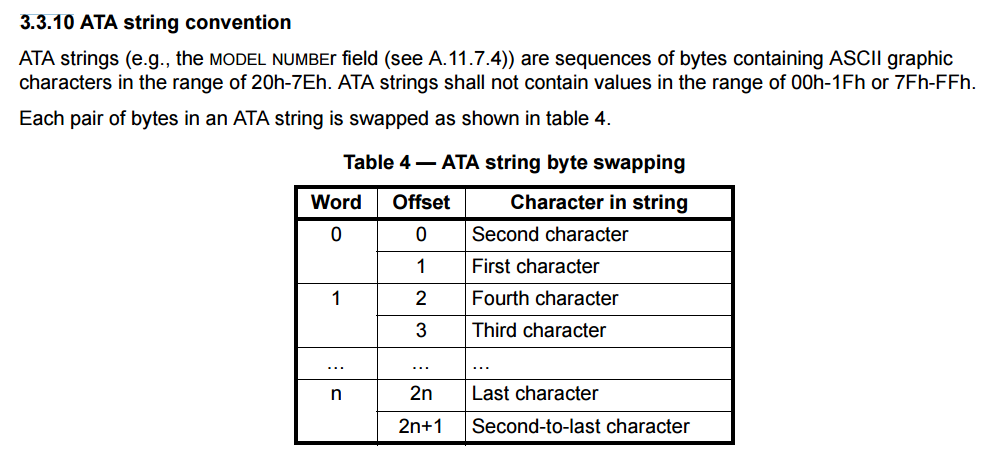
开始以为是 CHAR 对 CHAR16转换上的问题,后来查阅资料【参考1】,发现这里的行医比较特别。排列是 2/1/4/3/6/5……. 这样的:
所以,修改代码手工做一次反转就可以了。
完整的代码下载:
diskinfoahci
参考:
1. http://www.t13.org/Documents/UploadedDocuments/docs2013/d2161r5-ATAATAPI_Command_Set_-_3.pdf